Software/BIOS Setup Guide
Page 8
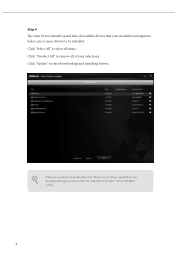
If there are no drivers to be installed. Click "Select All" to select all items. Click "Unselect All" to start downloading and installing drivers. Click "Update" to remove all of your motherboard supports. If you would like to exit. Step 4 The Auto Driver Installer panel lists all available drivers that your selections. Select one or more drivers to be installed, click "Finish" to run the application again, please enable the "Auto Driver Installer" item in the BIOS setting. 4
If there are no drivers to be installed. Click "Select All" to select all items. Click "Unselect All" to start downloading and installing drivers. Click "Update" to remove all of your motherboard supports. If you would like to exit. Step 4 The Auto Driver Installer panel lists all available drivers that your selections. Select one or more drivers to be installed, click "Finish" to run the application again, please enable the "Auto Driver Installer" item in the BIOS setting. 4
Software/BIOS Setup Guide
Page 71
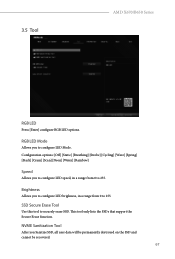
... to 255. Brightness Allows you Sanitize SSD, all user data will be permanently destroyed on the SSD and cannot be recovered. 67 This tool only lists the SSDs that support the Secure Erase function.
... to 255. Brightness Allows you Sanitize SSD, all user data will be permanently destroyed on the SSD and cannot be recovered. 67 This tool only lists the SSDs that support the Secure Erase function.

User Manual
Page 5
... occur, the updated version will be available on ASRock's website as well. If you for purchasing ASRock A620M-HDV/M.2+ motherboard, a reliable motherboard produced under ASRock's consistently stringent quality control. You may find the latest VGA cards and CPU support list on ASRock's website without notice. A620M-HDV/M.2+ Chapter 1 Introduction Thank you require technical support related to this motherboard, please visit our...
... occur, the updated version will be available on ASRock's website as well. If you for purchasing ASRock A620M-HDV/M.2+ motherboard, a reliable motherboard produced under ASRock's consistently stringent quality control. You may find the latest VGA cards and CPU support list on ASRock's website without notice. A620M-HDV/M.2+ Chapter 1 Introduction Thank you require technical support related to this motherboard, please visit our...

User Manual
Page 6
...8226; Nahimic Audio English 2 capacity of system memory: 64GB • Supports Extreme Memory Profile (XMP) and EXTended Profiles for more information. (http://www.asrock.com/) Expansion Slot CPU: • 1 x PCIe 4.0 x16 Slot (PCIE1), supports x16 mode* Chipset: • 2 x PCIe 3.0 x1 Slots (PCIE2...Slot (PCIE1) Graphics • Integrated AMD RDNATM 2 graphics (Actual support may vary by CPU) • 1 x HDMI 2.1 TMDS/FRL 8G Compatible, supports HDR, HDCP 2.3 and max. resolution up to Memory Support List on ASRock's website for Overclocking (EXPO) memory modules * Please refer to ...
...8226; Nahimic Audio English 2 capacity of system memory: 64GB • Supports Extreme Memory Profile (XMP) and EXTended Profiles for more information. (http://www.asrock.com/) Expansion Slot CPU: • 1 x PCIe 4.0 x16 Slot (PCIE1), supports x16 mode* Chipset: • 2 x PCIe 3.0 x1 Slots (PCIE2...Slot (PCIE1) Graphics • Integrated AMD RDNATM 2 graphics (Actual support may vary by CPU) • 1 x HDMI 2.1 TMDS/FRL 8G Compatible, supports HDR, HDCP 2.3 and max. resolution up to Memory Support List on ASRock's website for Overclocking (EXPO) memory modules * Please refer to ...

User Manual
Page 51
A620M-HDV/M.2+ Step 3 Align and gently insert the M.2 SSD module into place. For the latest updates of M.2 SSD module support list, please visit our website for details: http://www.asrock.com English 47 Please do not overtighten the screw as this might damage the module. A A 20o NUT2 NUT1 Step 4 Tighten the screw with a screwdriver to secure the module into the M.2 slot. Please be aware that the M.2 SSD module only fits in one orientation.
A620M-HDV/M.2+ Step 3 Align and gently insert the M.2 SSD module into place. For the latest updates of M.2 SSD module support list, please visit our website for details: http://www.asrock.com English 47 Please do not overtighten the screw as this might damage the module. A A 20o NUT2 NUT1 Step 4 Tighten the screw with a screwdriver to secure the module into the M.2 slot. Please be aware that the M.2 SSD module only fits in one orientation.

User Manual
Page 53
... on the nut to use the default nut. Step 5 Align and gently insert the M.2 SSD module into place. For the latest updates of M.2 SSD module support list, please visit our website for details: http://www.asrock.com 49 B A A620M-HDV/M.2+ Step 3 Move the standoff based on the module type and length.
... on the nut to use the default nut. Step 5 Align and gently insert the M.2 SSD module into place. For the latest updates of M.2 SSD module support list, please visit our website for details: http://www.asrock.com 49 B A A620M-HDV/M.2+ Step 3 Move the standoff based on the module type and length.


