

RAID Installation Guide
Page 1
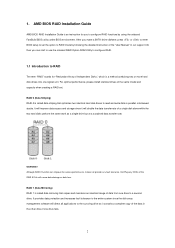
AMD BIOS RAID Installation Guide ...2 1.1 Introduction to RAID...2 1.2 RAID Configurations Precautions 4 1.3 Legacy RAID ROM Configuration (for AMD X370, B350, and A320 Chipsets 5 1.4 UEFI RAID Configuration (for AMD X399, X370, B350, and A320 Chipsets 11 2. AMD RAID Installation Guide 1. AMD Windows RAID Installation Guide 16 1
AMD BIOS RAID Installation Guide ...2 1.1 Introduction to RAID...2 1.2 RAID Configurations Precautions 4 1.3 Legacy RAID ROM Configuration (for AMD X370, B350, and A320 Chipsets 5 1.4 UEFI RAID Configuration (for AMD X399, X370, B350, and A320 Chipsets 11 2. AMD RAID Installation Guide 1. AMD Windows RAID Installation Guide 16 1
RAID Installation Guide
Page 2
...an instruction for "Redundant Array of the data in the other drive if one drive to RAID mode by using the onboard FastBuild BIOS utility under BIOS environment. For optimal performance, please install identical drives of the same model and capacity when creating a RAID set the option to... a second drive. AMD BIOS RAID Installation Guide AMD BIOS RAID Installation Guide is called data striping that copies and maintains an identical image of the "User Manual" in parallel, interleaved...
...an instruction for "Redundant Array of the data in the other drive if one drive to RAID mode by using the onboard FastBuild BIOS utility under BIOS environment. For optimal performance, please install identical drives of the same model and capacity when creating a RAID set the option to... a second drive. AMD BIOS RAID Installation Guide AMD BIOS RAID Installation Guide is called data striping that copies and maintains an identical image of the "User Manual" in parallel, interleaved...
RAID Installation Guide
Page 5
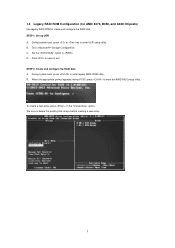
Click to save to enter UEFI setup utility. B. During system boot, press or key to exit. Set the "SATA Mode" option to enter the RAID BIOS setup utility. STEP 2: Create and configure the RAID disk A. When the appropriate prompt appears during POST, press to . Go to enter legacy RAID ROM utility. ...
Click to save to enter UEFI setup utility. B. During system boot, press or key to exit. Set the "SATA Mode" option to enter the RAID BIOS setup utility. STEP 2: Create and configure the RAID disk A. When the appropriate prompt appears during POST, press to . Go to enter legacy RAID ROM utility. ...
RAID Installation Guide
Page 7
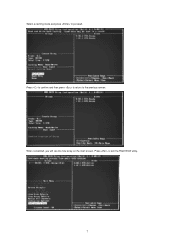
When completed, you will see the new array on the main screen. Press to confirm and then press to return to proceed. Select a caching mode and press to the previous screen. Press to exit the RAID BIOS utility. 7
When completed, you will see the new array on the main screen. Press to confirm and then press to return to proceed. Select a caching mode and press to the previous screen. Press to exit the RAID BIOS utility. 7
Quick Installation Guide
Page 3
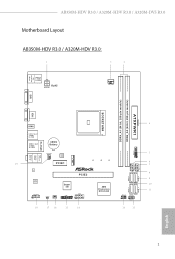
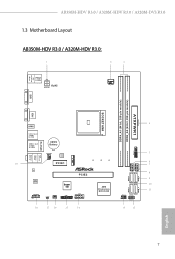
AB350M-HDV R3.0 / A320M-HDV R3.0 / A320M-DVS R3.0 Motherboard Layout AB350M-HDV R3.0 / A320M-HDV R3.0: 1 2 3 PS2 Keyboard/ Mouse USB 2.0 T: USB1 B: USB2 RoHS ATX12V CPU_FAN1 DDR4_A1 (64 bit, 288-FpinSBmo8d0ul0e) DDR4_A2 (64 bit, 288-pin module) USB3_5_6 ATXPWR1 SOCKET AM4 4 HDMI1 USB 3.1 Gen1 T: USB1 B: USB2 USB 3.1 Gen1 T: USB3 B: USB4 RJ-45 LAN CMOS Battery CHA_FAN1 BIOS ROM Top: LINE IN Center: FRONT Bottom...
AB350M-HDV R3.0 / A320M-HDV R3.0 / A320M-DVS R3.0 Motherboard Layout AB350M-HDV R3.0 / A320M-HDV R3.0: 1 2 3 PS2 Keyboard/ Mouse USB 2.0 T: USB1 B: USB2 RoHS ATX12V CPU_FAN1 DDR4_A1 (64 bit, 288-FpinSBmo8d0ul0e) DDR4_A2 (64 bit, 288-pin module) USB3_5_6 ATXPWR1 SOCKET AM4 4 HDMI1 USB 3.1 Gen1 T: USB1 B: USB2 USB 3.1 Gen1 T: USB3 B: USB4 RJ-45 LAN CMOS Battery CHA_FAN1 BIOS ROM Top: LINE IN Center: FRONT Bottom...
Quick Installation Guide
Page 9
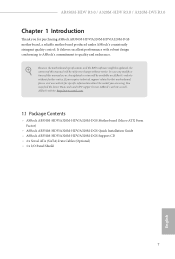
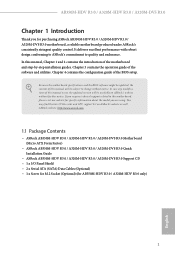
... manual will be subject to quality and endurance. AB350M-HDV R3.0 / A320M-HDV R3.0 / A320M-DVS R3.0 Chapter 1 Introduction Thank you for specific information about the model you require technical support related to this motherboard, please visit our website for purchasing ASRock AB350M-HDV/A320M-HDV/A320M-DGS motherboard, a reliable motherboard produced under ASRock's consistently stringent quality control. You may find the latest...
... manual will be subject to quality and endurance. AB350M-HDV R3.0 / A320M-HDV R3.0 / A320M-DVS R3.0 Chapter 1 Introduction Thank you for specific information about the model you require technical support related to this motherboard, please visit our website for purchasing ASRock AB350M-HDV/A320M-HDV/A320M-DGS motherboard, a reliable motherboard produced under ASRock's consistently stringent quality control. You may find the latest...
Quick Installation Guide
Page 13
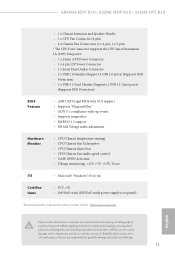
... ESD Protection) • 1 x USB 3.1 Gen1 Header (Supports 2 USB 3.1 Gen1 ports) (Supports ESD Protection) • AMI UEFI Legal BIOS with GUI support • Supports "Plug and Play" • ACPI 5.1 compliance wake up events • Supports jumperfree • SMBIOS 2.3 support...website: http://www.asrock.com Please realize that there is a certain risk involved with overclocking, including adjusting the setting in the BIOS, applying Untied Overclocking Technology, or using thirdparty overclocking tools. AB350M-HDV R3.0 / A320M-HDV R3.0 / A320M-DVS R3.0 BIOS Feature Hardware Monitor ...
... ESD Protection) • 1 x USB 3.1 Gen1 Header (Supports 2 USB 3.1 Gen1 ports) (Supports ESD Protection) • AMI UEFI Legal BIOS with GUI support • Supports "Plug and Play" • ACPI 5.1 compliance wake up events • Supports jumperfree • SMBIOS 2.3 support...website: http://www.asrock.com Please realize that there is a certain risk involved with overclocking, including adjusting the setting in the BIOS, applying Untied Overclocking Technology, or using thirdparty overclocking tools. AB350M-HDV R3.0 / A320M-HDV R3.0 / A320M-DVS R3.0 BIOS Feature Hardware Monitor ...
Quick Installation Guide
Page 19
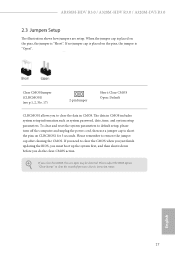
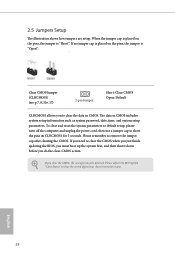
AB350M-HDV R3.0 / A320M-HDV R3.0 / A320M-DVS R3.0 2.3 Jumpers Setup The illustration shows how jumpers are setup. If no jumper cap is placed ...cord, then use a jumper cap to short the pins on the pins, the jumper is "Short". Please adjust the BIOS option "Clear Status" to remove the jumper cap after clearing the CMOS. When the jumper cap is placed on the pins... 17) 2-pin Jumper Short: Clear CMOS Open: Default CLRCMOS1 allows you to clear the CMOS when you just finish updating the BIOS, you must boot up the system first, and then shut it down before you clear the CMOS, the case open may be...
AB350M-HDV R3.0 / A320M-HDV R3.0 / A320M-DVS R3.0 2.3 Jumpers Setup The illustration shows how jumpers are setup. If no jumper cap is placed ...cord, then use a jumper cap to short the pins on the pins, the jumper is "Short". Please adjust the BIOS option "Clear Status" to remove the jumper cap after clearing the CMOS. When the jumper cap is placed on the pins... 17) 2-pin Jumper Short: Clear CMOS Open: Default CLRCMOS1 allows you to clear the CMOS when you just finish updating the BIOS, you must boot up the system first, and then shut it down before you clear the CMOS, the case open may be...
User Manual
Page 4
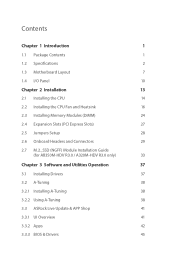
... (PCI Express Slots) 27 2.5 Jumpers Setup 28 2.6 Onboard Headers and Connectors 29 2.7 M.2_SSD (NGFF) Module Installation Guide (for AB350M-HDV R3.0 / A320M-HDV R3.0 only) 33 Chapter 3 Software and Utilities Operation 37 3.1 Installing Drivers 37 3.2 A-Tuning 38 3.2.1 Installing A-Tuning 38 3.2.2 Using A-Tuning 38 3.3 ASRock Live Update & APP Shop 41 3.3.1 UI Overview 41 3.3.2 Apps 42 3.3.3 BIOS & Drivers 45
... (PCI Express Slots) 27 2.5 Jumpers Setup 28 2.6 Onboard Headers and Connectors 29 2.7 M.2_SSD (NGFF) Module Installation Guide (for AB350M-HDV R3.0 / A320M-HDV R3.0 only) 33 Chapter 3 Software and Utilities Operation 37 3.1 Installing Drivers 37 3.2 A-Tuning 38 3.2.1 Installing A-Tuning 38 3.2.2 Using A-Tuning 38 3.3 ASRock Live Update & APP Shop 41 3.3.1 UI Overview 41 3.3.2 Apps 42 3.3.3 BIOS & Drivers 45
User Manual
Page 6
... R3.0 Quick Installation Guide • ASRock AB350M-HDV R3.0 / A320M-HDV R3.0 / A320M-DVS R3.0 Support CD • 1 x I/O Panel Shield • 2 x Serial ATA (SATA) Data Cables (Optional) • 1 x Screw for M.2 Socket (Optional) (for purchasing ASRock AB350M-HDV R3.0 / A320M-HDV R3.0 / A320M-DVS R3.0 motherboard, a reliable motherboard produced under ASRock's consistently stringent quality control. AB350M-HDV R3.0 / A320M-HDV R3.0 / A320M-DVS R3.0 Chapter 1 Introduction Thank you are using. Because the motherboard specifications and the BIOS...
... R3.0 Quick Installation Guide • ASRock AB350M-HDV R3.0 / A320M-HDV R3.0 / A320M-DVS R3.0 Support CD • 1 x I/O Panel Shield • 2 x Serial ATA (SATA) Data Cables (Optional) • 1 x Screw for M.2 Socket (Optional) (for purchasing ASRock AB350M-HDV R3.0 / A320M-HDV R3.0 / A320M-DVS R3.0 motherboard, a reliable motherboard produced under ASRock's consistently stringent quality control. AB350M-HDV R3.0 / A320M-HDV R3.0 / A320M-DVS R3.0 Chapter 1 Introduction Thank you are using. Because the motherboard specifications and the BIOS...

User Manual
Page 10
...(with Summit Ridge, Raven Ridge and Pinnacle Ridge) or Gen3 x2 (16 Gb/s) (with A-Series APU)* (for AB350M-HDV R3.0 / A320M-HDV R3.0 only) * Supports NVMe SSD as boot disks * Supports ASRock U.2 Kit Connector • 1 x COM Port Header • 1 x TPM Header • 1 x Chassis Intrusion ... 2.0 ports) (Supports ESD Protection) • 1 x USB 3.1 Gen1 Header (Supports 2 USB 3.1 Gen1 ports) (Supports ESD Protection) BIOS Feature • AMI UEFI Legal BIOS with GUI support • Supports "Plug and Play" • ACPI 5.1 compliance wake up events • Supports jumperfree • SMBIOS ...
...(with Summit Ridge, Raven Ridge and Pinnacle Ridge) or Gen3 x2 (16 Gb/s) (with A-Series APU)* (for AB350M-HDV R3.0 / A320M-HDV R3.0 only) * Supports NVMe SSD as boot disks * Supports ASRock U.2 Kit Connector • 1 x COM Port Header • 1 x TPM Header • 1 x Chassis Intrusion ... 2.0 ports) (Supports ESD Protection) • 1 x USB 3.1 Gen1 Header (Supports 2 USB 3.1 Gen1 ports) (Supports ESD Protection) BIOS Feature • AMI UEFI Legal BIOS with GUI support • Supports "Plug and Play" • ACPI 5.1 compliance wake up events • Supports jumperfree • SMBIOS ...
User Manual
Page 11
.../EuP ready power supply is required) * For detailed product information, please visit our website: http://www.asrock.com Please realize that there is a certain risk involved with overclocking, including adjusting the setting in the BIOS, applying Untied Overclocking Technology, or using thirdparty overclocking tools. Overclocking may affect your system's stability, or even...
.../EuP ready power supply is required) * For detailed product information, please visit our website: http://www.asrock.com Please realize that there is a certain risk involved with overclocking, including adjusting the setting in the BIOS, applying Untied Overclocking Technology, or using thirdparty overclocking tools. Overclocking may affect your system's stability, or even...
User Manual
Page 12
AB350M-HDV R3.0 / A320M-HDV R3.0 / A320M-DVS R3.0 1.3 Motherboard Layout AB350M-HDV R3.0 / A320M-HDV R3.0: 1 2 3 PS2 Keyboard/ Mouse USB 2.0 T: USB1 B: USB2 RoHS ATX12V CPU_FAN1 DDR4_A1 (64 bit, 288-FpinSBmo8d0ul0e) DDR4_A2 (64 bit, 288-pin module) USB3_5_6 ATXPWR1 SOCKET AM4 4 HDMI1 USB 3.1 Gen1 T: USB1 B: USB2 USB 3.1 Gen1 T: USB3 B: USB4 RJ-45 LAN CMOS Battery CHA_FAN1 BIOS ROM Top: LINE IN Center: FRONT Bottom...
AB350M-HDV R3.0 / A320M-HDV R3.0 / A320M-DVS R3.0 1.3 Motherboard Layout AB350M-HDV R3.0 / A320M-HDV R3.0: 1 2 3 PS2 Keyboard/ Mouse USB 2.0 T: USB1 B: USB2 RoHS ATX12V CPU_FAN1 DDR4_A1 (64 bit, 288-FpinSBmo8d0ul0e) DDR4_A2 (64 bit, 288-pin module) USB3_5_6 ATXPWR1 SOCKET AM4 4 HDMI1 USB 3.1 Gen1 T: USB1 B: USB2 USB 3.1 Gen1 T: USB3 B: USB4 RJ-45 LAN CMOS Battery CHA_FAN1 BIOS ROM Top: LINE IN Center: FRONT Bottom...
User Manual
Page 33
... use a jumper cap to clear the record of previous chassis intrusion status. If you need to clear the CMOS when you just finish updating the BIOS, you must boot up the system first, and then shut it down before you clear the CMOS, the case open may be detected. If you... do the clear-CMOS action. English 28 The data in CMOS. Please adjust the BIOS option "Clear Status" to short the pins on CLRCMOS1 for 3 seconds. Please remember to clear the data in CMOS includes system setup information such as...
... use a jumper cap to clear the record of previous chassis intrusion status. If you need to clear the CMOS when you just finish updating the BIOS, you must boot up the system first, and then shut it down before you clear the CMOS, the case open may be detected. If you... do the clear-CMOS action. English 28 The data in CMOS. Please adjust the BIOS option "Clear Status" to short the pins on CLRCMOS1 for 3 seconds. Please remember to clear the data in CMOS includes system setup information such as...
User Manual
Page 50
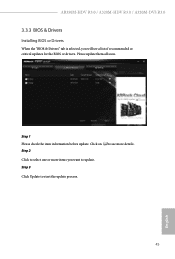
Click to select one or more details. Step 3 Click Update to see more items you will see a list of recommended or critical updates for the BIOS or drivers. AB350M-HDV R3.0 / A320M-HDV R3.0 / A320M-DVS R3.0 3.3.3 BIOS & Drivers Installing BIOS or Drivers When the "BIOS & Drivers" tab is selected, you want to update. Click on Step 2 to start the update process. 45 English Please update them all soon. Step 1 Please check the item information before update.
Click to select one or more details. Step 3 Click Update to see more items you will see a list of recommended or critical updates for the BIOS or drivers. AB350M-HDV R3.0 / A320M-HDV R3.0 / A320M-DVS R3.0 3.3.3 BIOS & Drivers Installing BIOS or Drivers When the "BIOS & Drivers" tab is selected, you want to update. Click on Step 2 to start the update process. 45 English Please update them all soon. Step 1 Please check the item information before update.
User Manual
Page 71
... 256 or 512 bytes. Memory interleaving size Controls the memory interleaving size. Note that distributed requires memory on parts where the probe filter is disabled, BIOS does not implement MemClear after memory training (only if non-ECC DIMMs are used unless the interleaving is set to channel and the interleaving size...
... 256 or 512 bytes. Memory interleaving size Controls the memory interleaving size. Note that distributed requires memory on parts where the probe filter is disabled, BIOS does not implement MemClear after memory training (only if non-ECC DIMMs are used unless the interleaving is set to channel and the interleaving size...
User Manual
Page 78
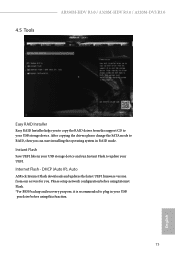
...Flash to plug in RAID mode. Please setup network configuration before using Internet Flash. *For BIOS backup and recovery purpose, it is recommended to update your USB storage device. 4.5 Tools AB350M-HDV R3.0 / A320M-HDV R3.0 / A320M-DVS R3.0 Easy RAID Installer Easy RAID Installer helps you to copy the RAID driver from our ... function. 73 English Internet Flash - After copying the drivers please change the SATA mode to your UEFI. DHCP (Auto IP), Auto ASRock Internet Flash downloads and updates the latest UEFI firmware version from the support CD to RAID, then you .
...Flash to plug in RAID mode. Please setup network configuration before using Internet Flash. *For BIOS backup and recovery purpose, it is recommended to update your USB storage device. 4.5 Tools AB350M-HDV R3.0 / A320M-HDV R3.0 / A320M-DVS R3.0 Easy RAID Installer Easy RAID Installer helps you to copy the RAID driver from our ... function. 73 English Internet Flash - After copying the drivers please change the SATA mode to your UEFI. DHCP (Auto IP), Auto ASRock Internet Flash downloads and updates the latest UEFI firmware version from the support CD to RAID, then you .


