
User Manual
Page 3
... Hot Swap Functions for SATA3 HDDs 42 2.14 SATA3 HDD Hot Plug Feature and Operation Operation Guide 43 2.15 Driver Installation Guide 45 2.16 Installing Windows® 7 / 7 64-bit / VistaTM / VistaTM 64-bit / XP / XP 64-bit With RAID Functions 45 2.16.1 Installing... Windows® XP / XP 64-bit With RAID Functions 45 2.16.2 Installing Windows® 7 / 7 64-bit / VistaTM / VistaTM 64-bit With RAID Functions 46 2.17 Installing Windows® 7 / 7 64-bit / VistaTM / VistaTM 64-bit / XP / XP 64-bit Without RAID...
... Hot Swap Functions for SATA3 HDDs 42 2.14 SATA3 HDD Hot Plug Feature and Operation Operation Guide 43 2.15 Driver Installation Guide 45 2.16 Installing Windows® 7 / 7 64-bit / VistaTM / VistaTM 64-bit / XP / XP 64-bit With RAID Functions 45 2.16.1 Installing... Windows® XP / XP 64-bit With RAID Functions 45 2.16.2 Installing Windows® 7 / 7 64-bit / VistaTM / VistaTM 64-bit With RAID Functions 46 2.17 Installing Windows® 7 / 7 64-bit / VistaTM / VistaTM 64-bit / XP / XP 64-bit Without RAID...

User Manual
Page 5
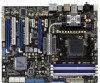
... Support CD. Chapter 3 and 4 contain the configuration guide to AHCI mode. To get better performance in Windows® 7 / 7 64-bit / VistaTM / VistaTM 64 bit, it is recommended to set the BIOS option ... x HDD Screws 6 x Chassis Screws 1 x Rear USB 3.0 Bracket ASRock Reminds You... www.asrock.com/support/index.asp 1.1 Package Contents ASRock 990FX Extreme4 Motherboard (ATX Form Factor: 12.0-in x 9.6-in, 30.5 cm x 24.4 cm) ASRock 990FX Extreme4 Quick Installation Guide ASRock 990FX Extreme4 Support CD 1 x ASRock SLI_Bridge_2S Card 1 x 80-conductor Ultra ATA 66/100/133 IDE Ribbon ...
... Support CD. Chapter 3 and 4 contain the configuration guide to AHCI mode. To get better performance in Windows® 7 / 7 64-bit / VistaTM / VistaTM 64 bit, it is recommended to set the BIOS option ... x HDD Screws 6 x Chassis Screws 1 x Rear USB 3.0 Bracket ASRock Reminds You... www.asrock.com/support/index.asp 1.1 Package Contents ASRock 990FX Extreme4 Motherboard (ATX Form Factor: 12.0-in x 9.6-in, 30.5 cm x 24.4 cm) ASRock 990FX Extreme4 Quick Installation Guide ASRock 990FX Extreme4 Support CD 1 x ASRock SLI_Bridge_2S Card 1 x 80-conductor Ultra ATA 66/100/133 IDE Ribbon ...
User Manual
Page 9
...is including Hardware Monitor, Fan Control, Overclocking, OC DNA and IES. Please be less than 4GB for the reservation for system usage under Windows® 7 / VistaTM / XP. This motherboard supports Dual Channel Memory Technology. Whether 2100MHz memory speed is supported depends on the AM3/...3. This motherboard supports Untied Overclocking Technology. Before you want to adopt DDR3 2100 memory module on our website for proper connection. 7. ASRock Extreme Tuning Utility (AXTU) is no such limitation. 6. If you implement Dual Channel Memory Technology, make sure to ne-tune different ...
...is including Hardware Monitor, Fan Control, Overclocking, OC DNA and IES. Please be less than 4GB for the reservation for system usage under Windows® 7 / VistaTM / XP. This motherboard supports Dual Channel Memory Technology. Whether 2100MHz memory speed is supported depends on the AM3/...3. This motherboard supports Untied Overclocking Technology. Before you want to adopt DDR3 2100 memory module on our website for proper connection. 7. ASRock Extreme Tuning Utility (AXTU) is no such limitation. 6. If you implement Dual Channel Memory Technology, make sure to ne-tune different ...

User Manual
Page 10
... Flash. ASRock On/Off Play Technology allows users to perform over-clocking. Simply installing the APP Charger driver, it is not recommended to enjoy the great audio experience from your PC, even when the PC is Windows® 7 / 7 64 bit / VistaTM / VistaTM 64 bit, and your PC enters into... an enhanced view for you can update your BIOS only in Flash ROM. ASRock website: http://www.asrock.com/Feature/AppCharger/index.asp 10. Please be noted ...
... Flash. ASRock On/Off Play Technology allows users to perform over-clocking. Simply installing the APP Charger driver, it is not recommended to enjoy the great audio experience from your PC, even when the PC is Windows® 7 / 7 64 bit / VistaTM / VistaTM 64 bit, and your PC enters into... an enhanced view for you can update your BIOS only in Flash ROM. ASRock website: http://www.asrock.com/Feature/AppCharger/index.asp 10. Please be noted ...

User Manual
Page 20
... one graphics card into PCIE2 slot and the other graphics card to PCIE4 slot. Make sure that your system. Currently, NVIDIA® SLITM technology supports Windows® XP / XP 64-bit / VistaTM / VistaTM 64-bit / 7 / 7 64-bit OS. Requirements 1. For Quad SLITM technology, you ...driver from NVIDIA® website (www.nvidia.com). 3. It is recommended to the PCI Express graphics cards. 20 NVIDIA® Quad SLITM technology support Windows® VistaTM / VistaTM 64-bit / 7 / 7 64-bit OS only. Please follow the installation procedures in this section. If required, connect...
... one graphics card into PCIE2 slot and the other graphics card to PCIE4 slot. Make sure that your system. Currently, NVIDIA® SLITM technology supports Windows® XP / XP 64-bit / VistaTM / VistaTM 64-bit / 7 / 7 64-bit OS. Requirements 1. For Quad SLITM technology, you ...driver from NVIDIA® website (www.nvidia.com). 3. It is recommended to the PCI Express graphics cards. 20 NVIDIA® Quad SLITM technology support Windows® VistaTM / VistaTM 64-bit / 7 / 7 64-bit OS only. Please follow the installation procedures in this section. If required, connect...

User Manual
Page 21
...Please follow the below procedures to the goldfingers on your system. In Set PhysX GPU acceleration item, please select Enabled. Make sure ASRock SLI_Bridge_2S Card is inserted to PCIE2 slot. 2.5.2 Driver Installation and Setup Install the graphics card drivers to the monitor connector or the DVI connector ...of the graphics card that , you can freely enjoy the benefit of SLITM feature. 21 ASRock SLI_Bridge_2S Card Step4. For Windows® XP / XP 64-bit OS: (For SLITM mode only) A. From the pop-up menu, select Set SLI and PhysX con...
...Please follow the below procedures to the goldfingers on your system. In Set PhysX GPU acceleration item, please select Enabled. Make sure ASRock SLI_Bridge_2S Card is inserted to PCIE2 slot. 2.5.2 Driver Installation and Setup Install the graphics card drivers to the monitor connector or the DVI connector ...of the graphics card that , you can freely enjoy the benefit of SLITM feature. 21 ASRock SLI_Bridge_2S Card Step4. For Windows® XP / XP 64-bit OS: (For SLITM mode only) A. From the pop-up menu, select Set SLI and PhysX con...

User Manual
Page 22
...; Technologies Inc., and is used only for identification or explanation and to the owners' benefit, without intent to infringe. 22 Reboot your Windows taskbar. From the pop-up menu, select All Programs, and then click NVIDIA Corporation. Select NVIDIA Control Panel tab. In Select an SLI confi... pop-up menu, select Set SLI and PhysX configuration. In Set PhysX GPU acceleration item, please select Enabled. D. Select Control Panel tab. For Windows® VistaTM / VistaTM 64-bit / 7 / 7 64-bit OS: (For SLITM and Quad SLITM mode) A.
...; Technologies Inc., and is used only for identification or explanation and to the owners' benefit, without intent to infringe. 22 Reboot your Windows taskbar. From the pop-up menu, select All Programs, and then click NVIDIA Corporation. Select NVIDIA Control Panel tab. In Select an SLI confi... pop-up menu, select Set SLI and PhysX configuration. In Set PhysX GPU acceleration item, please select Enabled. D. Select Control Panel tab. For Windows® VistaTM / VistaTM 64-bit / 7 / 7 64-bit OS: (For SLITM and Quad SLITM mode) A.

User Manual
Page 23
... example graphics card. Insert one Radeon graphics card into PCIE2 slot and the other CrossFireXTM cards that the cards are supported with Windows® VistaTM / 7 OS only. CrossFireXTM technology offers the most advantageous means available of CrossFireXTM. All three CrossFireXTM components, ... card, must be installed correctly to AMDTM graphics card manuals for AMDTM CrossFireXTM driver updates. 1. Currently CrossFireXTM feature is supported with Windows® XP with Service Pack 2 / VistaTM / 7 OS. 3-way CrossFireXTM and Quad CrossFireXTM feature are properly seated on the...
... example graphics card. Insert one Radeon graphics card into PCIE2 slot and the other CrossFireXTM cards that the cards are supported with Windows® VistaTM / 7 OS only. CrossFireXTM technology offers the most advantageous means available of CrossFireXTM. All three CrossFireXTM components, ... card, must be installed correctly to AMDTM graphics card manuals for AMDTM CrossFireXTM driver updates. 1. Currently CrossFireXTM feature is supported with Windows® XP with Service Pack 2 / VistaTM / 7 OS. 3-way CrossFireXTM and Quad CrossFireXTM feature are properly seated on the...

User Manual
Page 27
... (if you install three Radeon graphics cards). 27 The Catalyst Uninstaller is no need to be installed (If you have Windows® XP Service Pack 2 or higher installed in your system. Please check AMD website for details. Please check AMD website for details.... For Windows® XP OS: A. Restart your Windows® taskbar. Click "View", select "CrossFireXTM", and then check the item "Enable CrossFireXTM". We recommend using this ...
... (if you install three Radeon graphics cards). 27 The Catalyst Uninstaller is no need to be installed (If you have Windows® XP Service Pack 2 or higher installed in your system. Please check AMD website for details. Please check AMD website for details.... For Windows® XP OS: A. Restart your Windows® taskbar. Click "View", select "CrossFireXTM", and then check the item "Enable CrossFireXTM". We recommend using this ...

User Manual
Page 32
...Then click "FrontMic". D. MIC_RET and OUT_RET are for the front panel audio cable that allows convenient connection and control of audio devices. 1. For Windows® XP / XP 64-bit OS: Select "Mixer". Connect the power switch, reset switch and system status indicator on the chassis must support...audio panel, please install it to receive stereo audio input from sound sources such as below . Connect Mic_IN (MIC) to Ground (GND). Select "Recorder". For Windows® 7 / 7 64-bit / VistaTM / VistaTM 64-bit OS: Go to the "FrontMic" Tab in our manual and chassis manual to OUT2_L. Adjust...
...Then click "FrontMic". D. MIC_RET and OUT_RET are for the front panel audio cable that allows convenient connection and control of audio devices. 1. For Windows® XP / XP 64-bit OS: Select "Mixer". Connect the power switch, reset switch and system status indicator on the chassis must support...audio panel, please install it to receive stereo audio input from sound sources such as below . Connect Mic_IN (MIC) to Ground (GND). Select "Recorder". For Windows® 7 / 7 64-bit / VistaTM / VistaTM 64-bit OS: Go to the "FrontMic" Tab in our manual and chassis manual to OUT2_L. Adjust...

User Manual
Page 45
Please follow the order from up , press key, and then a window for boot devices selection appears. Enter UEFI SETUP UTILITY Advanced screen Storage Configuration. E. Insert the ASRock Support CD into your optical drive to format the floppy diskette and copy SATA3 drivers ...into the floppy diskette. 45 C. Then, the drivers compatible to your system can work properly. 2.16 Installing Windows® 7 / 7 64-bit ...
Please follow the order from up , press key, and then a window for boot devices selection appears. Enter UEFI SETUP UTILITY Advanced screen Storage Configuration. E. Insert the ASRock Support CD into your optical drive to format the floppy diskette and copy SATA3 drivers ...into the floppy diskette. 45 C. Then, the drivers compatible to your system can work properly. 2.16 Installing Windows® 7 / 7 64-bit ...

User Manual
Page 46
..."RAID Installation Guide" to install a third-party RAID driver. Select the driver to install according to the OS you install. 2.16.2 Installing Windows® 7 / 7 64-bit / VistaTM / VistaTM 64-bit With RAID Functions If you need to the BIOS RAID installation guide part of...2 on your sys- Enter UEFI SETUP UTILITY Advanced screen Storage Configuration. STEP 3: Use "RAID Installation Guide" to [RAID]. Please refer to install Windows® 7 / 7 64-bit / VistaTM / VistaTM 64-bit on your system. Make a SATA3 driver diskette by following path in the Support CD for ...
..."RAID Installation Guide" to install a third-party RAID driver. Select the driver to install according to the OS you install. 2.16.2 Installing Windows® 7 / 7 64-bit / VistaTM / VistaTM 64-bit With RAID Functions If you need to the BIOS RAID installation guide part of...2 on your sys- Enter UEFI SETUP UTILITY Advanced screen Storage Configuration. STEP 3: Use "RAID Installation Guide" to [RAID]. Please refer to install Windows® 7 / 7 64-bit / VistaTM / VistaTM 64-bit on your system. Make a SATA3 driver diskette by following path in the Support CD for ...

User Manual
Page 47
...SATA3_8 ports.) STEP 2: Make a SATA3 Driver Diskette. When prompted, insert the SATA3 driver diskette containing the AMD AHCI driver. A. B. STEP 3: Install Windows® XP / XP 64-bit OS on your SATA3 HDDs without RAID functions, please follow below steps. Enter UEFI SETUP UTILITY Advanced screen Storage Con... Mode" to [IDE]. (For SATA3_1 to SATA3_6 ports.) Set the option "Marvell SATA3 Operation Mode" to the OS you install. 2.17.1 Installing Windows® XP / XP 64-bit Without RAID Functions If you install. Make a SATA3 driver diskette by following section 2.16.1 step 2 on your ...
...SATA3_8 ports.) STEP 2: Make a SATA3 Driver Diskette. When prompted, insert the SATA3 driver diskette containing the AMD AHCI driver. A. B. STEP 3: Install Windows® XP / XP 64-bit OS on your SATA3 HDDs without RAID functions, please follow below steps. Enter UEFI SETUP UTILITY Advanced screen Storage Con... Mode" to [IDE]. (For SATA3_1 to SATA3_6 ports.) Set the option "Marvell SATA3 Operation Mode" to the OS you install. 2.17.1 Installing Windows® XP / XP 64-bit Without RAID Functions If you install. Make a SATA3 driver diskette by following section 2.16.1 step 2 on your ...

User Manual
Page 48
..." to [AHCI]. (For SATA3_1 to SATA3_6 ports.) Set the option "Marvell SATA3 Operation Mode" to [AHCI]. (For SATA3_7 and SATA3_8 ports.) STEP 2: Install Windows® 7 / 7 64-bit / VistaTM / VistaTM 64-bit OS on your sys- Enter UEFI SETUP UTILITY Advanced screen Storage Configuration. tem. 2.18...Mode" to [IDE]. (For SATA3_1 to SATA3_6 ports.) Set the option "Marvell SATA3 Operation Mode" to [IDE]. (For SATA3_7 and SATA3_8 ports.) STEP 2: Install Windows® 7 / 7 64-bit / VistaTM / VistaTM 64-bit OS on your sys- B. Please refer to the warning on page 9 for the possible overclocking ...
..." to [AHCI]. (For SATA3_1 to SATA3_6 ports.) Set the option "Marvell SATA3 Operation Mode" to [AHCI]. (For SATA3_7 and SATA3_8 ports.) STEP 2: Install Windows® 7 / 7 64-bit / VistaTM / VistaTM 64-bit OS on your sys- Enter UEFI SETUP UTILITY Advanced screen Storage Configuration. tem. 2.18...Mode" to [IDE]. (For SATA3_1 to SATA3_6 ports.) Set the option "Marvell SATA3 Operation Mode" to [IDE]. (For SATA3_7 and SATA3_8 ports.) STEP 2: Install Windows® 7 / 7 64-bit / VistaTM / VistaTM 64-bit OS on your sys- B. Please refer to the warning on page 9 for the possible overclocking ...

User Manual
Page 53
... Auto/Manual setting. The default is [Auto]. The default is [Auto]. Write Recovery Time (tWR) Use this item to change RAS to change Four Activate Window (tFAW) Auto/Manual setting. Max: 2T. The default is [Auto]. The default value is [Auto]. Command Rate (CR) Use this item to RAS Delay... (tRRD) Auto/Manual setting. The default is [Auto]. 53 The default is [Auto]. Four Activate Window (tFAW) Use this item to change CAS# Latency (tCL) Auto/Manual setting. CAS# Latency (tCL) Use this item to change Command Rate (CR) Auto...
... Auto/Manual setting. The default is [Auto]. The default is [Auto]. Write Recovery Time (tWR) Use this item to change RAS to change Four Activate Window (tFAW) Auto/Manual setting. Max: 2T. The default is [Auto]. The default value is [Auto]. Command Rate (CR) Use this item to RAS Delay... (tRRD) Auto/Manual setting. The default is [Auto]. 53 The default is [Auto]. Four Activate Window (tFAW) Use this item to change CAS# Latency (tCL) Auto/Manual setting. CAS# Latency (tCL) Use this item to change Command Rate (CR) Auto...

User Manual
Page 55
... other complicated flash utility. If you can update your UEFI only in a few clicks without entering operating systems first like MS-DOS or Windows®. Setting wrong values in Flash ROM. This convenient UEFI update tool allows you to update your UEFI, and reboot your USB flash drive...
... other complicated flash utility. If you can update your UEFI only in a few clicks without entering operating systems first like MS-DOS or Windows®. Setting wrong values in Flash ROM. This convenient UEFI update tool allows you to update your UEFI, and reboot your USB flash drive...

User Manual
Page 56
... system caches. The default value is supported through the native processor instructions HLT and MWAIT and requires no hardware support from overheated. If you install Windows® 7 / VistaTM and want to enable this function, please set this item to enable or disable AMD's Cool 'n' QuietTM technology. 3.4.1 CPU Configuration Cool 'n' Quiet Use...
... system caches. The default value is supported through the native processor instructions HLT and MWAIT and requires no hardware support from overheated. If you install Windows® 7 / VistaTM and want to enable this function, please set this item to enable or disable AMD's Cool 'n' QuietTM technology. 3.4.1 CPU Configuration Cool 'n' Quiet Use...

User Manual
Page 63
Please set this option to [Enabled] if you plan to use this item to enable or disable the system to wake from S5 using USB Mouse. The default value is [Enabled]. USB Mouse Power On Use this motherboard to submit Windows® VistaTM certification. 63 ACPI HPET table Use this item to enable or disable ACPI HPET Table.
Please set this option to [Enabled] if you plan to use this item to enable or disable the system to wake from S5 using USB Mouse. The default value is [Enabled]. USB Mouse Power On Use this motherboard to submit Windows® VistaTM certification. 63 ACPI HPET table Use this item to enable or disable ACPI HPET Table.

User Manual
Page 64
... OS. [Auto] - USB devices are connected. [UEFI Setup Only] - Legacy USB Support Use this item to enable or disable the use under UEFI setup and Windows / Linux OS. Enables legacy support if USB devices are not allowed to use of USB 3.0 controller. The default value is selected. Enables support for the...
... OS. [Auto] - USB devices are connected. [UEFI Setup Only] - Legacy USB Support Use this item to enable or disable the use under UEFI setup and Windows / Linux OS. Enables legacy support if USB devices are not allowed to use of USB 3.0 controller. The default value is selected. Enables support for the...

User Manual
Page 69
... CD that came with the motherboard contains necessary drivers and useful utilities that the motherboard supports. 4. Refer to visit ASRock's website at http://www.asrock.com; The CD automatically displays the Main Menu if "AUTORUN" is enabled in the Support CD to activate the ...support CD, insert the CD into your OS documentation for further information. 69 Software Support 4.1 Install Operating System This motherboard supports various Microsoft® Windows® operating systems: 7 / 7 64-bit / VistaTM / VistaTM 64-bit / XP / XP 64-bit. Because motherboard settings and hardware ...
... CD that came with the motherboard contains necessary drivers and useful utilities that the motherboard supports. 4. Refer to visit ASRock's website at http://www.asrock.com; The CD automatically displays the Main Menu if "AUTORUN" is enabled in the Support CD to activate the ...support CD, insert the CD into your OS documentation for further information. 69 Software Support 4.1 Install Operating System This motherboard supports various Microsoft® Windows® operating systems: 7 / 7 64-bit / VistaTM / VistaTM 64-bit / XP / XP 64-bit. Because motherboard settings and hardware ...


