
User Manual
Page 3
... Layout 12 1.4 I/O Panel 13 2. Installation 14 Pre-installation Precautions 14 2.1 CPU Installation 15 2.2 Installation of CPU Fan and Heatsink 15 2.3 Installation of Memory Modules (DIMM 16 2.4 Expansion Slots (PCI and PCI Express Slots 18 2.5 Jumpers Setup 19 2.6 Onboard Headers and Connectors 20 2.7 Serial ATA2 (SATA2) / Serial ATA3 (SATA3) Hard Disks Installation 25 2.8 Hot Plug and Hot Swap Functions for SATA2 / SATA3 HDDs ... 25 2.9 SATA2 / SATA3 HDD Hot Plug Feature and Operation Operation Guide 26 2.10 Driver Installation Guide 28 2.11 Installing Windows® 7 / 7 64-bit...
... Layout 12 1.4 I/O Panel 13 2. Installation 14 Pre-installation Precautions 14 2.1 CPU Installation 15 2.2 Installation of CPU Fan and Heatsink 15 2.3 Installation of Memory Modules (DIMM 16 2.4 Expansion Slots (PCI and PCI Express Slots 18 2.5 Jumpers Setup 19 2.6 Onboard Headers and Connectors 20 2.7 Serial ATA2 (SATA2) / Serial ATA3 (SATA3) Hard Disks Installation 25 2.8 Hot Plug and Hot Swap Functions for SATA2 / SATA3 HDDs ... 25 2.9 SATA2 / SATA3 HDD Hot Plug Feature and Operation Operation Guide 26 2.10 Driver Installation Guide 28 2.11 Installing Windows® 7 / 7 64-bit...

User Manual
Page 9
... motherboard supports Untied Overclocking Technology. ASRock Instant Flash is supported depends on our website for the operation procedures of output phases to access ASRock Instant Flash. Just launch this utility, you can press key during the POST or press key to BIOS setup menu to improve efficiency when the CPU cores are idle. For Windows® 64-bit OS with 64-bit CPU, there is a revolutionary technology that the USB flash drive or hard drive...
... motherboard supports Untied Overclocking Technology. ASRock Instant Flash is supported depends on our website for the operation procedures of output phases to access ASRock Instant Flash. Just launch this utility, you can press key during the POST or press key to BIOS setup menu to improve efficiency when the CPU cores are idle. For Windows® 64-bit OS with 64-bit CPU, there is a revolutionary technology that the USB flash drive or hard drive...
User Manual
Page 12
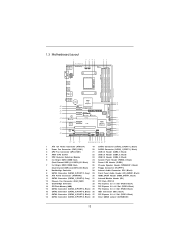
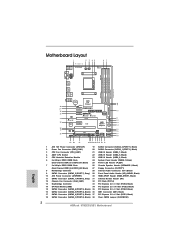
...USB 2.0 Header (USB4_5, Black) 5 CPU Heatsink Retention Module 23 USB 2.0 Header (USB8_9, Black) 6 2 x 240-pin DDR3 DIMM Slots 24 System Panel Header (PANEL1, Black) (Dual Channel: DDR3_A1, DDR3_B1; Black) 27 Floppy Connector (FLOPPY1) 8 Northbridge Controller 28 Internal Audio Connector: CD1 (Black) 9 SATA3 Connector (SATA3_2 (PORT 7), Gray) 29 Front Panel Audio Header (HD_AUDIO1, Black) 10 ATX Power Connector (ATXPWR1) 30 HDMI_SPDIF Header (HDMI_SPDIF1, Black) 11 SATA3 Connector (SATA3_1 (PORT 6), Gray) 31 Infrared Module Header (IR1) 12 Chassis Fan Connector (CHA_FAN1) 32 PCI...
...USB 2.0 Header (USB4_5, Black) 5 CPU Heatsink Retention Module 23 USB 2.0 Header (USB8_9, Black) 6 2 x 240-pin DDR3 DIMM Slots 24 System Panel Header (PANEL1, Black) (Dual Channel: DDR3_A1, DDR3_B1; Black) 27 Floppy Connector (FLOPPY1) 8 Northbridge Controller 28 Internal Audio Connector: CD1 (Black) 9 SATA3 Connector (SATA3_2 (PORT 7), Gray) 29 Front Panel Audio Header (HD_AUDIO1, Black) 10 ATX Power Connector (ATXPWR1) 30 HDMI_SPDIF Header (HDMI_SPDIF1, Black) 11 SATA3 Connector (SATA3_1 (PORT 6), Gray) 31 Infrared Module Header (IR1) 12 Chassis Fan Connector (CHA_FAN1) 32 PCI...

User Manual
Page 28
... boot your optical drive first. Enter BIOS SETUP UTILITY Advanced screen Storage Configuration. Set the "SATA Operation Mode" option to format and copy files [YN]? A. Please select CD-ROM as the boot device. When you want to format the floppy diskette and copy SATA / SATA2 drivers into the floppy drive, and press any key. D. Then you will start to install Windows® XP / XP 64-bit on a RAID disk...
... boot your optical drive first. Enter BIOS SETUP UTILITY Advanced screen Storage Configuration. Set the "SATA Operation Mode" option to format and copy files [YN]? A. Please select CD-ROM as the boot device. When you want to format the floppy diskette and copy SATA / SATA2 drivers into the floppy drive, and press any key. D. Then you will start to install Windows® XP / XP 64-bit on a RAID disk...
User Manual
Page 29
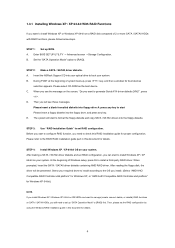
..., insert the SSATA / SATA2 driver diskette containing the AMD RAID driver. Select the driver to install according to the OS you install. 2.11.2 Installing Windows® 7 / 7 64-bit / VistaTM / VistaTM 64-bit With RAID Functions If you need to [RAID]. Enter BIOS SETUP UTILITY Advanced screen Storage Configuration. STEP 3: Use "RAID Installation Guide" to install Windows® 7 / 7 64-bit / VistaTM / VistaTM 64-bit on a RAID disk composed of 2 or more SATA / SATA2 HDDs with RAID functions, please follow below steps...
..., insert the SSATA / SATA2 driver diskette containing the AMD RAID driver. Select the driver to install according to the OS you install. 2.11.2 Installing Windows® 7 / 7 64-bit / VistaTM / VistaTM 64-bit With RAID Functions If you need to [RAID]. Enter BIOS SETUP UTILITY Advanced screen Storage Configuration. STEP 3: Use "RAID Installation Guide" to install Windows® 7 / 7 64-bit / VistaTM / VistaTM 64-bit on a RAID disk composed of 2 or more SATA / SATA2 HDDs with RAID functions, please follow below steps...

User Manual
Page 34
...Configuration options: [Auto] and [Disabled]. BIOS SETUP UTILITY Main OC Tweaker Advanced H/W Monitor Boot Security Exit EZ Overclocking Load Optimized CPU OC Setting CPU Configuration Overclock Mode CPU Frequency (MHz) PCIE Frequency (MHz) Spread Spectrum Boot Failure Guard Boot Failure Guard Count CPU Active Core Control AMD Turbo Core Technology AMD C-State Support AMD APM Processor Maximum Frequency North Bridge Maximum Frequency Processor Maximum Voltage Multiplier/Voltage Change [Press Enter] [Auto] [200] [100] [Auto] [Enabled] [3] [All Cores] [Auto] [Enabled] [Auto] x31.5 6300...
...Configuration options: [Auto] and [Disabled]. BIOS SETUP UTILITY Main OC Tweaker Advanced H/W Monitor Boot Security Exit EZ Overclocking Load Optimized CPU OC Setting CPU Configuration Overclock Mode CPU Frequency (MHz) PCIE Frequency (MHz) Spread Spectrum Boot Failure Guard Boot Failure Guard Count CPU Active Core Control AMD Turbo Core Technology AMD C-State Support AMD APM Processor Maximum Frequency North Bridge Maximum Frequency Processor Maximum Voltage Multiplier/Voltage Change [Press Enter] [Auto] [200] [100] [Auto] [Enabled] [3] [All Cores] [Auto] [Enabled] [Auto] x31.5 6300...

User Manual
Page 35
... CPU NB voltage. BIOS SETUP UTILITY Main OC Tweaker Advanced H/W Monitor Boot Security Exit EZ Overclocking Load Optimized CPU OC Setting CPU Configuration Overclock Mode CPU Frequency (MHz) PCIE Frequency (MHz) Spread Spectrum Boot Failure Guard Boot Failure Guard Count CPU Active Core Control AMD Turbo Core Technology AMD C-State Support AMD APM Processor Maximum Frequency North Bridge Maximum Frequency Processor Maximum Voltage Multiplier/Voltage Change [Press Enter] [Auto] [200] [100] [Auto] [Enabled] [3] [All Cores] [Auto] [Enabled] [Auto] x31.5 6300 MHZ x31.0 6200 MHz 1.5500 V [Manual...
... CPU NB voltage. BIOS SETUP UTILITY Main OC Tweaker Advanced H/W Monitor Boot Security Exit EZ Overclocking Load Optimized CPU OC Setting CPU Configuration Overclock Mode CPU Frequency (MHz) PCIE Frequency (MHz) Spread Spectrum Boot Failure Guard Boot Failure Guard Count CPU Active Core Control AMD Turbo Core Technology AMD C-State Support AMD APM Processor Maximum Frequency North Bridge Maximum Frequency Processor Maximum Voltage Multiplier/Voltage Change [Press Enter] [Auto] [200] [100] [Auto] [Enabled] [3] [All Cores] [Auto] [Enabled] [Auto] x31.5 6300 MHZ x31.0 6200 MHz 1.5500 V [Manual...
User Manual
Page 36
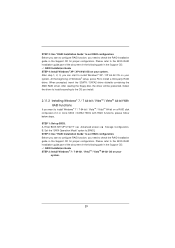
... selecting Hyper-Transport bus width. The default is [Auto]. 36 The default is [Auto]. DRAM Frequency If [Auto] is [Auto]. The default value is selected, the motherboard will detect the memory module(s) inserted and assigns appropriate frequency automatically. The default is [Auto]. HT Bus Width This feature allows you to enable Channel Memory Interleaving. The default value is [Auto]. Configuration options: [Disabled], [Auto]. Memory Timing BIOS SETUP UTILITY OC Tweaker Memory Timing Power Down Enable Bank Interleaving Channel Interleaving CAS...
... selecting Hyper-Transport bus width. The default is [Auto]. 36 The default is [Auto]. DRAM Frequency If [Auto] is [Auto]. The default value is selected, the motherboard will detect the memory module(s) inserted and assigns appropriate frequency automatically. The default is [Auto]. HT Bus Width This feature allows you to enable Channel Memory Interleaving. The default value is [Auto]. Configuration options: [Disabled], [Auto]. Memory Timing BIOS SETUP UTILITY OC Tweaker Memory Timing Power Down Enable Bank Interleaving Channel Interleaving CAS...

User Manual
Page 39
... item to enable CPU internal thermal control mechanism to [Enabled], a VMM (Virtual Machine Architecture) can utilize the additional hardware capabilities provided by AMD-V. Enhance Halt State (C1E) All processors support the Halt State (C1). Configuration options: [Enabled] and [Disabled]. 3.4.1 CPU Configuration BIOS SETUP UTILITY Advanced CPU Configuration Cool' n' Quiet Secure Virtual Machine Enhanced Halt State(C1E) CPU Thermal Throttle [Enabled] [Enabled] [Disabled] [Auto] +F1 F9 F10 ESC Select Screen Select Item Change Option General Help Load Defaults Save and...
... item to enable CPU internal thermal control mechanism to [Enabled], a VMM (Virtual Machine Architecture) can utilize the additional hardware capabilities provided by AMD-V. Enhance Halt State (C1E) All processors support the Halt State (C1). Configuration options: [Enabled] and [Disabled]. 3.4.1 CPU Configuration BIOS SETUP UTILITY Advanced CPU Configuration Cool' n' Quiet Secure Virtual Machine Enhanced Halt State(C1E) CPU Thermal Throttle [Enabled] [Enabled] [Disabled] [Auto] +F1 F9 F10 ESC Select Screen Select Item Change Option General Help Load Defaults Save and...
User Manual
Page 43
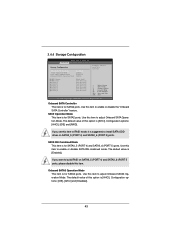
...PORT 5) ports. SATA Operation Mode This item is [AHCI]. 3.4.4 Storage Configuration BIOS SETUP UTILITY Advanced Storage Configuration Onboard SATA Controller SATA Operation Mode SATA IDE Combined Mode Onboard SATA3 Operation Mode [Enabled] [AHCI] [Enabled] [AHCI] IDE1 Master IDE1 Slave SATAII_1 SATAII_2 SATAII_3 SATAII_4 SATAII_5 SATAII_6 [Hard Disk] [Not Detected] [Not Detected] [Not Detected] [Not Detected] [Not Detected] [Not Detected] [Not Detected] Configure onboard serial ATA controller. +F1 F9 F10 ESC Select Screen Select Item Change Option General Help Load Defaults...
...PORT 5) ports. SATA Operation Mode This item is [AHCI]. 3.4.4 Storage Configuration BIOS SETUP UTILITY Advanced Storage Configuration Onboard SATA Controller SATA Operation Mode SATA IDE Combined Mode Onboard SATA3 Operation Mode [Enabled] [AHCI] [Enabled] [AHCI] IDE1 Master IDE1 Slave SATAII_1 SATAII_2 SATAII_3 SATAII_4 SATAII_5 SATAII_6 [Hard Disk] [Not Detected] [Not Detected] [Not Detected] [Not Detected] [Not Detected] [Not Detected] [Not Detected] Configure onboard serial ATA controller. +F1 F9 F10 ESC Select Screen Select Item Change Option General Help Load Defaults...

User Manual
Page 47
...USB 3.0 Controller Use this item to select legacy support for legacy USB. [Auto] - Enables legacy support if USB devices are four confi guration options: [Enabled], [Auto], [Disabled] and [BIOS Setup Only]. 3.4.8 USB Configuration BIOS SETUP UTILITY Advanced USB Configuration USB Controller USB 2.0 Support Legacy USB Support USB 3.0 Controller [Enabled] [Enabled] [Enabled] [Enabled] USB Keyboard/Remote Power On [Disabled] USB Mouse Power On [Disabled] To enable or disable the onboard USB controllers. +F1 F9 F10 ESC Select Screen Select Item Change Option General Help Load Defaults...
...USB 3.0 Controller Use this item to select legacy support for legacy USB. [Auto] - Enables legacy support if USB devices are four confi guration options: [Enabled], [Auto], [Disabled] and [BIOS Setup Only]. 3.4.8 USB Configuration BIOS SETUP UTILITY Advanced USB Configuration USB Controller USB 2.0 Support Legacy USB Support USB 3.0 Controller [Enabled] [Enabled] [Enabled] [Enabled] USB Keyboard/Remote Power On [Disabled] USB Mouse Power On [Disabled] To enable or disable the onboard USB controllers. +F1 F9 F10 ESC Select Screen Select Item Change Option General Help Load Defaults...
User Manual
Page 52
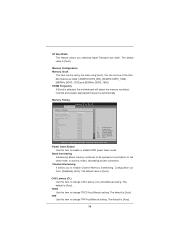
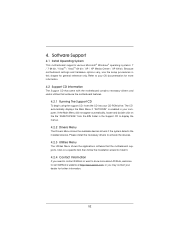
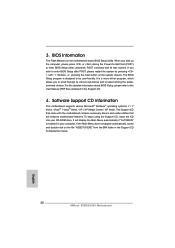
... install the necessary drivers to display the menus. 4.2.2 Drivers Menu The Drivers Menu shows the available devices drivers if the system detects the installed devices. Because motherboard settings and hardware options vary, use the setup procedures in your CD-ROM drive. or you need to contact ASRock or want to know more information. 4.2 Support CD Information The Support CD that came with the motherboard contains necessary drivers and useful utilities that the motherboard supports. Refer to visit ASRock...
... install the necessary drivers to display the menus. 4.2.2 Drivers Menu The Drivers Menu shows the available devices drivers if the system detects the installed devices. Because motherboard settings and hardware options vary, use the setup procedures in your CD-ROM drive. or you need to contact ASRock or want to know more information. 4.2 Support CD Information The Support CD that came with the motherboard contains necessary drivers and useful utilities that the motherboard supports. Refer to visit ASRock...
Quick Installation Guide
Page 2
...4 AM3+ CPU Socket 22 USB 2.0 Header (USB4_5, Black) 5 CPU Heatsink Retention Module 23 USB 2.0 Header (USB8_9, Black) 6 2 x 240-pin DDR3 DIMM Slots 24 System Panel Header (PANEL1, Black) (Dual Channel: DDR3_A1, DDR3_B1; Black) 25 Power LED Header (PLED1) 7 2 x 240-pin DDR3 DIMM Slots 26 Chassis Speaker Header (SPEAKER 1, Black) (Dual Channel: DDR3_A2, DDR3_B2; Black) 27 Floppy Connector (FLOPPY1) 8 Northbridge Controller 28 Internal Audio Connector: CD1 (Black) 9 SATA3 Connector (SATA3_2 (PORT 7), Gray) 29 Front Panel Audio Header (HD_AUDIO1, Black) 10 ATX Power Connector (ATXPWR1...
...4 AM3+ CPU Socket 22 USB 2.0 Header (USB4_5, Black) 5 CPU Heatsink Retention Module 23 USB 2.0 Header (USB8_9, Black) 6 2 x 240-pin DDR3 DIMM Slots 24 System Panel Header (PANEL1, Black) (Dual Channel: DDR3_A1, DDR3_B1; Black) 25 Power LED Header (PLED1) 7 2 x 240-pin DDR3 DIMM Slots 26 Chassis Speaker Header (SPEAKER 1, Black) (Dual Channel: DDR3_A2, DDR3_B2; Black) 27 Floppy Connector (FLOPPY1) 8 Northbridge Controller 28 Internal Audio Connector: CD1 (Black) 9 SATA3 Connector (SATA3_2 (PORT 7), Gray) 29 Front Panel Audio Header (HD_AUDIO1, Black) 10 ATX Power Connector (ATXPWR1...
Quick Installation Guide
Page 4
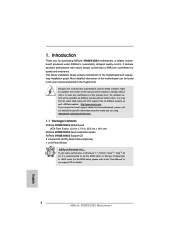
...) ASRock 970DE3/U3S3 Quick Installation Guide ASRock 970DE3/U3S3 Support CD 2 x Serial ATA (SATA) Data Cables (Optional) 1 x I/O Panel Shield ASRock Reminds You... Because the motherboard specifications and the BIOS software might be updated, the content of this manual will be subject to change without further notice. In case any modifications of this manual occur, the updated version will be available on ASRock website as well. You may find the latest VGA cards and CPU support lists...
...) ASRock 970DE3/U3S3 Quick Installation Guide ASRock 970DE3/U3S3 Support CD 2 x Serial ATA (SATA) Data Cables (Optional) 1 x I/O Panel Shield ASRock Reminds You... Because the motherboard specifications and the BIOS software might be updated, the content of this manual will be subject to change without further notice. In case any modifications of this manual occur, the updated version will be available on ASRock website as well. You may find the latest VGA cards and CPU support lists...
Quick Installation Guide
Page 8
... monitor function and overclock your USB flash drive, floppy disk or hard drive, then you implement Dual Channel Memory Technology, make sure to get the best system performance under Windows® 7 / VistaTM / XP. Just launch this tool and save the new BIOS file to your hardware devices to read "Untied Overclocking Technology" on page 13 for proper installation. 3. This motherboard supports Dual Channel Memory Technology. In other complicated flash utility...
... monitor function and overclock your USB flash drive, floppy disk or hard drive, then you implement Dual Channel Memory Technology, make sure to get the best system performance under Windows® 7 / VistaTM / XP. Just launch this tool and save the new BIOS file to your hardware devices to read "Untied Overclocking Technology" on page 13 for proper installation. 3. This motherboard supports Dual Channel Memory Technology. In other complicated flash utility...

Quick Installation Guide
Page 22
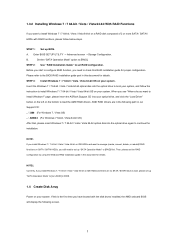
Using SATA / SATA2 / SATA3 HDDs without NCQ and Hot Plug functions (IDE mode) STEP 1: Set up to bottom side to install those required drivers. Set the "Onboard SATA3 Operation Mode" option to [IDE] for SATA2 ports. 2.7 Driver Installation Guide To install the drivers to your system, please insert the support CD to your system. English 22 ASRock 970DE3/U3S3 Motherboard B. STEP 2: Install Windows® XP / XP 64-bit OS on your optical drive first. Then, the drivers compatible to your SATA / SATA2...
Using SATA / SATA2 / SATA3 HDDs without NCQ and Hot Plug functions (IDE mode) STEP 1: Set up to bottom side to install those required drivers. Set the "Onboard SATA3 Operation Mode" option to [IDE] for SATA2 ports. 2.7 Driver Installation Guide To install the drivers to your system, please insert the support CD to your system. English 22 ASRock 970DE3/U3S3 Motherboard B. STEP 2: Install Windows® XP / XP 64-bit OS on your optical drive first. Then, the drivers compatible to your SATA / SATA2...
Quick Installation Guide
Page 24
... in the Support CD to enter BIOS Setup after POST, please restart the system by pressing + + , or pressing the reset button on the system chassis. The BIOS Setup program is enabled in the Support CD. 4. It is a menu-driven program, which allows you wish to display the menus. 24 ASRock 970DE3/U3S3 Motherboard English Software Support CD information This motherboard supports various Microsoft® Windows® operating systems: 7 / 7 64-bit / VistaTM / VistaTM 64-bit / XP...
... in the Support CD to enter BIOS Setup after POST, please restart the system by pressing + + , or pressing the reset button on the system chassis. The BIOS Setup program is enabled in the Support CD. 4. It is a menu-driven program, which allows you wish to display the menus. 24 ASRock 970DE3/U3S3 Motherboard English Software Support CD information This motherboard supports various Microsoft® Windows® operating systems: 7 / 7 64-bit / VistaTM / VistaTM 64-bit / XP...
RAID Installation Guide
Page 4
... diskette into floppy drive A: press any key. Before you start to format the floppy diskette and copy SATA / SATAII drivers into the floppy diskette. Then, please set RAID configuration. 1.3.1 Installing Windows XP / XP 64-bit With RAID Functions If you want to install Windows XP / XP 64-bit on your system. Enter BIOS SETUP UTILITY → Advanced screen →Storage Configuration. A. C. STEP 3: Use "RAID Installation Guide" to the OS you install. (Select "AMD AHCI Compatible RAID Controller-x86 platform" for Windows XP, or "AMD AHCI Compatible RAID Controller-x64 platform...
... diskette into floppy drive A: press any key. Before you start to format the floppy diskette and copy SATA / SATAII drivers into the floppy diskette. Then, please set RAID configuration. 1.3.1 Installing Windows XP / XP 64-bit With RAID Functions If you want to install Windows XP / XP 64-bit on your system. Enter BIOS SETUP UTILITY → Advanced screen →Storage Configuration. A. C. STEP 3: Use "RAID Installation Guide" to the OS you install. (Select "AMD AHCI Compatible RAID Controller-x86 platform" for Windows XP, or "AMD AHCI Compatible RAID Controller-x64 platform...
RAID Installation Guide
Page 5
... your optical drive, and click the "Load Driver" button on the left on your system. If this document for details. Set the "SATA Operation Mode" option to load the AMD RAID drivers. Before you start to install Windows 7 / 7 64-bit / Vista / Vista 64-bit OS on IDE HDDs and there are in this RAID installation guide for proper configuration. NOTE2. STEP 3: Install Windows 7 / 7 64-bit / Vista / Vista 64-bit OS on the bottom to [RAID]. Enter BIOS SETUP UTILITY → Advanced screen →Storage Configuration.
... your optical drive, and click the "Load Driver" button on the left on your system. If this document for details. Set the "SATA Operation Mode" option to load the AMD RAID drivers. Before you start to install Windows 7 / 7 64-bit / Vista / Vista 64-bit OS on IDE HDDs and there are in this RAID installation guide for proper configuration. NOTE2. STEP 3: Install Windows 7 / 7 64-bit / Vista / Vista 64-bit OS on the bottom to [RAID]. Enter BIOS SETUP UTILITY → Advanced screen →Storage Configuration.
RAID Installation Guide
Page 10
... the default browser. Please read this private JRE to all AMD SB710 SATA logical drives that may be present on your system. 2.2 Browser Support On the Host PC with AMD SB710 SATA RAID controllers. RAIDXpert uses this guide carefully and follow the instructions below to work with the AMD SB710 Controller, where you install RAIDXpert, you are not supported. If you to configure RAID functions by using RAIDXpert RAID management software under...
... the default browser. Please read this private JRE to all AMD SB710 SATA logical drives that may be present on your system. 2.2 Browser Support On the Host PC with AMD SB710 SATA RAID controllers. RAIDXpert uses this guide carefully and follow the instructions below to work with the AMD SB710 Controller, where you install RAIDXpert, you are not supported. If you to configure RAID functions by using RAIDXpert RAID management software under...


