User Manual
Page 3
...2.3 Installation of Memory Modules (DIMM 16 2.4 Expansion Slots (PCI and PCI Express Slots 17 2.5 Dual Monitor and Surround Display Features 18 2.6 ASRock Smart Remote Installation Guide 21 2.7 Jumpers Setup 22 2.8 Onboard Headers and Connectors 23 2.9 SATAII Hard Disk Setup Guide 27 2.10 Serial ATA (...bit / VistaTM / VistaTM 64-bit With RAID Functions 32 2.16.1 Installing Windows® XP / XP 64-bit With RAID Functions 32 2.16.2 Installing Windows® VistaTM / VistaTM 64-bit With RAID Functions 33 2.17 Installing Windows® XP / XP 64-bit / VistaTM / VistaTM 64-bit Without RAID...
...2.3 Installation of Memory Modules (DIMM 16 2.4 Expansion Slots (PCI and PCI Express Slots 17 2.5 Dual Monitor and Surround Display Features 18 2.6 ASRock Smart Remote Installation Guide 21 2.7 Jumpers Setup 22 2.8 Onboard Headers and Connectors 23 2.9 SATAII Hard Disk Setup Guide 27 2.10 Serial ATA (...bit / VistaTM / VistaTM 64-bit With RAID Functions 32 2.16.1 Installing Windows® XP / XP 64-bit With RAID Functions 32 2.16.2 Installing Windows® VistaTM / VistaTM 64-bit With RAID Functions 33 2.17 Installing Windows® XP / XP 64-bit / VistaTM / VistaTM 64-bit Without RAID...
User Manual
Page 8
... damage to the components and devices of your own risk and expense. ASRock Instant Flash (see CAUTION 15) - CPU Frequency Stepless Control (see CAUTION 7) - ASRock Instant Boot - CPU Temperature Sensing Monitor - ASRock OC Tuner (see CAUTION 16) - FCC, CE, WHQL - Microsoft® Windows® 7 / 7 64-bit / VistaTM / VistaTM 64-bit / XP / XP Media Center...
... damage to the components and devices of your own risk and expense. ASRock Instant Flash (see CAUTION 15) - CPU Frequency Stepless Control (see CAUTION 7) - ASRock Instant Boot - CPU Temperature Sensing Monitor - ASRock OC Tuner (see CAUTION 16) - FCC, CE, WHQL - Microsoft® Windows® 7 / 7 64-bit / VistaTM / VistaTM 64-bit / XP / XP Media Center...

User Manual
Page 9
... function, please enable Cool 'n' Quiet option in the BIOS setup in advance. ASRock website: http://www.asrock.com 9 This motherboard supports Dual Channel Memory Technology. Please visit our website for system usage under Windows® environment. In other words, it is supported depends on page 36 for... your SATAII hard disk drive to get the best system performance under Windows® 7 / VistaTM / XP. Before you adopt. If you to surveil your hardware devices to SATAII mode. ASRock website http://www.asrock.com 4. The maximum shared memory size is defined by hardware monitor ...
... function, please enable Cool 'n' Quiet option in the BIOS setup in advance. ASRock website: http://www.asrock.com 9 This motherboard supports Dual Channel Memory Technology. Please visit our website for system usage under Windows® environment. In other words, it is supported depends on page 36 for... your SATAII hard disk drive to get the best system performance under Windows® 7 / VistaTM / XP. Before you adopt. If you to surveil your hardware devices to SATAII mode. ASRock website http://www.asrock.com 4. The maximum shared memory size is defined by hardware monitor ...
User Manual
Page 10
... the USB flash drive or hard drive must use SmartView feature, please make sure your OS version is Windows® 7 / 7 64 bit / VistaTM / VistaTM 64 bit, and your friends! ASRock APP Charger allows you can only be noted that the OC profile can press key during the POST or... Charger driver, it is a BIOS flash utility embedded in a few clicks without entering operating systems first like MS-DOS or Windows®. SmartView, a new function of the device. 10 To use FAT32/ 16/12 file system. 10. ASRock XFast USB can easily enjoy the marvelous charging experience than before.
... the USB flash drive or hard drive must use SmartView feature, please make sure your OS version is Windows® 7 / 7 64 bit / VistaTM / VistaTM 64 bit, and your friends! ASRock APP Charger allows you can only be noted that the OC profile can press key during the POST or... Charger driver, it is a BIOS flash utility embedded in a few clicks without entering operating systems first like MS-DOS or Windows®. SmartView, a new function of the device. 10 To use FAT32/ 16/12 file system. 10. ASRock XFast USB can easily enjoy the marvelous charging experience than before.

User Manual
Page 11
...Frequencies other than the recommended CPU bus frequencies may cause the instability of previously visited websites, making web surfing faster than 50% under Windows® OS 32-bit CPU. To improve heat dissipation, remember to Intel's suggestion, the EuP ready power supply must meet EuP ...PC system. 18. Although this motherboard offers stepless control, it back again. ASRock XFast RAM fully utilizes the memory space that it also boosts the speed of Your Data: With the status window, you are required. Traffic Shaping: You can easily recognize which includes below ...
...Frequencies other than the recommended CPU bus frequencies may cause the instability of previously visited websites, making web surfing faster than 50% under Windows® OS 32-bit CPU. To improve heat dissipation, remember to Intel's suggestion, the EuP ready power supply must meet EuP ...PC system. 18. Although this motherboard offers stepless control, it back again. ASRock XFast RAM fully utilizes the memory space that it also boosts the speed of Your Data: With the status window, you are required. Traffic Shaping: You can easily recognize which includes below ...

User Manual
Page 13
... 100Mbps connection Green 1Gbps connection LAN Port * To enable Multi-Streaming function, you are two LED next to "Quadraphonic" or "Stereo". For Windows® XP: After restarting your system. For Windows® 7 / VistaTM: After restarting your computer, please double-click "Realtek HD Audio Manager" on your computer, you will find "Mixer" tool...
... 100Mbps connection Green 1Gbps connection LAN Port * To enable Multi-Streaming function, you are two LED next to "Quadraphonic" or "Stereo". For Windows® XP: After restarting your system. For Windows® 7 / VistaTM: After restarting your computer, please double-click "Realtek HD Audio Manager" on your computer, you will find "Mixer" tool...

User Manual
Page 19
...move items from one monitor to save your system. Select the display icon identified by the number three and four. 6. Click "Extend my Windows desktop onto this monitor". F. Repeat steps C through C for the second monitor. The placement of the multi-monitor according to use multiple ...monitors with your card, one , two, three and four. Boot your change. A. For Windows® 7 / 7 64-bit / VistaTM / VistaTM 64-bit OS: Right click the desktop, choose "Personalize", and select the "Display Settings" ...
...move items from one monitor to save your system. Select the display icon identified by the number three and four. 6. Click "Extend my Windows desktop onto this monitor". F. Repeat steps C through C for the second monitor. The placement of the multi-monitor according to use multiple ...monitors with your card, one , two, three and four. Boot your change. A. For Windows® 7 / 7 64-bit / VistaTM / VistaTM 64-bit OS: Right click the desktop, choose "Personalize", and select the "Display Settings" ...

User Manual
Page 25
... front panel audio header as below: A. Connect Ground (GND) to OUT2_L. You don't need to connect them for HD audio panel only. For Windows® XP / XP 64-bit OS: Select "Mixer". Adjust "Recording Volume". MIC_RET and OUT_RET are for AC'97 audio panel. Please connect the... To activate the front mic. Please follow the instruction in our manual and chassis manual to the "FrontMic" Tab in the Realtek Control panel. E. B. For Windows® 7 / 7 64-bit / VistaTM / VistaTM 64-bit OS: Go to install your system. 2. High Definition Audio supports Jack Sensing, but the ...
... front panel audio header as below: A. Connect Ground (GND) to OUT2_L. You don't need to connect them for HD audio panel only. For Windows® XP / XP 64-bit OS: Select "Mixer". Adjust "Recording Volume". MIC_RET and OUT_RET are for AC'97 audio panel. Please connect the... To activate the front mic. Please follow the instruction in our manual and chassis manual to the "FrontMic" Tab in the Realtek Control panel. E. B. For Windows® 7 / 7 64-bit / VistaTM / VistaTM 64-bit OS: Go to install your system. 2. High Definition Audio supports Jack Sensing, but the ...

User Manual
Page 32
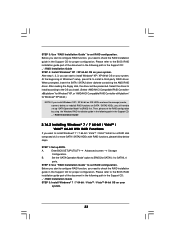
...follow below procedures according to the OS you install. 2.16.1 Installing Windows® XP / XP 64-bit With RAID Functions If you install can be auto-detected and listed on the support CD driver page. Insert the ASRock Support CD into your optical drive to boot your optical drive first.... Then you want to install Windows® XP / XP 64-bit on the screen, "Generate Serial ATA driver diskette [YN]?", ...
...follow below procedures according to the OS you install. 2.16.1 Installing Windows® XP / XP 64-bit With RAID Functions If you install can be auto-detected and listed on the support CD driver page. Insert the ASRock Support CD into your optical drive to boot your optical drive first.... Then you want to install Windows® XP / XP 64-bit on the screen, "Generate Serial ATA driver diskette [YN]?", ...
User Manual
Page 33
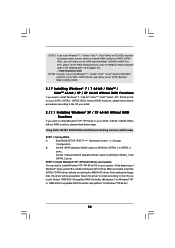
... rebuild) RAID functions on your system. At the beginning of the document in the following path in the Support CD: .. \ RAID Installation Guide STEP 3: Install Windows® 7 / 7 64-bit / VistaTM / VistaTM 64-bit OS on your system. STEP 2: Use "RAID Installation Guide" to set RAID configuration. STEP 3: ... the driver to install according to the OS you still need to set up BIOS. Then, please set the RAID configuration by using the Windows RAID installation guide in the following path in the Support CD for SATAII_1 to [RAID] first. Set the "SATA Operation Mode" option to...
... rebuild) RAID functions on your system. At the beginning of the document in the following path in the Support CD: .. \ RAID Installation Guide STEP 3: Install Windows® 7 / 7 64-bit / VistaTM / VistaTM 64-bit OS on your system. STEP 2: Use "RAID Installation Guide" to set RAID configuration. STEP 3: ... the driver to install according to the OS you still need to set up BIOS. Then, please set the RAID configuration by using the Windows RAID installation guide in the following path in the Support CD for SATAII_1 to [RAID] first. Set the "SATA Operation Mode" option to...
User Manual
Page 34
...SATA / SATA2/ SATA3 HDDs with NCQ and Hot Plug functions (AHCI mode) STEP 1: Set Up BIOS. You can start to SATAII_4 ports. If you install Windows® 7 / 7 64-bit / VistaTM / VistaTM 64-bit on IDE HDDs and want to manage (create, convert, delete, or rebuild) RAID functions on... SATA / SATA2 HDDs, you install. (Select "AMD AHCI Compatible RAID Controller-x86 platform" for Windows® XP, or "AMD AHCI Compatible RAID Controller-x64 platform" for SATAII_1 to install Windows® XP / XP 64-bit OS on your system. Enter BIOS SETUP UTILITY Advanced screen Storage Configuration...
...SATA / SATA2/ SATA3 HDDs with NCQ and Hot Plug functions (AHCI mode) STEP 1: Set Up BIOS. You can start to SATAII_4 ports. If you install Windows® 7 / 7 64-bit / VistaTM / VistaTM 64-bit on IDE HDDs and want to manage (create, convert, delete, or rebuild) RAID functions on... SATA / SATA2 HDDs, you install. (Select "AMD AHCI Compatible RAID Controller-x86 platform" for Windows® XP, or "AMD AHCI Compatible RAID Controller-x64 platform" for SATAII_1 to install Windows® XP / XP 64-bit OS on your system. Enter BIOS SETUP UTILITY Advanced screen Storage Configuration...

User Manual
Page 35
... to [IDE] for SATAII_1 to SATAII_4 ports. A. Set the "SATA Operation Mode" option to [AHCI] for SATA3_1 and SATA3_2 ports. STEP 2: Install Windows® 7 / 7 64-bit / VistaTM / VistaTM 64-bit OS on your system. 35 A. A. B. Set the "SATA Operation Mode" option ...to [IDE] for SATA3_1 and SATA3_2 ports. B. STEP 2: Install Windows® 7 / 7 64-bit / VistaTM / VistaTM 64-bit OS on your SATA / SATA2 / SATA3 HDDs without RAID functions, please follow below steps. Using...
... to [IDE] for SATAII_1 to SATAII_4 ports. A. Set the "SATA Operation Mode" option to [AHCI] for SATA3_1 and SATA3_2 ports. STEP 2: Install Windows® 7 / 7 64-bit / VistaTM / VistaTM 64-bit OS on your system. 35 A. A. B. Set the "SATA Operation Mode" option ...to [IDE] for SATA3_1 and SATA3_2 ports. B. STEP 2: Install Windows® 7 / 7 64-bit / VistaTM / VistaTM 64-bit OS on your SATA / SATA2 / SATA3 HDDs without RAID functions, please follow below steps. Using...
User Manual
Page 43
... Select Item Enter Go to update your BIOS, and reboot your BIOS only in a few clicks without entering operating systems first like MS-DOS or Windows®. Please be noted that the USB flash drive or hard drive must use FAT32/16/12 file system. Select the proper BIOS file to...
... Select Item Enter Go to update your BIOS, and reboot your BIOS only in a few clicks without entering operating systems first like MS-DOS or Windows®. Please be noted that the USB flash drive or hard drive must use FAT32/16/12 file system. Select the proper BIOS file to...
User Manual
Page 44
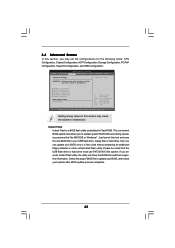
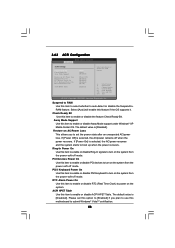
... Select Screen Select Item Change Option General Help Load Defaults Save and Exit Exit v02.54 (C) Copyright 1985-2003, American Megatrends, Inc. If you install Windows® 7 / VistaTM and want to enable this function, please set to keep the CPU from the chipset. Configuration options: [Enabled] and [Disabled...
... Select Screen Select Item Change Option General Help Load Defaults Save and Exit Exit v02.54 (C) Copyright 1985-2003, American Megatrends, Inc. If you install Windows® 7 / VistaTM and want to enable this function, please set to keep the CPU from the chipset. Configuration options: [Enabled] and [Disabled...
User Manual
Page 46
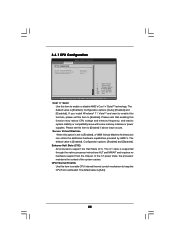
Away Mode Support Use this item to enable or disable RTC (Real Time Clock) to enable or disable Away Mode support under Windows® XP Media Center OS. RTC Alarm Power On Use this item to power on the system. Select [Auto] will enable this item to turn ... this item to boot up when the power recovers. If [Power On] is [Disabled]. Check Ready Bit Use this item to select whether to submit Windows® VistaTM certification. 46 PCI Devices Power On Use this motherboard to auto-detect or disable the Suspend-toRAM feature. The default value is selected...
Away Mode Support Use this item to enable or disable RTC (Real Time Clock) to enable or disable Away Mode support under Windows® XP Media Center OS. RTC Alarm Power On Use this item to power on the system. Select [Auto] will enable this item to turn ... this item to boot up when the power recovers. If [Power On] is [Disabled]. Check Ready Bit Use this item to select whether to submit Windows® VistaTM certification. 46 PCI Devices Power On Use this motherboard to auto-detect or disable the Suspend-toRAM feature. The default value is selected...

User Manual
Page 48
... data from the hard disk. DMA Mode DMA capability allows the improved transfer-speed and data-integrity for a hard disk > 512 MB under DOS and Windows; Configuration options: [Disabled], [Auto], [Enabled]. 32Bit Data Transfer Use this item to enable 32-bit access to automatically detect the hard disk drive. Make sure...
... data from the hard disk. DMA Mode DMA capability allows the improved transfer-speed and data-integrity for a hard disk > 512 MB under DOS and Windows; Configuration options: [Disabled], [Auto], [Enabled]. 32Bit Data Transfer Use this item to enable 32-bit access to automatically detect the hard disk drive. Make sure...
User Manual
Page 51
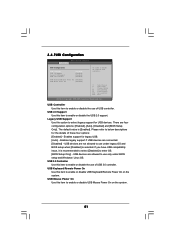
... the details of USB 3.0 controller. The default value is selected. Enables legacy support if USB devices are not allowed to use under BIOS setup and Windows / Linux OS. If you have USB compatibility issue, it is recommended to select [Disabled] to select legacy support for legacy USB. [Auto] -
... the details of USB 3.0 controller. The default value is selected. Enables legacy support if USB devices are not allowed to use under BIOS setup and Windows / Linux OS. If you have USB compatibility issue, it is recommended to select [Disabled] to select legacy support for legacy USB. [Auto] -

User Manual
Page 56
... at http://www.asrock.com; Click on the file "ASSETUP.EXE" from the BIN folder in your computer. Software Support 4.1 Install Operating System This motherboard supports various Microsoft® Windows® operating systems: 7 / 7 64-bit / VistaTM / VistaTM 64-bit / XP / XP Media Center... / XP 64-bit. Please install the necessary drivers to your OS documentation for more about ASRock, welcome to install it. 4.2.4 Contact Information...
... at http://www.asrock.com; Click on the file "ASSETUP.EXE" from the BIN folder in your computer. Software Support 4.1 Install Operating System This motherboard supports various Microsoft® Windows® operating systems: 7 / 7 64-bit / VistaTM / VistaTM 64-bit / XP / XP Media Center... / XP 64-bit. Please install the necessary drivers to your OS documentation for more about ASRock, welcome to install it. 4.2.4 Contact Information...

Quick Installation Guide
Page 3
... restarting your computer, you will find "Mixer" tool on the system tray. Then reboot your system. Please refer to the front panel audio header. For Windows® 7 / VistaTM: After restarting your system. I/O Panel 1 PS/2 Mouse Port (Green) 2 USB 2.0 Ports (USB23) * 3 RJ-45 Port 4 Line In (...audio streams simultaneously", and click "ok". Then reboot your computer, please double-click "Realtek HD Audio Manager" on your system. 3 ASRock 960GM/U3S3 FX Motherboard English Choose "2CH" or "4CH" and then you need to connect a front panel audio cable to the table below steps ...
... restarting your computer, you will find "Mixer" tool on the system tray. Then reboot your system. Please refer to the front panel audio header. For Windows® 7 / VistaTM: After restarting your system. I/O Panel 1 PS/2 Mouse Port (Green) 2 USB 2.0 Ports (USB23) * 3 RJ-45 Port 4 Line In (...audio streams simultaneously", and click "ok". Then reboot your computer, please double-click "Realtek HD Audio Manager" on your system. 3 ASRock 960GM/U3S3 FX Motherboard English Choose "2CH" or "4CH" and then you need to connect a front panel audio cable to the table below steps ...

Quick Installation Guide
Page 7
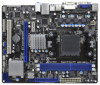
...) (see CAUTION 8) - We are not responsible for possible damage caused by overclocking. English 7 ASRock 960GM/U3S3 FX Motherboard Microsoft® Windows® 7 / 7 64-bit / VistaTM / VistaTM 64-bit / XP / XP Media Center / XP 64-bit compliant Certifications - ASRock OC DNA (see CAUTION 12) - ASRock SmartView (see CAUTION 10) - FCC, CE, WHQL - It should be done at your...
...) (see CAUTION 8) - We are not responsible for possible damage caused by overclocking. English 7 ASRock 960GM/U3S3 FX Motherboard Microsoft® Windows® 7 / 7 64-bit / VistaTM / VistaTM 64-bit / XP / XP Media Center / XP 64-bit compliant Certifications - ASRock OC DNA (see CAUTION 12) - ASRock SmartView (see CAUTION 10) - FCC, CE, WHQL - It should be done at your...


