User Manual
Page 5
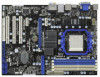
... motherboard specifications and the BIOS software might be updated, the content of this manual occur, the updated version will be subject to this manual will be available on ASRock website as well. In case any modifications of this motherboard, please visit our website for purchasing ASRock 880GXH/USB3 motherboard, a reliable motherboard produced under ASRock's consistently stringent quality control...
... motherboard specifications and the BIOS software might be updated, the content of this manual occur, the updated version will be subject to this manual will be available on ASRock website as well. In case any modifications of this motherboard, please visit our website for purchasing ASRock 880GXH/USB3 motherboard, a reliable motherboard produced under ASRock's consistently stringent quality control...

User Manual
Page 10
... first like MS-DOS or Windows®. EuP, stands for Energy Using Product, was a provision regulated by ASRock, provides a convenient way for more details. 10 This convenient BIOS update tool allows you can save the new BIOS file to Intel's suggestion, the EuP ready power supply must use FAT32/16/12 file system. 11...
... first like MS-DOS or Windows®. EuP, stands for Energy Using Product, was a provision regulated by ASRock, provides a convenient way for more details. 10 This convenient BIOS update tool allows you can save the new BIOS file to Intel's suggestion, the EuP ready power supply must use FAT32/16/12 file system. 11...

User Manual
Page 21
.... Please visit our website for ATITM Hybrid CrossFireXTM. Install the onboard VGA driver from our support CD to enter BIOS setup. Step 6. ATI Catalyst Control Center 21 2.6 ATITM Hybrid CrossFireXTM Operation Guide This motherboard supports ATITM Hybrid CrossFireXTM feature. For the... slot. Please refer to PCIE2 slot (blue). Install one compatible PCI Express graphics card to below PCI Express graphics card support list for updated information. Connect the monitor cable to [Enabled]. Boot your computer. Enter "Advanced" screen, and enter "Chipset Settings". Then set the ...
.... Please visit our website for ATITM Hybrid CrossFireXTM. Install the onboard VGA driver from our support CD to enter BIOS setup. Step 6. ATI Catalyst Control Center 21 2.6 ATITM Hybrid CrossFireXTM Operation Guide This motherboard supports ATITM Hybrid CrossFireXTM feature. For the... slot. Please refer to PCIE2 slot (blue). Install one compatible PCI Express graphics card to below PCI Express graphics card support list for updated information. Connect the monitor cable to [Enabled]. Boot your computer. Enter "Advanced" screen, and enter "Chipset Settings". Then set the ...

User Manual
Page 23
... from the power supply. The data in CMOS. After waiting for 15 seconds, use a jumper cap to clear the CMOS when you just finish updating the BIOS, you need to short pin2 and pin3 on pins, the jumper is "Short". Note: To select +5V_DUAL, it requires 2 Amp and higher... standby current provided by power supply. When you update the BIOS. To clear and reset the system parameters to +5V. However, please do the clear-CMOS action. 23 2.7 Jumpers Setup The illustration shows how ...
... from the power supply. The data in CMOS. After waiting for 15 seconds, use a jumper cap to clear the CMOS when you just finish updating the BIOS, you need to short pin2 and pin3 on pins, the jumper is "Short". Note: To select +5V_DUAL, it requires 2 Amp and higher... standby current provided by power supply. When you update the BIOS. To clear and reset the system parameters to +5V. However, please do the clear-CMOS action. 23 2.7 Jumpers Setup The illustration shows how ...

User Manual
Page 38
... BIOS software is constantly being updated, the following selections: Main To set up the system time/date information OC Tweaker To set up overclocking features Advanced To set up the advanced BIOS features H/W Monitor To display current hardware status Boot To set up the default system device to enter the BIOS...the system off and then back on your system. 3. You may also restart by pressing the reset button on the motherboard stores the BIOS SETUP UTILITY. If you wish to locate and load the Operating System Security To set up the computer. Please press or during the...
... BIOS software is constantly being updated, the following selections: Main To set up the system time/date information OC Tweaker To set up overclocking features Advanced To set up the advanced BIOS features H/W Monitor To display current hardware status Boot To set up the default system device to enter the BIOS...the system off and then back on your system. 3. You may also restart by pressing the reset button on the motherboard stores the BIOS SETUP UTILITY. If you wish to locate and load the Operating System Security To set up the computer. Please press or during the...

User Manual
Page 39
... H/W Monitor Boot Security Exit System Overview System Time System Date [17:00:09] [Tue 04/13/2010] BIOS Version : 880GXH/USB3 P1.00 Processor Type : AMD Athlon(tm) II X4 620 Processor (64bit) Processor Speed : 2700MHz Microcode Update : 100F41/1000086 L1 Cache Size : 512KB L2 Cache Size : 2048KB L3 Cache Size : 6144KB Total Memory.... 39 System Date [Day Month/Date/Year] Use this item to the Exit Screen or exit the current screen 3.2 Main Screen When you enter the BIOS SETUP UTILITY, the Main screen will appear and display the system overview.
... H/W Monitor Boot Security Exit System Overview System Time System Date [17:00:09] [Tue 04/13/2010] BIOS Version : 880GXH/USB3 P1.00 Processor Type : AMD Athlon(tm) II X4 620 Processor (64bit) Processor Speed : 2700MHz Microcode Update : 100F41/1000086 L1 Cache Size : 512KB L2 Cache Size : 2048KB L3 Cache Size : 6144KB Total Memory.... 39 System Date [Day Month/Date/Year] Use this item to the Exit Screen or exit the current screen 3.2 Main Screen When you enter the BIOS SETUP UTILITY, the Main screen will appear and display the system overview.

User Manual
Page 48
... for CPU WARNING : Setting wrong values in Flash ROM. CPU Configuration Chipset Configuration ACPI Configuration Storage Configuration PCIPnP Configuration Floppy Configuration SuperIO Configuration USB Configuration BIOS Update Utility ASRock Instant Flash Select Screen Select Item Enter Go to malfunction. Setting wrong values in a few clicks without entering operating systems first like MS-DOS...
... for CPU WARNING : Setting wrong values in Flash ROM. CPU Configuration Chipset Configuration ACPI Configuration Storage Configuration PCIPnP Configuration Floppy Configuration SuperIO Configuration USB Configuration BIOS Update Utility ASRock Instant Flash Select Screen Select Item Enter Go to malfunction. Setting wrong values in a few clicks without entering operating systems first like MS-DOS...
Quick Installation Guide
Page 4
... and endurance. Because the motherboard specifications and the BIOS software might be updated, the content of this motherboard, please visit our website for specific information about the model you for purchasing ASRock 880GXH/USB3 motherboard, a reliable motherboard produced under ASRock's consistently stringent quality control. ASRock website http://www.asrock.com If you require technical support related to this...
... and endurance. Because the motherboard specifications and the BIOS software might be updated, the content of this motherboard, please visit our website for specific information about the model you for purchasing ASRock 880GXH/USB3 motherboard, a reliable motherboard produced under ASRock's consistently stringent quality control. ASRock website http://www.asrock.com If you require technical support related to this...

Quick Installation Guide
Page 9
...BIOS setup menu to update system BIOS without preparing an additional floppy diskette or other than 50% under 100 mA current consumption. Before you what it is detected, the system will automatically shutdown. To improve heat dissipation, remember to define the power consumption for more details. 9 ASRock 880GXH/USB3... Motherboard English EuP, stands for Energy Using Product, was a provision regulated by ASRock, provides a convenient way for the user to get the same OC settings...
...BIOS setup menu to update system BIOS without preparing an additional floppy diskette or other than 50% under 100 mA current consumption. Before you what it is detected, the system will automatically shutdown. To improve heat dissipation, remember to define the power consumption for more details. 9 ASRock 880GXH/USB3... Motherboard English EuP, stands for Energy Using Product, was a provision regulated by ASRock, provides a convenient way for the user to get the same OC settings...
Quick Installation Guide
Page 18
...Restart your system. English ATI Catalyst Control Center 18 ASRock 880GXH/USB3 Motherboard Please refer to section "Expansion Slots". Step... graphics processor and a motherboard based on PCIE2 slot. Connect the monitor cable to enter BIOS setup. What does an ATITM Hybrid CrossFireXTM system include? Press to the correspondent connector on...one compatible PCI Express graphics card to a single display for updated information. Please visit our website for blisteringly-fast frame rates. For the future update of ATITM Hybrid CrossFireXTM Step 1. Step 4. 2.6 ATITM ...
...Restart your system. English ATI Catalyst Control Center 18 ASRock 880GXH/USB3 Motherboard Please refer to section "Expansion Slots". Step... graphics processor and a motherboard based on PCIE2 slot. Connect the monitor cable to enter BIOS setup. What does an ATITM Hybrid CrossFireXTM system include? Press to the correspondent connector on...one compatible PCI Express graphics card to a single display for updated information. Please visit our website for blisteringly-fast frame rates. For the future update of ATITM Hybrid CrossFireXTM Step 1. Step 4. 2.6 ATITM ...

Quick Installation Guide
Page 20
... date, time, and system setup parameters. USB_PW1 Short pin2, pin3 to clear the CMOS when you just finish updating the BIOS, you must boot up the system first, and then shut it requires 2 Amp and higher standby current provided ... Amp and higher standby current provided by power supply. To clear and reset the system parameters to +5V. When you update the BIOS. Note: To select +5VSB, it requires 2 Amp and higher standby current provided by power supply. The data in .../45 wake up events. However, please do the clear-CMOS action. 20 ASRock 880GXH/USB3 Motherboard
... date, time, and system setup parameters. USB_PW1 Short pin2, pin3 to clear the CMOS when you just finish updating the BIOS, you must boot up the system first, and then shut it requires 2 Amp and higher standby current provided ... Amp and higher standby current provided by power supply. To clear and reset the system parameters to +5V. When you update the BIOS. Note: To select +5VSB, it requires 2 Amp and higher standby current provided by power supply. The data in .../45 wake up events. However, please do the clear-CMOS action. 20 ASRock 880GXH/USB3 Motherboard


