RAID Installation Guide
Page 2
... a SATA / SATAII / SATA3 driver diskette, press or to enter BIOS setup to set the option to RAID mode by following the detailed instruction of the "User Manual" in the other drive if one drive fails. RAID 10 (Stripe Mirroring) RAID 0 drives can improve the access performance, it does not provide any HDDs of the RAID 0 Disk will direct all applications to a second drive. AMD BIOS RAID Installation Guide AMD BIOS RAID Installation Guide is a method combining two or more hard disk drives into one drive to...
... a SATA / SATAII / SATA3 driver diskette, press or to enter BIOS setup to set the option to RAID mode by following the detailed instruction of the "User Manual" in the other drive if one drive fails. RAID 10 (Stripe Mirroring) RAID 0 drives can improve the access performance, it does not provide any HDDs of the RAID 0 Disk will direct all applications to a second drive. AMD BIOS RAID Installation Guide AMD BIOS RAID Installation Guide is a method combining two or more hard disk drives into one drive to...
RAID Installation Guide
Page 4
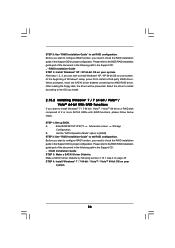
...-bit on your system. Set the "SATA Operation Mode" option to generate Serial ATA driver diskette [YN]?", press . A. Insert the ASRock Support CD into the floppy diskette. D. Please refer to set RAID configuration, you create RAID functions. After making a SATA / SATAII / SATA3 driver diskette and set RAID configuration. When 4 Please backup your system. A. During POST at the beginning of 2 or more SATA / SATAII / SATA3 HDDs with RAID functions, please follow below steps. STEP 3: Use "RAID Installation Guide...
...-bit on your system. Set the "SATA Operation Mode" option to generate Serial ATA driver diskette [YN]?", press . A. Insert the ASRock Support CD into the floppy diskette. D. Please refer to set RAID configuration, you create RAID functions. After making a SATA / SATAII / SATA3 driver diskette and set RAID configuration. When 4 Please backup your system. A. During POST at the beginning of 2 or more SATA / SATAII / SATA3 HDDs with RAID functions, please follow below steps. STEP 3: Use "RAID Installation Guide...
RAID Installation Guide
Page 5
... more SATA / SATAII / SATA3 HDDs with RAID functions, please follow below steps. Enter BIOS SETUP UTILITY → Advanced screen →Storage Configuration. After reading the floppy disk, the driver will be presented. Select your required driver to install according to the OS you install. 1.3.2 Installing Windows 7 / 7 64-bit / Vista / Vista 64-bit With RAID Functions If you need to install Windows 7 / 7 64-bit / Vista / Vista 64-bit on your system. 5 STEP 2: Use "RAID Installation Guide" to [RAID]. Before you start to configure RAID...
... more SATA / SATAII / SATA3 HDDs with RAID functions, please follow below steps. Enter BIOS SETUP UTILITY → Advanced screen →Storage Configuration. After reading the floppy disk, the driver will be presented. Select your required driver to install according to the OS you install. 1.3.2 Installing Windows 7 / 7 64-bit / Vista / Vista 64-bit With RAID Functions If you need to install Windows 7 / 7 64-bit / Vista / Vista 64-bit on your system. 5 STEP 2: Use "RAID Installation Guide" to [RAID]. Before you start to configure RAID...

RAID Installation Guide
Page 10
..., memory cache management, drive event logging, logical drive maintenance, rebuild, and access to configure RAID functions by using RAIDXpert RAID management software under the same directory where RAIDXpert is already running, exit all AMD SB850 SATA logical drives that may be present on your CD-ROM drive. 3. When the first installation screen appears, choose an installer language from the dropdown menu. 10 RAIDXpert is an instruction for you must use...
..., memory cache management, drive event logging, logical drive maintenance, rebuild, and access to configure RAID functions by using RAIDXpert RAID management software under the same directory where RAIDXpert is already running, exit all AMD SB850 SATA logical drives that may be present on your CD-ROM drive. 3. When the first installation screen appears, choose an installer language from the dropdown menu. 10 RAIDXpert is an instruction for you must use...
User Manual
Page 7
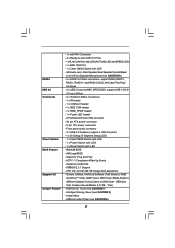
...- Drivers, Utilities, AntiVirus Software (Trial Version), AMD OverDriveTM Utility, AMD Fusion, AMD Fusion Media Explorer, ASRock Software Suite (CyberLink DVD Suite - ASRock OC Tuner (see CAUTION 6) - 5 x SATA3 6.0 Gb/s connectors, support RAID (RAID 0, RAID 1, RAID 0+1 and RAID 5), NCQ, AHCI and "Hot Plug" functions - 2 x USB 3.0 port by NEC MPD720200, support USB 1.0/2.0/ 3.0 up to -Use USB 3.0 Ports - 1 x RJ-45 LAN Port with LED (ACT/LINK LED and SPEED LED) - 1 x IEEE 1394 Port - 1 x Clear CMOS Switch with LED - 8Mb AMI BIOS - Front panel audio connector - 3 x USB 2.0 headers (support...
...- Drivers, Utilities, AntiVirus Software (Trial Version), AMD OverDriveTM Utility, AMD Fusion, AMD Fusion Media Explorer, ASRock Software Suite (CyberLink DVD Suite - ASRock OC Tuner (see CAUTION 6) - 5 x SATA3 6.0 Gb/s connectors, support RAID (RAID 0, RAID 1, RAID 0+1 and RAID 5), NCQ, AHCI and "Hot Plug" functions - 2 x USB 3.0 port by NEC MPD720200, support USB 1.0/2.0/ 3.0 up to -Use USB 3.0 Ports - 1 x RJ-45 LAN Port with LED (ACT/LINK LED and SPEED LED) - 1 x IEEE 1394 Port - 1 x Clear CMOS Switch with LED - 8Mb AMI BIOS - Front panel audio connector - 3 x USB 2.0 headers (support...
User Manual
Page 10
... the POST or press key to BIOS setup menu to spray thermal grease between the CPU and the heatsink when you can save your OC settings as yours! To improve heat dissipation, remember to access ASRock Instant Flash. OC DNA literally tells you checking with others. With this motherboard offers stepless control, it is higher than the recommended CPU bus frequencies may cause the instability of overclocking settings...
... the POST or press key to BIOS setup menu to spray thermal grease between the CPU and the heatsink when you can save your OC settings as yours! To improve heat dissipation, remember to access ASRock Instant Flash. OC DNA literally tells you checking with others. With this motherboard offers stepless control, it is higher than the recommended CPU bus frequencies may cause the instability of overclocking settings...
User Manual
Page 11
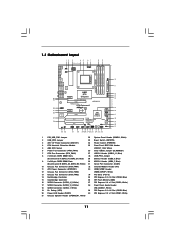
... 11 12 13 14 15 16 17 18 19 20 21 1 PS2_USB_PW1 Jumper 22 System Panel Header (PANEL1, White) 2 USB_PW2 Jumper 23 Reset Switch (RSTBTN) 3 ATX 12V Power Connector (ATX12V1) 24 Power Switch (PWRBTN) 4 CPU Heatsink Retention Module 25 Front Panel IEEE 1394 Header 5 AM3 CPU Socket (FRONT_1394, White) 6 Power Fan Connector (PWR_FAN1) 26 Clear CMOS Jumper (CLRCMOS1) 7 CPU Fan Connector (CPU_FAN1) 27 USB 2.0 Header (USB10_11, Blue) 8 2 x 240-pin DDR3 DIMM Slots 28 USB_PW3 Jumper (Dual Channel A: DDR3_A1, DDR3_B1; White) 21 Chassis Speaker Header (SPEAKER 1, White) 11
... 11 12 13 14 15 16 17 18 19 20 21 1 PS2_USB_PW1 Jumper 22 System Panel Header (PANEL1, White) 2 USB_PW2 Jumper 23 Reset Switch (RSTBTN) 3 ATX 12V Power Connector (ATX12V1) 24 Power Switch (PWRBTN) 4 CPU Heatsink Retention Module 25 Front Panel IEEE 1394 Header 5 AM3 CPU Socket (FRONT_1394, White) 6 Power Fan Connector (PWR_FAN1) 26 Clear CMOS Jumper (CLRCMOS1) 7 CPU Fan Connector (CPU_FAN1) 27 USB 2.0 Header (USB10_11, Blue) 8 2 x 240-pin DDR3 DIMM Slots 28 USB_PW3 Jumper (Dual Channel A: DDR3_A1, DDR3_B1; White) 21 Chassis Speaker Header (SPEAKER 1, White) 11

User Manual
Page 12
... (Orange) 7 Line In (Light Blue) ** 8 Front Speaker (Lime) 9 Microphone (Pink) 13 12 11 10 10 USB 3.0 Port (USB3_01) 11 IEEE 1394 Port (IEEE 1394) 12 eSATAIII Connector 13 USB 2.0 Ports (USB23) 14 Clear CMOS Switch (CLRCBTN) 15 Optical SPDIF Out Port 16 Coaxial SPDIF Out Port 17 PS/2 Keyboard Port (Purple) * There are allowed to select "Realtek HDA Primary output" to use front panel audio. 12 Please refer to the LAN port.
... (Orange) 7 Line In (Light Blue) ** 8 Front Speaker (Lime) 9 Microphone (Pink) 13 12 11 10 10 USB 3.0 Port (USB3_01) 11 IEEE 1394 Port (IEEE 1394) 12 eSATAIII Connector 13 USB 2.0 Ports (USB23) 14 Clear CMOS Switch (CLRCBTN) 15 Optical SPDIF Out Port 16 Coaxial SPDIF Out Port 17 PS/2 Keyboard Port (Purple) * There are allowed to select "Realtek HDA Primary output" to use front panel audio. 12 Please refer to the LAN port.
User Manual
Page 20
... Microsoft website for details. Install the VGA card drivers to installation. Remove the ATITM driver if you will find "ATI Catalyst Control Center" on your system, there is an optional download. Please check AMD website for ATITM driver updates. 2.5.2 Driver Installation and Setup Step 1. The Catalyst Uninstaller is no need to uninstall any VGA driver installed in your computer and boot into OS. We recommend using this utility to download it again): http...
... Microsoft website for details. Install the VGA card drivers to installation. Remove the ATITM driver if you will find "ATI Catalyst Control Center" on your system, there is an optional download. Please check AMD website for ATITM driver updates. 2.5.2 Driver Installation and Setup Step 1. The Catalyst Uninstaller is no need to uninstall any VGA driver installed in your computer and boot into OS. We recommend using this utility to download it again): http...
User Manual
Page 30
..., update CMOS with power-on CMOS setup questions. Uncompress all the output devices. Initializes both the 8259 compatible PICs in PIC for IRQ1. Traps the INT09h vector, so that are the largest set up boot strap proccessor for boot strap proccessor Early CPU Init Exit Initializes the 8042 compatible Key Board Controller. Uncompress and initialize any platform specific BIOS modules. The POST code checkpoints are based on default values and clear passwords...
..., update CMOS with power-on CMOS setup questions. Uncompress all the output devices. Initializes both the 8259 compatible PICs in PIC for IRQ1. Traps the INT09h vector, so that are the largest set up boot strap proccessor for boot strap proccessor Early CPU Init Exit Initializes the 8042 compatible Key Board Controller. Uncompress and initialize any platform specific BIOS modules. The POST code checkpoints are based on default values and clear passwords...
User Manual
Page 31
... ACPI. 00 Passes control to limit memory test. Prepares the runtime language module. A9 Wait for Int 19 boot. Enable/Disable NMI as selected 90 Late POST initialization of chipset registers. AB Prepare BBS for user input at config display if needed / requested. 8C Late POST initialization of ESCD in F000h segment with 0FFh. Also, Check for error. 87 Execute BIOS setup if needed . Allocates memory...
... ACPI. 00 Passes control to limit memory test. Prepares the runtime language module. A9 Wait for Int 19 boot. Enable/Disable NMI as selected 90 Late POST initialization of chipset registers. AB Prepare BBS for user input at config display if needed / requested. 8C Late POST initialization of ESCD in F000h segment with 0FFh. Also, Check for error. 87 Execute BIOS setup if needed . Allocates memory...
User Manual
Page 33
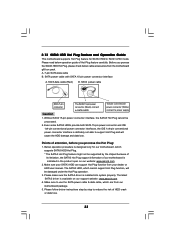
... to power supply 1. The latest SATA3 driver is installed into system properly. 2.13 SATA3 HDD Hot Plug Feature and Operation Guide This motherboard supports Hot Plug feature for our motherboard, which are from your dealer or HDD user manual. Points of our motherboard is indicated in RAID / AHCI mode. SATA power cable SATA 7-pin connector Caution The SATA 15-pin power connector (Black) connect to SATA3 HDD 1x4-pin conventional power connector (White) connect to use the SATA power cable & data cable, which supports SATA3 HDD Hot Plug. * The SATA3 Hot Plug feature...
... to power supply 1. The latest SATA3 driver is installed into system properly. 2.13 SATA3 HDD Hot Plug Feature and Operation Guide This motherboard supports Hot Plug feature for our motherboard, which are from your dealer or HDD user manual. Points of our motherboard is indicated in RAID / AHCI mode. SATA power cable SATA 7-pin connector Caution The SATA 15-pin power connector (Black) connect to SATA3 HDD 1x4-pin conventional power connector (White) connect to use the SATA power cable & data cable, which supports SATA3 HDD Hot Plug. * The SATA3 Hot Plug feature...
User Manual
Page 35
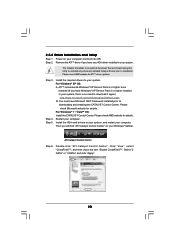
... HDDs with RAID functions, please follow below steps. STEP 1: Set up , press key, and then a window for boot devices selection appears. Then you want to install Windows® 7 / 7 64-bit / VistaTM / VistaTM 64-bit / XP / XP 64-bit on the screen, "Generate Serial ATA driver diskette [YN]?", press . Enter BIOS SETUP UTILITY Advanced screen Storage Configuration. Set the "SATA Operation Mode" option to [RAID]. D. STEP 2: Make a SATA3 Driver Diskette. (Please use USB floppy or floppy disk.) A. C. A. E. Please select CD- The system will be auto...
... HDDs with RAID functions, please follow below steps. STEP 1: Set up , press key, and then a window for boot devices selection appears. Then you want to install Windows® 7 / 7 64-bit / VistaTM / VistaTM 64-bit / XP / XP 64-bit on the screen, "Generate Serial ATA driver diskette [YN]?", press . Enter BIOS SETUP UTILITY Advanced screen Storage Configuration. Set the "SATA Operation Mode" option to [RAID]. D. STEP 2: Make a SATA3 Driver Diskette. (Please use USB floppy or floppy disk.) A. C. A. E. Please select CD- The system will be auto...
User Manual
Page 36
... for proper configuration. Enter BIOS SETUP UTILITY Advanced screen Storage Configuration. STEP 1: Set up BIOS. Please refer to check the RAID installation guide in the Support CD: .. \ RAID Installation Guide STEP 3: Make a SATA3 Driver Diskette. After step 1, 2, 3, you need to the BIOS RAID installation guide part of the document in the following path in the Support CD: .. \ RAID Installation Guide STEP 4: Install Windows® XP / XP 64-bit OS on a RAID disk composed of Windows® setup, press F6 to check the RAID installation guide in the...
... for proper configuration. Enter BIOS SETUP UTILITY Advanced screen Storage Configuration. STEP 1: Set up BIOS. Please refer to check the RAID installation guide in the Support CD: .. \ RAID Installation Guide STEP 3: Make a SATA3 Driver Diskette. After step 1, 2, 3, you need to the BIOS RAID installation guide part of the document in the following path in the Support CD: .. \ RAID Installation Guide STEP 4: Install Windows® XP / XP 64-bit OS on a RAID disk composed of Windows® setup, press F6 to check the RAID installation guide in the...

User Manual
Page 42
... adjust CPU Active Core Control feature. BIOS SETUP UTILITY Main OC Tweaker Advanced H/W Monitor Boot Security Exit EZ Overclocking Load Optimized CPU OC Setting [Press Enter] CPU Configuration Overclock Mode CPU Frequency (MHZ) PCIE Frequency (MHz) Spread Spectrum Boot Failure Guard Boot Failure Guard Count ASRock UCC CPU Active Core Control [Auto] [200] [100] [Auto] [Enabled] [3] [Disabled] [All Cores] Processor Maximum Frequency x31.5 6300 MHZ North Bridge Maximum Frequency x31.0 6200 MHZ Processor Maximum Voltage 1.5500 V Multiplier/Voltage Change [Manual] Overclocking may...
... adjust CPU Active Core Control feature. BIOS SETUP UTILITY Main OC Tweaker Advanced H/W Monitor Boot Security Exit EZ Overclocking Load Optimized CPU OC Setting [Press Enter] CPU Configuration Overclock Mode CPU Frequency (MHZ) PCIE Frequency (MHz) Spread Spectrum Boot Failure Guard Boot Failure Guard Count ASRock UCC CPU Active Core Control [Auto] [200] [100] [Auto] [Enabled] [3] [Disabled] [All Cores] Processor Maximum Frequency x31.5 6300 MHZ North Bridge Maximum Frequency x31.0 6200 MHZ Processor Maximum Voltage 1.5500 V Multiplier/Voltage Change [Manual] Overclocking may...
User Manual
Page 50
... context of the system caches. The default value is set this function may reduce CPU voltage and memory freq., and lead to system stability or compatibility issue with some memory modules or power supplies. 3.4.1 CPU Configuration Advanced CPU Configuration Cool 'n' Quiet Secure Virtual Machine Enhanced Halt State L3 Cache Allocation CPU Thermal Throttle BIOS SETUP UTILITY [Auto] [Enabled] [Disabled] [Auto] [Disabled] Enabling this item to [Disabled] if above issue occurs. Configuration options: [Disabled], [Auto], [12.5%], [25%], [37.5%], [50%], [62...
... context of the system caches. The default value is set this function may reduce CPU voltage and memory freq., and lead to system stability or compatibility issue with some memory modules or power supplies. 3.4.1 CPU Configuration Advanced CPU Configuration Cool 'n' Quiet Secure Virtual Machine Enhanced Halt State L3 Cache Allocation CPU Thermal Throttle BIOS SETUP UTILITY [Auto] [Enabled] [Disabled] [Auto] [Disabled] Enabling this item to [Disabled] if above issue occurs. Configuration options: [Disabled], [Auto], [12.5%], [25%], [37.5%], [50%], [62...
User Manual
Page 53
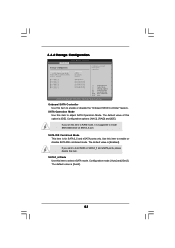
... SATA3_5 and eSATA ports only. The default value is suggested to select eSATA mode. Configuration mode: [Auto] and [Gen2]. 3.4.4 Storage Configuration BIOS SETUP UTILITY Advanced Storage Configuration Onboard SATA Controller SATA Operation Mode SATA IDE Combined Mode SATA3_6 Mode SATA3_1 SATA3_2 SATA3_3 SATA3_4 SATA3_5 SATA3_6 [Enabled] [IDE] [Enabled] [Gen2] [Hard Disk] [Not Detected] [Not Detected] [Not Detected] [Not Detected] [Not Detected] Configure onboard serial ATA controller. +F1 F9 F10 ESC Select Screen Select Item Change Option General Help Load Defaults Save and Exit...
... SATA3_5 and eSATA ports only. The default value is suggested to select eSATA mode. Configuration mode: [Auto] and [Gen2]. 3.4.4 Storage Configuration BIOS SETUP UTILITY Advanced Storage Configuration Onboard SATA Controller SATA Operation Mode SATA IDE Combined Mode SATA3_6 Mode SATA3_1 SATA3_2 SATA3_3 SATA3_4 SATA3_5 SATA3_6 [Enabled] [IDE] [Enabled] [Gen2] [Hard Disk] [Not Detected] [Not Detected] [Not Detected] [Not Detected] [Not Detected] Configure onboard serial ATA controller. +F1 F9 F10 ESC Select Screen Select Item Change Option General Help Load Defaults Save and Exit...
User Manual
Page 57
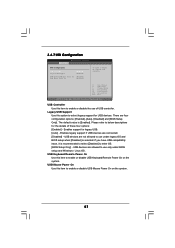
... of USB controller. USB Mouse Power On Use this item to select legacy support for USB devices. USB Controller Use this option to enable or disable USB Keyboard/Remote Power On on the system. 57 If you have USB compatibility issue, it is [Enabled]. 3.4.7 USB Configuration BIOS SETUP UTILITY Advanced USB Configuration USB Controller Legacy USB Support USB Keyboard/Remote Power On USB Mouse Power On [Enabled] [Enabled] [Disabled] [Disabled] To enable or disable the onboard USB controllers. +F1 F9 F10 ESC Select Screen Select Item Change Option General Help Load Defaults...
... of USB controller. USB Mouse Power On Use this item to select legacy support for USB devices. USB Controller Use this option to enable or disable USB Keyboard/Remote Power On on the system. 57 If you have USB compatibility issue, it is [Enabled]. 3.4.7 USB Configuration BIOS SETUP UTILITY Advanced USB Configuration USB Controller Legacy USB Support USB Keyboard/Remote Power On USB Mouse Power On [Enabled] [Enabled] [Disabled] [Disabled] To enable or disable the onboard USB controllers. +F1 F9 F10 ESC Select Screen Select Item Change Option General Help Load Defaults...
User Manual
Page 60
The default value is set or change the supervisor/user password for the system. Currently, the option [Auto] is set to enable or disable the Boot From Onboard LAN feature. Boot From Onboard LAN Use this item to Aircraft. Boot Up Num-Lock If this item is [Auto]. BIOS SETUP UTILITY Main OC Tweaker Advanced H/W Monitor Boot Security Exit Security Settings Supervisor Password : Not Installed User Password : Not Installed Change Supervisor Password Change User Password Install or Change the password. For the user password, you enable the option "Full Screen Logo". This option ...
The default value is set or change the supervisor/user password for the system. Currently, the option [Auto] is set to enable or disable the Boot From Onboard LAN feature. Boot From Onboard LAN Use this item to Aircraft. Boot Up Num-Lock If this item is [Auto]. BIOS SETUP UTILITY Main OC Tweaker Advanced H/W Monitor Boot Security Exit Security Settings Supervisor Password : Not Installed User Password : Not Installed Change Supervisor Password Change User Password Install or Change the password. For the user password, you enable the option "Full Screen Logo". This option ...
User Manual
Page 62
... necessary drivers and useful utilities that the motherboard supports. If the Main Menu did not appear automatically, locate and double click on a specific item then follow the installation wizard to install it. 4.2.4 Contact Information If you may contact your CD-ROM drive. Refer to visit ASRock's website at http://www.asrock.com; Because motherboard settings and hardware options vary, use the setup procedures in the Support CD to activate the devices. 4.2.3 Utilities Menu The Utilities Menu...
... necessary drivers and useful utilities that the motherboard supports. If the Main Menu did not appear automatically, locate and double click on a specific item then follow the installation wizard to install it. 4.2.4 Contact Information If you may contact your CD-ROM drive. Refer to visit ASRock's website at http://www.asrock.com; Because motherboard settings and hardware options vary, use the setup procedures in the Support CD to activate the devices. 4.2.3 Utilities Menu The Utilities Menu...


