
RAID Installation Guide
Page 3
..." or not. You may use two new drives, or use two drives of the same size or larger than the existing drive). If you have booted with the disk drives installed, the ATI onboard BIOS will operate under a clean environment. 1.3 Create Disk Array Power on your future data building will display...
..." or not. You may use two new drives, or use two drives of the same size or larger than the existing drive). If you have booted with the disk drives installed, the ATI onboard BIOS will operate under a clean environment. 1.3 Create Disk Array Power on your future data building will display...

RAID Installation Guide
Page 8
...-Based Promise Array Management) software offers local and remote management and monitoring of RAID controllers are not supported. You must have one of all programs. 2. Boot up the PC/server and launch Windows. Insert the software CD into your system. 2.2 Browser Support On the Host PC with the ATI SB600 SATA...
...-Based Promise Array Management) software offers local and remote management and monitoring of RAID controllers are not supported. You must have one of all programs. 2. Boot up the PC/server and launch Windows. Insert the software CD into your system. 2.2 Browser Support On the Host PC with the ATI SB600 SATA...

User Manual
Page 4
... Configuration 48 3.3.4 IDE Configuration 49 3.3.5 PCIPnP Configuration 51 3.3.6 Floppy Configuration 51 3.3.7 Super IO Configuration 52 3.3.8 USB Configuration 53 3.4 Hardware Health Event Monitoring Screen 54 3.5 Boot Screen 55 3.5.1 Boot Settings Configuration 56 3.6 Security Screen 56 3.7 Exit Screen 57 4. 2.18 Installing Windows® 2000 / XP / XP 64-bit / VistaTM / VistaTM 64-bit Without RAID...
... Configuration 48 3.3.4 IDE Configuration 49 3.3.5 PCIPnP Configuration 51 3.3.6 Floppy Configuration 51 3.3.7 Super IO Configuration 52 3.3.8 USB Configuration 53 3.4 Hardware Health Event Monitoring Screen 54 3.5 Boot Screen 55 3.5.1 Boot Settings Configuration 56 3.6 Security Screen 56 3.7 Exit Screen 57 4. 2.18 Installing Windows® 2000 / XP / XP 64-bit / VistaTM / VistaTM 64-bit Without RAID...

User Manual
Page 6
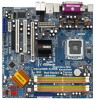
Supports Hyper-Threading Technology (see CAUTION 7) - Support DDRII800/667/533 - ASRock U-COP (see CAUTION 2) - Integrated ATITM X1250 graphics - Dual VGA Output: support DVI-D and D-Sub ports by independent display controllers -... all FSB1333/1066/800/533MHz CPUs (see CAUTION 4) - 4 x DDRII DIMM slots - Supports HDCP function with DVI-D port (see CAUTION 3) - Realtek RTL8111B - Southbridge: ATITM SB600 - Boot Failure Guard (B.F.G.) - 1 x PCI Express x16 slot - 1 x PCI Express x1 slot - 2 x PCI slots - 1 x HDMR slot - Supports Untied Overclocking Technology (see CAUTION ...
Supports Hyper-Threading Technology (see CAUTION 7) - Support DDRII800/667/533 - ASRock U-COP (see CAUTION 2) - Integrated ATITM X1250 graphics - Dual VGA Output: support DVI-D and D-Sub ports by independent display controllers -... all FSB1333/1066/800/533MHz CPUs (see CAUTION 4) - 4 x DDRII DIMM slots - Supports HDCP function with DVI-D port (see CAUTION 3) - Realtek RTL8111B - Southbridge: ATITM SB600 - Boot Failure Guard (B.F.G.) - 1 x PCI Express x16 slot - 1 x PCI Express x1 slot - 2 x PCI slots - 1 x HDMR slot - Supports Untied Overclocking Technology (see CAUTION ...

User Manual
Page 21
...-D and D-sub can freely enjoy the benefits of dual monitor function provided by VGA/DVI-D and VGA/D-Sub ports with this motherboard after your system boots. If you playback HDCP-protected video from our support CD to use dual monitor function provided by VGA/DVI-D and VGA/D-Sub ports with this...
...-D and D-sub can freely enjoy the benefits of dual monitor function provided by VGA/DVI-D and VGA/D-Sub ports with this motherboard after your system boots. If you playback HDCP-protected video from our support CD to use dual monitor function provided by VGA/DVI-D and VGA/D-Sub ports with this...

User Manual
Page 22
... this motherboard. 3. With the internal dual VGA output support (DVI-D and D-Sub) and the external add-on PCI Express VGA card driver to be similar.) A. Boot your system. Install the onboard VGA driver and the add-on PCI Express VGA card, you move items from one , two, three and four. 6. C. Click...
... this motherboard. 3. With the internal dual VGA output support (DVI-D and D-Sub) and the external add-on PCI Express VGA card driver to be similar.) A. Boot your system. Install the onboard VGA driver and the add-on PCI Express VGA card, you move items from one , two, three and four. 6. C. Click...

User Manual
Page 25
... jumper cap is placed on CLRCMOS1 for 5 seconds. Note: To select +5VSB, it down before you do not clear the CMOS right after you must boot up events. After waiting for PS/2 or USB wake up the system first, and then shut it requires 2 Amp and higher standby current provided by...
... jumper cap is placed on CLRCMOS1 for 5 seconds. Note: To select +5VSB, it down before you do not clear the CMOS right after you must boot up events. After waiting for PS/2 or USB wake up the system first, and then shut it requires 2 Amp and higher standby current provided by...
User Manual
Page 36
... Configuration. A. The system will start to format the floppy diskette and copy SATA / SATAII drivers into your optical drive to boot your system. (There are two ASRock Support CD in the Support CD for Windows® XP 64-bit.) NOTE1. Before you start to configure RAID function, you... RAID installation guide in the following path in the Support CD: .. \ RAID Installation Guide NOTE2. Then, please set RAID configuration. Insert the ASRock Support CD into the floppy diskette. Select the driver to install according to the OS you install "SATA2 Utility" from our support CD to ...
... Configuration. A. The system will start to format the floppy diskette and copy SATA / SATAII drivers into your optical drive to boot your system. (There are two ASRock Support CD in the Support CD for Windows® XP 64-bit.) NOTE1. Before you start to configure RAID function, you... RAID installation guide in the following path in the Support CD: .. \ RAID Installation Guide NOTE2. Then, please set RAID configuration. Insert the ASRock Support CD into the floppy diskette. Select the driver to install according to the OS you install "SATA2 Utility" from our support CD to ...
User Manual
Page 37
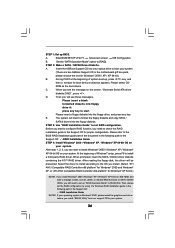
... "RAID Installation Guide" to [RAID]. Insert the Windows® VistaTM / Windows® VistaTM 64-bit optical disk into the optical drive to boot your system, and follow below steps. If you install Windows® VistaTM / Windows® VistaTM 64-bit on IDE HDDs and want to manage..., please choose the one for proper configuration. NOTE. When you see "Where do you want to install Windows?" page, please insert the ASRock Support CD into the optical drive again to continue the installation. Enter BIOS SETUP UTILITY Advanced screen IDE Configuration. B. A. Please refer to ...
... "RAID Installation Guide" to [RAID]. Insert the Windows® VistaTM / Windows® VistaTM 64-bit optical disk into the optical drive to boot your system, and follow below steps. If you install Windows® VistaTM / Windows® VistaTM 64-bit on IDE HDDs and want to manage..., please choose the one for proper configuration. NOTE. When you see "Where do you want to install Windows?" page, please insert the ASRock Support CD into the optical drive again to continue the installation. Enter BIOS SETUP UTILITY Advanced screen IDE Configuration. B. A. Please refer to ...

User Manual
Page 39
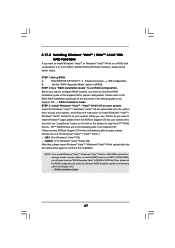
... start to install Windows® 2000 / Windows® XP / Windows® XP 64-bit OS on your system. page, please insert the ASRock Support CD into the optical drive to boot your system, and follow below steps. After step 1, 2, 3, you want to [non-RAID]. JBOD function on page 36. At the beginning...
... start to install Windows® 2000 / Windows® XP / Windows® XP 64-bit OS on your system. page, please insert the ASRock Support CD into the optical drive to boot your system, and follow below steps. After step 1, 2, 3, you want to [non-RAID]. JBOD function on page 36. At the beginning...

User Manual
Page 41
... following selections: Main To set up the system time/date information Advanced To set up the advanced BIOS features H/W Monitor To display current hardware status Boot To set up the default system device to configure your screen. 3.1.1 BIOS Menu Bar The top of the screen has a menu bar with its test...
... following selections: Main To set up the system time/date information Advanced To set up the advanced BIOS features H/W Monitor To display current hardware status Boot To set up the default system device to configure your screen. 3.1.1 BIOS Menu Bar The top of the screen has a menu bar with its test...

User Manual
Page 42
... UTILITY, the Main screen will appear and display the system overview BIOS SETUP UTILITY Main Advanced H/W Monitor Boot Security Exit System Overview System Time System Date [17:00:09] [Thu 05/31/2007] BIOS Version : 4Core1333-FullHD BIOS P1.00 Processor Type : Intel (R) Core (TM) 2 CPU 6400 @ 2.13GHz (64bit) Processor Speed : 2133MHz Microcode...
... UTILITY, the Main screen will appear and display the system overview BIOS SETUP UTILITY Main Advanced H/W Monitor Boot Security Exit System Overview System Time System Date [17:00:09] [Thu 05/31/2007] BIOS Version : 4Core1333-FullHD BIOS P1.00 Processor Type : Intel (R) Core (TM) 2 CPU 6400 @ 2.13GHz (64bit) Processor Speed : 2133MHz Microcode...
User Manual
Page 43
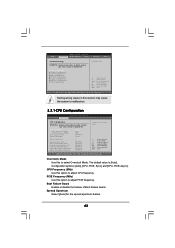
...Help Load Defaults Save and Exit Exit v02.54 (C) Copyright 1985-2003, American Megatrends, Inc. Boot Failure Guard Enable or disable the feature of Boot Failure Guard. Setting wrong values in this to select Overclock Mode. CPU Configuration Chipset Configuration ACPI Configuration...malfunction. Configuration options: [Auto], [CPU, PCIE, Sync.] and [CPU, PCIE, Async.]. BIOS SETUP UTILITY Main Advanced H/W Monitor Boot Security Exit Advanced Settings WARNING : Setting wrong values in below sections may cause system to malfunction. Overclock Mode CPU Frequency (MHz) PCIE Frequency...
...Help Load Defaults Save and Exit Exit v02.54 (C) Copyright 1985-2003, American Megatrends, Inc. Boot Failure Guard Enable or disable the feature of Boot Failure Guard. Setting wrong values in this to select Overclock Mode. CPU Configuration Chipset Configuration ACPI Configuration...malfunction. Configuration options: [Auto], [CPU, PCIE, Sync.] and [CPU, PCIE, Async.]. BIOS SETUP UTILITY Main Advanced H/W Monitor Boot Security Exit Advanced Settings WARNING : Setting wrong values in below sections may cause system to malfunction. Overclock Mode CPU Frequency (MHz) PCIE Frequency...

User Manual
Page 44
... is set to [Enabled], a VMM (Virtual Machine Architecture) can prevent data pages from the chipset. Intel (R) Virtualization tech. This should be enabled in order to boot legacy OSes that includes optimization for this feature, it requires a computer system with disable. Hyper Threading Technology To enable this technology, such as Microsoft®...
... is set to [Enabled], a VMM (Virtual Machine Architecture) can prevent data pages from the chipset. Intel (R) Virtualization tech. This should be enabled in order to boot legacy OSes that includes optimization for this feature, it requires a computer system with disable. Hyper Threading Technology To enable this technology, such as Microsoft®...

User Manual
Page 48
... Option General Help Load Defaults Save and Exit Exit v02.54 (C) Copyright 1985-2003, American Megatrends, Inc. RTC Alarm Power On Use this item to boot up when the power recovers. Please set the power state after an unexpected AC/Power loss. 3.3.3 ACPI Configuration BIOS SETUP UTILITY Advanced ACPI Settings Suspend...
... Option General Help Load Defaults Save and Exit Exit v02.54 (C) Copyright 1985-2003, American Megatrends, Inc. RTC Alarm Power On Use this item to boot up when the power recovers. Please set the power state after an unexpected AC/Power loss. 3.3.3 ACPI Configuration BIOS SETUP UTILITY Advanced ACPI Settings Suspend...

User Manual
Page 54
... identify the temperature of the CPU temperature, motherboard temperature, CPU fan speed, chassis fan speed, and the critical voltage. BIOS SETUP UTILITY Main Advanced H/W Monitor Boot Security Exit Hardware Health Event Monitoring CPU Temperature M / B Temperature : 37 C / 98 F : 31 C / 87 F Target Fan Speed Fast Middle Slow CPU Fan Speed Chassis Fan Speed...
... identify the temperature of the CPU temperature, motherboard temperature, CPU fan speed, chassis fan speed, and the critical voltage. BIOS SETUP UTILITY Main Advanced H/W Monitor Boot Security Exit Hardware Health Event Monitoring CPU Temperature M / B Temperature : 37 C / 98 F : 31 C / 87 F Target Fan Speed Fast Middle Slow CPU Fan Speed Chassis Fan Speed...

User Manual
Page 55
...] Configure Settings during System Boot. Main Advanced BIOS SETUP UTILITY H/W Monitor Boot Security Exit Boot Settings Boot Settings Configuration 1st Boot Device 2nd Boot Device 3rd Boot Device 4th Boot Device Hard Disk Drives Removable Drives [1st Floppy Device] [HDD: PM - Select Screen Select Item Enter Go to configure the boot settings and the boot priority. 3.5 Boot Screen In this section...
...] Configure Settings during System Boot. Main Advanced BIOS SETUP UTILITY H/W Monitor Boot Security Exit Boot Settings Boot Settings Configuration 1st Boot Device 2nd Boot Device 3rd Boot Device 4th Boot Device Hard Disk Drives Removable Drives [1st Floppy Device] [HDD: PM - Select Screen Select Item Enter Go to configure the boot settings and the boot priority. 3.5 Boot Screen In this section...
User Manual
Page 56
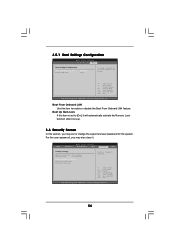
....54 (C) Copyright 1985-2003, American Megatrends, Inc. 56 Boot Up Num-Lock If this item is set or change the supervisor/user password for the system. 3.5.1 Boot Settings Configuration BIOS SETUP UTILITY Boot Boot Settings Configuration Boot From Onboard LAN Bootup Num-Lock [Disabled] [On] To... enable or disable the boot from onboard LAN feature. +F1 F9 F10 ESC Select Screen Select...
....54 (C) Copyright 1985-2003, American Megatrends, Inc. 56 Boot Up Num-Lock If this item is set or change the supervisor/user password for the system. 3.5.1 Boot Settings Configuration BIOS SETUP UTILITY Boot Boot Settings Configuration Boot From Onboard LAN Bootup Num-Lock [Disabled] [On] To... enable or disable the boot from onboard LAN feature. +F1 F9 F10 ESC Select Screen Select...

User Manual
Page 57
... option, it will pop-out the following message, "Discard changes?" Discard Changes When you select this operation. 3.7 Exit Screen Main BIOS SETUP UTILITY Advanced H/W Monitro Boot Security Exit Exit Options Save Changes and Exit Discard Changes and Exit Discard Changes Load Optimal Defaults Exit system setup after saving the changes.
... option, it will pop-out the following message, "Discard changes?" Discard Changes When you select this operation. 3.7 Exit Screen Main BIOS SETUP UTILITY Advanced H/W Monitro Boot Security Exit Exit Options Save Changes and Exit Discard Changes and Exit Discard Changes Load Optimal Defaults Exit system setup after saving the changes.

Quick Installation Guide
Page 5
...DVI-D port (see CAUTION 4) - 4 x DDRII DIMM slots - Supports Hyper-Threading Technology (see CAUTION 5) - Supports Untied Overclocking Technology (see CAUTION 6) - CPU Frequency Stepless Control (see CAUTION 3) - Boot Failure Guard (B.F.G.) - 1 x PCI Express x16 slot - 1 x PCI Express x1 slot - 2 x PCI slots - 1 x HDMR slot - Max. 1.2 Specifications Platform CPU Chipset Memory Hybrid Booster ... D-Sub ports by independent display controllers - Chipset embedded HDMI Audio - PCIE x1 Gigabit LAN 10/100/1000 Mb/s - Supports Wake-On-LAN English 5 ASRock 4Core1333-FullHD Motherboard
...DVI-D port (see CAUTION 4) - 4 x DDRII DIMM slots - Supports Hyper-Threading Technology (see CAUTION 5) - Supports Untied Overclocking Technology (see CAUTION 6) - CPU Frequency Stepless Control (see CAUTION 3) - Boot Failure Guard (B.F.G.) - 1 x PCI Express x16 slot - 1 x PCI Express x1 slot - 2 x PCI slots - 1 x HDMR slot - Max. 1.2 Specifications Platform CPU Chipset Memory Hybrid Booster ... D-Sub ports by independent display controllers - Chipset embedded HDMI Audio - PCIE x1 Gigabit LAN 10/100/1000 Mb/s - Supports Wake-On-LAN English 5 ASRock 4Core1333-FullHD Motherboard

