Spec Sheet_i2353Ph
Page 1
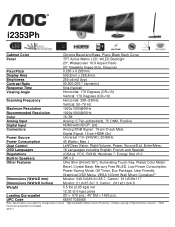
i2353Ph Cabinet Color Chrome Bezel and Base, Piano Black Back Cover Panel TFT Active Matrix LCD, WLED Backlight 23", Widescreen 16:9 Aspect Ratio 23" Viewable Image Size, Diagonal Pixel Pitch 0.265 x 0.265mm Display Area 509.2mm x 286.4mm Brightness 250 cd/m2 (typ) Contrast Ratio ... Mode, Off Timer, Eco Package, User Friendly Graphical OSD Menu, VESA 100mm Wall Mount Compliant** Dimensions (WxHxD mm) Monitor: 549.5x388.3x185.7, Carton: 611x539x117 Dimensions (WxHxD inches) Monitor: 21.6x15.3x7.3, Carton: 24.1x21.2x4.6 Weight 5.5 lbs (2.85 kgs) net 12.32 (5.6 kgs) gross ...
i2353Ph Cabinet Color Chrome Bezel and Base, Piano Black Back Cover Panel TFT Active Matrix LCD, WLED Backlight 23", Widescreen 16:9 Aspect Ratio 23" Viewable Image Size, Diagonal Pixel Pitch 0.265 x 0.265mm Display Area 509.2mm x 286.4mm Brightness 250 cd/m2 (typ) Contrast Ratio ... Mode, Off Timer, Eco Package, User Friendly Graphical OSD Menu, VESA 100mm Wall Mount Compliant** Dimensions (WxHxD mm) Monitor: 549.5x388.3x185.7, Carton: 611x539x117 Dimensions (WxHxD inches) Monitor: 21.6x15.3x7.3, Carton: 24.1x21.2x4.6 Weight 5.5 lbs (2.85 kgs) net 12.32 (5.6 kgs) gross ...

User's Manual_i2353Ph
Page 2
......4 Power ...5 Installation...6 Cleaning ...7 Other...8 Setup ...9 Contents in Box ...9 Setup Stand & Base...10 Adjusting Viewing Angle...11 Connecting the Monitor...12 Wall Mounting ...13 Adjusting ...14 Setting Optimal Resolution ...14 Windows Vista ...14 Windows XP ...16 Windows ME/2000...17 Hotkeys ...18...20 Luminance ...21 Image Setup ...23 Color Setup...25 Picture Boost ...27 OSD Setup ...29 Extra ...31 Exit ...33 LED Indicator ...33 Driver ...34 Monitor Driver ...34 Windows 7 ...34 Windows Vista ...38 Windows XP ...40 Windows 2000 ...43 Windows ME...43 i-Menu ...44 e-saver ...45 Screen+ ...
......4 Power ...5 Installation...6 Cleaning ...7 Other...8 Setup ...9 Contents in Box ...9 Setup Stand & Base...10 Adjusting Viewing Angle...11 Connecting the Monitor...12 Wall Mounting ...13 Adjusting ...14 Setting Optimal Resolution ...14 Windows Vista ...14 Windows XP ...16 Windows ME/2000...17 Hotkeys ...18...20 Luminance ...21 Image Setup ...23 Color Setup...25 Picture Boost ...27 OSD Setup ...29 Extra ...31 Exit ...33 LED Indicator ...33 Driver ...34 Monitor Driver ...34 Windows 7 ...34 Windows Vista ...38 Windows XP ...40 Windows 2000 ...43 Windows ME...43 i-Menu ...44 e-saver ...45 Screen+ ...
User's Manual_i2353Ph
Page 12
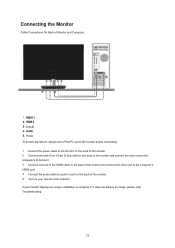
...of the monitor and connect the other end to the computer's HDMI port. 4 Connect the audio cable to audio in port on your monitor displays an image, installation is complete. HDMI 1 2. If it does not display an image, please refer Troubleshooting. 12 Connecting the Monitor Cable ...Connections On Back of the monitor. 5 Turn on the back of Monitor and Computer: 1 2345 1.
...of the monitor and connect the other end to the computer's HDMI port. 4 Connect the audio cable to audio in port on your monitor displays an image, installation is complete. HDMI 1 2. If it does not display an image, please refer Troubleshooting. 12 Connecting the Monitor Cable ...Connections On Back of the monitor. 5 Turn on the back of Monitor and Computer: 1 2345 1.
User's Manual_i2353Ph
Page 34
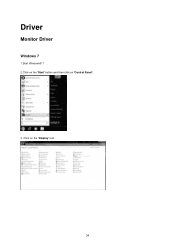
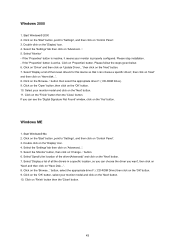
Driver Monitor Driver Windows 7 1.Start Windows® 7 2.Click on the 'Start' button and then click on the 'Display' icon. 34 Click on 'Control Panel'. 3.
Driver Monitor Driver Windows 7 1.Start Windows® 7 2.Click on the 'Start' button and then click on the 'Display' icon. 34 Click on 'Control Panel'. 3.
User's Manual_i2353Ph
Page 35
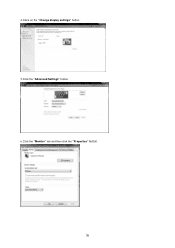
4.Ckick on the "Change display settings" button. 5.Click the "Advanced Settings" button. 6.Click the "Monitor" tab and then click the "Properties" button. 35
4.Ckick on the "Change display settings" button. 5.Click the "Advanced Settings" button. 6.Click the "Monitor" tab and then click the "Properties" button. 35
User's Manual_i2353Ph
Page 39
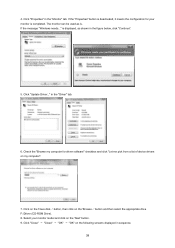
... 7. Check the "Browse my computer for your monitor model and click on the 'Next' button. 9. Click "Close" → "Close" → "OK" → "OK" on the 'Have disk...' is . Click on the following screens displayed in the figure below, click "Continue". 5. button... and then select the appropriate drive F:\Driver (CD-ROM Drive). 8. Select your monitor is completed. Click "Update Driver..." Click "Properties" in the "Driver" tab. 6. If...
... 7. Check the "Browse my computer for your monitor model and click on the 'Next' button. 9. Click "Close" → "Close" → "OK" → "OK" on the 'Have disk...' is . Click on the following screens displayed in the figure below, click "Continue". 5. button... and then select the appropriate drive F:\Driver (CD-ROM Drive). 8. Select your monitor is completed. Click "Update Driver..." Click "Properties" in the "Driver" tab. 6. If...
User's Manual_i2353Ph
Page 42
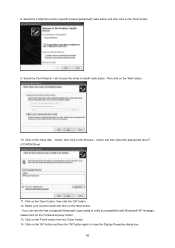
... you can see the 'has not passed Windows® Logo testing to close the Display Properties dialog box. 42 Click on the 'Open' button, then click the 'OK' button. 12. Click on the 'Next' button. - Select your monitor model and click on the 'Have disk...' Then click on the 'Continue Anyway' button...
... you can see the 'has not passed Windows® Logo testing to close the Display Properties dialog box. 42 Click on the 'Open' button, then click the 'OK' button. 12. Click on the 'Next' button. - Select your monitor model and click on the 'Have disk...' Then click on the 'Continue Anyway' button...
User's Manual_i2353Ph
Page 43
...the 'Close' button. 43 Click on the 'Browse...' Select 'Display a list of the known drivers for this device so that I can see the 'Digital Signature Not Found' window, click on 'Control Panel'. 3. Select your monitor model and click on 'Advanced...'. 5. Click on the 'OK'.... Select the 'Settings' tab then click on the 'Next' button. 10. Select 'Monitor' - If the 'Properties' button is properly configured. Windows ME 1. Double click on 'Update Driver...' button. 6. Select 'Display a list of the driver(Advanced)' and click on 'Change...' Please follow the steps given...
...the 'Close' button. 43 Click on the 'Browse...' Select 'Display a list of the known drivers for this device so that I can see the 'Digital Signature Not Found' window, click on 'Control Panel'. 3. Select your monitor model and click on 'Advanced...'. 5. Click on the 'OK'.... Select the 'Settings' tab then click on the 'Next' button. 10. Select 'Monitor' - If the 'Properties' button is properly configured. Windows ME 1. Double click on 'Update Driver...' button. 6. Select 'Display a list of the driver(Advanced)' and click on 'Change...' Please follow the steps given...
User's Manual_i2353Ph
Page 44
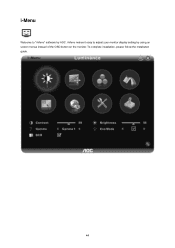
To complete installation, please follow the installation guide. 44 i-Menu makes it easy to "i-Menu" software by using on screen menus instead of the OSD button on the monitor. i-Menu Welcome to adjust your monitor display setting by AOC.
To complete installation, please follow the installation guide. 44 i-Menu makes it easy to "i-Menu" software by using on screen menus instead of the OSD button on the monitor. i-Menu Welcome to adjust your monitor display setting by AOC.

User's Manual_i2353Ph
Page 46
It supports multiple monitor display to "Screen+" software by AOC, Screen+ software is a desktop screen splitting tool, it splits the desktop into different panes, each pane displays a different window. You only need to drag the window to a corresponding pane, when you want to install it . Please follow the installation software to access it . 46 Screen+ Welcome to make your task easier.
It supports multiple monitor display to "Screen+" software by AOC, Screen+ software is a desktop screen splitting tool, it splits the desktop into different panes, each pane displays a different window. You only need to drag the window to a corresponding pane, when you want to install it . Please follow the installation software to access it . 46 Screen+ Welcome to make your task easier.
User's Manual_i2353Ph
Page 49
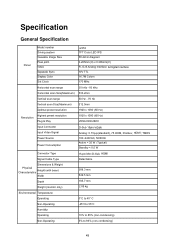
... W Connector Type Signal Cable Type 15-pin Mini D-Sub, HDMI Detachable Dimensions & Weight: Physical Height (with base) Characteristics Width Depth Weight (monitor only) 388.3 mm 549.5 mm 185.7 mm 2.85 kg Environmental Temperature: Operating 0°C to 40° C Non-Operating -25°Cto... 5% to 93% (non-condensing) 49 Specification General Specification Panel Model number Driving system Viewable Image Size Pixel pitch Video Separate Sync. Display Color Dot Clock i2353 TFT Color LED IPS 58.42cm diagoanl 0.265mm(H) x 0.265mm(V) R, G, B Analog lnterface & Digital Interface ...
... W Connector Type Signal Cable Type 15-pin Mini D-Sub, HDMI Detachable Dimensions & Weight: Physical Height (with base) Characteristics Width Depth Weight (monitor only) 388.3 mm 549.5 mm 185.7 mm 2.85 kg Environmental Temperature: Operating 0°C to 40° C Non-Operating -25°Cto... 5% to 93% (non-condensing) 49 Specification General Specification Panel Model number Driving system Viewable Image Size Pixel pitch Video Separate Sync. Display Color Dot Clock i2353 TFT Color LED IPS 58.42cm diagoanl 0.265mm(H) x 0.265mm(V) R, G, B Analog lnterface & Digital Interface ...

User's Manual_i2353Ph
Page 52
The host can request EDID information over the DDC2B channel. 52 It allows the monitor to the VESA DDC STANDARD. The DDC2B is equipped with VESA DDC2B capabilities according to inform the host system of DDC used, communicate additional information about its display capabilities. Plug and Play Plug & Play DDC2B Feature This monitor is a bi-directional data channel based on the level of its identity and, depending on the I2C protocol.
The host can request EDID information over the DDC2B channel. 52 It allows the monitor to the VESA DDC STANDARD. The DDC2B is equipped with VESA DDC2B capabilities according to inform the host system of DDC used, communicate additional information about its display capabilities. Plug and Play Plug & Play DDC2B Feature This monitor is a bi-directional data channel based on the level of its identity and, depending on the I2C protocol.


