
Data Sheet_e2425Swd
Page 1
AOC Monitors LED monitor 25 Series 24" Class, 1920 x 1080 E2425Swd Slim Design with AOC's eSaver software to set low-power configuration and iMenu software to access the user-friendly On Screen Display. Key Features 23.6" viewable image with 16:9 aspect ratio VGA and DVI-D with Kensington Security Slot for easy connection VESA 100mm wall mount compliant Kensington Security Slot The 24-inch class monitor is eco-friendly and Energy...
AOC Monitors LED monitor 25 Series 24" Class, 1920 x 1080 E2425Swd Slim Design with AOC's eSaver software to set low-power configuration and iMenu software to access the user-friendly On Screen Display. Key Features 23.6" viewable image with 16:9 aspect ratio VGA and DVI-D with Kensington Security Slot for easy connection VESA 100mm wall mount compliant Kensington Security Slot The 24-inch class monitor is eco-friendly and Energy...

Data Sheet_e2425Swd
Page 2
... with VGA and DVI-D with AOC's eSaver and iMenu software for both eco-friendly and user-friendly configuration and navigation. You can watch videos or play games without missing a beat. The VESA 100mm Wall Mount compliant feature allows you the optimum 23.6" viewable image screen with 16:9 aspect ratio. The e2425Swd is perfect for saving desktop space, while giving you to have the monitor mounted...
... with VGA and DVI-D with AOC's eSaver and iMenu software for both eco-friendly and user-friendly configuration and navigation. You can watch videos or play games without missing a beat. The VESA 100mm Wall Mount compliant feature allows you the optimum 23.6" viewable image screen with 16:9 aspect ratio. The e2425Swd is perfect for saving desktop space, while giving you to have the monitor mounted...
User's Manual_e2425Swd
Page 2
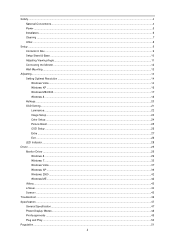
... Setup Stand & Base ...10 Adjusting Viewing Angle...11 Connecting the Monitor...12 Wall Mounting ...13 Adjusting ...14 Setting Optimal Resolution ...14 Windows Vista ...14 Windows XP ...16 Windows ME/2000...17 Windows 8 ...18 Hotkeys ...20 OSD Setting...21 Luminance ...22 Image Setup ...23 Color Setup...24 Picture Boost ...25 OSD Setup ...26 Extra ...27 Exit ...28 LED Indicator ...28 Driver ...29 Monitor Driver ...29 Windows 8 ...29 Windows 7 ...33 Windows Vista ...37 Windows XP ...39 Windows 2000 ...42 Windows ME...42 i-Menu ...43 e-Saver ...44 Screen+ ...45 Troubleshoot ...46 Specification...
... Setup Stand & Base ...10 Adjusting Viewing Angle...11 Connecting the Monitor...12 Wall Mounting ...13 Adjusting ...14 Setting Optimal Resolution ...14 Windows Vista ...14 Windows XP ...16 Windows ME/2000...17 Windows 8 ...18 Hotkeys ...20 OSD Setting...21 Luminance ...22 Image Setup ...23 Color Setup...24 Picture Boost ...25 OSD Setup ...26 Extra ...27 Exit ...28 LED Indicator ...28 Driver ...29 Monitor Driver ...29 Windows 8 ...29 Windows 7 ...33 Windows Vista ...37 Windows XP ...39 Windows 2000 ...42 Windows ME...42 i-Menu ...43 e-Saver ...44 Screen+ ...45 Troubleshoot ...46 Specification...

User's Manual_e2425Swd
Page 5
... The wall socket shall be installed near the equipment and shall be easily accessible. Overloading can result in fire or electric shock. For use the monitor only with power adapter). 5 Power The monitor should be operated only from damage due to power surges. Do not defeat the safety purpose of power source indicated on the label. This plug will protect the monitor from...
... The wall socket shall be installed near the equipment and shall be easily accessible. Overloading can result in fire or electric shock. For use the monitor only with power adapter). 5 Power The monitor should be operated only from damage due to power surges. Do not defeat the safety purpose of power source indicated on the label. This plug will protect the monitor from...

User's Manual_e2425Swd
Page 9
Setup Contents in Box Monitor CD Manual Stand Monitor Base Power Cable Analog Cable DVI Cable Not all countries and regions. Please check with the local dealer or AOC branch office for all signal cables (Analog, DVI cables) will be provided for confirmation. 9
Setup Contents in Box Monitor CD Manual Stand Monitor Base Power Cable Analog Cable DVI Cable Not all countries and regions. Please check with the local dealer or AOC branch office for all signal cables (Analog, DVI cables) will be provided for confirmation. 9

User's Manual_e2425Swd
Page 12
.... D-Sub To protect equipment, always turn off the PC and LCD monitor before connecting. 1 Connect the power cable to the AC port on your monitor displays an image, installation is complete. If it does not display an image, please refer Troubleshooting. 12 DVI 3. Connecting the Monitor Cable Connections In Back of the monitor and connect the other end to the computer‟s DVI port. 4 Turn on the back of the monitor. 2 Connect one end of the D-Sub...
.... D-Sub To protect equipment, always turn off the PC and LCD monitor before connecting. 1 Connect the power cable to the AC port on your monitor displays an image, installation is complete. If it does not display an image, please refer Troubleshooting. 12 DVI 3. Connecting the Monitor Cable Connections In Back of the monitor and connect the other end to the computer‟s DVI port. 4 Turn on the back of the monitor. 2 Connect one end of the D-Sub...
User's Manual_e2425Swd
Page 13
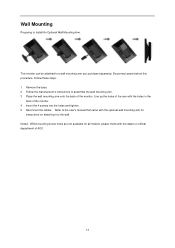
...: 1 Remove the base. 2 Follow the manufacturer's instructions to assemble the wall mounting arm. 3 Place the wall mounting arm onto the back of the monitor. 4 Insert the 4 screws into the holes and tighten. 5 Reconnect the cables. Refer to the wall. Disconnect power before this procedure. Wall Mounting Preparing to a wall mounting arm you purchase separately. Noted : VESA mounting screw holes are not available for all models, please check with the optional wall mounting arm for instructions...
...: 1 Remove the base. 2 Follow the manufacturer's instructions to assemble the wall mounting arm. 3 Place the wall mounting arm onto the back of the monitor. 4 Insert the 4 screws into the holes and tighten. 5 Reconnect the cables. Refer to the wall. Disconnect power before this procedure. Wall Mounting Preparing to a wall mounting arm you purchase separately. Noted : VESA mounting screw holes are not available for all models, please check with the optional wall mounting arm for instructions...

User's Manual_e2425Swd
Page 20
Menu/Enter Press to turn on when there is no OSD, press + continuously to change 4:3 or wide image ratio. (If the product screen size is 4:3 or input signal resolution is wide format, the hot key is disable to adjust. ) Source /Auto / Exit When the OSD is closed , press Auto/Source/Exit button will be available in all models). 4:3 or Wide/+ When there is closed , press Auto/Source/Exit button continuously about 2 second to do auto configure (only...
Menu/Enter Press to turn on when there is no OSD, press + continuously to change 4:3 or wide image ratio. (If the product screen size is 4:3 or input signal resolution is wide format, the hot key is disable to adjust. ) Source /Auto / Exit When the OSD is closed , press Auto/Source/Exit button will be available in all models). 4:3 or Wide/+ When there is closed , press Auto/Source/Exit button continuously about 2 second to do auto configure (only...

User's Manual_e2425Swd
Page 21
... press power button to turn the monitor on the control keys. 1) Press the MENU-button to turn the monitor on. Press AUTO to navigate through the sub-menu functions. Notes: 1) If the product has only one signal input, the item of "Input Select" is disable to adjust. 2) If the product screen size is 4:3 or input signal resolution is wide format, the item of "Image Ratio" is turned off and then press power button to activate the OSD window...
... press power button to turn the monitor on the control keys. 1) Press the MENU-button to turn the monitor on. Press AUTO to navigate through the sub-menu functions. Notes: 1) If the product has only one signal input, the item of "Input Select" is disable to adjust. 2) If the product screen size is 4:3 or input signal resolution is wide format, the item of "Image Ratio" is turned off and then press power button to activate the OSD window...

User's Manual_e2425Swd
Page 27
Input Select Auto Config Off timer Image Ratio DDC-CI Reset Information AUTO/D-SUB/DVI yes or no 0-24hrs wide or 4:3 yes or no Yes or no Select input signal source. or + to select submenu, and press MENU to display menu. 2. Press MENU to enter. 4. Press - Auto adjust the picture to default Select DC off time Select wide or 4:3 format for display Turn ON/OFF DDC-CI Support Reset the menu to enter. 3. or + to...
Input Select Auto Config Off timer Image Ratio DDC-CI Reset Information AUTO/D-SUB/DVI yes or no 0-24hrs wide or 4:3 yes or no Yes or no Select input signal source. or + to select submenu, and press MENU to display menu. 2. Press MENU to enter. 4. Press - Auto adjust the picture to default Select DC off time Select wide or 4:3 format for display Turn ON/OFF DDC-CI Support Reset the menu to enter. 3. or + to...

User's Manual_e2425Swd
Page 29
Right click and click All apps at the bottom-right of the screen. 3. Click on the "Display" icon. 29 Click on the "Control panel" icon 4. Set the "View by" to "Large icons" or "Small icons". 5. Start Windows® 8 2. Driver Monitor Driver Windows 8 1.
Right click and click All apps at the bottom-right of the screen. 3. Click on the "Display" icon. 29 Click on the "Control panel" icon 4. Set the "View by" to "Large icons" or "Small icons". 5. Start Windows® 8 2. Driver Monitor Driver Windows 8 1.
User's Manual_e2425Swd
Page 38
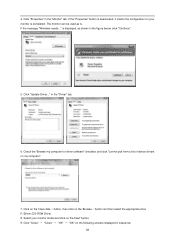
... of device drivers on the following screens displayed in the figure below, click "Continue". 5. button and then select the appropriate drive F:\Driver (CD-ROM Drive). 8. Click "Close" → "Close" → "OK" → "OK" on my computer". 7. Click on the 'Browse...' Click "Update Driver..." If the "Properties" button is displayed, as is completed. If the message "Windows needs..." The monitor can be used as...
... of device drivers on the following screens displayed in the figure below, click "Continue". 5. button and then select the appropriate drive F:\Driver (CD-ROM Drive). 8. Click "Close" → "Close" → "OK" → "OK" on my computer". 7. Click on the 'Browse...' Click "Update Driver..." If the "Properties" button is displayed, as is completed. If the message "Windows needs..." The monitor can be used as...
User's Manual_e2425Swd
Page 40
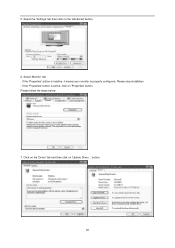
Select 'Monitor' tab - button. 40 If the 'Properties' button is properly configured. If the 'Properties' button is inactive, it means your monitor is active, click on the 'Advanced' button. 6. Please follow the steps below. 7. Please stop installation. - 5. Select the 'Settings' tab then click on 'Properties' button. Click on the 'Driver' tab and then click on 'Update Driver...'
Select 'Monitor' tab - button. 40 If the 'Properties' button is properly configured. If the 'Properties' button is inactive, it means your monitor is active, click on the 'Advanced' button. 6. Please follow the steps below. 7. Please stop installation. - 5. Select the 'Settings' tab then click on 'Properties' button. Click on the 'Driver' tab and then click on 'Update Driver...'
User's Manual_e2425Swd
Page 42
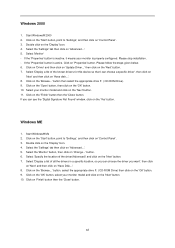
... 'Control Panel'. 3. Select the 'Monitor' button, then click on 'Properties' button. Click on 'Change...' Click on the 'Open' button, then click on 'Advanced...'. 5. Windows ME 1. Click on the 'Start' button, point to 'Settings', and then click on the 'Yes' button. Select the 'Settings' tab then click on the 'OK' button. 10. button. 6. then click on 'Finish' button then the 'Close' button. 42 Select 'Display a list of all the drivers in a specific...
... 'Control Panel'. 3. Select the 'Monitor' button, then click on 'Properties' button. Click on 'Change...' Click on the 'Open' button, then click on 'Advanced...'. 5. Windows ME 1. Click on the 'Start' button, point to 'Settings', and then click on the 'Yes' button. Select the 'Settings' tab then click on the 'OK' button. 10. button. 6. then click on 'Finish' button then the 'Close' button. 42 Select 'Display a list of all the drivers in a specific...
User's Manual_e2425Swd
Page 44
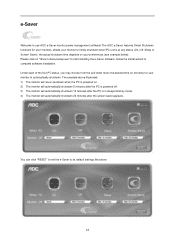
... may choose from the pull-down menu the desired time (in sleep/stand-by mode. 4) The monitor will never shutdown when the PC is at any status (On, Off, Sleep or Screen Saver); You can click "RESET" to set the e-Saver to complete software installation. the actual shutdown time depends on your monitor to use AOC e-Saver monitor power management software! The AOC e-Saver features Smart Shutdown functions...
... may choose from the pull-down menu the desired time (in sleep/stand-by mode. 4) The monitor will never shutdown when the PC is at any status (On, Off, Sleep or Screen Saver); You can click "RESET" to set the e-Saver to complete software installation. the actual shutdown time depends on your monitor to use AOC e-Saver monitor power management software! The AOC e-Saver features Smart Shutdown functions...
User's Manual_e2425Swd
Page 46
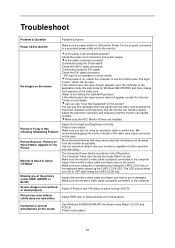
... colors (RED, GREEN, or BLUE) Is the power cord connected properly? Inspect the monitor's video cable and make sure no pin is properly connected to a grounded power outlet and to the computer. Troubleshoot Problem & Question Possible Solutions Power LED Is Not ON Make sure the power button is ON and the Power Cord is damaged. Check the power cord connection and power supply. Adjust the maximum resolution and frequency that no pin is operational by hitting the CAPS LOCK key on the screen Use Windows...
... colors (RED, GREEN, or BLUE) Is the power cord connected properly? Inspect the monitor's video cable and make sure no pin is properly connected to a grounded power outlet and to the computer. Troubleshoot Problem & Question Possible Solutions Power LED Is Not ON Make sure the power button is ON and the Power Cord is damaged. Check the power cord connection and power supply. Adjust the maximum resolution and frequency that no pin is operational by hitting the CAPS LOCK key on the screen Use Windows...

User's Manual_e2425Swd
Page 47
Display Color Dot Clock Horizontal scan range Horizontal scan Size(Maximum) Vertical scan range Vertical scan Size(Maximum) Optimal preset resolution Plug & Play Input Connector Input Video Signal Power Source Power Consumption Off timer Connector Type Signal Cable Type Physical Characteristics Dimensions & Weight Temperature Environmental Humidity Altitude E2425SWD TFT Color LCD 59.8 cm diagonal 0. 2715(H)mm x 0. 2715(V)mm R, G, B Analog Interface & Digital Interface H/V TTL 16.7M Colors 165 MHz 30 kHz - 83 kHz 521.28 mm 50 Hz - 76 Hz 293.22 mm...
Display Color Dot Clock Horizontal scan range Horizontal scan Size(Maximum) Vertical scan range Vertical scan Size(Maximum) Optimal preset resolution Plug & Play Input Connector Input Video Signal Power Source Power Consumption Off timer Connector Type Signal Cable Type Physical Characteristics Dimensions & Weight Temperature Environmental Humidity Altitude E2425SWD TFT Color LCD 59.8 cm diagonal 0. 2715(H)mm x 0. 2715(V)mm R, G, B Analog Interface & Digital Interface H/V TTL 16.7M Colors 165 MHz 30 kHz - 83 kHz 521.28 mm 50 Hz - 76 Hz 293.22 mm...

User's Manual_e2425Swd
Page 51
... for a Class B digital device, pursuant to Part 15 of the user to provide reasonable protection against harmful interference in a particular installation. Regulation FCC Notice FCC Class B Radio Frequency Interference Statement WARNING: (FOR FCC CERTIFIED MODELS) NOTE: This equipment has been tested and found to comply with the limits for any , must be determined by turning the equipment...
... for a Class B digital device, pursuant to Part 15 of the user to provide reasonable protection against harmful interference in a particular installation. Regulation FCC Notice FCC Class B Radio Frequency Interference Statement WARNING: (FOR FCC CERTIFIED MODELS) NOTE: This equipment has been tested and found to comply with the limits for any , must be determined by turning the equipment...
User's Manual_e2425Swd
Page 54
... application Adjustment by non-authorized source Repair, modification, or installation of options or parts by anyone other than an AOC Certified or Authorized Service Center Improper environments like humidity and dusts Damaged by violence Excessive or inadequate heating or air conditioning or electrical powers failures, surges, or other irregularities All AOC LCD Monitors are produced according...
... application Adjustment by non-authorized source Repair, modification, or installation of options or parts by anyone other than an AOC Certified or Authorized Service Center Improper environments like humidity and dusts Damaged by violence Excessive or inadequate heating or air conditioning or electrical powers failures, surges, or other irregularities All AOC LCD Monitors are produced according...

User's Manual_e2425Swd
Page 56
... AOC Color Monitors Including those Sold within this period, EPI ( EPI is not responsible for the name of one (1) years for parts & labor and one of EPI. The parts or product that occur as a result of: Shipping or improper installation or maintenance Misuse Neglect Any cause other than ordinary commercial or industrial application Adjustment by non-authorized source Repair...
... AOC Color Monitors Including those Sold within this period, EPI ( EPI is not responsible for the name of one (1) years for parts & labor and one of EPI. The parts or product that occur as a result of: Shipping or improper installation or maintenance Misuse Neglect Any cause other than ordinary commercial or industrial application Adjustment by non-authorized source Repair...


