
User's Manual 2036Sa
Page 14
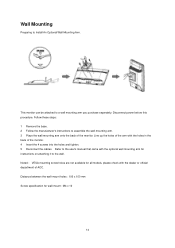
This monitor can be attached to assemble the wall mounting arm. 3 Place the wall mounting arm onto the back of the monitor. Refer to the user's manual that came with the optional wall mounting arm for wall-mount : M4 x 10 14 Distance between the wall-mount holes : 100 x 100 mm Screw specification .... Disconnect power before this procedure. Noted : VESA mounting screw holes are not available for all models, please check with the holes in the back of AOC.
This monitor can be attached to assemble the wall mounting arm. 3 Place the wall mounting arm onto the back of the monitor. Refer to the user's manual that came with the optional wall mounting arm for wall-mount : M4 x 10 14 Distance between the wall-mount holes : 100 x 100 mm Screw specification .... Disconnect power before this procedure. Noted : VESA mounting screw holes are not available for all models, please check with the holes in the back of AOC.


