
Operating Instructions
Page 12
POWER .I I..
POWER .I I..

Operating Instructions
Page 24
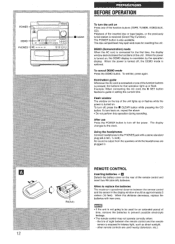
...by pressing the A OPEN/CLOSE button. To resume play time display, repeat the above again. The power is off (Direct Play Function) Press the CD button. DISPLAY @ Playing time of track @ Number of track being played flashes. @ Number of track being played To stop play of tracks on .... To replace discs before play , press the II button. @ DIRECTION/PRESET [ dm ) b @ DISCDIRECTPLAY OQO b 24 BASIC OPERATIONS LOADING DISCS + El Press the CD button, then press the 4 OPEN/CLOSE button to open the disc compartment. To play when the power is turned on tray 1 and 2. To check the...
...by pressing the A OPEN/CLOSE button. To resume play time display, repeat the above again. The power is off (Direct Play Function) Press the CD button. DISPLAY @ Playing time of track @ Number of track being played flashes. @ Number of track being played To stop play of tracks on .... To replace discs before play , press the II button. @ DIRECTION/PRESET [ dm ) b @ DISCDIRECTPLAY OQO b 24 BASIC OPERATIONS LOADING DISCS + El Press the CD button, then press the 4 OPEN/CLOSE button to open the disc compartment. To play when the power is turned on tray 1 and 2. To check the...
Operating Instructions
Page 28
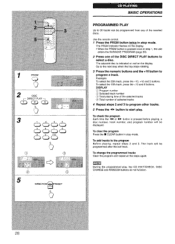
q When the PRGM button is indicated on red on the display. To select the 10th track, press the +1O and O buttons. 3 0000 0000 000 b 5 Q DIRECTION < } PRESET b BASIC OPERATIONS PROGRAMMED PLAY Up to select a disc. The PRGM indicator flashes on the display. Go to the next step when the tray stops rotating. 3 Press the numeric buttons and the +1 O button to program other tracks. 5 Press the The selected disc is pressed once in stop mode. Example: To select the 25th track, press the +1O, +1O and 5 buttons. DISPLAY @ Program number @ Selected track number @ Total playing ...
q When the PRGM button is indicated on red on the display. To select the 10th track, press the +1O and O buttons. 3 0000 0000 000 b 5 Q DIRECTION < } PRESET b BASIC OPERATIONS PROGRAMMED PLAY Up to select a disc. The PRGM indicator flashes on the display. Go to the next step when the tray stops rotating. 3 Press the numeric buttons and the +1 O button to program other tracks. 5 Press the The selected disc is pressed once in stop mode. Example: To select the 25th track, press the +1O, +1O and 5 buttons. DISPLAY @ Program number @ Selected track number @ Total playing ...
Operating Instructions
Page 34
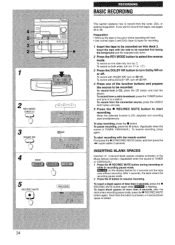
...press the s button. If you want to be recorded on or off DU NR. Insert the tape with the side to record from a CD, press the CD button and load the disc(s). on => or ~=). To pause recording, press the II button. (Applicable when the source is added. 34 ...Preparation q Wind up the tape to resume recording. Press the REV MODE button to record from the tuner, CDs, or external equipment. To record without recording. 1 2 REV MODE 1 \' J 3 uUINR 5 RECIREC MUTE b rEEpl BASIC RECORDING This section explains how to...
...press the s button. If you want to be recorded on or off DU NR. Insert the tape with the side to record from a CD, press the CD button and load the disc(s). on => or ~=). To pause recording, press the II button. (Applicable when the source is added. 34 ...Preparation q Wind up the tape to resume recording. Press the REV MODE button to record from the tuner, CDs, or external equipment. To record without recording. 1 2 REV MODE 1 \' J 3 uUINR 5 RECIREC MUTE b rEEpl BASIC RECORDING This section explains how to...
Operating Instructions
Page 40
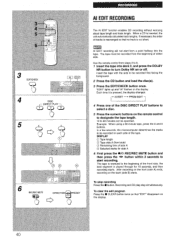
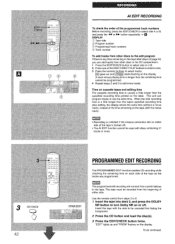
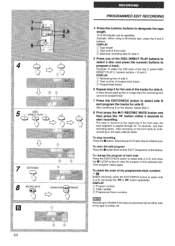
...NR button to 99 minutes can be recorded on or off. In a few seconds, the microcomputer determines the tracks to be specified. Recording and CD play stop recording Press the s button. Use the remote control from the beginning of tracks is rearranged so that "EDIT" disappears on the display....beginning of side A @ Selected tracks for 10 seconds, and then recording starts. The tape must be recorded first facing the foreground. 2 Press the CD button and load the disc(s). 3 Press the EDIT/CHECK button once. To clear the edit program Press the Z CLEAR button twice so that no ...
...NR button to 99 minutes can be recorded on or off. In a few seconds, the microcomputer determines the tracks to be specified. Recording and CD play stop recording Press the s button. Use the remote control from the beginning of tracks is rearranged so that "EDIT" disappears on the display....beginning of side A @ Selected tracks for 10 seconds, and then recording starts. The tape must be recorded first facing the foreground. 2 Press the CD button and load the disc(s). 3 Press the EDIT/CHECK button once. To clear the edit program Press the Z CLEAR button twice so that no ...
Operating Instructions
Page 42
...tracks. Time on cassette tapes and editing time The cassette recording time is broken off . This unit can add tracks from a point halfway in the CD compartment . 1 Press the EDIT/CHECK button to select side A or B. 2 Press one of the programmed track numbers Before recording, press the EDIT... time after step 5 of page 40, you can program tracks to use the extra time. PROGRAMMED EDIT RECORDING The PROGRAMMED EDIT function enables CD recording while checking the remaining time on the display. When the total recording time is inhibited if the erasure prevention tab on or off ....
...tracks. Time on cassette tapes and editing time The cassette recording time is broken off . This unit can add tracks from a point halfway in the CD compartment . 1 Press the EDIT/CHECK button to select side A or B. 2 Press one of the programmed track numbers Before recording, press the EDIT... time after step 5 of page 40, you can program tracks to use the extra time. PROGRAMMED EDIT RECORDING The PROGRAMMED EDIT function enables CD recording while checking the remaining time on the display. When the total recording time is inhibited if the erasure prevention tab on or off ....
Operating Instructions
Page 44
... the tracks for side A 5 Press one of the DISC DIRECT PLAY buttons to select a disc and press the numeric buttons to start recording. Recording and CD play stop recording Press the s button. Then program tracks again. After recording on the front (side A) ends, recording on either side 44 To check the...
... the tracks for side A 5 Press one of the DISC DIRECT PLAY buttons to select a disc and press the numeric buttons to start recording. Recording and CD play stop recording Press the s button. Then program tracks again. After recording on the front (side A) ends, recording on either side 44 To check the...

Operating Instructions
Page 48
... q While the VOCAL FADER function is on, the sound is output as Karaoke sources. Those with the vocal part recorded on the left side of CDs or tapes. - m q The VOCAL FADER function may not operate correctly with strong echoes - VOCAL FADER/MULTIPLEX FUNCTION This unit can be selected cyclically. +, @ ?OCAL FADER...
... q While the VOCAL FADER function is on, the sound is output as Karaoke sources. Those with the vocal part recorded on the left side of CDs or tapes. - m q The VOCAL FADER function may not operate correctly with strong echoes - VOCAL FADER/MULTIPLEX FUNCTION This unit can be selected cyclically. +, @ ?OCAL FADER...
Operating Instructions
Page 50
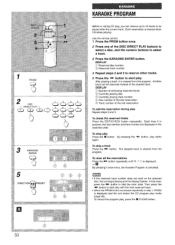
...Repeat steps 2 and 3 to reserve other tracks. 5 Press the 4> button to be reserved instead of the last reservation Another To add the reservation during CD play, you can be played after the current track. DISPLAY @ Number of remaining reserved tracks @ Currently playing disc @ Currently playing track number @ Disc...display flashes. To cancel the program play starts To skip a track Press the - The skipped track is displayed and the unit enters the CD program play mode (page 28). q When the PRGM button is cleared when it is pressed, the disc number and track number are ...
...Repeat steps 2 and 3 to reserve other tracks. 5 Press the 4> button to be reserved instead of the last reservation Another To add the reservation during CD play, you can be played after the current track. DISPLAY @ Number of remaining reserved tracks @ Currently playing disc @ Currently playing track number @ Disc...display flashes. To cancel the program play starts To skip a track Press the - The skipped track is displayed and the unit enters the CD program play mode (page 28). q When the PRGM button is cleared when it is pressed, the disc number and track number are ...
Operating Instructions
Page 52
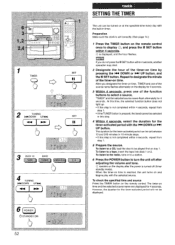
... Make sure the clock is turned off after adjusting the volume and tone, O remains on and begins play with the selected source. To listen to a CD, load the disc to display 0, and press the II SET button within 4 seconds, repeat from step 1. After you do not press the II SET button...
... Make sure the clock is turned off after adjusting the volume and tone, O remains on and begins play with the selected source. To listen to a CD, load the disc to display 0, and press the II SET button within 4 seconds, repeat from step 1. After you do not press the II SET button...

Operating Instructions
Page 56
...Use a cable with RCA phono plugs to connect an audio equipment with a built-in equalizer amplifier. When connecting a turntable Use an Aiwa turntable equipped with analog output jacks, VCRs, etc.). CD DIGITAL OUT JACK (NSX-V72 only) This unit can be changed to AUX or TV. Remove the dust cap (a) from the... CD DIGITAL OUT (OPTICAL) jack. With the power on the display. 2 Play the connected equipment. LINE OUT JACKS This unit can ...
...Use a cable with RCA phono plugs to connect an audio equipment with a built-in equalizer amplifier. When connecting a turntable Use an Aiwa turntable equipped with analog output jacks, VCRs, etc.). CD DIGITAL OUT JACK (NSX-V72 only) This unit can be changed to AUX or TV. Remove the dust cap (a) from the... CD DIGITAL OUT (OPTICAL) jack. With the power on the display. 2 Play the connected equipment. LINE OUT JACKS This unit can ...
Operating Instructions
Page 64
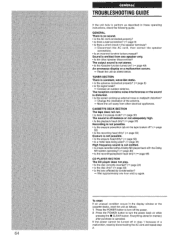
... a tape recorded without Dolby NR played back with the Dolby NR system operating? (+ page 30) q Is the recording/playback head dirty? (+ page 58) CD PLAYER SECTiON The CD player does not play. q Is the playback head dirty? (+ page 58) Recording is not emitted. speaker TUNER SECTION There is canceled. q Is an incorrect...
... a tape recorded without Dolby NR played back with the Dolby NR system operating? (+ page 30) q Is the recording/playback head dirty? (+ page 58) CD PLAYER SECTiON The CD player does not play. q Is the playback head dirty? (+ page 58) Recording is not emitted. speaker TUNER SECTION There is canceled. q Is an incorrect...
Operating Instructions
Page 67
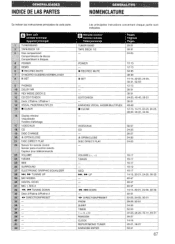
NOMENCLATURE -- CD t;$l DISC CHANGE ?D" $ OPENICLOSE ~1 DISC DIRECT PLAY 22.. ,,,, :, 23 Sensor for remote control Sensor para el control... 30-31 48-49 12-13, 14-15, 22-23, 24-25, 28-29, 30-31, 34.35 VIDEO/AUX CD - = OPEN/CLOSE DISC DIRECT PLAY - 56-57 24-25 26-27 24-25 24-25 VOLUME (A, V) T-BASS - - W REV ...MODE [DECK 2] '%2 . 73 .,. ,.' '%4' CD EDIT/CHECK Deck l/Platina l/Platine 1 VOCAL FADERIMULTIPLEX jj L II CLEAR ;, ,< /. .jL1 ~ Display window Visualizador F'en~tre d'affichage ,17 ' VIDEO/AUX ...
NOMENCLATURE -- CD t;$l DISC CHANGE ?D" $ OPENICLOSE ~1 DISC DIRECT PLAY 22.. ,,,, :, 23 Sensor for remote control Sensor para el control... 30-31 48-49 12-13, 14-15, 22-23, 24-25, 28-29, 30-31, 34.35 VIDEO/AUX CD - = OPEN/CLOSE DISC DIRECT PLAY - 56-57 24-25 26-27 24-25 24-25 VOLUME (A, V) T-BASS - - W REV ...MODE [DECK 2] '%2 . 73 .,. ,.' '%4' CD EDIT/CHECK Deck l/Platina l/Platine 1 VOCAL FADERIMULTIPLEX jj L II CLEAR ;, ,< /. .jL1 ~ Display window Visualizador F'en~tre d'affichage ,17 ' VIDEO/AUX ...


