
Operating Instructions
Page 2
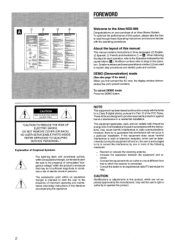
FOREWORD ,.---...
FOREWORD ,.---...
Operating Instructions
Page 4
... 52 Al EDIT RECORDING 54 PROGRAMMED EDIT RECORDING 58 TIMER 62 SETTING THE TIMER 62 SETTING THE SLEEP TIMER 64 KARAOKE 66 MICROPHONE MIXING 66 USEFUL FUNCTIONS FOR KARAOKE 68 CARE AND MAINTENANCE 7O SPECIFICATIONS 72 TROUBLESHOOTING GUIDE 76 PARTS AND CONTROLS 78 4
... 52 Al EDIT RECORDING 54 PROGRAMMED EDIT RECORDING 58 TIMER 62 SETTING THE TIMER 62 SETTING THE SLEEP TIMER 64 KARAOKE 66 MICROPHONE MIXING 66 USEFUL FUNCTIONS FOR KARAOKE 68 CARE AND MAINTENANCE 7O SPECIFICATIONS 72 TROUBLESHOOTING GUIDE 76 PARTS AND CONTROLS 78 4
Operating Instructions
Page 6
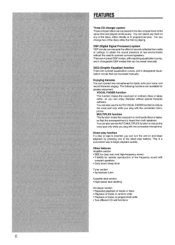
You can also use the AUTO MULTIPLEX function to reduce the vocal part only while you can enjoy Karaoke without the need to connect surround speakers. MULTIPLEX function This ... direct play . VOCAL FADER function This function makes the vocal parl on and begin playback quickly. DSP (Digital Signal Processor) system DSP circuits can also use the AUTO VOCAL FADER functionto reduce the vocal part only while you can turn the unit on ordinary discs or tapes softer, so you sing...
You can also use the AUTO MULTIPLEX function to reduce the vocal part only while you can enjoy Karaoke without the need to connect surround speakers. MULTIPLEX function This ... direct play . VOCAL FADER function This function makes the vocal parl on and begin playback quickly. DSP (Digital Signal Processor) system DSP circuits can also use the AUTO VOCAL FADER functionto reduce the vocal part only while you can turn the unit on ordinary discs or tapes softer, so you sing...
Operating Instructions
Page 8
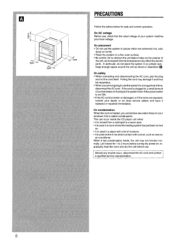
...inside the CD player unit when: q it is moved from a cold spot to 2 hours before use , check that the rated voltage of your system matches your local voltage. q Place the system on your dealer or an Aiwa service station and have it has direct contact with a lot of current keeps on ; On... safety q When connecting and disconnecting the AC cord, grip the plug and not the cord itself. If the cord is used where it replaced or repaired immediately. q it...
...inside the CD player unit when: q it is moved from a cold spot to 2 hours before use , check that the rated voltage of your system matches your local voltage. q Place the system on your dealer or an Aiwa service station and have it has direct contact with a lot of current keeps on ; On... safety q When connecting and disconnecting the AC cord, grip the plug and not the cord itself. If the cord is used where it replaced or repaired immediately. q it...
Operating Instructions
Page 12
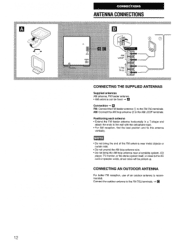
... can be picked up. q Do not bring the AM loop antenna near metal objects or curtain rails. CONNECTING AN OUTDOOR ANTENNA For better FM reception, use of the FM antenna near a turntable system, CD player, TV monitor, or the stereo system itself, or close to the FM 75.Q terminals. + u 12 AM...
... can be picked up. q Do not bring the AM loop antenna near metal objects or curtain rails. CONNECTING AN OUTDOOR ANTENNA For better FM reception, use of the FM antenna near a turntable system, CD player, TV monitor, or the stereo system itself, or close to the FM 75.Q terminals. + u 12 AM...
Operating Instructions
Page 14
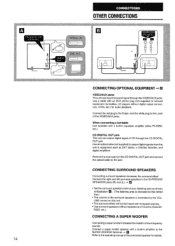
...to equipment such as shown in illustration u , (The listening area is enclosed by the dotted line.) q The volume of 16 ohms (Aiwa SX- UME control on this unit to the jack. CONNECTING A SUPER WOOFER Connecting a super woofer increases the realism of CD through the ... VIDEO/AUX jacks. Connect a super woofer speaker with a built-in equalizer amplifier (Aiwa PX-E850, etc.). When connecting a turntable Use turntable with an RCA phono plug (not supplied) to output digital signals from this unit. Use a cable with a built-in amplifier to the SUPER WOOFER terminal. + u Refer...
...to equipment such as shown in illustration u , (The listening area is enclosed by the dotted line.) q The volume of 16 ohms (Aiwa SX- UME control on this unit to the jack. CONNECTING A SUPER WOOFER Connecting a super woofer increases the realism of CD through the ... VIDEO/AUX jacks. Connect a super woofer speaker with a built-in equalizer amplifier (Aiwa PX-E850, etc.). When connecting a turntable Use turntable with an RCA phono plug (not supplied) to output digital signals from this unit. Use a cable with a built-in amplifier to the SUPER WOOFER terminal. + u Refer...
Operating Instructions
Page 16
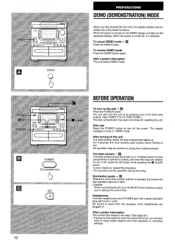
.... Illumination guide + u Whenever on , repeat the procedure. To reenter DEMO mode Press the DEMO button again, After a power interruption The unit enters DEMO mode. After use Press the POWER button to reset preset stations and timer playback or recording settings. To turn off the power. The display changes to the PHONES... or closed, and when the trays are plugged in setting the current time. To turn on by the operation display. For 4 seconds, the most recently used function button flashes in red. When the power is pressed, the buttons for resetting the unit.
.... Illumination guide + u Whenever on , repeat the procedure. To reenter DEMO mode Press the DEMO button again, After a power interruption The unit enters DEMO mode. After use Press the POWER button to reset preset stations and timer playback or recording settings. To turn off the power. The display changes to the PHONES... or closed, and when the trays are plugged in setting the current time. To turn on by the operation display. For 4 seconds, the most recently used function button flashes in red. When the power is pressed, the buttons for resetting the unit.
Operating Instructions
Page 18
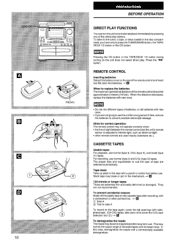
BEFORE OPERA TION DIRECT PLAY FUNCTIONS You can turn the unit on the unit does not select direct play buttons. Press the To listen to the tuner, a tape, or discs loaded in the disc compartment, you have only to press the TUNEFUBAND button, the TAPE/ DECK 1/2 button or the CD button. Pressing the CD button or the TAPE/DECK 1/2 button during turning on and starl playback immediately by pressing one of the direct play .
BEFORE OPERA TION DIRECT PLAY FUNCTIONS You can turn the unit on the unit does not select direct play buttons. Press the To listen to the tuner, a tape, or discs loaded in the disc compartment, you have only to press the TUNEFUBAND button, the TAPE/ DECK 1/2 button or the CD button. Pressing the CD button or the TAPE/DECK 1/2 button during turning on and starl playback immediately by pressing one of the direct play .
Operating Instructions
Page 22
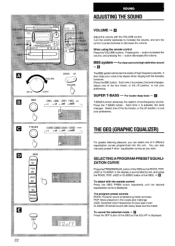
uB GEQ IROC Ml POP EM2 JAZZ M3 CLASSI M4 PRGh MANIJ 22 ADJUSTING THE SOUND VOLUME + u Adjust the volume with the Karaoke functions. When using the remote control Press the VOLUME buttons. For clear and vivid high-definition sound "El The BBE system enhances the clarity of the GEQ. + u To ...
uB GEQ IROC Ml POP EM2 JAZZ M3 CLASSI M4 PRGh MANIJ 22 ADJUSTING THE SOUND VOLUME + u Adjust the volume with the Karaoke functions. When using the remote control Press the VOLUME buttons. For clear and vivid high-definition sound "El The BBE system enhances the clarity of the GEQ. + u To ...

Operating Instructions
Page 26
... the DSP Ml -M4 buttons. To select a manual-preset DSP 1 Press the PRGM/MANUAL button of the DSP so that one of the DSP before using them. Be sure to M4 indicators in the display is displayed, the surround effect increases, especially in the center. D-VOL1 1IN L* R - FB ON/...Increasing the number in the display increases the reverb effect level and surround effect. -15, -12, -9, -6, -3, O, +3 and the off position can be also used to M4 indicators in GEQ Ml -M4 is displayed. The equalization curve stored in the display is displayed. To select with the remote control Press...
... the DSP Ml -M4 buttons. To select a manual-preset DSP 1 Press the PRGM/MANUAL button of the DSP so that one of the DSP before using them. Be sure to M4 indicators in the display is displayed, the surround effect increases, especially in the center. D-VOL1 1IN L* R - FB ON/...Increasing the number in the display increases the reverb effect level and surround effect. -15, -12, -9, -6, -3, O, +3 and the off position can be also used to M4 indicators in GEQ Ml -M4 is displayed. The equalization curve stored in the display is displayed. To select with the remote control Press...
Operating Instructions
Page 30
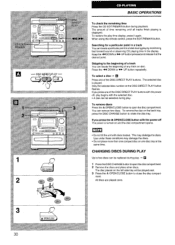
... the A OPEN/CLOSE button to rotate the disc tray. To remove the disc on the DISC DIRECT PLAY button flashes. When using the remote control, press the EDIT/REMAIN button. Use under these conditions may dislodge the discs. C!i DISCCHANGE BASIC OPERATIONS To check the remaining time Press the CD EDIT/REMAIN button...
... the A OPEN/CLOSE button to rotate the disc tray. To remove the disc on the DISC DIRECT PLAY button flashes. When using the remote control, press the EDIT/REMAIN button. Use under these conditions may dislodge the discs. C!i DISCCHANGE BASIC OPERATIONS To check the remaining time Press the CD EDIT/REMAIN button...
Operating Instructions
Page 38
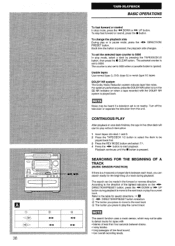
... play without interruption. 1 Insert tapes into deck 1 and 2. 2 Press the TAPE/DECK 1/2 button to select the deck to be able I The search function uses a music sensor, which may be made in the forward or reverse direction. SEARCHING FOR THE BEGINNING TRACK (MUSIC SENSOR FUNCTION) OF A If there is also... button. To set to the next track or play the current track Im I to 0000. The selected counter is set is played back. Usable tapes Use normal (type I 1 1 38 Noise may not be played back first. 3 Press the REV MODE button and select =1. 4 Press the 4F button to turn...
... play without interruption. 1 Insert tapes into deck 1 and 2. 2 Press the TAPE/DECK 1/2 button to select the deck to be able I The search function uses a music sensor, which may be made in the forward or reverse direction. SEARCHING FOR THE BEGINNING TRACK (MUSIC SENSOR FUNCTION) OF A If there is also... button. To set to the next track or play the current track Im I to 0000. The selected counter is set is played back. Usable tapes Use normal (type I 1 1 38 Noise may not be played back first. 3 Press the REV MODE button and select =1. 4 Press the 4F button to turn...
Operating Instructions
Page 40
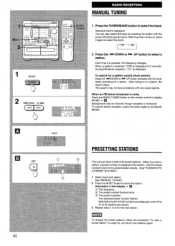
... on page 42, and store new stations again, Each time it again to select the band. 2 Press the + DOWN or * UP button to extinguish MONO. Use the preset number to tune in the display+ u @ The frequency Q The preset number flashes twice. @ The preset numbers The selected preset number flashes.
... on page 42, and store new stations again, Each time it again to select the band. 2 Press the + DOWN or * UP button to extinguish MONO. Use the preset number to tune in the display+ u @ The frequency Q The preset number flashes twice. @ The preset numbers The selected preset number flashes.
Operating Instructions
Page 42
... remote control to be tuned. The preset stations have to select a preset number. + u The selected preset station can check total number of the station you use this procedure. If you want to select a preset number.
... remote control to be tuned. The preset stations have to select a preset number. + u The selected preset station can check total number of the station you use this procedure. If you want to select a preset number.
Operating Instructions
Page 46
q Use normal (type I) or Cr02 (type II) tapes. 1 Insert the tape to be recorded from recording pause mode. Insert the tape with DOLBY NR: Press the ... Blank spaces in the display for 4 seconds and the tape runs without DOLBY NR: Press the DOLBY NR button to turn on first facing you use the remote control to start recording. Each time the REV MODE button is added. Push the cassette holder to open the cassette holder. When you...
q Use normal (type I) or Cr02 (type II) tapes. 1 Insert the tape to be recorded from recording pause mode. Insert the tape with DOLBY NR: Press the ... Blank spaces in the display for 4 seconds and the tape runs without DOLBY NR: Press the DOLBY NR button to turn on first facing you use the remote control to start recording. Each time the REV MODE button is added. Push the cassette holder to open the cassette holder. When you...
Operating Instructions
Page 48
...Press the EJECT A mark to open the cassette holder. Press the EJECT A mark to start recording. If it is done only on facing you use the remote control to the point where recording will start recording, first press the q/0 REC/REC MUTE button and then press the Wind up the ..., play begins by the direct play function. Press the s button to stop playback. 2 Inseti the tape to be recorded on one side of the tape.) 9 Use normal (type I) or CrOA(type II) tapes. 1 Press the TAPHDECK 1/2 button. /,!,, k!3 !1!!, II nice u -JJ 48 RECORDING FROM TAPE TO TAPE MANUALLY . if a tape is displayed...
...Press the EJECT A mark to open the cassette holder. Press the EJECT A mark to start recording. If it is done only on facing you use the remote control to the point where recording will start recording, first press the q/0 REC/REC MUTE button and then press the Wind up the ..., play begins by the direct play function. Press the s button to stop playback. 2 Inseti the tape to be recorded on one side of the tape.) 9 Use normal (type I) or CrOA(type II) tapes. 1 Press the TAPHDECK 1/2 button. /,!,, k!3 !1!!, II nice u -JJ 48 RECORDING FROM TAPE TO TAPE MANUALLY . if a tape is displayed...
Operating Instructions
Page 52
The UU NR indicator will light. The disc loaded on into deck 2. When you use the remote control to start recording. q Use normal (type I) or CrOz (type II) tapes. 1 Insert the tape to be recorded on tray 1 is played first. 6 Press the q REC/REC MUTE button to ...
The UU NR indicator will light. The disc loaded on into deck 2. When you use the remote control to start recording. q Use normal (type I) or CrOz (type II) tapes. 1 Insert the tape to be recorded on tray 1 is played first. 6 Press the q REC/REC MUTE button to ...
Operating Instructions
Page 54
...middle of the tape. UP button to designate Enter a length from 10 to record on each side of the program Press the s button. When you use the remote control to start recording, first press the q/0 REC/REC MUTE button and then press the 49 button within 2 seconds. Recording and CD ...recording. See steps 1 and 2 on the back side (side B) starts. In a few seconds, the microcomputer decides which tracks to 99 minutes. PRGM EDIT7 I I When using the remote control, press the EDIT/REMAIN but- If only one of tracks, so that no track is pressed, the display changes. ~Al EDIT-
...middle of the tape. UP button to designate Enter a length from 10 to record on each side of the program Press the s button. When you use the remote control to start recording, first press the q/0 REC/REC MUTE button and then press the 49 button within 2 seconds. Recording and CD ...recording. See steps 1 and 2 on the back side (side B) starts. In a few seconds, the microcomputer decides which tracks to 99 minutes. PRGM EDIT7 I I When using the remote control, press the EDIT/REMAIN but- If only one of tracks, so that no track is pressed, the display changes. ~Al EDIT-
Operating Instructions
Page 58
...-minute tape, press the 4 and 6 buttons. @ When using a 60-minute tape, press the 6 and O buttons. @) Recording time of side A @ Tape side A: Front side /B: Back side 5 Select a disc by pressing one of the DISC ... B. EDIT lights up and PRGM flashes in any order. b 6 8 58 PROGRAMMED EDIT RECORDING This function lets you program the tracks. 1 Insert thetapeto be continued. When using the remote control, press the EDIT/REMAIN button. 4 Press the 4 DOWN or* the tape length. 4 K DOWN UP PM n 5 -DISC DIRECT PLAY - Each time it is...
...-minute tape, press the 4 and 6 buttons. @ When using a 60-minute tape, press the 6 and O buttons. @) Recording time of side A @ Tape side A: Front side /B: Back side 5 Select a disc by pressing one of the DISC ... B. EDIT lights up and PRGM flashes in any order. b 6 8 58 PROGRAMMED EDIT RECORDING This function lets you program the tracks. 1 Insert thetapeto be continued. When using the remote control, press the EDIT/REMAIN button. 4 Press the 4 DOWN or* the tape length. 4 K DOWN UP PM n 5 -DISC DIRECT PLAY - Each time it is...
Operating Instructions
Page 60
... to start recording, first press the q/0 REC/REC MUTE button and then press the 4 ® button within 2 seconds. DOWN or > UP button repeatedly. When you use the remote control to start recording. To stop simultaneously, To clear the edit program Before recording, press the s CLEAR button twice so that EDIT in...
... to start recording, first press the q/0 REC/REC MUTE button and then press the 4 ® button within 2 seconds. DOWN or > UP button repeatedly. When you use the remote control to start recording. To stop simultaneously, To clear the edit program Before recording, press the s CLEAR button twice so that EDIT in...