
Operating Instructions
Page 7
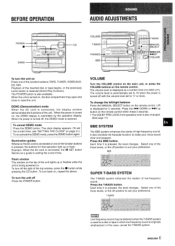
... make your voice souncl clear and pleasant. To turn off the light of the top window, press the u button while pressin~l the CD button. The volume level is also changed. (See page 17) BBE SYSTEM The BBE system enhances the clarity of the inserted disc or tape begins, or the previously..., TUNER, VIDEO/AUX, CD, ME)). BEFORE OPERATION AUDIO ADJUSTMENTS CD DEMO To turn the unit off Press the POWER button VOLUME Turn the VOLUME control on the main unit, or press the VOLUME buttons on the remote control. L/Fl is being powered on Press one of the unit lights up or flashes while...
... make your voice souncl clear and pleasant. To turn off the light of the top window, press the u button while pressin~l the CD button. The volume level is also changed. (See page 17) BBE SYSTEM The BBE system enhances the clarity of the inserted disc or tape begins, or the previously..., TUNER, VIDEO/AUX, CD, ME)). BEFORE OPERATION AUDIO ADJUSTMENTS CD DEMO To turn the unit off Press the POWER button VOLUME Turn the VOLUME control on the main unit, or press the VOLUME buttons on the remote control. L/Fl is being powered on Press one of the unit lights up or flashes while...

Operating Instructions
Page 8
... performance HALL: Sound presence of a concert hall Press one of sounds reflected from the surround speakers. CLASSIC- Sound adjustment during recording The output volume and tone (except BBE) of the speakers or headphones may be selected or turned off to obtain a simulated stereo effect, When DISCO or ... bass POP: More presence in . When playing back a tape recorded with the remote control Press the SURROUND button repeatedly. To adjust the volume of the SURROUND buttons. q When the headphones are plugged in, the SURROUND system and the DOLBY PRO LOGIC are plugged in the vocals ...
... performance HALL: Sound presence of a concert hall Press one of sounds reflected from the surround speakers. CLASSIC- Sound adjustment during recording The output volume and tone (except BBE) of the speakers or headphones may be selected or turned off to obtain a simulated stereo effect, When DISCO or ... bass POP: More presence in . When playing back a tape recorded with the remote control Press the SURROUND button repeatedly. To adjust the volume of the SURROUND buttons. q When the headphones are plugged in, the SURROUND system and the DOLBY PRO LOGIC are plugged in the vocals ...
Operating Instructions
Page 18
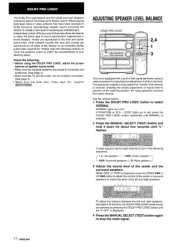
... 4) q Make sure the laser disc, video tape, etc., support no Immv s.mcmm. n a C)o 2,4 1 3 The unit is displayed, press the DOWN M or UP M button to adjust the volume of the listener for about four seconds until the "P-OFF is sent to match the level of speaker sound levels. Use the remote control. 1 Press...
... 4) q Make sure the laser disc, video tape, etc., support no Immv s.mcmm. n a C)o 2,4 1 3 The unit is displayed, press the DOWN M or UP M button to adjust the volume of the listener for about four seconds until the "P-OFF is sent to match the level of speaker sound levels. Use the remote control. 1 Press...
Operating Instructions
Page 19
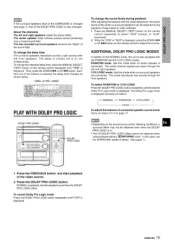
If the surround speakers level of the SURROUND is changed . The center speaker helps achieve precise sound positioning over a broad sound field. To chi~nge the delay time The surround speakers reproduce sounds a split second after the front speakers, The delay is initially set to select "CEN" (center) or "SLJF?" (surround). 2 While the "CEN" or "SUR is also changed (see pa!]e 7), that of the DOLBY PRO LOGIC is displayed, press the DOWN 11 The rear-mounted surround speakers enhance the "depth" of laser discs or video software. 1 Press the MANUAL SELECT (TEST) button on the ...
If the surround speakers level of the SURROUND is changed . The center speaker helps achieve precise sound positioning over a broad sound field. To chi~nge the delay time The surround speakers reproduce sounds a split second after the front speakers, The delay is initially set to select "CEN" (center) or "SLJF?" (surround). 2 While the "CEN" or "SUR is also changed (see pa!]e 7), that of the DOLBY PRO LOGIC is displayed, press the DOWN 11 The rear-mounted surround speakers enhance the "depth" of laser discs or video software. 1 Press the MANUAL SELECT (TEST) button on the ...
Operating Instructions
Page 20
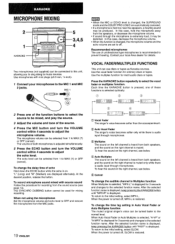
...heard from 1 to music sources. VOCAL FADEFUMULTIPLEX FUNCTIONS This unit can be selected from both microphones is changed , the microphone volume and the echo volume are set to prevent howling. Use the multiplex function for ordinary discs or tapes. To hear the sound on the right ... position, release the button. To record microphone sound mixed with mini plugs (03.5 mm, 1/8inch). 1 Connect your local Aiwa dealer for recording from the speakers, or decrease the microphone volume. To hear the sound ;n the right channel, see page 13). In this case, decrease the microphone...
...heard from 1 to music sources. VOCAL FADEFUMULTIPLEX FUNCTIONS This unit can be selected from both microphones is changed , the microphone volume and the echo volume are set to prevent howling. Use the multiplex function for ordinary discs or tapes. To hear the sound on the right ... position, release the button. To record microphone sound mixed with mini plugs (03.5 mm, 1/8inch). 1 Connect your local Aiwa dealer for recording from the speakers, or decrease the microphone volume. To hear the sound ;n the right channel, see page 13). In this case, decrease the microphone...
Operating Instructions
Page 23
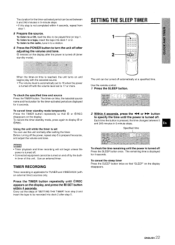
...displayed for 4 seconds. To listen to the radio, tune in to a station. 6 Press the POWER button to prepare the source, and adjust the volume and tone. To cancel timer standby mode temporarily Press the TIMER button repeatedly so that "SLEEP" on the display. The remaining time is turne(d off...time and source Press the TIMER button. Press the TIMER button repeatedly until the power is turned off with the selected source. * The volume level is automatically set You can be turned on time, the selected source name and the duration for the timer-activated period are displayed ...
...displayed for 4 seconds. To listen to the radio, tune in to a station. 6 Press the POWER button to prepare the source, and adjust the volume and tone. To cancel timer standby mode temporarily Press the TIMER button repeatedly so that "SLEEP" on the display. The remaining time is turne(d off...time and source Press the TIMER button. Press the TIMER button repeatedly until the power is turned off with the selected source. * The volume level is automatically set You can be turned on time, the selected source name and the duration for the timer-activated period are displayed ...
Operating Instructions
Page 80
... SET 8,9, 11 SLEEP 22 SURROUND (DISCO, LIVE, HALL 7 SYNC DUB 14 TAPE/DECK l/2 11, 13 T-BASS 6 TIMER 2l TUNER/BAND 8 M, M UP 8, 9, 11 VIDEO/AUX 23 voLuME 6 O-9, +10 8, 9 For assistance and information C~// ~0// fll?e l-80&6ukA/wA Printed in alphabetical order. The parts are indicated on the main unit or remote control are...
... SET 8,9, 11 SLEEP 22 SURROUND (DISCO, LIVE, HALL 7 SYNC DUB 14 TAPE/DECK l/2 11, 13 T-BASS 6 TIMER 2l TUNER/BAND 8 M, M UP 8, 9, 11 VIDEO/AUX 23 voLuME 6 O-9, +10 8, 9 For assistance and information C~// ~0// fll?e l-80&6ukA/wA Printed in alphabetical order. The parts are indicated on the main unit or remote control are...
