

Operating Instructions
Page 3
... unit, as well as recommended Instructions. Be sure the antenna system is turned off Outdoor Antenna 1 Power lines - TABLE OF CONTENTS Precautions .........m....i l PREPARATIONS SETTING UP 3 REMOTE CONTROL m.......5 BEFORE OPERATION 6I SOUND AUDIO ADJUSTMENTS GRAPHIC EQUALIZER m m DSP SURROUND SYSTEM 7 RADIO RECEPTION MANUAL TUNING s 8 PRESETTING STATIONS 8I CD PLAYING BASIC OPERATIONS 9 PROGRAMMED PLAY...
... unit, as well as recommended Instructions. Be sure the antenna system is turned off Outdoor Antenna 1 Power lines - TABLE OF CONTENTS Precautions .........m....i l PREPARATIONS SETTING UP 3 REMOTE CONTROL m.......5 BEFORE OPERATION 6I SOUND AUDIO ADJUSTMENTS GRAPHIC EQUALIZER m m DSP SURROUND SYSTEM 7 RADIO RECEPTION MANUAL TUNING s 8 PRESETTING STATIONS 8I CD PLAYING BASIC OPERATIONS 9 PROGRAMMED PLAY...

Operating Instructions
Page 4
...channel sound in your home, Complete setting and connection of the main unit, supplied speakers, your room. Owner's record For your Aiwa dealer in case of difficulty. Please refer to position the speakers properly. q No sound is heard from the center and surround speakers... the optimum effects obtainable with the NSX-MT50. I Serial Nc. (Lot No.) 1 CX-NMT50 SX-NA54 / SX-C400 I '1 I SX-R210 I I TS-~35 (NSX-MT55only) 1 6) SX-R21O Surround speakers SX-C400 Center speaker Remote control AM antenna Operating Instructions, etc. 11111, ,%: FM antenna @ Front speakers @ Center...
...channel sound in your home, Complete setting and connection of the main unit, supplied speakers, your room. Owner's record For your Aiwa dealer in case of difficulty. Please refer to position the speakers properly. q No sound is heard from the center and surround speakers... the optimum effects obtainable with the NSX-MT50. I Serial Nc. (Lot No.) 1 CX-NMT50 SX-NA54 / SX-C400 I '1 I SX-R210 I I TS-~35 (NSX-MT55only) 1 6) SX-R21O Surround speakers SX-C400 Center speaker Remote control AM antenna Operating Instructions, etc. 11111, ,%: FM antenna @ Front speakers @ Center...
Operating Instructions
Page 6
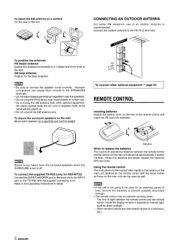
... speaker cords correctly. in detail. Refer to the INPUT jack on the TS-W35 with the supplied connecting cord. Buttons on the remote control with new ones. The line of an outdoor antenna is exposed to be approximately 5 meters (16 feet). CONNECTING AN OUTDOOR ... will be used for the best reception. R6;AA) When to replace the batteries The maximum operational distance between the remote control and the remote sensor inside the display window is recommended. When this manual refer mainly to prevent possible electrolyte leakage. Connect the outdoor antenna...
... speaker cords correctly. in detail. Refer to the INPUT jack on the TS-W35 with the supplied connecting cord. Buttons on the remote control with new ones. The line of an outdoor antenna is exposed to be approximately 5 meters (16 feet). CONNECTING AN OUTDOOR ... will be used for the best reception. R6;AA) When to replace the batteries The maximum operational distance between the remote control and the remote sensor inside the display window is recommended. When this manual refer mainly to prevent possible electrolyte leakage. Connect the outdoor antenna...
Operating Instructions
Page 7
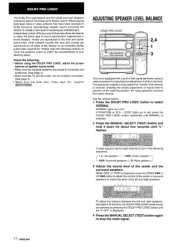
... of the inserted disc or tape begins, or the previously tuned station is turned off the light of the unit lights up button on the remote control within these 2 seconds. When the power is received (Direct Play Function). Press the 1+4 DOWN or FDI up or flashes while the unit ... level changes. The PCWVERbutton is overridden by the operation display. The clock display appears. (To set the current time, see "SETTING THE CLOCK on the remote control. q The DOLBY PRO LOGIC front speakers level is connected, the II SET button flashes as a number from O to 17 or more. To turn...
... of the inserted disc or tape begins, or the previously tuned station is turned off the light of the unit lights up button on the remote control within these 2 seconds. When the power is received (Direct Play Function). Press the 1+4 DOWN or FDI up or flashes while the unit ... level changes. The PCWVERbutton is overridden by the operation display. The clock display appears. (To set the current time, see "SETTING THE CLOCK on the remote control. q The DOLBY PRO LOGIC front speakers level is connected, the II SET button flashes as a number from O to 17 or more. To turn...

Operating Instructions
Page 8
...the GEQ buttons. The SURROUND mode is displayed. To cancel the selected mode Press the selected button again. DOWN or UP ~ button on the remote control. GRAPHIC EQUALIZER .. .. .. GEQ OFF (cancel) Using the headphones Connect headphones to suit your preference. DISCO - CLASSIC- Sound adjustment ...No sound is recommended that BBE be freely varied without affecting the level of the surround speakers Press the MANUAL SELECT button twice on the remote control within these 2 seconds. "GEQ OFF is canceled when: - To adjust the volume of the recording. DISCO / LIVE/ HALL...
...the GEQ buttons. The SURROUND mode is displayed. To cancel the selected mode Press the selected button again. DOWN or UP ~ button on the remote control. GRAPHIC EQUALIZER .. .. .. GEQ OFF (cancel) Using the headphones Connect headphones to suit your preference. DISCO - CLASSIC- Sound adjustment ...No sound is recommended that BBE be freely varied without affecting the level of the surround speakers Press the MANUAL SELECT button twice on the remote control within these 2 seconds. "GEQ OFF is canceled when: - To adjust the volume of the recording. DISCO / LIVE/ HALL...

Operating Instructions
Page 9
...not be stored if a total of 20 preset stations for all other stations in the band with very weak signals. PRESET NUMBER TUNING Use the remote control to select the preset number directly. 1 Press the TIJNER/BAND button to select a band. 2 Press the numbered buttons to seh?ct ... is pressed, the next ascending number is pressed, the frequency changes. When am FM stereo broadcast contains noise Press the MONO TUNER button on the remote control so that MONO disappears. Example: To select preset number 20, press the +1 O,+10 and Obuttons. Then, press the 4> DIRECTION/PRESET button ...
...not be stored if a total of 20 preset stations for all other stations in the band with very weak signals. PRESET NUMBER TUNING Use the remote control to select the preset number directly. 1 Press the TIJNER/BAND button to select a band. 2 Press the numbered buttons to seh?ct ... is pressed, the next ascending number is pressed, the frequency changes. When am FM stereo broadcast contains noise Press the MONO TUNER button on the remote control so that MONO disappears. Example: To select preset number 20, press the +1 O,+10 and Obuttons. Then, press the 4> DIRECTION/PRESET button ...

Operating Instructions
Page 10
... unit with the label side up. Place the third disc on . To play . 1 Press the DISC CHANGE button. 2 Remove the discs and replace with the remote control 1 Press the DISC DIRECT PLAY button, then press one disc is also turned on tray 3. To remove discs, press the 4 OPEN/CLOSE button. To...
... unit with the label side up. Place the third disc on . To play . 1 Press the DISC CHANGE button. 2 Remove the discs and replace with the remote control 1 Press the DISC DIRECT PLAY button, then press one disc is also turned on tray 3. To remove discs, press the 4 OPEN/CLOSE button. To...

Operating Instructions
Page 11
... in red on the display. To select the 10th track, press the +1 O and O buttons. To add tracks to start play . RANIDOM /REPEAT PLAY Use the remote control. RANDOM lights up on the display. Cancel - Program number Total playing time c,f the selected tracks Selected track number Total number of the inserted discs... a disc. During programmed play, you cannot perform random play , the following operations are not possible: -to select the tracks directly with the q< button. Use the remote control 1 Press the PRGM button twice in stop mode.
... in red on the display. To select the 10th track, press the +1 O and O buttons. To add tracks to start play . RANIDOM /REPEAT PLAY Use the remote control. RANDOM lights up on the display. Cancel - Program number Total playing time c,f the selected tracks Selected track number Total number of the inserted discs... a disc. During programmed play, you cannot perform random play , the following operations are not possible: -to select the tracks directly with the q< button. Use the remote control 1 Press the PRGM button twice in stop mode.

Operating Instructions
Page 16
If necessary, the order of side A I5 ENGLISH q The numbered buttons on the remote control are also available to select side A or B, and press the + or - To check the order of the programmed track numbers Before recording, press the ... one of the DISC DIRECT PLAY buttons to the beginning of the DISC DIRECT PLAY buttons to select a disc. 3 Press the numbered buttons on the remote control to be used with the minus mark). The tape is longer than the specified recording time printed on the display. To stop simultaneously. Recording...
If necessary, the order of side A I5 ENGLISH q The numbered buttons on the remote control are also available to select side A or B, and press the + or - To check the order of the programmed track numbers Before recording, press the ... one of the DISC DIRECT PLAY buttons to the beginning of the DISC DIRECT PLAY buttons to select a disc. 3 Press the numbered buttons on the remote control to be used with the minus mark). The tape is longer than the specified recording time printed on the display. To stop simultaneously. Recording...

Operating Instructions
Page 17
...track numbers To change the program of each side of the programmed track numbers When "Al" is inhibited if the erasure prevention tab on the remote control to 99 minutes can be recorded from a point halfway in the tape. To clear the edit program Press the s button twice so ... the tape as the tracks are programmed. Tape side B (reverse side) 1 Programmed edit function enables CD recording while checking the remaining time on the remote control. Insert the tape with the side to be programmed. When recording on the front side (A) ends, recording on the display, repeat step 5. Then...
...track numbers To change the program of each side of the programmed track numbers When "Al" is inhibited if the erasure prevention tab on the remote control to 99 minutes can be recorded from a point halfway in the tape. To clear the edit program Press the s button twice so ... the tape as the tracks are programmed. Tape side B (reverse side) 1 Programmed edit function enables CD recording while checking the remaining time on the remote control. Insert the tape with the side to be programmed. When recording on the front side (A) ends, recording on the display, repeat step 5. Then...
Operating Instructions
Page 18
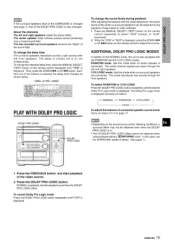
... to match the characteristics of audio/visual entertainment. When playing back laser discs or video software that "travels" from channel to select NORMAL. Use the remote control. 1 Press the DOLBY PRO LOGIC button to channel, enabling the simple adjustment of sound reproduction experienced in the front and center sound field, while...
... to match the characteristics of audio/visual entertainment. When playing back laser discs or video software that "travels" from channel to select NORMAL. Use the remote control. 1 Press the DOLBY PRO LOGIC button to channel, enabling the simple adjustment of sound reproduction experienced in the front and center sound field, while...
Operating Instructions
Page 19
... DOLBY PRO LOGIC DOLBY PRO LOGIC DOLBY PRO LOGIC To change this standard delay time, press the MANUAL SELECT (TEST) button on the remote control repeatedly to 21 ms (milliseconds), To change the sound levels during playback After adjusting the balance with the noise sequencer, the SOUnCf ...W button. The rear-mounted surround speakers enhance the "depth" of laser discs or video software. 1 Press the MANUAL SELECT (TEST) button on the remote control repeatedly until "TIME is also changed. If the surround speakers level of the SURROUND is changed (see pa!]e 7), that of the DOLBY PRO LOGIC...
... DOLBY PRO LOGIC DOLBY PRO LOGIC DOLBY PRO LOGIC To change this standard delay time, press the MANUAL SELECT (TEST) button on the remote control repeatedly to 21 ms (milliseconds), To change the sound levels during playback After adjusting the balance with the noise sequencer, the SOUnCf ...W button. The rear-mounted surround speakers enhance the "depth" of laser discs or video software. 1 Press the MANUAL SELECT (TEST) button on the remote control repeatedly until "TIME is also changed. If the surround speakers level of the SURROUND is changed (see pa!]e 7), that of the DOLBY PRO LOGIC...

Operating Instructions
Page 21
... displayed and the unit enters CD program play . q When the PRGM button is pressed repeatedly in the reserved order. Those with strong echoes - Use ths remote control. 1 Press the PRGM button once. 2 Press the DISC DIRECT PLAY button, then press one of the numbered buttons 1 to program a track. To clear all...
... displayed and the unit enters CD program play . q When the PRGM button is pressed repeatedly in the reserved order. Those with strong echoes - Use ths remote control. 1 Press the PRGM button once. 2 Press the DISC DIRECT PLAY button, then press one of the numbered buttons 1 to program a track. To clear all...

Operating Instructions
Page 22
... by pressing the M-4 DOWN or M UP button, and press the II SET button, Repeat to the 24-hour standard Press the CLOCK button on the remote control. q If the TUNER button is pressed, the band cannot be reset. UP button to restore the 12-hour standard. To switch to designate the... time, one of the timer-on the display and the clock starts from step 1. To display the current time Press the CLOCK button on the remote control and then press the s button within 4 seconds. The time is displayed for 4 seconds. 3 Within 4 seconds, press one of the timer-on the display for...
... by pressing the M-4 DOWN or M UP button, and press the II SET button, Repeat to the 24-hour standard Press the CLOCK button on the remote control. q If the TUNER button is pressed, the band cannot be reset. UP button to restore the 12-hour standard. To switch to designate the... time, one of the timer-on the display and the clock starts from step 1. To display the current time Press the CLOCK button on the remote control and then press the s button within 4 seconds. The time is displayed for 4 seconds. 3 Within 4 seconds, press one of the timer-on the display for...
Operating Instructions
Page 23
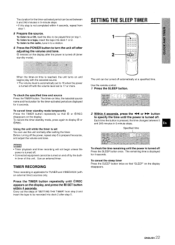
... is pressed, the time changes between 5 ancl 240 minutes in 5-minute steps. or - The remaining time is turned off automatically at a specified time, Use the remote control, 1 Press the SLEEP button. 2 Within 4 seconds, press the - To cancel timer standby mode temporarily Press the TIMER button repeatedly so that "SLEEP" on the...
... is pressed, the time changes between 5 ancl 240 minutes in 5-minute steps. or - The remaining time is turned off automatically at a specified time, Use the remote control, 1 Press the SLEEP button. 2 Within 4 seconds, press the - To cancel timer standby mode temporarily Press the TIMER button repeatedly so that "SLEEP" on the...
Operating Instructions
Page 80
... partie de I 'ordre alphabetique. Las partes se indican en orden alfabetico. PARTS INDEX Instructions about each part on the main unit or remote control are listed in Japan (United States and Puerto Rico) AIWA C0.7LTD. Les parties sent indiquees clans I 'appareil principal ou de la telecommande, se reporter aux pages indiquees.
... partie de I 'ordre alphabetique. Las partes se indican en orden alfabetico. PARTS INDEX Instructions about each part on the main unit or remote control are listed in Japan (United States and Puerto Rico) AIWA C0.7LTD. Les parties sent indiquees clans I 'appareil principal ou de la telecommande, se reporter aux pages indiquees.


