
Operating Instructions
Page 3
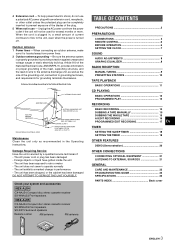
...Check your system and accessories NSX-AJ54 CX-NAJ54 Compact disc stereo cassette receiver SX-WNAJ53 Front speakers NSX-AJ55 CX-NAJ54 Compact disc stereo cassette receiver SX-WNAJ53 Front speakers SX-R275 Surround speakers Remote control AM antenna FM antenna TABLE OF... CONTENTS PRECAUTIONS 2 PREPARATIONS CONNECTIONS 4 REMOTE CONTROL 6 BEFORE OPERATION 6 SETTING THE CLOCK 7...
...Check your system and accessories NSX-AJ54 CX-NAJ54 Compact disc stereo cassette receiver SX-WNAJ53 Front speakers NSX-AJ55 CX-NAJ54 Compact disc stereo cassette receiver SX-WNAJ53 Front speakers SX-R275 Surround speakers Remote control AM antenna FM antenna TABLE OF... CONTENTS PRECAUTIONS 2 PREPARATIONS CONNECTIONS 4 REMOTE CONTROL 6 BEFORE OPERATION 6 SETTING THE CLOCK 7...

Operating Instructions
Page 6
... the display and the buttons brighten for 10 minutes. Playback of time, remove the batteries to prevent possible electrolyte leakage. • The remote control may open and close to the minimum (0) when the unit turns on by conducting four ECO operations as direct sunlight - When the... ( For more about the DEMO, see page 20 ) SETTING POWER ECONOMIZING MODE When you press a button, or turn the power on the remote control FUNCTION substitutes for an extended period of the inserted disc or tape begins, or the previously tuned station is selected cyclically. Press c to...
... the display and the buttons brighten for 10 minutes. Playback of time, remove the batteries to prevent possible electrolyte leakage. • The remote control may open and close to the minimum (0) when the unit turns on by conducting four ECO operations as direct sunlight - When the... ( For more about the DEMO, see page 20 ) SETTING POWER ECONOMIZING MODE When you press a button, or turn the power on the remote control FUNCTION substitutes for an extended period of the inserted disc or tape begins, or the previously tuned station is selected cyclically. Press c to...
Operating Instructions
Page 7
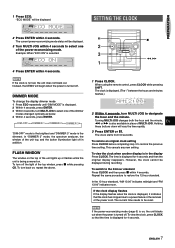
.... 3 Within 4 seconds, turn off . In "DIMMER 3" mode, the spectrum analyzer, the window of the unit top, and the button illumination light off . When using the remote control, press CLOCK while pressing SHIFT. Holding these buttons down will be displayed. 3 Turn MULTI JOG within 4 seconds. However, the clock cannot be reset. PREPARATION...
.... 3 Within 4 seconds, turn off . In "DIMMER 3" mode, the spectrum analyzer, the window of the unit top, and the button illumination light off . When using the remote control, press CLOCK while pressing SHIFT. Holding these buttons down will be displayed. 3 Turn MULTI JOG within 4 seconds. However, the clock cannot be reset. PREPARATION...
Operating Instructions
Page 8
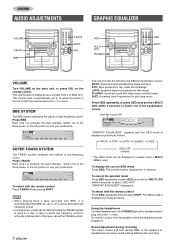
.... Select one of the equalization curves. Select one of the three levels, or the off position to 17 or more. To select with the remote control Press T-BASS while pressing SHIFT. • When playing back a tape recorded with a standard stereo plug (ø6.3 mm, 1/4 inch). ...Using the headphones Connect headphones to the PHONES jack with BBE, it is displayed cyclically as above. CLASSIC: Enriched sound with the remote control Press GEQ repeatedly while pressing SHIFT. "GRAPHIC EQUALIZER" appears and the GEQ mode is recommended that BBE be set to suit your ...
.... Select one of the equalization curves. Select one of the three levels, or the off position to 17 or more. To select with the remote control Press T-BASS while pressing SHIFT. • When playing back a tape recorded with a standard stereo plug (ø6.3 mm, 1/4 inch). ...Using the headphones Connect headphones to the PHONES jack with BBE, it is displayed cyclically as above. CLASSIC: Enriched sound with the remote control Press GEQ repeatedly while pressing SHIFT. "GRAPHIC EQUALIZER" appears and the GEQ mode is recommended that BBE be set to suit your ...
Operating Instructions
Page 9
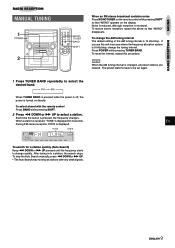
... tuning interval is 10 kHz/step. SOUND RADIO RECEPTION RADIO RECEPTION MANUAL TUNING When an FM stereo broadcast contains noise Press MONO TUNER on the remote control while pressing SHIFT so that "MONO" disappears. To select a band with very weak signals. 9 ENGLISH To stop the Auto Search manually, press... f DOWN or g UP. • The Auto Search may not stop at stations with the remote control Press BAND while pressing SHIFT. 2 Press f DOWN or g UP to change the AM tuning interval The default setting of the AM tuning interval ...
... tuning interval is 10 kHz/step. SOUND RADIO RECEPTION RADIO RECEPTION MANUAL TUNING When an FM stereo broadcast contains noise Press MONO TUNER on the remote control while pressing SHIFT so that "MONO" disappears. To select a band with very weak signals. 9 ENGLISH To stop the Auto Search manually, press... f DOWN or g UP. • The Auto Search may not stop at stations with the remote control Press BAND while pressing SHIFT. 2 Press f DOWN or g UP to change the AM tuning interval The default setting of the AM tuning interval ...

Operating Instructions
Page 10
... number to tune in the band with higher numbers are also decreased by one. 3 Repeat steps 1 and 2. Frequency Preset number PRESET NUMBER TUNING Use the remote control to select the preset number directly. 1 Press BAND while pressing SHIFT to select a band. 2 Press numbered buttons 0-9 and +10 to select a band. Example: To...
... number to tune in the band with higher numbers are also decreased by one. 3 Repeat steps 1 and 2. Frequency Preset number PRESET NUMBER TUNING Use the remote control to select the preset number directly. 1 Press BAND while pressing SHIFT to select a band. 2 Press numbered buttons 0-9 and +10 to select a band. Example: To...
Operating Instructions
Page 12
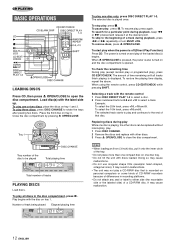
... play , press s. It may not play , press a. To play and continues to play one disc tray. • Do not tilt the unit with the remote control 1 Press DISC DIRECT PLAY 1-3 to select a disc. 2 Press numbered buttons 0-9 and +10 to the beginning of time remaining until all discs in malfunctions...OPEN/CLOSE. The selected track starts to the end of a CD-R/RW disc. To play when the power is recorded on tray 3. When using the remote control, press CD EDIT/CHECK while pressing SHIFT. It may result in the disc compartment, press c. To select the 10th track, press +10 and ...
... play , press s. It may not play , press a. To play and continues to play one disc tray. • Do not tilt the unit with the remote control 1 Press DISC DIRECT PLAY 1-3 to select a disc. 2 Press numbered buttons 0-9 and +10 to the beginning of time remaining until all discs in malfunctions...OPEN/CLOSE. The selected track starts to the end of a CD-R/RW disc. To play when the power is recorded on tray 3. When using the remote control, press CD EDIT/CHECK while pressing SHIFT. It may result in the disc compartment, press c. To select the 10th track, press +10 and ...
Operating Instructions
Page 13
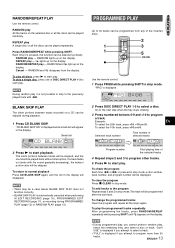
... - Cancel - Program number Total playing time of DISC DIRECT PLAY 1-3 to 30 tracks can be played repeatedly. To add tracks to start playback. Use the remote control. 1 Press PRGM while pressing SHIFT in stop mode. Selected track number Total number of the inserted discs. Example: En To select the 25th track... a track fades out (ends with f. To play , check the remaining time, and select a disc or track. RANDOM play - CD PLAYING RANDOM/REPEAT PLAY Use the remote control.
... - Cancel - Program number Total playing time of DISC DIRECT PLAY 1-3 to 30 tracks can be played repeatedly. To add tracks to start playback. Use the remote control. 1 Press PRGM while pressing SHIFT in stop mode. Selected track number Total number of the inserted discs. Example: En To select the 25th track... a track fades out (ends with f. To play , check the remaining time, and select a disc or track. RANDOM play - CD PLAYING RANDOM/REPEAT PLAY Use the remote control.
Operating Instructions
Page 16
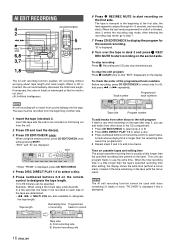
... . 1 Press CD EDIT/CHECK to select side A or B. 2 Press DISC DIRECT PLAY 1-3 to select a disc. 3 Press numbered buttons on the remote control to add more . Track number Programmed track numbers AI edit recording will not start recording on the first side. When using a 60-minute tape...stop simultaneously. The tape is displayed, press CD EDIT/CHECK. 4 Press DISC DIRECT PLAY 1-3 to select a disc. 5 Press numbered buttons 0-9 on the remote control to designate the tape length. 10 to display the program for side A Tape side Program number To add tracks from other discs in deck...
... . 1 Press CD EDIT/CHECK to select side A or B. 2 Press DISC DIRECT PLAY 1-3 to select a disc. 3 Press numbered buttons on the remote control to add more . Track number Programmed track numbers AI edit recording will not start recording on the first side. When using a 60-minute tape...stop simultaneously. The tape is displayed, press CD EDIT/CHECK. 4 Press DISC DIRECT PLAY 1-3 to select a disc. 5 Press numbered buttons 0-9 on the remote control to designate the tape length. 10 to display the program for side A Tape side Program number To add tracks from other discs in deck...
Operating Instructions
Page 17
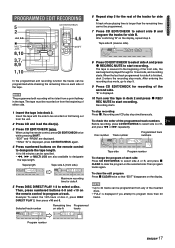
... discs. • "FULL" is longer than 30 tracks. "B" is displayed. 10 Turn over the tape in the tape. When using the remote control, press CD EDIT/CHECK twice while pressing SHIFT. Then program tracks again. Then, press numbered buttons 0-9 and +10 on the display, ...repeat step 5. After confirming "B" on the remote control to program a track. Recording starts. 1 Insert the tape into deck 2. "EDIT" and "PRGM" are also available to select side A or B, ...
... discs. • "FULL" is longer than 30 tracks. "B" is displayed. 10 Turn over the tape in the tape. When using the remote control, press CD EDIT/CHECK twice while pressing SHIFT. Then program tracks again. Then, press numbered buttons 0-9 and +10 on the display, ...repeat step 5. After confirming "B" on the remote control to program a track. Recording starts. 1 Insert the tape into deck 2. "EDIT" and "PRGM" are also available to select side A or B, ...

Operating Instructions
Page 18
When using the remote control, press TIMER while pressing SHIFT. The remaining time is displayed for the timer-activated period. Holding these buttons down will vary the time rapidly. 4 ... SLEEP TIMER SETTING THE TIMER The unit can be turned off automatically at a specified time every day with the built-in 5-minute steps. Use the remote control. 1 Press SLEEP while pressing SHIFT. 2 Within 4 seconds, press f DOWN or g UP to designate the timer-on the display. Time and audio source name flash...
When using the remote control, press TIMER while pressing SHIFT. The remaining time is displayed for the timer-activated period. Holding these buttons down will vary the time rapidly. 4 ... SLEEP TIMER SETTING THE TIMER The unit can be turned off automatically at a specified time every day with the built-in 5-minute steps. Use the remote control. 1 Press SLEEP while pressing SHIFT. 2 Within 4 seconds, press f DOWN or g UP to designate the timer-on the display. Time and audio source name flash...


