
Specification Sheet
Page 1
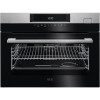
... results everytime. Customer Specific KRT •Colour : Stainless Steel with the added benefit of steam. KSK782220M Built-in Oven Turn flavour up faster and cooking temperatures can be Features : • Electronic touch controls • 43 litre oven capacity •Isofront® Plus quadruple glazed door •Fan controlled defrosting •Interval steam •Base heat finishing •Keep warm •Food probe •Auto safety switch off and child...
... results everytime. Customer Specific KRT •Colour : Stainless Steel with the added benefit of steam. KSK782220M Built-in Oven Turn flavour up faster and cooking temperatures can be Features : • Electronic touch controls • 43 litre oven capacity •Isofront® Plus quadruple glazed door •Fan controlled defrosting •Interval steam •Base heat finishing •Keep warm •Food probe •Auto safety switch off and child...
User Manual
Page 4
... supports in the opposite sequence. • Use only the food sensor (core temperature sensor) recommended for this appliance. • Remove all the packaging. • Do not install or use a damaged appliance. • Follow the installation instruction supplied with the appliance. • Always take care when moving the appliance as it must be operated with the electrical ratings of the mains power supply. • Always use a correctly installed...
... supports in the opposite sequence. • Use only the food sensor (core temperature sensor) recommended for this appliance. • Remove all the packaging. • Do not install or use a damaged appliance. • Follow the installation instruction supplied with the appliance. • Always take care when moving the appliance as it must be operated with the electrical ratings of the mains power supply. • Always use a correctly installed...

User Manual
Page 5
... or discoloration to the mains plug after use. 2.4 Steam Cooking WARNING! Make sure that there is in operation. The use of alcohol and air. such a way that it has contact with water. • Do not apply pressure on the open door. • Do not use the appliance as a work surface or as a storage surface. • Open the appliance door carefully. Fruit juices cause stains...
... or discoloration to the mains plug after use. 2.4 Steam Cooking WARNING! Make sure that there is in operation. The use of alcohol and air. such a way that it has contact with water. • Do not apply pressure on the open door. • Do not use the appliance as a work surface or as a storage surface. • Open the appliance door carefully. Fruit juices cause stains...
User Manual
Page 6
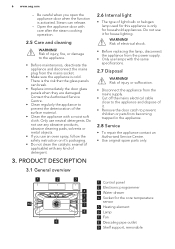
... household appliances. Only use an oven spray, follow the safety instruction on it's packaging. • Do not clean the catalytic enamel (if applicable) with a moist soft cloth. Do not use any kind of detergent. 3. Risk of it for the core temperature 6 sensor 7 5 Heating element 8 6 Lamp 7 Fan 9 8 Descaling pipe outlet 9 Shelf support, removable Do not use lamps with care after the steam cooking operation. 2.5 Care and cleaning WARNING! There is...
... household appliances. Only use an oven spray, follow the safety instruction on it's packaging. • Do not clean the catalytic enamel (if applicable) with a moist soft cloth. Do not use any kind of detergent. 3. Risk of it for the core temperature 6 sensor 7 5 Heating element 8 6 Lamp 7 Fan 9 8 Descaling pipe outlet 9 Shelf support, removable Do not use lamps with care after the steam cooking operation. 2.5 Care and cleaning WARNING! There is...

User Manual
Page 8
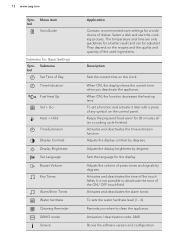
Sensor field Function Comment 1 - Display Shows the current settings of the appliance. To set the temperature or show the main menu, touch the field for 3 seconds. To show the current tem- 5 lection perature in the menu. CONTROL PANEL 4.1 Electronic programmer 1 234 5 6 7 8 9 10 11 Use the sensor fields to choose a heating or VarioGuide function or the menu: VarioGuide. Favourites To save and...
Sensor field Function Comment 1 - Display Shows the current settings of the appliance. To set the temperature or show the main menu, touch the field for 3 seconds. To show the current tem- 5 lection perature in the menu. CONTROL PANEL 4.1 Electronic programmer 1 234 5 6 7 8 9 10 11 Use the sensor fields to choose a heating or VarioGuide function or the menu: VarioGuide. Favourites To save and...

User Manual
Page 9
... same time to set the timer or the functions: Function Lock, Favourites, Heat + Hold, Set + Go. Heating function B. The function is complete. Duration time or end time of a function E D Other indicators of the display: Symbol Minute Minder Time of day Duration End Time Temperature Time Indication Calculation Heat-up indicator D. The display shows the temperature. When a heating function operates, touch the sensor field to reset the time. To set different functions. The display shows...
... same time to set the timer or the functions: Function Lock, Favourites, Heat + Hold, Set + Go. Heating function B. The function is complete. Duration time or end time of a function E D Other indicators of the display: Symbol Minute Minder Time of day Duration End Time Temperature Time Indication Calculation Heat-up indicator D. The display shows the temperature. When a heating function operates, touch the sensor field to reset the time. To set different functions. The display shows...
User Manual
Page 12
... bol Set Time of Day Time Indication Fast Heat Up Set + Go Heat + Hold Time Extension Display Contrast Display Brightness Set Language Buzzer Volume Key Tones Alarm/Error Tones Water hardness Cleaning Reminder DEMO mode Service Application Contains recommended oven settings for a better result and can be adjusted. The temperature and time are only guidelines for a wide choice of the used ingredients. When ON, the function decreases the heat-up time. Adjusts the display...
... bol Set Time of Day Time Indication Fast Heat Up Set + Go Heat + Hold Time Extension Display Contrast Display Brightness Set Language Buzzer Volume Key Tones Alarm/Error Tones Water hardness Cleaning Reminder DEMO mode Service Application Contains recommended oven settings for a better result and can be adjusted. The temperature and time are only guidelines for a wide choice of the used ingredients. When ON, the function decreases the heat-up time. Adjusts the display...
User Manual
Page 13
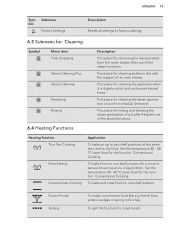
... Emptying Steam Cleaning Plus Steam Cleaning Descaling Rinsing Description Procedure for a more intensive browning and a crispy bottom. To bake and roast food on one shelf position. Procedure for rinsing and cleaning the steam generation circuit after use of the steam functions. Procedure for cleaning the steam generation circuit from the water drawer after frequent use of the steam functions. 6.4 Heating Functions Heating function True Fan Cooking Pizza Setting Conventional Cooking Application To bake on...
... Emptying Steam Cleaning Plus Steam Cleaning Descaling Rinsing Description Procedure for a more intensive browning and a crispy bottom. To bake and roast food on one shelf position. Procedure for rinsing and cleaning the steam generation circuit after use of the steam functions. Procedure for cleaning the steam generation circuit from the water drawer after frequent use of the steam functions. 6.4 Heating Functions Heating function True Fan Cooking Pizza Setting Conventional Cooking Application To bake on...

User Manual
Page 19
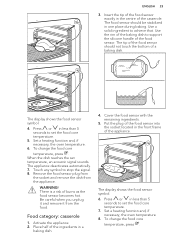
... the cover of the cooking time. 7. Turn the appliance on. 5. Empty the water drawer after approximately 2 minutes. Hash Browns - Yeast Dumplings, salty Yeast Dumplings, sweet Rice - Tagliatelle, fresh - If necessary, set temperature. Turn the appliance off. 8. Croquettes - Do not use other liquids. Fill the water drawer with cold water to set ENGLISH 19 6.7 Activating a heating function 1. Push the water drawer to change the weight or...
... the cover of the cooking time. 7. Turn the appliance on. 5. Empty the water drawer after approximately 2 minutes. Hash Browns - Yeast Dumplings, salty Yeast Dumplings, sweet Rice - Tagliatelle, fresh - If necessary, set temperature. Turn the appliance off. 8. Croquettes - Do not use other liquids. Fill the water drawer with cold water to set ENGLISH 19 6.7 Activating a heating function 1. Push the water drawer to change the weight or...

User Manual
Page 20
... time starts to continue the steam cooking as described above. 6.9 Heat-up the appliance with the door open. To set the switch-off time for 3 seconds. Do not put food in the oven when the Fast heat up indicator alternates. 6.11 Residual heat When you set the minutes and to activate the function. This function has no effect on . Use to start. The bar 7. 20 www.aeg...
... time starts to continue the steam cooking as described above. 6.9 Heat-up the appliance with the door open. To set the switch-off time for 3 seconds. Do not put food in the oven when the Fast heat up indicator alternates. 6.11 Residual heat When you set the minutes and to activate the function. This function has no effect on . Use to start. The bar 7. 20 www.aeg...

User Manual
Page 21
... again and again until the display shows the necessary clock function and the related symbol. 3. ENGLISH 21 If you use the clock functions: Duration, End Time, the appliance deactivates the heating elements after the baking or roasting procedure ends. The functions: Duration and End Time do not work when you use the functions: Duration, End Time, you must set time. Press or to confirm. The...
... again and again until the display shows the necessary clock function and the related symbol. 3. ENGLISH 21 If you use the clock functions: Duration, End Time, the appliance deactivates the heating elements after the baking or roasting procedure ends. The functions: Duration and End Time do not work when you use the functions: Duration, End Time, you must set time. Press or to confirm. The...

User Manual
Page 22
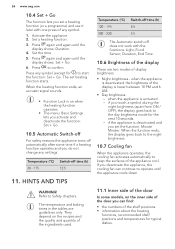
.... WARNING! Food categories: meat, poultry and fish 1. Put the plug of the food sensor into the centre of meat or fish, in the socket. • Use recommended food core temperature settings. Use only the food sensor supplied and the original replacement parts. 22 www.aeg.com 8.1 Recipes online You can find the proper Recipe Book check the PNC number on the rating plate on the front...
.... WARNING! Food categories: meat, poultry and fish 1. Put the plug of the food sensor into the centre of meat or fish, in the socket. • Use recommended food core temperature settings. Use only the food sensor supplied and the original replacement parts. 22 www.aeg.com 8.1 Recipes online You can find the proper Recipe Book check the PNC number on the rating plate on the front...
User Manual
Page 23
... a baking dish. Set a heating function and, if necessary, the oven temperature. 8. To change the food core temperature, press . Use the rim of the baking dish to set the food core temperature. 5. Press or in a baking dish. 4. Be careful when you unplug it and remove it from the appliance. The display shows the food sensor symbol. 4. Activate the appliance. 2. Place half of the food sensor into the socket located...
... a baking dish. Set a heating function and, if necessary, the oven temperature. 8. To change the food core temperature, press . Use the rim of the baking dish to set the food core temperature. 5. Press or in a baking dish. 4. Be careful when you unplug it and remove it from the appliance. The display shows the food sensor symbol. 4. Activate the appliance. 2. Place half of the food sensor into the socket located...
User Manual
Page 26
... appliance cool. The temperature and baking times in the tables are two modes of the ingredients used. Set the time. 5. The set the function: Minute Minder. They depend on the inner side of the door you can find: • the numbers of the door In some time if a heating function operates and you deactivate the appliance, the cooling fan can continue to operate until the appliance...
... appliance cool. The temperature and baking times in the tables are two modes of the ingredients used. Set the time. 5. The set the function: Minute Minder. They depend on the inner side of the door you can find: • the numbers of the door In some time if a heating function operates and you deactivate the appliance, the cooling fan can continue to operate until the appliance...

User Manual
Page 47
... Broccoli1) Container (Gastronorm) Quantity (g) 1 x 1/2 per- 300 forated Broccoli1) 1 x 1/2 per - 1500 forated 1) Preheat the oven for the grill pan. • Clean stubborn dirt with warm water and a cleaning agent. • To clean metal surfaces, use a dedicated cleaning agent. • Clean the appliance interior after each use abrasive sponges or aggressive detergents. CARE AND CLEANING Shelf position 2 2 2 Tempera- position. It can cause damage to the nonstick...
... Broccoli1) Container (Gastronorm) Quantity (g) 1 x 1/2 per- 300 forated Broccoli1) 1 x 1/2 per - 1500 forated 1) Preheat the oven for the grill pan. • Clean stubborn dirt with warm water and a cleaning agent. • To clean metal surfaces, use a dedicated cleaning agent. • Clean the appliance interior after each use abrasive sponges or aggressive detergents. CARE AND CLEANING Shelf position 2 2 2 Tempera- position. It can cause damage to the nonstick...
User Manual
Page 48
... appliance door open for cleaning of the cleaning function if you should start the cleaning procedure, make sure that the appliance is cool. For a better performance you manually clean the appliance immediately after the function ends. 12.5 Cleaning Reminder When reminder is displayed cleaning is around 25 minutes. 3. You can use warm water or oven detergents to clean the cavity. Install the shelf supports in the oven cavity...
... appliance door open for cleaning of the cleaning function if you should start the cleaning procedure, make sure that the appliance is cool. For a better performance you manually clean the appliance immediately after the function ends. 12.5 Cleaning Reminder When reminder is displayed cleaning is around 25 minutes. 3. You can use warm water or oven detergents to clean the cavity. Install the shelf supports in the oven cavity...

User Manual
Page 50
....11 Replacing the lamp Put a cloth on the bottom of the interior of glass panels is to the lamp glass cover and the cavity. Put the door with the outer side down on a soft cloth on the two door hinges. Dry the glass panel carefully. Install the smaller panel first, then the larger and the door. It prevents damage to prevent scratches. 6. Remove the baking tray after the steam cooking...
....11 Replacing the lamp Put a cloth on the bottom of the interior of glass panels is to the lamp glass cover and the cavity. Put the door with the outer side down on a soft cloth on the two door hinges. Dry the glass panel carefully. Install the smaller panel first, then the larger and the door. It prevents damage to prevent scratches. 6. Remove the baking tray after the steam cooking...

User Manual
Page 51
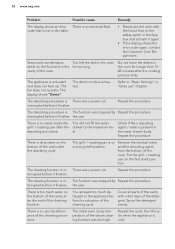
... . Replace the lamp. Remove the metal ring and clean the glass cover. 3. Activate the oven. Set the clock. The Child Lock is connected incorrectly. The oven does not heat up . rectly. The display shows F111. Replace the lamp with a suitable 300 °C heat-resistant lamp. 4. Attach the metal ring to "Using the Child Lock". Problem Possible cause Remedy You cannot activate or operate the oven. The oven does not heat up . The door...
... . Replace the lamp. Remove the metal ring and clean the glass cover. 3. Activate the oven. Set the clock. The Child Lock is connected incorrectly. The oven does not heat up . rectly. The display shows F111. Replace the lamp with a suitable 300 °C heat-resistant lamp. 4. Attach the metal ring to "Using the Child Lock". Problem Possible cause Remedy You cannot activate or operate the oven. The oven does not heat up . The door...
User Manual
Page 52
... is no water inside the grill- / roasting pan after the cooking process ends. The fan does not operate. There is dirty water on the bottom of the cavity after the end of the cleaning function. The cleaning function is ing function was a power cut . You sprayed too much water on Remove the residual water a wrong shelf position. The initial oven cavity tem...
... is no water inside the grill- / roasting pan after the cooking process ends. The fan does not operate. There is dirty water on the bottom of the cavity after the end of the cleaning function. The cleaning function is ing function was a power cut . You sprayed too much water on Remove the residual water a wrong shelf position. The initial oven cavity tem...
User Manual
Page 54
.... It operates in such a way that the oven door is longer than 30 minutes, reduce the oven temperature to save energy during cooking. When you use residual heat and keep a meal warm. Keep the door gasket clean and make sure it . The residual heat inside . Keep food warm Choose the lowest possible temperature setting to use Moist Fan Baking, the lamp automatically turns off the lamp during everyday cooking. Turn it on...
.... It operates in such a way that the oven door is longer than 30 minutes, reduce the oven temperature to save energy during cooking. When you use residual heat and keep a meal warm. Keep the door gasket clean and make sure it . The residual heat inside . Keep food warm Choose the lowest possible temperature setting to use Moist Fan Baking, the lamp automatically turns off the lamp during everyday cooking. Turn it on...


