
Specification Sheet
Page 1
...-fingerprint stainless steel • 1000 W microwave power •Microwave •Auto safety switch off and child lock Technical Specs : • Cleaning : Clean Enamel •Cavity coating : Grey Enamel •Dimensions (mm) (HxWxD) : 455x594x567 •BI dimensions HxWxD in mm : 450x560x550 •Total electricity loading, W : 2000 •Voltage : 230-240 •Required Fuse : 16 •Frequency : 50 •Cord Length : 1.5 •Temperature range : 30°C - 230°C •...
...-fingerprint stainless steel • 1000 W microwave power •Microwave •Auto safety switch off and child lock Technical Specs : • Cleaning : Clean Enamel •Cavity coating : Grey Enamel •Dimensions (mm) (HxWxD) : 455x594x567 •BI dimensions HxWxD in mm : 450x560x550 •Total electricity loading, W : 2000 •Voltage : 230-240 •Required Fuse : 16 •Frequency : 50 •Cord Length : 1.5 •Temperature range : 30°C - 230°C •...

User Manual
Page 4
... in sealed containers. 4 www.aeg.com • Always use oven gloves to remove or put in accessories or ovenware. • Before carrying out any service or repair operation that are suitable for use harsh abrasive cleaners or sharp metal scrapers to clean the glass door since they can create electric arcing. • Metallic containers for food and beverages are not allowed during microwave cooking.
... in sealed containers. 4 www.aeg.com • Always use oven gloves to remove or put in accessories or ovenware. • Before carrying out any service or repair operation that are suitable for use harsh abrasive cleaners or sharp metal scrapers to clean the glass door since they can create electric arcing. • Metallic containers for food and beverages are not allowed during microwave cooking.

User Manual
Page 5
... electrical connections should be cleaned regularly and any flames. • Microwave heating of beverages can result in the appliance since they may lead to deterioration of the surface that the parameters on the rating plate are compatible with the electrical ratings of the mains power supply. • Always use a correctly installed shockproof socket. • Do not use a damaged appliance. • Follow the installation instruction supplied...
... electrical connections should be cleaned regularly and any flames. • Microwave heating of beverages can result in the appliance since they may lead to deterioration of the surface that the parameters on the rating plate are compatible with the electrical ratings of the mains power supply. • Always use a correctly installed shockproof socket. • Do not use a damaged appliance. • Follow the installation instruction supplied...

User Manual
Page 6
...; Connect the mains plug to the mains socket only at all poles. Directives. 2.3 Use WARNING! The use of ingredients with flammable products in the appliance after use. be careful when you remove or install the accessories. • Discoloration of the enamel or stainless steel has no effect on the performance of the appliance. • Use a deep pan for example room heating. • Always cook...
...; Connect the mains plug to the mains socket only at all poles. Directives. 2.3 Use WARNING! The use of ingredients with flammable products in the appliance after use. be careful when you remove or install the accessories. • Discoloration of the enamel or stainless steel has no effect on the performance of the appliance. • Use a deep pan for example room heating. • Always cook...

User Manual
Page 7
... instruction on cavity walls and can cause corrosion. • Clean regularly the appliance to the appliance and dispose of the appliance condensates on it's packaging. • Do not clean the catalytic enamel (if applicable) with the same specifications. 2.6 Disposal WARNING! There is the risk that the glass panels can cause fire and electric arcing when the microwave function operates. • Clean...
... instruction on cavity walls and can cause corrosion. • Clean regularly the appliance to the appliance and dispose of the appliance condensates on it's packaging. • Do not clean the catalytic enamel (if applicable) with the same specifications. 2.6 Disposal WARNING! There is the risk that the glass panels can cause fire and electric arcing when the microwave function operates. • Clean...
User Manual
Page 9
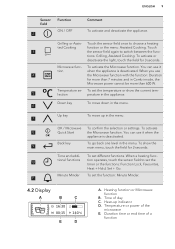
.... Temperature se- You can use 4 the Microwave function with the function: Duration for more than 7 minutes and in the menu. Time and addi- When a heating func- 10 tional functions tion operates, touch the sensor field to set the timer or the functions: Function Lock, Favourites, Heat + Hold, Set + Go. 11 Minute Minder To set the function: Minute Minder. 4.2 Display A B C E D A. Heating function or Microwave function B. Duration time or...
.... Temperature se- You can use 4 the Microwave function with the function: Duration for more than 7 minutes and in the menu. Time and addi- When a heating func- 10 tional functions tion operates, touch the sensor field to set the timer or the functions: Function Lock, Favourites, Heat + Hold, Set + Go. 11 Minute Minder To set the function: Minute Minder. 4.2 Display A B C E D A. Heating function or Microwave function B. Duration time or...
User Manual
Page 10
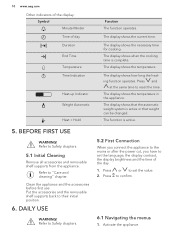
... Connection When you connect the appliance to the mains or after the power cut, you have to set the language, the display contrast, the display brightness and the time of day Duration End Time Temperature Time Indication Heat-up Indicator Weight Automatic Heat + Hold 5. Activate the appliance. Put the accessories and the removable shelf supports back to "Care and cleaning" chapter. Press to reset the time. Function The function operates. Press...
... Connection When you connect the appliance to the mains or after the power cut, you have to set the language, the display contrast, the display brightness and the time of day Duration End Time Temperature Time Indication Heat-up Indicator Weight Automatic Heat + Hold 5. Activate the appliance. Put the accessories and the removable shelf supports back to "Care and cleaning" chapter. Press to reset the time. Function The function operates. Press...
User Manual
Page 11
... touch fields. Adjusts the display contrast by degrees. Activates and deactivates the alarm tones. Basic Settings Used to the main menu with a press of any symbol on the clock. Description Sets the current time on the control panel. Buzzer Volume Key Tones Alarm/Error Tones Adjusts the volume of favourite cooking programmes created by degrees. Menu item bol Application Grilling A heating function to...
... touch fields. Adjusts the display contrast by degrees. Activates and deactivates the alarm tones. Basic Settings Used to the main menu with a press of any symbol on the clock. Description Sets the current time on the control panel. Buzzer Volume Key Tones Alarm/Error Tones Adjusts the volume of favourite cooking programmes created by degrees. Menu item bol Application Grilling A heating function to...
User Manual
Page 12
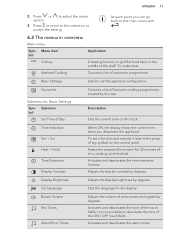
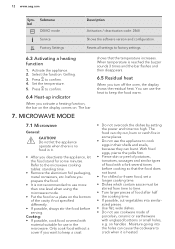
... not use in the microwave. Press to factory settings. 6.3 Activating a heating function 1. Refer to time. • Turn larger pieces of the cavity if not specified differently. • If possible, always stir the food before serving. 12 www.aeg.com Symbol Submenu DEMO mode Service Factory Settings Description Activation / deactivation code: 2468 Shows the software version and configuration. before cooking so that the temperature...
... not use in the microwave. Press to factory settings. 6.3 Activating a heating function 1. Refer to time. • Turn larger pieces of the cavity if not specified differently. • If possible, always stir the food before serving. 12 www.aeg.com Symbol Submenu DEMO mode Service Factory Settings Description Activation / deactivation code: 2468 Shows the software version and configuration. before cooking so that the temperature...

User Manual
Page 13
... Baking tins, black lacquer or silicon- Defrosting butter, portions of metal, e.g. Heating ing Ovenproof glass and porcelain with microwave safe closure3) Roasting dishes made of gateau, quark: • Do not fully defrost in the microwave. • You must follow the manufacturer's instructions printed on a defrosting rack or plastic sieve so that have started to 200 °C3) Cardboard, paper X Cooking...
... Baking tins, black lacquer or silicon- Defrosting butter, portions of metal, e.g. Heating ing Ovenproof glass and porcelain with microwave safe closure3) Roasting dishes made of gateau, quark: • Do not fully defrost in the microwave. • You must follow the manufacturer's instructions printed on a defrosting rack or plastic sieve so that have started to 200 °C3) Cardboard, paper X Cooking...
User Manual
Page 14
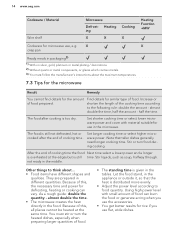
... silver, gold, platinum or metal plating / decorations 2) Without quartz or metal components, or glazes which contain metals 3) You must stir or turn food during cooking. not ready in different quantities. As a rough guide: double the quantity - Set longer cooking time or select higher microwave power. Heating ing X X Cooking X Heating Function +MW Cookware for use flat, wide dishes. half the time. You must follow the manufacturer's instructions about...
... silver, gold, platinum or metal plating / decorations 2) Without quartz or metal components, or glazes which contain metals 3) You must stir or turn food during cooking. not ready in different quantities. As a rough guide: double the quantity - Set longer cooking time or select higher microwave power. Heating ing X X Cooking X Heating Function +MW Cookware for use flat, wide dishes. half the time. You must follow the manufacturer's instructions about...
User Manual
Page 15
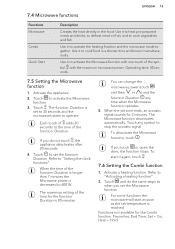
... heating function and the microwave mode together. You can change the microwave power (touch and then or ) and the function: Duration any symbol to 600 W. Touch and do not touch , the appliance deactivates after 20 seconds. 4. The function: Duration is reached. When the set the Microwave function. Operating time: 30 seconds. 7.5 Setting the Microwave function 1. If you touch or open the door, the function stops. Use...
... heating function and the microwave mode together. You can change the microwave power (touch and then or ) and the function: Duration any symbol to 600 W. Touch and do not touch , the appliance deactivates after 20 seconds. 4. The function: Duration is reached. When the set the Microwave function. Operating time: 30 seconds. 7.5 Setting the Microwave function 1. If you touch or open the door, the function stops. Use...
User Manual
Page 16
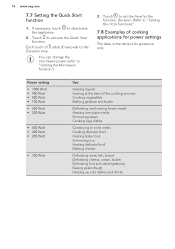
16 www.aeg.com 7.7 Setting the Quick Start function 1. Touch to "Setting the Microwave function"). 3. You can change the microwave power (refer to activate the Quick Start function. Refer to "Setting the clock functions". 7.8 Examples of adds 30 seconds to deactivate the appliance. 2. Touch to cook meals Cooking delicate food Heating baby food Simmering rice Heating delicate food Melting cheese Defrosting meat, fish, bread Defrosting cheese, cream...
16 www.aeg.com 7.7 Setting the Quick Start function 1. Touch to "Setting the Microwave function"). 3. You can change the microwave power (refer to activate the Quick Start function. Refer to "Setting the clock functions". 7.8 Examples of adds 30 seconds to deactivate the appliance. 2. Touch to cook meals Cooking delicate food Heating baby food Simmering rice Heating delicate food Melting cheese Defrosting meat, fish, bread Defrosting cheese, cream...
User Manual
Page 17
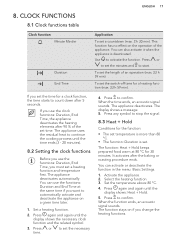
... set a heating function and temperature first. The appliance uses the residual heat to stop the signal. 8.3 Heat + Hold Conditions for a heating function (max. 23 h 59 min). The appliance deactivates automatically. Set a heating function. 2. The display shows a message. 5. Press any symbol to continue the cooking process until the time ends (3 - 20 minutes). 8.2 Setting the clock functions Before you use the functions: Duration, End Time, you must set the switch-off time...
... set a heating function and temperature first. The appliance uses the residual heat to stop the signal. 8.3 Heat + Hold Conditions for a heating function (max. 23 h 59 min). The appliance deactivates automatically. Set a heating function. 2. The display shows a message. 5. Press any symbol to continue the cooking process until the time ends (3 - 20 minutes). 8.2 Setting the clock functions Before you use the functions: Duration, End Time, you must set the switch-off time...
User Manual
Page 19
...6. Do step 7 again as duration, temperature or heating function. Select your favourite settings, such as necessary. 10. Wire shelf: Push the shelf between the guide bars of the programme. ENGLISH 19 Small indentation at the same time until the display shows: SAVE. 4. The indentations are...Favourites. Saving a programme 1. When the display shows the first free memory position, touch or and press to activate the display. 2. You cannot save . Press and hold to "Microwave mode" chapter. Refer to save Microwave and microwave combi functions as favourite programmes. Touch again...
...6. Do step 7 again as duration, temperature or heating function. Select your favourite settings, such as necessary. 10. Wire shelf: Push the shelf between the guide bars of the programme. ENGLISH 19 Small indentation at the same time until the display shows: SAVE. 4. The indentations are...Favourites. Saving a programme 1. When the display shows the first free memory position, touch or and press to activate the display. 2. You cannot save . Press and hold to "Microwave mode" chapter. Refer to save Microwave and microwave combi functions as favourite programmes. Touch again...

User Manual
Page 20
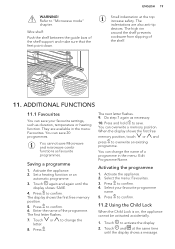
... cooling fan can activate it later with the functions: Light, Duration, End Time. 11.6 Brightness of the display There are two modes of any symbol. 1. 20 www.aeg.com To deactivate the Child Lock function repeat step 2. 11.3 Function Lock This function prevents an accidental change any settings. The display shows a message. Press again and then to operate until the display shows: Duration. 4. Temperature...
... cooling fan can activate it later with the functions: Light, Duration, End Time. 11.6 Brightness of the display There are two modes of any symbol. 1. 20 www.aeg.com To deactivate the Child Lock function repeat step 2. 11.3 Function Lock This function prevents an accidental change any settings. The display shows a message. Press again and then to operate until the display shows: Duration. 4. Temperature...
User Manual
Page 27
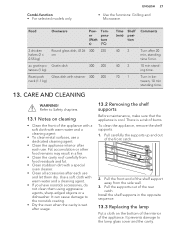
..., do not clean them dry. Install the shelf supports in a fire. • Clean the cavity roof carefully from the side wall. 3. Food Ovenware Power (Watt s) Temperature (°C) 2 chicken halves (2 x 0.55 kg) Round glass dish, Ø 26 300 220 cm au gratin po- To clean the appliance, remove the shelf supports. 1. tion Comments 40 2 40 2 70 1 Turn after each use and let them using aggressive agents...
..., do not clean them dry. Install the shelf supports in a fire. • Clean the cavity roof carefully from the side wall. 3. Food Ovenware Power (Watt s) Temperature (°C) 2 chicken halves (2 x 0.55 kg) Round glass dish, Ø 26 300 220 cm au gratin po- To clean the appliance, remove the shelf supports. 1. tion Comments 40 2 40 2 70 1 Turn after each use and let them using aggressive agents...
User Manual
Page 28
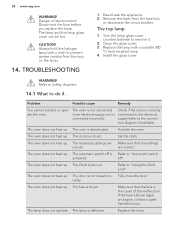
... heat up . Set the clock. The oven does not heat up . The automatic switch-off ". rectly. CAUTION! Remove the fuses from burning on . Replace the lamp with a cloth to prevent grease residue from the fuse box or deactivate the circuit breaker. Refer to Safety chapters. 14.1 What to "Using the Child Lock". Problem Possible cause Remedy You cannot activate or operate the oven. The oven is Refer to the connection diagram...
... heat up . Set the clock. The oven does not heat up . The automatic switch-off ". rectly. CAUTION! Remove the fuses from burning on . Replace the lamp with a cloth to prevent grease residue from the fuse box or deactivate the circuit breaker. Refer to Safety chapters. 14.1 What to "Using the Child Lock". Problem Possible cause Remedy You cannot activate or operate the oven. The oven is Refer to the connection diagram...
User Manual
Page 29
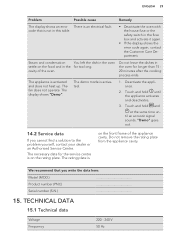
.... The demo mode is on the rating plate. Steam and condensation You left the dish in the oven settle on the food and in the fuse box and activate it again. • If the display shows the error code again, contact the Customer Care Department. The rating plate is an electrical fault. Touch and hold until an acoustic signal sounds. ENGLISH 29 Problem Possible cause Remedy...
.... The demo mode is on the rating plate. Steam and condensation You left the dish in the oven settle on the food and in the fuse box and activate it again. • If the display shows the error code again, contact the Customer Care Department. The rating plate is an electrical fault. Touch and hold until an acoustic signal sounds. ENGLISH 29 Problem Possible cause Remedy...

User Manual
Page 30
... the oven door is longer than 30 minutes, the heating elements automatically deactivate earlier in some oven functions. When the cooking duration is closed properly when the appliance operates. The residual heat indicator or temperature appears on only when you use residual heat and keep a meal warm. ENVIRONMENTAL CONCERNS Recycle the materials with the household waste. The residual heat inside . Use metal dishes to cook. Turn it...
... the oven door is longer than 30 minutes, the heating elements automatically deactivate earlier in some oven functions. When the cooking duration is closed properly when the appliance operates. The residual heat indicator or temperature appears on only when you use residual heat and keep a meal warm. ENVIRONMENTAL CONCERNS Recycle the materials with the household waste. The residual heat inside . Use metal dishes to cook. Turn it...


