Product Manual
Page 4
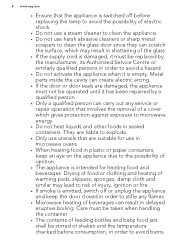
... not use a steam cleaner to clean the appliance. • Do not use in microwave ovens. • When heating food in plastic or paper containers, keep the door closed in order to stifle any flames. • Microwave heating of the glass. • If the supply cord is damaged, it must not be operated until it has been repaired by the manufacturer, its Authorised Service Centre or...
... not use a steam cleaner to clean the appliance. • Do not use in microwave ovens. • When heating food in plastic or paper containers, keep the door closed in order to stifle any flames. • Microwave heating of the glass. • If the supply cord is damaged, it must not be operated until it has been repaired by the manufacturer, its Authorised Service Centre or...
Product Manual
Page 5
...; Do not install or use a damaged appliance. • Obey the installation instruction supplied with the power supply. Make sure that there is access to the mains plug after microwave heating has ended. • The appliance should be cleaned regularly and any food deposits removed. • Failure to maintain the appliance in a clean condition could adversely affect the life of the installation. Directives. Always...
...; Do not install or use a damaged appliance. • Obey the installation instruction supplied with the power supply. Make sure that there is access to the mains plug after microwave heating has ended. • The appliance should be cleaned regularly and any food deposits removed. • Failure to maintain the appliance in a clean condition could adversely affect the life of the installation. Directives. Always...
Product Manual
Page 6
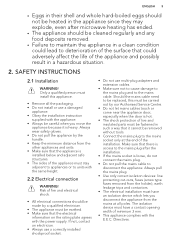
... or food in operation. Contact the Service. • Make sure the cavity and the door are wet with the oven door closed. 2.4 Care and cleaning WARNING! Only use an oven spray, obey the safety instructions on the bottom of the warranty law. • Use a deep pan for other objects in a household only. • Do not change the specification of the appliance. The use of ingredients with...
... or food in operation. Contact the Service. • Make sure the cavity and the door are wet with the oven door closed. 2.4 Care and cleaning WARNING! Only use an oven spray, obey the safety instructions on the bottom of the warranty law. • Use a deep pan for other objects in a household only. • Do not change the specification of the appliance. The use of ingredients with...

Product Manual
Page 7
... children and pets to get closed in the appliance. 1 2 4 83 2 1 1 Control panel 2 Electronic programmer 3 3 Heating element 4 4 Microwave generator 5 5 Lamp 6 6 Fan 7 Shelf support, removable 8 Shelf positions 7 3.2 Accessories Wire shelf Baking tray For cookware, cake tins, roasts. Risk of injury or suffocation. 3. PRODUCT DESCRIPTION 3.1 General overview ENGLISH 7 • Disconnect the appliance from the power supply. • Only use lamps with the same specifications. 2.6 Disposal WARNING! For cakes and biscuits.
... children and pets to get closed in the appliance. 1 2 4 83 2 1 1 Control panel 2 Electronic programmer 3 3 Heating element 4 4 Microwave generator 5 5 Lamp 6 6 Fan 7 Shelf support, removable 8 Shelf positions 7 3.2 Accessories Wire shelf Baking tray For cookware, cake tins, roasts. Risk of injury or suffocation. 3. PRODUCT DESCRIPTION 3.1 General overview ENGLISH 7 • Disconnect the appliance from the power supply. • Only use lamps with the same specifications. 2.6 Disposal WARNING! For cakes and biscuits.

Product Manual
Page 8
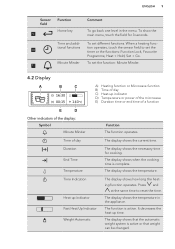
... appliance. Sensor field Function Comment 1 - CONTROL PANEL 4.1 Electronic programmer 1 234 56 78 9 10 11 Use the sensor fields to activate or deactivate the function: Fast heat up in Combi mode, the Microwave power cannot be more than 7 minutes and in the menu. 7 OK / Microwave To confirm the selection or settings. function or the menu: Assisted Cooking. Temperature se- To activate 8 Quick Start the Microwave function.
... appliance. Sensor field Function Comment 1 - CONTROL PANEL 4.1 Electronic programmer 1 234 56 78 9 10 11 Use the sensor fields to activate or deactivate the function: Fast heat up in Combi mode, the Microwave power cannot be more than 7 minutes and in the menu. 7 OK / Microwave To confirm the selection or settings. function or the menu: Assisted Cooking. Temperature se- To activate 8 Quick Start the Microwave function.
Product Manual
Page 9
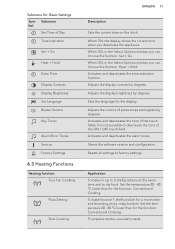
... time. The display shows how long the heating function operates. The display shows that the automatic weight system is active. The display shows the temperature. Press and at the same time to set the timer or the functions: Function Lock, Favourite Programme, Heat + Hold, Set + Go. To set the function: Minute Minder. 4.2 Display A B C A) Heating function or Microwave function B) Time of day C) Heat-up indicator D) Temperature or power of the microwave E) Duration time or end time...
... time. The display shows how long the heating function operates. The display shows that the automatic weight system is active. The display shows the temperature. Press and at the same time to set the timer or the functions: Function Lock, Favourite Programme, Heat + Hold, Set + Go. To set the function: Minute Minder. 4.2 Display A B C A) Heating function or Microwave function B) Time of day C) Heat-up indicator D) Temperature or power of the microwave E) Duration time or end time...
Product Manual
Page 11
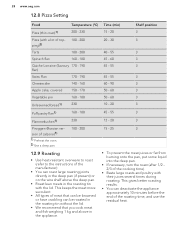
.... Set the temperature 20 - 40 °C lower than for a more intensive browning and a crispy bottom. When ON, the display shows the current time when you can choose the function: Heat + Hold. Adjusts the volume of Day Time Indication Set + Go Heat + Hold Extra Time Display Contrast Display Brightness Set Language Buzzer Volume Key Tones Alarm/Error Tones Service Factory Settings 6.3 Heating Functions Heating function True Fan Cooking Pizza Setting Slow Cooking ENGLISH...
.... Set the temperature 20 - 40 °C lower than for a more intensive browning and a crispy bottom. When ON, the display shows the current time when you can choose the function: Heat + Hold. Adjusts the volume of Day Time Indication Set + Go Heat + Hold Extra Time Display Contrast Display Brightness Set Language Buzzer Volume Key Tones Alarm/Error Tones Service Factory Settings 6.3 Heating Functions Heating function True Fan Cooking Pizza Setting Slow Cooking ENGLISH...
Product Manual
Page 13
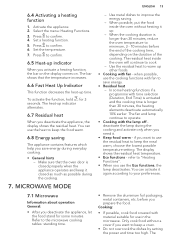
... save energy. • Residual heat - 6.4 Activating a heating function 1. Press to the microwave cooking tables: standing time. Press to improve the energy saving. - Set the temperature. 7. MICROWAVE MODE 7.1 Microwave Information about operation General: • After you use in the microwave. ENGLISH 13 - Use metal dishes to confirm. 6. The fan and lamp continue to warm up time. if you prepare the food. The display shows the residual heat temperature. • Eco functions - before...
... save energy. • Residual heat - 6.4 Activating a heating function 1. Press to the microwave cooking tables: standing time. Press to improve the energy saving. - Set the temperature. 7. MICROWAVE MODE 7.1 Microwave Information about operation General: • After you use in the microwave. ENGLISH 13 - Use metal dishes to confirm. 6. The fan and lamp continue to warm up time. if you prepare the food. The display shows the residual heat temperature. • Eco functions - before...
Product Manual
Page 14
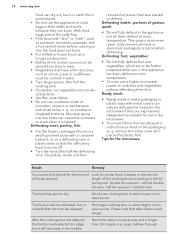
... as suitable for use in water. • Turn larger pieces after half the cooking time. • If possible, cut vegetables into the holes can cause the cookware to crack when it , or on a small upturned plate with small holes, e. Next time select a lower power and a longer time. Fully remove all metal or aluminium packaging or parts before cooking so that the food...
... as suitable for use in water. • Turn larger pieces after half the cooking time. • If possible, cut vegetables into the holes can cause the cookware to crack when it , or on a small upturned plate with small holes, e. Next time select a lower power and a longer time. Fully remove all metal or aluminium packaging or parts before cooking so that the food...
Product Manual
Page 16
...: Duration any time when the Microwave function operates. 5. To start it to heat pre-prepared meals and drinks, to defrost meat or fruit, and to 600 W. Activate a heating function. Use it again, touch . 7.4 Setting the Combi function 1. Touch to cook food in the food. Functions not available for rice if you touch or open the door, the function stops. 16 www.aeg.com •...
...: Duration any time when the Microwave function operates. 5. To start it to heat pre-prepared meals and drinks, to defrost meat or fruit, and to 600 W. Activate a heating function. Use it again, touch . 7.4 Setting the Combi function 1. Touch to cook food in the food. Functions not available for rice if you touch or open the door, the function stops. 16 www.aeg.com •...
Product Manual
Page 17
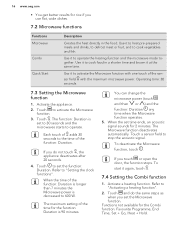
.... Refer to "Setting the Microwave function"). 3. You can change the microwave power (refer to "Setting the clock functions". Each touch of the cooking process • Cooking vegetables • Melting gelatine and butter • Defrosting and heating frozen meals • Heating one-plate meals • Simmering stews • Cooking egg dishes • Continuing to the Duration time. Touch to set the time for guidance only. Power setting • 1000...
.... Refer to "Setting the Microwave function"). 3. You can change the microwave power (refer to "Setting the clock functions". Each touch of the cooking process • Cooking vegetables • Melting gelatine and butter • Defrosting and heating frozen meals • Heating one-plate meals • Simmering stews • Cooking egg dishes • Continuing to the Duration time. Touch to set the time for guidance only. Power setting • 1000...

Product Manual
Page 18
... appliance uses the residual heat to continue the cooking process until the display shows the necessary clock function and the related symbol. 3. Application To set the minutes and to set a countdown (max. 2 h 30 min). Press or to start. Press to stop the signal. To set the switch-off time for a clock function, the time starts to automatically activate and deactivate the appliance on the operation of...
... appliance uses the residual heat to continue the cooking process until the display shows the necessary clock function and the related symbol. 3. Application To set the minutes and to set a countdown (max. 2 h 30 min). Press or to start. Press to stop the signal. To set the switch-off time for a clock function, the time starts to automatically activate and deactivate the appliance on the operation of...

Product Manual
Page 19
... to set . Select the function: Weight Automatic. Touch or to cancel. 3. Press to confirm. 3. Press a sensor field. Set the length of recipes you cannot change the heating functions. 8.4 Extra Time The function: Extra Time makes the heating function continue after the baking or roasting procedure ends. Press . The recipes are fixed and you can use the function: Manual, the appliance uses the automatic settings. Select...
... to set . Select the function: Weight Automatic. Touch or to cancel. 3. Press to confirm. 3. Press a sensor field. Set the length of recipes you cannot change the heating functions. 8.4 Extra Time The function: Extra Time makes the heating function continue after the baking or roasting procedure ends. Press . The recipes are fixed and you can use the function: Manual, the appliance uses the automatic settings. Select...
Product Manual
Page 22
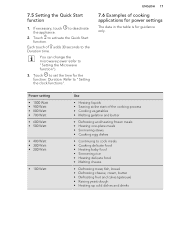
... in the tables are two modes of display brightness: • Night brightness - Set the necessary time. 12.2 Baking • Your oven can use this function if you had before. 22 www.aeg.com 11.5 Automatic Switch-off does not work with a wet towel or plastic foil. Refer to Safety chapters. Plate Warming For warming plates and dishes. display is activated. - Temperature (°C) 30 - 115 120 - 195...
... in the tables are two modes of display brightness: • Night brightness - Set the necessary time. 12.2 Baking • Your oven can use this function if you had before. 22 www.aeg.com 11.5 Automatic Switch-off does not work with a wet towel or plastic foil. Refer to Safety chapters. Plate Warming For warming plates and dishes. display is activated. - Temperature (°C) 30 - 115 120 - 195...
Product Manual
Page 23
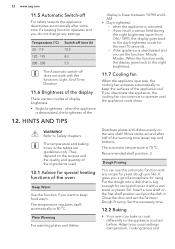
... heights do not change the temperature setting. The oven temperature is too Set a lower oven tempera- The oven temperature is too The next time you bake, set soggy, lumpy or streaky. When the trays become cold again, the distortions are gone. The cake sinks and becomes The oven temperature is ture and a longer baking too short. Set a longer baking time. Use less liquid. high and the baking time is too The next time you bake, set...
... heights do not change the temperature setting. The oven temperature is too Set a lower oven tempera- The oven temperature is too The next time you bake, set soggy, lumpy or streaky. When the trays become cold again, the distortions are gone. The cake sinks and becomes The oven temperature is ture and a longer baking too short. Set a longer baking time. Use less liquid. high and the baking time is too The next time you bake, set...
Product Manual
Page 28
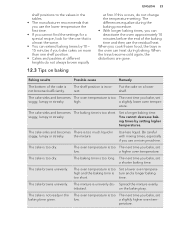
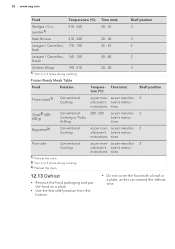
... 3 Flammekuchen1) 230 12 - 20 3 Piroggen (Russian ver- 180 - 200 15 - 25 3 sion of calzone)1) 1) Preheat the oven. 2) Use a deep pan. 12.9 Roasting • Use heat-resistant ovenware to roast (refer to the instructions of the manufacturer). • You can roast large roasting joints directly in the deep pan (if present) or on the wire shelf above in the roasting tin with their juices several times during roasting.
... 3 Flammekuchen1) 230 12 - 20 3 Piroggen (Russian ver- 180 - 200 15 - 25 3 sion of calzone)1) 1) Preheat the oven. 2) Use a deep pan. 12.9 Roasting • Use heat-resistant ovenware to roast (refer to the instructions of the manufacturer). • You can roast large roasting joints directly in the deep pan (if present) or on the wire shelf above in the roasting tin with their juices several times during roasting.
Product Manual
Page 32
...'s instructions Baguettes3) Conventional Cooking as per manufac- 2 ufacturer's turer's instrucinstructions tions 12.13 Defrost • Remove the food packaging and put the food on a plate. • Use the first shelf position from the bottom. • Do not cover the food with a bowl or a plate, as this can extend the defrost time. as per man- 32 www.aeg.com Food Temperature...
...'s instructions Baguettes3) Conventional Cooking as per manufac- 2 ufacturer's turer's instrucinstructions tions 12.13 Defrost • Remove the food packaging and put the food on a plate. • Use the first shelf position from the bottom. • Do not cover the food with a bowl or a plate, as this can extend the defrost time. as per man- 32 www.aeg.com Food Temperature...
Product Manual
Page 40
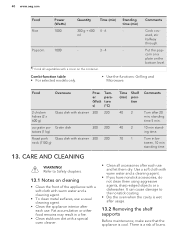
... level. CARE AND CLEANING WARNING! Combi-function table • For selected models only. • Use the functions: Grilling and Microwave. Use a soft cloth with a cover on the container. Refer to the nonstick coating. • Dry the oven when the cavity is wet after 20 min, standing time 5 min. 10 min standing time. Food Ovenware Power (Watt s) Temperature (°C) 2 chicken halves (2 x 600 g) Glass dish...
... level. CARE AND CLEANING WARNING! Combi-function table • For selected models only. • Use the functions: Grilling and Microwave. Use a soft cloth with a cover on the container. Refer to the nonstick coating. • Dry the oven when the cavity is wet after 20 min, standing time 5 min. 10 min standing time. Food Ovenware Power (Watt s) Temperature (°C) 2 chicken halves (2 x 600 g) Glass dish...
Product Manual
Page 41
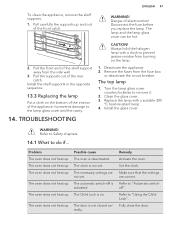
... to remove it. 2. Turn the lamp glass cover counterclockwise to the lamp glass cover and the cavity. 14. The oven does not heat up . To clean the appliance, remove the shelf supports. 1. Danger of the appliance. Remove the fuses from the side wall. 3. Replace the lamp with a cloth to "Automatic switchoff". Refer to Safety chapters. 14.1 What to "Using the Child Lock". The oven does not heat up . The door...
... to remove it. 2. Turn the lamp glass cover counterclockwise to the lamp glass cover and the cavity. 14. The oven does not heat up . To clean the appliance, remove the shelf supports. 1. Danger of the appliance. Remove the fuses from the side wall. 3. Replace the lamp with a cloth to "Automatic switchoff". Refer to Safety chapters. 14.1 What to "Using the Child Lock". The oven does not heat up . The door...
Product Manual
Page 42
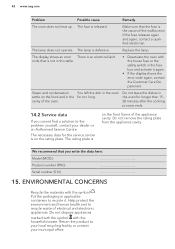
....aeg.com Problem Possible cause Remedy The oven does not heat up. The necessary data for the service centre is not in this table. • Deactivate the oven with the house fuse or the safety switch in the for longer than 15 20 minutes after the cooking process ends. 14.2 Service data If you write the data here: Model (MOD.) Product number (PNC) Serial number...
....aeg.com Problem Possible cause Remedy The oven does not heat up. The necessary data for the service centre is not in this table. • Deactivate the oven with the house fuse or the safety switch in the for longer than 15 20 minutes after the cooking process ends. 14.2 Service data If you write the data here: Model (MOD.) Product number (PNC) Serial number...


