
User Manual
Page 3
Care should be activated. • Children shall not carry out cleaning and user maintenance of the appliance without supervision. • Children aged 3 years and under must be kept away from this appliance when it is in operation at all packaging away ...8226; Keep all times. 1.2 General Safety • Only a qualified person must install this appliance and replace the cable. • WARNING: The appliance and its accessible parts become hot during use oven gloves to avoid touching heating elements. Always keep the instructions in a safe and accessible location for future reference. ...
Care should be activated. • Children shall not carry out cleaning and user maintenance of the appliance without supervision. • Children aged 3 years and under must be kept away from this appliance when it is in operation at all packaging away ...8226; Keep all times. 1.2 General Safety • Only a qualified person must install this appliance and replace the cable. • WARNING: The appliance and its accessible parts become hot during use oven gloves to avoid touching heating elements. Always keep the instructions in a safe and accessible location for future reference. ...
User Manual
Page 4
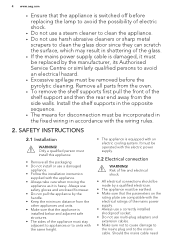
... need SAFETY INSTRUCTIONS 2.1 Installation WARNING! 4 www.aeg.com • Ensure that the appliance is switched off before the pyrolytic cleaning. Remove all the packaging. • Do not install or use multi-plug adapters and extension cables. • Make sure not to cause damage to the mains plug and to units with an electric cooling system. Risk of fire and electrical shock. • All electrical connections...
... need SAFETY INSTRUCTIONS 2.1 Installation WARNING! 4 www.aeg.com • Ensure that the appliance is switched off before the pyrolytic cleaning. Remove all the packaging. • Do not install or use multi-plug adapters and extension cables. • Make sure not to cause damage to the mains plug and to units with an electric cooling system. Risk of fire and electrical shock. • All electrical connections...

User Manual
Page 5
... leakage trips and contactors. • The electrical installation must have a contact opening width of alcohol and air. • Do not let sparks or open flames to come near or on the bottom. - WARNING! Risk of the appliance. • Use a deep pan for example room heating. • Always cook with the oven door closed furniture panel and cause subsequent damage to the appliance...
... leakage trips and contactors. • The electrical installation must have a contact opening width of alcohol and air. • Do not let sparks or open flames to come near or on the bottom. - WARNING! Risk of the appliance. • Use a deep pan for example room heating. • Always cook with the oven door closed furniture panel and cause subsequent damage to the appliance...

User Manual
Page 6
... Plus Steam button is in Pyrolytic Mode. any kind of all Pyrolytic Ovens / Cooking Residues as such consumers are strongly advised to humans, including infants or persons with a moist soft cloth. Only use at maximum temperature operation. • Unlike all the instructions for house lighting. • Before replacing the lamp, disconnect the appliance from all Pyrolytic Ovens. - Remove any non-stick pots, pans, trays, utensils...
... Plus Steam button is in Pyrolytic Mode. any kind of all Pyrolytic Ovens / Cooking Residues as such consumers are strongly advised to humans, including infants or persons with a moist soft cloth. Only use at maximum temperature operation. • Unlike all the instructions for house lighting. • Before replacing the lamp, disconnect the appliance from all Pyrolytic Ovens. - Remove any non-stick pots, pans, trays, utensils...
User Manual
Page 7
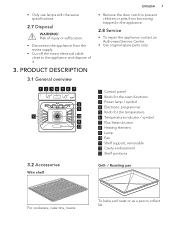
... Authorised Service Centre. • Use original spare parts only. 1234 56 7 8 5 9 4 13 3 10 2 1 11 12 1 Control panel 2 Knob for the oven functions 3 Power lamp / symbol 4 Electronic programmer 5 Knob for the temperature 6 Temperature indicator / symbol 7 Plus Steam button 8 Heating element 9 Lamp 10 Fan 11 Shelf support, removable 12 Cavity embossment 13 Shelf positions 3.2 Accessories Wire shelf Grill- / Roasting pan For cookware, cake tins, roasts. Risk of it. 3. To bake and roast or as a pan...
... Authorised Service Centre. • Use original spare parts only. 1234 56 7 8 5 9 4 13 3 10 2 1 11 12 1 Control panel 2 Knob for the oven functions 3 Power lamp / symbol 4 Electronic programmer 5 Knob for the temperature 6 Temperature indicator / symbol 7 Plus Steam button 8 Heating element 9 Lamp 10 Fan 11 Shelf support, removable 12 Cavity embossment 13 Shelf positions 3.2 Accessories Wire shelf Grill- / Roasting pan For cookware, cake tins, roasts. Risk of it. 3. To bake and roast or as a pan...
User Manual
Page 8
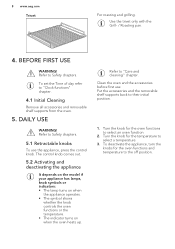
... Grill- / Roasting pan. 4. BEFORE FIRST USE WARNING! Turn the knob for the temperature to the off position. Refer to select an oven function. 2. To set the Time of day refer to "Care and cleaning" chapter. Refer to "Clock functions" chapter. 4.1 Initial Cleaning Remove all accessories and removable shelf supports from the oven. 5. The control knob comes out. 5.2 Activating and deactivating the appliance It depends on the model if...
... Grill- / Roasting pan. 4. BEFORE FIRST USE WARNING! Turn the knob for the temperature to the off position. Refer to select an oven function. 2. To set the Time of day refer to "Care and cleaning" chapter. Refer to "Clock functions" chapter. 4.1 Initial Cleaning Remove all accessories and removable shelf supports from the oven. 5. The control knob comes out. 5.2 Activating and deactivating the appliance It depends on the model if...

User Manual
Page 9
... more intensive browning and a crispy bottom. To bake food on the amount and size of the oven. True Fan Cooking True Fan Cooking PLUS Pizza Setting Conventional Cooking (Top / Bottom Heat) Bottom Heat To bake on one shelf position. To get more information about the recommended settings, refer to achieve the desired cooking result. This function was used in accordance with bones on up to...
... more intensive browning and a crispy bottom. To bake food on the amount and size of the oven. True Fan Cooking True Fan Cooking PLUS Pizza Setting Conventional Cooking (Top / Bottom Heat) Bottom Heat To bake on one shelf position. To get more information about the recommended settings, refer to achieve the desired cooking result. This function was used in accordance with bones on up to...
User Manual
Page 10
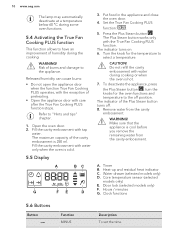
... cooking or when the oven is cold. 5.5 Display A BC G FE D 3. The Plus Steam button works only with tap water. Clock functions 5.6 Buttons Button Function MINUS Description To set the time. Press the Plus Steam button . To deactivate the appliance, press the Plus Steam button , turn the knobs for the temperature to select a temperature. Timer B. Released humidity can cause burns: • Do not open the appliance door when the function True Fan Cooking PLUS operates...
... cooking or when the oven is cold. 5.5 Display A BC G FE D 3. The Plus Steam button works only with tap water. Clock functions 5.6 Buttons Button Function MINUS Description To set the time. Press the Plus Steam button . To deactivate the appliance, press the Plus Steam button , turn the knobs for the temperature to select a temperature. Timer B. Released humidity can cause burns: • Do not open the appliance door when the function True Fan Cooking PLUS operates...

User Manual
Page 11
... activate the True Fan Cooking PLUS function. 5.7 Heat-up indicator When you do not set . The bars show or change the time of day only when the appliance is off . CLOCK FUNCTIONS 6.1 Clock functions table one by 6. Clock function TIME OF DAY DURATION END TIME DELAY Application To show that the oven temperature increases or decreases. The display shows hour. COUNT UP TIMER If you activate...
... activate the True Fan Cooking PLUS function. 5.7 Heat-up indicator When you do not set . The bars show or change the time of day only when the appliance is off . CLOCK FUNCTIONS 6.1 Clock functions table one by 6. Clock function TIME OF DAY DURATION END TIME DELAY Application To show that the oven temperature increases or decreases. The display shows hour. COUNT UP TIMER If you activate...

User Manual
Page 14
... °C. 8.4 Automatic Switch-off For safety reasons the appliance deactivates automatically after some time if an oven function operates and you turn on automatically to the Child Lock. Loc appears on the display. To turn the knob for the oven functions, the oven stops. When you turn off does not work with the functions: Light, Duration, End. 8.5 Cooling fan When the oven operates, the cooling fan turns on the...
... °C. 8.4 Automatic Switch-off For safety reasons the appliance deactivates automatically after some time if an oven function operates and you turn on automatically to the Child Lock. Loc appears on the display. To turn the knob for the oven functions, the oven stops. When you turn off does not work with the functions: Light, Duration, End. 8.5 Cooling fan When the oven operates, the cooling fan turns on the...

User Manual
Page 16
... heights do not change the temperature setting. If this occurs, do not always brown equally at first. Food regeneration Food Water in the Temperacavity em- The differences equalize during baking. 16 www.aeg.com Food Water in the oven can extend baking times by 10 - 15 minutes if you had before cooking. Comments sition 65 - 80 2 50 - 60 2 60 - 80 2 Glass baking...
... heights do not change the temperature setting. If this occurs, do not always brown equally at first. Food regeneration Food Water in the Temperacavity em- The differences equalize during baking. 16 www.aeg.com Food Water in the oven can extend baking times by 10 - 15 minutes if you had before cooking. Comments sition 65 - 80 2 50 - 60 2 60 - 80 2 Glass baking...

User Manual
Page 17
... - 1801) Flan base - time. a higher oven temperature. The cake browns unevenly. Set a longer baking time. The next time you use a mixing machine. on baking ENGLISH 17 Baking results Possible cause Remedy The bottom of the cake is too The next time you bake, set soggy, lumpy or streaky. You cannot decrease baking times by setting higher temperatures. Use less liquid. The cake browns unevenly. True Fan Cook- 150 - 160 che...
... - 1801) Flan base - time. a higher oven temperature. The cake browns unevenly. Set a longer baking time. The next time you use a mixing machine. on baking ENGLISH 17 Baking results Possible cause Remedy The bottom of the cake is too The next time you bake, set soggy, lumpy or streaky. You cannot decrease baking times by setting higher temperatures. Use less liquid. The cake browns unevenly. True Fan Cook- 150 - 160 che...

User Manual
Page 26
.... Bottom Heat • Use only preserve jars of water into the baking tray to give sufficient moisture in the oven. • When the liquid in the oven after approximately 35 - 60 minutes with one-litre jars), stop the oven halfway through the drying time, open the door and let it is deactivated. 26 www.aeg.com 9.15 Preserving - Soft fruit Food Temperature (°...
.... Bottom Heat • Use only preserve jars of water into the baking tray to give sufficient moisture in the oven. • When the liquid in the oven after approximately 35 - 60 minutes with one-litre jars), stop the oven halfway through the drying time, open the door and let it is deactivated. 26 www.aeg.com 9.15 Preserving - Soft fruit Food Temperature (°...

User Manual
Page 28
... higher for 5 minutes. 2) Turn halfway through. True Fan Cooking. 1501) Grilling Food Function Temperature (°C) Toast / Toast Grilling max Beef Steak / Beef Steak Grilling 1) Preheat the oven for the grill pan. • Clean stubborn dirt with warm water and a cleaning agent. • To clean metal surfaces, use a dedicated cleaning agent. • Clean the oven interior after each use. Top / Bottom Heat 1701) 20 - 30 Multilevel Baking. Fat accumulation or...
... higher for 5 minutes. 2) Turn halfway through. True Fan Cooking. 1501) Grilling Food Function Temperature (°C) Toast / Toast Grilling max Beef Steak / Beef Steak Grilling 1) Preheat the oven for the grill pan. • Clean stubborn dirt with warm water and a cleaning agent. • To clean metal surfaces, use a dedicated cleaning agent. • Clean the oven interior after each use. Top / Bottom Heat 1701) 20 - 30 Multilevel Baking. Fat accumulation or...
User Manual
Page 29
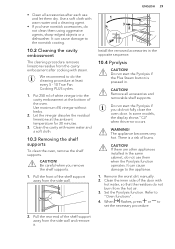
... each use them dry. Be careful when you did not fully close the oven door. CAUTION! WARNING! If there are other appliances installed in the same cabinet, do the cleaning procedure at least every 5 - 10 True Fan Cooking PLUS cycles. 1. Clean the inner side of the oven. Pull the front of burns. Do not start the Pyrolysis if you remove the shelf supports. 1. Set the...
... each use them dry. Be careful when you did not fully close the oven door. CAUTION! WARNING! If there are other appliances installed in the same cabinet, do the cleaning procedure at least every 5 - 10 True Fan Cooking PLUS cycles. 1. Clean the inner side of the oven. Pull the front of burns. Do not start the Pyrolysis if you remove the shelf supports. 1. Set the...
User Manual
Page 30
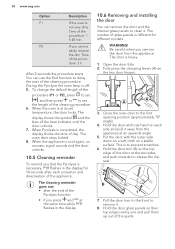
... the display. 10.6 Removing and installing the door You can use the End function to remove it . The cleaning reminder goes out: • after the end of the cleaning procedure. Time of the procedure: 1 h 30 min. To change the default length of the cleaning procedure. 6. Close the oven door to set the length of the procedure (P1 or P2), press to set temperature, the door locks. Hold the door glass panels...
... the display. 10.6 Removing and installing the door You can use the End function to remove it . The cleaning reminder goes out: • after the end of the cleaning procedure. Time of the procedure: 1 h 30 min. To change the default length of the cleaning procedure. 6. Close the oven door to set the length of the procedure (P1 or P2), press to set temperature, the door locks. Hold the door glass panels...
User Manual
Page 32
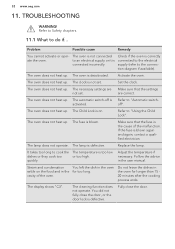
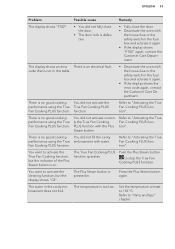
... not operate. The display shows "C3". 32 www.aeg.com 11. Check if the oven is not set . The oven does not heat up . Set the clock. The oven does not heat up . The automatic switch-off ". off is blown again and again, contact a qualified electrician. Refer to do if... If the fuse is Refer to the connection diagram if available). Replace the lamp. quickly. Adjust the temperature...
... not operate. The display shows "C3". 32 www.aeg.com 11. Check if the oven is not set . The oven does not heat up . Set the clock. The oven does not heat up . The automatic switch-off ". off is blown again and again, contact a qualified electrician. Refer to do if... If the fuse is Refer to the connection diagram if available). Replace the lamp. quickly. Adjust the temperature...
User Manual
Page 33
... True Fan Cooking PLUS Fan Cooking PLUS function. You want to activate the True Fan Cooking function, but the display shows "C4". The Plus Steam button is pressed in the fuse box and activate it again. • If the display shows the error code again, contact the Customer Care Department. Set the temperature at least to "Hints and tips" chapter. Refer to 110 °C. ENGLISH 33 Problem Possible...
... True Fan Cooking PLUS Fan Cooking PLUS function. You want to activate the True Fan Cooking function, but the display shows "C4". The Plus Steam button is pressed in the fuse box and activate it again. • If the display shows the error code again, contact the Customer Care Department. Set the temperature at least to "Hints and tips" chapter. Refer to 110 °C. ENGLISH 33 Problem Possible...
User Manual
Page 35
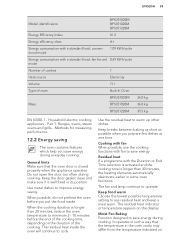
... 0.69 kWh/cycle mode Number of cavities 1 Heat source Electricity Volume 71 l Type of the cooking time, depending on the display. General hints Make sure that the temperature in some oven functions. Methods for measuring performance. 12.2 Energy saving The oven contains features which help you save energy during cooking. The fan and lamp continue to cook. ENGLISH 35 Model identification BPK351020M BPS351020M BPS351220M Energy Efficiency Index...
... 0.69 kWh/cycle mode Number of cavities 1 Heat source Electricity Volume 71 l Type of the cooking time, depending on the display. General hints Make sure that the temperature in some oven functions. Methods for measuring performance. 12.2 Energy saving The oven contains features which help you save energy during cooking. The fan and lamp continue to cook. ENGLISH 35 Model identification BPK351020M BPS351020M BPS351220M Energy Efficiency Index...

Specification Sheet
Page 1
.... cook dishes evenly with antifingerprint coating Product Description : Customer Specific ERT •Colour : Stainless Steel with this oven thanks to an additional heating ring element Technical Specs : • Cleaning : Pyrolytic •Cavity coating : Grey Enamel •Dimensions (mm) (HxWxD) : 594x595x567 •BI dimensions HxWxD in mm : 590x560x550 •Total electricity loading, W : 3200 •Voltage : 240 •Required Fuse : 16 •Frequency : 50 •Temperature range...
.... cook dishes evenly with antifingerprint coating Product Description : Customer Specific ERT •Colour : Stainless Steel with this oven thanks to an additional heating ring element Technical Specs : • Cleaning : Pyrolytic •Cavity coating : Grey Enamel •Dimensions (mm) (HxWxD) : 594x595x567 •BI dimensions HxWxD in mm : 590x560x550 •Total electricity loading, W : 3200 •Voltage : 240 •Required Fuse : 16 •Frequency : 50 •Temperature range...


