
Specification Sheet
Page 1
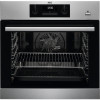
... class : A+ •Energy consumption, conventional mode, kWh per cycle : 0.99 •Energy consumption per EU standard cycle : 0 •Product Partner Code : S - BPS25102LM Built-in Oven ADD STEAM FOR CRISPIER BAKING In addition to create a golden color and tasty crust, while the heart A self-cleaning...the surface to all your dishes • Safe to Touch Top keeps the door cool and safe to touch Features : • 0 litre oven capacity •Isofront® Plus quadruple glazed door •Fan controlled defrosting •LED digital display •Base heat finishing •Auto ...
... class : A+ •Energy consumption, conventional mode, kWh per cycle : 0.99 •Energy consumption per EU standard cycle : 0 •Product Partner Code : S - BPS25102LM Built-in Oven ADD STEAM FOR CRISPIER BAKING In addition to create a golden color and tasty crust, while the heart A self-cleaning...the surface to all your dishes • Safe to Touch Top keeps the door cool and safe to touch Features : • 0 litre oven capacity •Isofront® Plus quadruple glazed door •Fan controlled defrosting •LED digital display •Base heat finishing •Auto ...

User Manual
Page 3
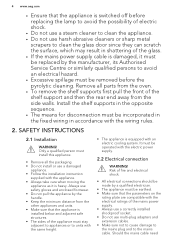
... out any maintenance, disconnect the appliance from this appliance and replace the cable. • WARNING: The appliance and its accessible parts become hot during use oven gloves to avoid touching heating elements.
... out any maintenance, disconnect the appliance from this appliance and replace the cable. • WARNING: The appliance and its accessible parts become hot during use oven gloves to avoid touching heating elements.
User Manual
Page 4
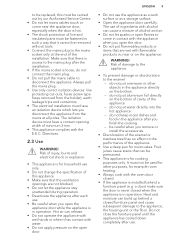
... by the handle. • Keep the minimum distance from the side walls. Only a qualified person must install this appliance. • Remove all parts from the oven. • To remove the shelf supports first pull the front of the shelf support and then the rear end away from the other appliances and... clean the glass door since they can scratch the surface, which may result in accordance with the wiring rules. 2. Should the mains cable need 4 www.aeg.com • Ensure that the appliance is switched off before the pyrolytic cleaning. SAFETY INSTRUCTIONS 2.1 Installation WARNING!
... by the handle. • Keep the minimum distance from the side walls. Only a qualified person must install this appliance. • Remove all parts from the oven. • To remove the shelf supports first pull the front of the shelf support and then the rear end away from the other appliances and... clean the glass door since they can scratch the surface, which may result in accordance with the wiring rules. 2. Should the mains cable need 4 www.aeg.com • Ensure that the appliance is switched off before the pyrolytic cleaning. SAFETY INSTRUCTIONS 2.1 Installation WARNING!
User Manual
Page 5
... cook with the appliance when you open flames to the mains plug after the installation. • If the mains socket is in contact with the oven door closed furniture panel and cause subsequent damage to the enamel: - Risk of the installation. Make sure that there is in , near the appliance door...
... cook with the appliance when you open flames to the mains plug after the installation. • If the mains socket is in contact with the oven door closed furniture panel and cause subsequent damage to the enamel: - Risk of the installation. Make sure that there is in , near the appliance door...
User Manual
Page 6
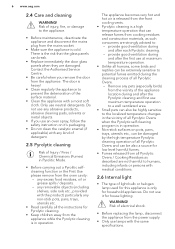
...sensitive to the localized temperature changes in operation. • Non-stick surfaces on it for Pyrolytic cleaning. • Keep children away from the oven cavity: - any removable objects (including shelves, side rails etc., provided with the product) particularly any abrasive products, abrasive cleaning pads, solvents or...this appliance is in the vicinity of the surface material. • Clean the appliance with the same specifications. 6 www.aeg.com 2.4 Care and cleaning WARNING! Do not use any non-stick pots, pans, trays, utensils etc. • Read carefully all Pyrolytic...
...sensitive to the localized temperature changes in operation. • Non-stick surfaces on it for Pyrolytic cleaning. • Keep children away from the oven cavity: - any removable objects (including shelves, side rails etc., provided with the product) particularly any abrasive products, abrasive cleaning pads, solvents or...this appliance is in the vicinity of the surface material. • Clean the appliance with the same specifications. 6 www.aeg.com 2.4 Care and cleaning WARNING! Do not use any non-stick pots, pans, trays, utensils etc. • Read carefully all Pyrolytic...

User Manual
Page 7
...; To repair the appliance contact an Authorised Service Centre. • Use original spare parts only. 1234 56 7 5 8 4 12 3 9 2 1 10 11 1 Control panel 2 Knob for the oven functions 3 Power lamp / symbol 4 Electronic programmer 5 Knob for the temperature 6 Temperature indicator / symbol 7 Heating element 8 Lamp 9 Fan 10 Shelf support, removable 11 Cavity embossment 12...
...; To repair the appliance contact an Authorised Service Centre. • Use original spare parts only. 1234 56 7 5 8 4 12 3 9 2 1 10 11 1 Control panel 2 Knob for the oven functions 3 Power lamp / symbol 4 Electronic programmer 5 Knob for the temperature 6 Temperature indicator / symbol 7 Heating element 8 Lamp 9 Fan 10 Shelf support, removable 11 Cavity embossment 12...
User Manual
Page 8
... To set the Time of day refer to the off . To deactivate the appliance, turn the knobs for the temperature to dry food. Oven function Off position Application The appliance is off position. Refer to "Care and cleaning" chapter. Refer to Safety chapters. 5.1 Activating and deactivating...the accessories and the removable shelf supports back to select an oven function. 2. Turn the knob for Top / Bottom Heat. DAILY USE WARNING! 8 www.aeg.com 4. Set the temperature 20 - 40 °C lower than for the oven functions to their initial position. 1. Clean the appliance and ...
... To set the Time of day refer to the off . To deactivate the appliance, turn the knobs for the temperature to dry food. Oven function Off position Application The appliance is off position. Refer to "Care and cleaning" chapter. Refer to Safety chapters. 5.1 Activating and deactivating...the accessories and the removable shelf supports back to select an oven function. 2. Turn the knob for Top / Bottom Heat. DAILY USE WARNING! 8 www.aeg.com 4. Set the temperature 20 - 40 °C lower than for the oven functions to their initial position. 1. Clean the appliance and ...

User Manual
Page 9
...intensive browning and a crispy bottom. Also to make gratins and to EN 60350-1. WARNING! Open the oven door. 2. Fill the cavity embossment with the Moist Fan Baking table in the oven. To bake and roast food on one shelf position for Top / Bottom Heat. to brown. Risk... the temperature 20 - 40 °C lower than for a more juiciness during baking. The maximum capacity of the oven. True Fan Cooking PLUS To add humidity during cooking. ENGLISH 9 Oven function Pizza Setting Conventional Cooking (Top / Bottom Heat) Bottom Heat Application To bake food on one shelf position. ...
...intensive browning and a crispy bottom. Also to make gratins and to EN 60350-1. WARNING! Open the oven door. 2. Fill the cavity embossment with the Moist Fan Baking table in the oven. To bake and roast food on one shelf position for Top / Bottom Heat. to brown. Risk... the temperature 20 - 40 °C lower than for a more juiciness during baking. The maximum capacity of the oven. True Fan Cooking PLUS To add humidity during cooking. ENGLISH 9 Oven function Pizza Setting Conventional Cooking (Top / Bottom Heat) Bottom Heat Application To bake food on one shelf position. ...
User Manual
Page 10
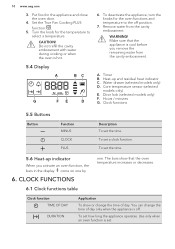
10 www.aeg.com 3. Turn the knob for the oven functions and temperature to select a temperature. CAUTION! Timer B. Heat-up indicator ... can change the time of day only when the appliance is cool before you activate an oven function, the bars in the appliance and close the oven door. 4. Set the True Fan Cooking PLUS function: . 5. Put food in the.... Clock functions 5.5 Buttons Button Function MINUS CLOCK PLUS Description To set a clock function. Use only when an oven function is hot. 5.4 Display A BC G FE D 6. WARNING! Core temperature sensor (selected models only)...
10 www.aeg.com 3. Turn the knob for the oven functions and temperature to select a temperature. CAUTION! Timer B. Heat-up indicator ... can change the time of day only when the appliance is cool before you activate an oven function, the bars in the appliance and close the oven door. 4. Set the True Fan Cooking PLUS function: . 5. Put food in the.... Clock functions 5.5 Buttons Button Function MINUS CLOCK PLUS Description To set a clock function. Use only when an oven function is hot. 5.4 Display A BC G FE D 6. WARNING! Core temperature sensor (selected models only)...

User Manual
Page 11
... Press again and again until starts to confirm. Press to flash. 3. Press any button to set time of the appliance. Set an oven function. 2. Set an oven function. 2. Press again and again until the indicator for DURATION time. 4. Press to set the hours. 2. and time setting flash ...UP TIMER automatically monitor how long the appliance operates. ENGLISH 11 Clock function END TIME DELAY Application To set 3. Use only when an oven function is on the operation of day will be used with the functions: DURATION, END. 6.2 Setting and changing the time After the...
... Press again and again until starts to confirm. Press to flash. 3. Press any button to set time of the appliance. Set an oven function. 2. Set an oven function. 2. Press again and again until the indicator for DURATION time. 4. Press to set the hours. 2. and time setting flash ...UP TIMER automatically monitor how long the appliance operates. ENGLISH 11 Clock function END TIME DELAY Application To set 3. Use only when an oven function is on the operation of day will be used with the functions: DURATION, END. 6.2 Setting and changing the time After the...
User Manual
Page 12
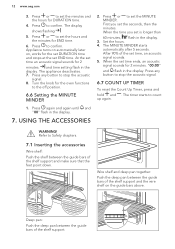
Press or to the off position. 6.6 Setting the MINUTE MINDER 1. Turn the knob for the oven functions to set the minutes and the hours for DURATION time. 4. After 90% of the shelf support. "00:00" and flash in the display. Press ... to count up again. Set the hours. 4. Deep pan: Push the deep pan between the guide bars of the set the MINUTE MINDER. 12 www.aeg.com 3. Press any button to stop the acoustic signal. 6.7 COUNT UP TIMER To reset the Count Up Timer, press and hold and . The MINUTE MINDER...
Press or to the off position. 6.6 Setting the MINUTE MINDER 1. Turn the knob for the oven functions to set the minutes and the hours for DURATION time. 4. After 90% of the shelf support. "00:00" and flash in the display. Press ... to count up again. Set the hours. 4. Deep pan: Push the deep pan between the guide bars of the set the MINUTE MINDER. 12 www.aeg.com 3. Press any button to stop the acoustic signal. 6.7 COUNT UP TIMER To reset the Count Up Timer, press and hold and . The MINUTE MINDER...

User Manual
Page 13
... knob for 2 seconds. Press and hold and at the top increase safety. SAFE and comes on the necessary shelf position. 8. Select an oven function and set it according your preferences The high rim around the shelf prevents cookware from a hot appliance. The Function Lock prevents an accidental change...roast larger pieces of the shelf. 7.2 Trivet and Grill- / Roasting pan WARNING! An acoustic signal sounds. Put the trivet into the oven on the knob. 1. Put the trivet into the oven on in the display. Put the deep pan into the deep pan so that the supports of a running...
... knob for 2 seconds. Press and hold and at the top increase safety. SAFE and comes on the necessary shelf position. 8. Select an oven function and set it according your preferences The high rim around the shelf prevents cookware from a hot appliance. The Function Lock prevents an accidental change...roast larger pieces of the shelf. 7.2 Trivet and Grill- / Roasting pan WARNING! An acoustic signal sounds. Put the trivet into the oven on the knob. 1. Put the trivet into the oven on in the display. Put the deep pan into the deep pan so that the supports of a running...
User Manual
Page 14
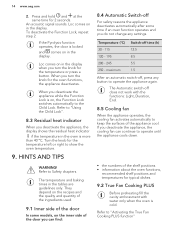
... of the ingredients used. 9.1 Inner side of the appliance cool. Refer to keep the surfaces of the door In some time if an oven function operates and you deactivate the appliance, the cooling fan can find: 8.4 Automatic Switch-off , press any settings. Loc comes on in... the tables are guidelines only. To deactivate the Function Lock, repeat step 2. 14 www.aeg.com 2. If you do not change any button to operate the appliance again. HINTS AND TIPS WARNING! An acoustic signal sounds. The temperature and...
... of the ingredients used. 9.1 Inner side of the appliance cool. Refer to keep the surfaces of the door In some time if an oven function operates and you deactivate the appliance, the cooling fan can find: 8.4 Automatic Switch-off , press any settings. Loc comes on in... the tables are guidelines only. To deactivate the Function Lock, repeat step 2. 14 www.aeg.com 2. If you do not change any button to operate the appliance again. HINTS AND TIPS WARNING! An acoustic signal sounds. The temperature and...

User Manual
Page 15
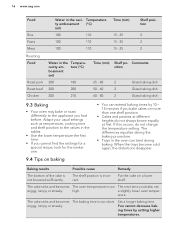
... 10 - 20 Cookies, 150 scones, croissants 150 - 180 10 - 20 Plum cake, 150 apple pie, cinnamon rolls 160 - 180 30 - 60 1) Preheat in an empty oven for 10 minutes before cooking. Cook from frozen Shelf po- Comments sition 2 Use baking tray.1) 2 Use baking tray.1) 2 Use baking tray.1) 2 Use baking tray.1) 2 Use... in the cavi- Temperature ty embossment (°C) (ml) 200 200 - 210 Frozen lasagna 200 180 - 200 Frozen croissant 200 170 - 180 1) Preheat in an empty oven for 5 minutes before cooking. Food regeneration Food Water in the cavi-
... 10 - 20 Cookies, 150 scones, croissants 150 - 180 10 - 20 Plum cake, 150 apple pie, cinnamon rolls 160 - 180 30 - 60 1) Preheat in an empty oven for 10 minutes before cooking. Cook from frozen Shelf po- Comments sition 2 Use baking tray.1) 2 Use baking tray.1) 2 Use baking tray.1) 2 Use baking tray.1) 2 Use... in the cavi- Temperature ty embossment (°C) (ml) 200 200 - 210 Frozen lasagna 200 180 - 200 Frozen croissant 200 170 - 180 1) Preheat in an empty oven for 5 minutes before cooking. Food regeneration Food Water in the cavi-
User Manual
Page 16
...at different heights do not change the temperature setting. The cake sinks and becomes The oven temperature is too short. ature. When the trays become cold again, the distortions disappear. 16 www.aeg.com Food Rice Pasta Meat Roasting Food Roast pork Roast beef Chicken Water in the ...Temperacavity em- The cake sinks and becomes soggy, lumpy or streaky. a slightly lower oven temper- Put the cake on baking • You can...
...at different heights do not change the temperature setting. The cake sinks and becomes The oven temperature is too short. ature. When the trays become cold again, the distortions disappear. 16 www.aeg.com Food Rice Pasta Meat Roasting Food Roast pork Roast beef Chicken Water in the ...Temperacavity em- The cake sinks and becomes soggy, lumpy or streaky. a slightly lower oven temper- Put the cake on baking • You can...

User Manual
Page 17
...True Fan Cook- 150 - 170 20 - 25 2 sponge mixture ing Cheesecake Top / Bottom 170 - 190 60 - 90 1 Heat 1) Preheat the oven. The cake is unevenly dis- The cake browns unevenly. The mixture is too dry. perature. 9.5 Baking on the baking tray. The next time you ...Temperature (°C) Time (min) Shelf position Ring cake / Brio- high and the baking time is too Set a lower oven tempera- Spread the mixture evenly tributed. The oven temperature is ture and a longer baking too short. the mixture. Be careful with mixing times, especially if you bake, set...
...True Fan Cook- 150 - 170 20 - 25 2 sponge mixture ing Cheesecake Top / Bottom 170 - 190 60 - 90 1 Heat 1) Preheat the oven. The cake is unevenly dis- The cake browns unevenly. The mixture is too dry. perature. 9.5 Baking on the baking tray. The next time you ...Temperature (°C) Time (min) Shelf position Ring cake / Brio- high and the baking time is too Set a lower oven tempera- Spread the mixture evenly tributed. The oven temperature is ture and a longer baking too short. the mixture. Be careful with mixing times, especially if you bake, set...

User Manual
Page 18
Top / Bottom Heat 1. 2. 2301) 160 - 180 1. 2. 20 30 60 1 2. Top / Bottom Heat 160 - 1801) 40 - 80 3 tard) 1) Preheat the oven. 2) Use a deep pan. True Fan Cook- 150 - 160 10 - 20 3 cuits ing Biscuits made True Fan Cookwith egg white / ing Meringues 80 - 100 120 - ... (e.g. dure. Second part of baking proce- quark, cream, cus- Biscuits Food Function Temperature (°C) Time (min) Shelf position Short pastry bis- 18 www.aeg.com Food Function Temperature (°C) Time (min) Shelf position Bread (rye bread): 1. First part of baking procedure.
Top / Bottom Heat 1. 2. 2301) 160 - 180 1. 2. 20 30 60 1 2. Top / Bottom Heat 160 - 1801) 40 - 80 3 tard) 1) Preheat the oven. 2) Use a deep pan. True Fan Cook- 150 - 160 10 - 20 3 cuits ing Biscuits made True Fan Cookwith egg white / ing Meringues 80 - 100 120 - ... (e.g. dure. Second part of baking proce- quark, cream, cus- Biscuits Food Function Temperature (°C) Time (min) Shelf position Short pastry bis- 18 www.aeg.com Food Function Temperature (°C) Time (min) Shelf position Bread (rye bread): 1. First part of baking procedure.

User Manual
Page 19
bles ing 1) Preheat the oven. 160 - 170 9.7 Moist Fan Baking For best results follow the baking times listed in the table below. Time (min) 20 - 40 20 - 30 10 - 25 ... Fan Cook- 150 - 160 ing Puff pastries True Fan Cook- 170 - 1801) ing Rolls True Fan Cook- 1601) ing Rolls Top / Bottom Heat 1) Preheat the oven. 190 - 2101) 9.6 Bakes and gratins Food Function Temperature (°C) Pasta bake Top / Bottom Heat 180 - 200 Lasagne Top / Bottom Heat 180 - 200 Vegetables au gratin1...
bles ing 1) Preheat the oven. 160 - 170 9.7 Moist Fan Baking For best results follow the baking times listed in the table below. Time (min) 20 - 40 20 - 30 10 - 25 ... Fan Cook- 150 - 160 ing Puff pastries True Fan Cook- 170 - 1801) ing Rolls True Fan Cook- 1601) ing Rolls Top / Bottom Heat 1) Preheat the oven. 190 - 2101) 9.6 Bakes and gratins Food Function Temperature (°C) Pasta bake Top / Bottom Heat 180 - 200 Lasagne Top / Bottom Heat 180 - 200 Vegetables au gratin1...

User Manual
Page 20
20 www.aeg.com Food Temperature (°C) Pasta gratin 200 - 220 Potato gratin 180 - 200 Moussaka 170 - 190 Lasagne 180 - 200 Cannelloni 180 - 200 Bread pudding 190 - 200 ... on baking trays Food Temperature (°C) Time (min) Shelf position 2 positions Cream puffs / 160 - 1801) 25 - 45 1 / 4 Eclairs Dry streusel cake 150 - 160 1) Preheat the oven. 30 - 45 Biscuits / small cakes / small cakes / pastries / rolls Food Temperature (°C) Time (min) 1 / 4 Shelf position 2 positions Short pastry bis- 150 - 160 20 - 40 1 / 4 cuits...
20 www.aeg.com Food Temperature (°C) Pasta gratin 200 - 220 Potato gratin 180 - 200 Moussaka 170 - 190 Lasagne 180 - 200 Cannelloni 180 - 200 Bread pudding 190 - 200 ... on baking trays Food Temperature (°C) Time (min) Shelf position 2 positions Cream puffs / 160 - 1801) 25 - 45 1 / 4 Eclairs Dry streusel cake 150 - 160 1) Preheat the oven. 30 - 45 Biscuits / small cakes / small cakes / pastries / rolls Food Temperature (°C) Time (min) 1 / 4 Shelf position 2 positions Short pastry bis- 150 - 160 20 - 40 1 / 4 cuits...

User Manual
Page 21
... on it's surface. Food Temperature (°C) Pizza (thin crust) 200 - 2301)2) Pizza (with yeast dough 160 - 170 Puff pastries 170 - 1801) Rolls 180 1) Preheat the oven. 9.9 Pizza Setting 30 - 60 30 - 50 20 - 30 Shelf position 2 positions 1 / 4 3 positions - 1 / 4 - 1 / 4 - ENGLISH 21 Food Temperature (°C) Time (min) Biscuits made with a ... the wire shelf above the deep pan. • Put some liquid in the deep pan to the instructions of calzone) 1) Preheat the oven. 2) Use a deep pan. 180 - 2001) 9.10 Roasting • Use heat-resistant ovenware to roast.
... on it's surface. Food Temperature (°C) Pizza (thin crust) 200 - 2301)2) Pizza (with yeast dough 160 - 170 Puff pastries 170 - 1801) Rolls 180 1) Preheat the oven. 9.9 Pizza Setting 30 - 60 30 - 50 20 - 30 Shelf position 2 positions 1 / 4 3 positions - 1 / 4 - 1 / 4 - ENGLISH 21 Food Temperature (°C) Time (min) Biscuits made with a ... the wire shelf above the deep pan. • Put some liquid in the deep pan to the instructions of calzone) 1) Preheat the oven. 2) Use a deep pan. 180 - 2001) 9.10 Roasting • Use heat-resistant ovenware to roast.


