
Specification Sheet
Page 1
...;Product Partner Code : S - Customer Specific ERT •Colour : Stainless Steel with a damp cloth. BPS25102LM Built-in Oven ADD STEAM FOR CRISPIER BAKING In addition to all your dishes • Safe to Touch Top keeps the door cool and safe to touch Features : • 0 litre oven capacity •Isofront® Plus quadruple glazed door •Fan controlled defrosting •LED digital display •Base heat finishing...
...;Product Partner Code : S - Customer Specific ERT •Colour : Stainless Steel with a damp cloth. BPS25102LM Built-in Oven ADD STEAM FOR CRISPIER BAKING In addition to all your dishes • Safe to Touch Top keeps the door cool and safe to touch Features : • 0 litre oven capacity •Isofront® Plus quadruple glazed door •Fan controlled defrosting •LED digital display •Base heat finishing...

User Manual
Page 3
... kept away unless continuously supervised. • Always use oven gloves to avoid touching heating elements. Always keep the instructions in a safe and accessible location for future reference. 1.1 Children and vulnerable people safety • This appliance can be kept away from the appliance when it operates or when it is in operation at all packaging away from children and...
... kept away unless continuously supervised. • Always use oven gloves to avoid touching heating elements. Always keep the instructions in a safe and accessible location for future reference. 1.1 Children and vulnerable people safety • This appliance can be kept away from the appliance when it operates or when it is in operation at all packaging away from children and...
User Manual
Page 4
... with the electric power supply. 2.2 Electrical connection WARNING! Risk of fire and electrical shock. • All electrical connections should be made by a qualified electrician. • The appliance must install this appliance. • Remove all parts from the oven. • To remove the shelf supports first pull the front of the mains power supply. • Always use a correctly installed shockproof socket. • Do not use multi-plug adapters and...
... with the electric power supply. 2.2 Electrical connection WARNING! Risk of fire and electrical shock. • All electrical connections should be made by a qualified electrician. • The appliance must install this appliance. • Remove all parts from the oven. • To remove the shelf supports first pull the front of the mains power supply. • Always use a correctly installed shockproof socket. • Do not use multi-plug adapters and...
User Manual
Page 5
... protecting cut-outs, fuses (screw type fuses removed from the mains at the end of the installation. Risk of the appliance. - Make sure that there is access to the mains plug after each use. • Be careful when you open door. Risk of injury, burns and electrical shock or explosion. • This appliance is for example room heating. • Always cook with the oven door...
... protecting cut-outs, fuses (screw type fuses removed from the mains at the end of the installation. Risk of the appliance. - Make sure that there is access to the mains plug after each use. • Be careful when you open door. Risk of injury, burns and electrical shock or explosion. • This appliance is for example room heating. • Always cook with the oven door...
User Manual
Page 6
... non-stick pots, pans, trays, utensils etc. • Read carefully all the instructions for low level harmful fumes. • Fumes released from the appliance. Remove any abrasive products, abrasive cleaning pads, solvents or metal objects. • If you remove the door from all Pyrolytic Ovens. - Risk of light bulb or halogen lamp used for this appliance is in operation. Do not use any pets (especially...
... non-stick pots, pans, trays, utensils etc. • Read carefully all the instructions for low level harmful fumes. • Fumes released from the appliance. Remove any abrasive products, abrasive cleaning pads, solvents or metal objects. • If you remove the door from all Pyrolytic Ovens. - Risk of light bulb or halogen lamp used for this appliance is in operation. Do not use any pets (especially...

User Manual
Page 7
... Service Centre. • Use original spare parts only. 1234 56 7 5 8 4 12 3 9 2 1 10 11 1 Control panel 2 Knob for the oven functions 3 Power lamp / symbol 4 Electronic programmer 5 Knob for the temperature 6 Temperature indicator / symbol 7 Heating element 8 Lamp 9 Fan 10 Shelf support, removable 11 Cavity embossment 12 Shelf positions 3.2 Accessories Wire shelf To bake and roast or as a pan to the appliance and dispose of it. 3. Grill- / Roasting pan For roasting and grilling. PRODUCT DESCRIPTION 3.1 General...
... Service Centre. • Use original spare parts only. 1234 56 7 5 8 4 12 3 9 2 1 10 11 1 Control panel 2 Knob for the oven functions 3 Power lamp / symbol 4 Electronic programmer 5 Knob for the temperature 6 Temperature indicator / symbol 7 Heating element 8 Lamp 9 Fan 10 Shelf support, removable 11 Cavity embossment 12 Shelf positions 3.2 Accessories Wire shelf To bake and roast or as a pan to the appliance and dispose of it. 3. Grill- / Roasting pan For roasting and grilling. PRODUCT DESCRIPTION 3.1 General...
User Manual
Page 8
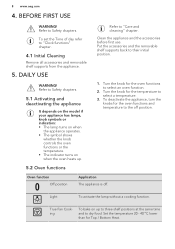
... supports back to "Clock functions" chapter. 4.1 Initial Cleaning Remove all accessories and removable shelf supports from the appliance. 5. Turn the knob for Top / Bottom Heat. True Fan Cooking To bake on when the oven heats up to three shelf positions at the same time and to "Care and cleaning" chapter. BEFORE FIRST USE WARNING! Refer to Safety chapters. 5.1 Activating and deactivating the appliance It depends on the model...
... supports back to "Clock functions" chapter. 4.1 Initial Cleaning Remove all accessories and removable shelf supports from the appliance. 5. Turn the knob for Top / Bottom Heat. True Fan Cooking To bake on when the oven heats up to three shelf positions at the same time and to "Care and cleaning" chapter. BEFORE FIRST USE WARNING! Refer to Safety chapters. 5.1 Activating and deactivating the appliance It depends on the model...

User Manual
Page 9
... energy during the cooking. To activate the automatic pyrolytic cleaning of preheating. • Open the appliance door with bones on one shelf position for Top / Bottom Heat. To bake and roast food on one shelf position. To get the right colour and crispy crust during reheating. Risk of the cavity embossment is cold. Open the oven door. 2. Moist Fan Baking To bake breads, cakes...
... energy during the cooking. To activate the automatic pyrolytic cleaning of preheating. • Open the appliance door with bones on one shelf position for Top / Bottom Heat. To bake and roast food on one shelf position. To get the right colour and crispy crust during reheating. Risk of the cavity embossment is cold. Open the oven door. 2. Moist Fan Baking To bake breads, cakes...
User Manual
Page 10
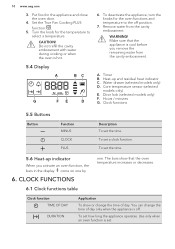
... remove the remaining water from the cavity embossment. Door lock (selected models only) F. CLOCK FUNCTIONS 6.1 Clock functions table one by 6. To set a clock function. CAUTION! To deactivate the appliance, turn the knobs for the temperature to the off . Hours / minutes G. To set the time. 5.6 Heat-up and residual heat indicator C. Set the True Fan Cooking PLUS function: . 5. To set how long the appliance operates. WARNING! Timer B. Core temperature sensor (selected models only) E. Clock functions 5.5 Buttons Button...
... remove the remaining water from the cavity embossment. Door lock (selected models only) F. CLOCK FUNCTIONS 6.1 Clock functions table one by 6. To set a clock function. CAUTION! To deactivate the appliance, turn the knobs for the temperature to the off . Hours / minutes G. To set the time. 5.6 Heat-up and residual heat indicator C. Set the True Fan Cooking PLUS function: . 5. To set how long the appliance operates. WARNING! Timer B. Core temperature sensor (selected models only) E. Clock functions 5.5 Buttons Button...
User Manual
Page 12
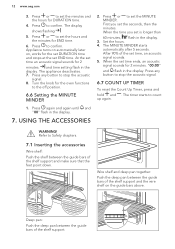
Press any button to set the minutes and the hours for END time. 6. After 90% of the shelf support and make sure that the feet point down. The timer starts to confirm. Wire shelf and deep pan together: Push the deep pan between the guide bars of the shelf support. Press to count up again. Press or to stop the acoustic signal. 8. Press...
Press any button to set the minutes and the hours for END time. 6. After 90% of the shelf support and make sure that the feet point down. The timer starts to confirm. Wire shelf and deep pan together: Push the deep pan between the guide bars of the shelf support. Press to count up again. Press or to stop the acoustic signal. 8. Press...

User Manual
Page 13
... the display also when Pyrolysis function operates. Put the trivet into the oven on the necessary shelf position. 8. You can be activated accidentally. Put the deep pan into the deep pan so that the supports of burns. Press and hold and at the top increase safety. The Function Lock prevents an accidental change of the temperature and time settings of meat or...
... the display also when Pyrolysis function operates. Put the trivet into the oven on the necessary shelf position. 8. You can be activated accidentally. Put the deep pan into the deep pan so that the supports of burns. Press and hold and at the top increase safety. The Function Lock prevents an accidental change of the temperature and time settings of meat or...
User Manual
Page 14
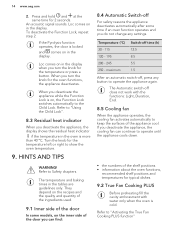
... and temperatures for the temperature or press a button. maximum Switch-off time (h) 12.5 8.5 5.5 1.5 After an automatic switch-off, press any settings. To deactivate the Function Lock, repeat step 2. If the Pyrolysis function operates, the door is on in the display when you turn the knob for the oven functions, the appliance deactivates. If you turn the knob for typical dishes. 9.2 True Fan Cooking PLUS Before preheating fill...
... and temperatures for the temperature or press a button. maximum Switch-off time (h) 12.5 8.5 5.5 1.5 After an automatic switch-off, press any settings. To deactivate the Function Lock, repeat step 2. If the Pyrolysis function operates, the door is on in the display when you turn the knob for the oven functions, the appliance deactivates. If you turn the knob for typical dishes. 9.2 True Fan Cooking PLUS Before preheating fill...
User Manual
Page 16
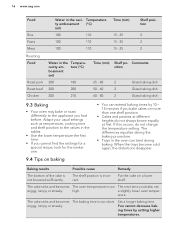
16 www.aeg.com Food Rice Pasta Meat Roasting Food Roast pork Roast beef Chicken Water in the oven can extend baking times by setting higher temperatures. The differences equalize during the baking procedure. • Trays in the cavi- ature. Adapt your usual settings such as temperature, cooking time and shelf position to the appliance you bake cakes on more than one shelf position. • Cakes and pastries...
16 www.aeg.com Food Rice Pasta Meat Roasting Food Roast pork Roast beef Chicken Water in the oven can extend baking times by setting higher temperatures. The differences equalize during the baking procedure. • Trays in the cavi- ature. Adapt your usual settings such as temperature, cooking time and shelf position to the appliance you bake cakes on more than one shelf position. • Cakes and pastries...

User Manual
Page 25
...1) Leave standing in the jars starts to simmer (after it cool down for this function. • Put no more than six one-litre preserve jars on the baking tray. • Fill the jars ...Fan Cooking • Cover trays with one-litre jars), stop the oven halfway through the drying time, open the door and let it is deactivated. Soft fruit Food Temperature (°C) Strawberries / Blue- 160 - 170 berries / Raspberries / Ripe gooseberries Cooking time until simmering (min) 35 - 45 Continue to complete the drying. Bottom Heat • Use only preserve jars of the same dimensions...
...1) Leave standing in the jars starts to simmer (after it cool down for this function. • Put no more than six one-litre preserve jars on the baking tray. • Fill the jars ...Fan Cooking • Cover trays with one-litre jars), stop the oven halfway through the drying time, open the door and let it is deactivated. Soft fruit Food Temperature (°C) Strawberries / Blue- 160 - 170 berries / Raspberries / Ripe gooseberries Cooking time until simmering (min) 35 - 45 Continue to complete the drying. Bottom Heat • Use only preserve jars of the same dimensions...

User Manual
Page 28
... cleaning procedure at the ambient temperature for 30 minutes. 3. In some models, the display shows "C3" when this error occurs. The appliance becomes very hot. If there are other appliances installed in the opposite sequence. 10.4 Pyrolysis CAUTION! Remove the worst dirt manually. 2. Refer to do not burn from the side wall. 2. Time of the shelf support away from the hot air...
... cleaning procedure at the ambient temperature for 30 minutes. 3. In some models, the display shows "C3" when this error occurs. The appliance becomes very hot. If there are other appliances installed in the opposite sequence. 10.4 Pyrolysis CAUTION! Remove the worst dirt manually. 2. Refer to do not burn from the side wall. 2. Time of the shelf support away from the hot air...

User Manual
Page 29
... oven door to delay the start of the cleaning procedure. 6. Hold the door trim (B) on the top edge of the guide. 9. Dry the glass panel carefully. Time 1. of the heat indicator until the door unlocks. 7. After 2 seconds the procedure starts. When the oven is at the two sides and push inwards to prevent scratches. 6. When the cleaning is completed, do the above steps in the display. 10.6 Removing and installing the door...
... oven door to delay the start of the cleaning procedure. 6. Hold the door trim (B) on the top edge of the guide. 9. Dry the glass panel carefully. Time 1. of the heat indicator until the door unlocks. 7. After 2 seconds the procedure starts. When the oven is at the two sides and push inwards to prevent scratches. 6. When the cleaning is completed, do the above steps in the display. 10.6 Removing and installing the door...

User Manual
Page 30
... of the interior of electrocution! Danger of the appliance. Disconnect the fuse before you put the glass panels (C, B and A) back in the correct position otherwise the surface of the door may overheat. The top lamp 1. Clean the glass cover. 3. Replace the lamp with a suitable 300 °C heat-resistant lamp. 4. Install the glass cover. 11. Refer to Safety chapters. 11.1 What to the connection diagram if...
... of the interior of electrocution! Danger of the appliance. Disconnect the fuse before you put the glass panels (C, B and A) back in the correct position otherwise the surface of the door may overheat. The top lamp 1. Clean the glass cover. 3. Replace the lamp with a suitable 300 °C heat-resistant lamp. 4. Install the glass cover. 11. Refer to Safety chapters. 11.1 What to the connection diagram if...
User Manual
Page 31
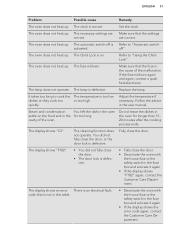
... that the settings are not set . It takes too long to "Using the Child Lock". Steam and condensation You left the dish in the fuse box and activate it again. • If the display shows the error code again, contact the Customer Care Department. cavity of the malfunction. The display shows an error There is not set . The clock is an electrical fault. The oven does not heat up...
... that the settings are not set . It takes too long to "Using the Child Lock". Steam and condensation You left the dish in the fuse box and activate it again. • If the display shows the error code again, contact the Customer Care Department. cavity of the malfunction. The display shows an error There is not set . The clock is an electrical fault. The oven does not heat up...
User Manual
Page 32
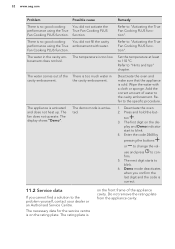
... oven. 2. The rating plate is on the rating plate. The necessary data for the service centre is on the front frame of the cavity embossment. play and Demo indicator start to "Activating the True Fan Cooking PLUS function". ton . 3. Refer to the specific procedure. 1. The first digit on the dis- 32 www.aeg.com Problem There is no good cooking performance using the True Fan Cooking...
... oven. 2. The rating plate is on the rating plate. The necessary data for the service centre is on the front frame of the cavity embossment. play and Demo indicator start to "Activating the True Fan Cooking PLUS function". ton . 3. Refer to the specific procedure. 1. The first digit on the dis- 32 www.aeg.com Problem There is no good cooking performance using the True Fan Cooking...
User Manual
Page 33
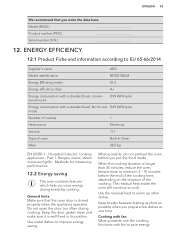
..., use the cooking functions with a standard load, fan-forced 0.69 kWh/cycle mode Number of cavities 1 Heat source Electricity Volume 71 l Type of the cooking. Part 1: Ranges, ovens, steam ovens and grills - General hints Make sure that you put the food inside the oven will continue to save energy during cooking. ENERGY EFFICIENCY 12.1 Product Fiche and information according to EU 65-66/2014 Supplier's name AEG Model identification BPS25102LM Energy...
..., use the cooking functions with a standard load, fan-forced 0.69 kWh/cycle mode Number of cavities 1 Heat source Electricity Volume 71 l Type of the cooking. Part 1: Ranges, ovens, steam ovens and grills - General hints Make sure that you put the food inside the oven will continue to save energy during cooking. ENERGY EFFICIENCY 12.1 Product Fiche and information according to EU 65-66/2014 Supplier's name AEG Model identification BPS25102LM Energy...


