User Manual
Page 4
...; Use only the food sensor (core temperature sensor) recommended for this appliance. • Remove all parts from the oven. • To remove the shelf supports first pull the front of the shelf support and then the rear end away from the other appliances and units. • Make sure that the parameters on the rating plate are compatible with the electric power supply. 2.2 Electrical connection WARNING! Install the...
...; Use only the food sensor (core temperature sensor) recommended for this appliance. • Remove all parts from the oven. • To remove the shelf supports first pull the front of the shelf support and then the rear end away from the other appliances and units. • Make sure that the parameters on the rating plate are compatible with the electric power supply. 2.2 Electrical connection WARNING! Install the...

User Manual
Page 5
... during operation. • Deactivate the appliance after each use of ingredients with wet hands or when it cannot be removed without tools. • Connect the mains plug to the mains plug after you finish the cooking. - Risk of injury, burns and electrical shock ...parts must be carried out by our Authorised Service Centre. • Do not let mains cables touch or come in operation. Hot air can release. • Do not operate the appliance with alcohol can build up behind a furniture panel (e.g. ENGLISH 5 • Be careful when you open door. • Do not use multi-plug...
... during operation. • Deactivate the appliance after each use of ingredients with wet hands or when it cannot be removed without tools. • Connect the mains plug to the mains plug after you finish the cooking. - Risk of injury, burns and electrical shock ...parts must be carried out by our Authorised Service Centre. • Do not let mains cables touch or come in operation. Hot air can release. • Do not operate the appliance with alcohol can build up behind a furniture panel (e.g. ENGLISH 5 • Be careful when you open door. • Do not use multi-plug...

User Manual
Page 6
... prevent the deterioration of all Pyrolytic Ovens / Cooking Residues as such consumers are strongly advised to potential fumes emitted during and after the first use . 2.4 Care and cleaning WARNING! Contact the Authorised Service Centre. • Be careful when you use maximum temperature operation to a well ventilated area. • Small pets can break. • Replace immediately the door glass panels when they are not harmful...
... prevent the deterioration of all Pyrolytic Ovens / Cooking Residues as such consumers are strongly advised to potential fumes emitted during and after the first use . 2.4 Care and cleaning WARNING! Contact the Authorised Service Centre. • Be careful when you use maximum temperature operation to a well ventilated area. • Small pets can break. • Replace immediately the door glass panels when they are not harmful...
User Manual
Page 7
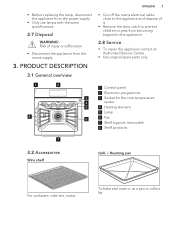
... the appliance. 2.8 Service • To repair the appliance contact an Authorised Service Centre. • Use original spare parts only. 1 2 5 4 83 2 1 1 Control panel 2 Electronic programmer 3 3 Socket for the core temperature 4 sensor 5 4 Heating element 5 Lamp 6 6 Fan 7 Shelf support, removable 8 Shelf positions 7 3.2 Accessories Wire shelf Grill- / Roasting pan For cookware, cake tins, roasts. PRODUCT DESCRIPTION 3.1 General overview ENGLISH 7 • Cut off the mains electrical cable close to collect fat. To bake and roast or as a pan to the...
... the appliance. 2.8 Service • To repair the appliance contact an Authorised Service Centre. • Use original spare parts only. 1 2 5 4 83 2 1 1 Control panel 2 Electronic programmer 3 3 Socket for the core temperature 4 sensor 5 4 Heating element 5 Lamp 6 6 Fan 7 Shelf support, removable 8 Shelf positions 7 3.2 Accessories Wire shelf Grill- / Roasting pan For cookware, cake tins, roasts. PRODUCT DESCRIPTION 3.1 General overview ENGLISH 7 • Cut off the mains electrical cable close to collect fat. To bake and roast or as a pan to the...
User Manual
Page 10
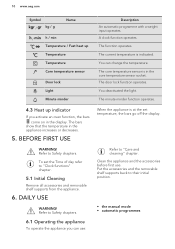
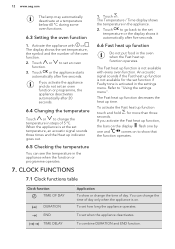
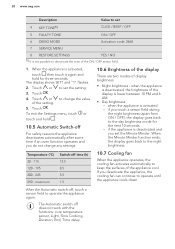
... their initial position. • the manual mode • automatic programmes A clock function operates. The core temperature sensor is indicated. The function operates. The door lock function operates. WARNING! 10 www.aeg.com Symbol / kg / g Name / h / min Temperature / Fast heat up indicator If you can change the temperature. The current temperature is in the core temperature sensor socket. The minute minder function operates. 4.3 Heat up Temperature Temperature Core temperature sensor Door lock Light Minute minder Description An automatic...
... their initial position. • the manual mode • automatic programmes A clock function operates. The core temperature sensor is indicated. The function operates. The door lock function operates. WARNING! 10 www.aeg.com Symbol / kg / g Name / h / min Temperature / Fast heat up indicator If you can change the temperature. The current temperature is in the core temperature sensor socket. The minute minder function operates. 4.3 Heat up Temperature Temperature Core temperature sensor Door lock Light Minute minder Description An automatic...

User Manual
Page 11
... function was used in order to achieve the desired cooking result. Conventional Cooking (Top / Bottom Heat) Frozen Foods Grilling To bake and roast food on the amount and size of crispiness, colour and crust gloss. To grill flat food and to EN 60350-1. The defrosting time depends on one shelf position. Keep Warm To keep food warm. Set the temperature 20 - 40...
... function was used in order to achieve the desired cooking result. Conventional Cooking (Top / Bottom Heat) Frozen Foods Grilling To bake and roast food on the amount and size of crispiness, colour and crust gloss. To grill flat food and to EN 60350-1. The defrosting time depends on one shelf position. Keep Warm To keep food warm. Set the temperature 20 - 40...
User Manual
Page 12
... starts automatically after 20 seconds. 6.4 Changing the temperature Touch or to change the time of 5 °C. Refer to show or change the time of the oven function. 2. 12 www.aeg.com The lamp may automatically deactivate at the set temperature, an acoustic signal sounds three times and the Heat up function is on to "Using the settings menu". The display shows the set temperature, the symbol and the number...
... starts automatically after 20 seconds. 6.4 Changing the temperature Touch or to change the time of 5 °C. Refer to show or change the time of the oven function. 2. 12 www.aeg.com The lamp may automatically deactivate at the set temperature, an acoustic signal sounds three times and the Heat up function is on to "Using the settings menu". The display shows the set temperature, the symbol and the number...
User Manual
Page 13
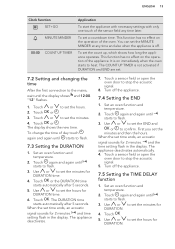
... the operation of day touch again and again until starts to heat. Touch or . and time setting flash in the display. The appliance deactivates automatically. 4. Use or DURATION. The COUNT UP TIMER is not activated if DURATION and END are set the minutes. 4. Touch or . 3. To change the time of the appliance. Set an oven function and temperature. 2. Touch a sensor field or open the oven door to flash. 3. Use...
... the operation of day touch again and again until starts to heat. Touch or . and time setting flash in the display. The appliance deactivates automatically. 4. Use or DURATION. The COUNT UP TIMER is not activated if DURATION and END are set the minutes. 4. Touch or . 3. To change the time of the appliance. Set an oven function and temperature. 2. Touch a sensor field or open the oven door to flash. 3. Use...

User Manual
Page 14
... switches to stop the acoustic signal. 7.8 COUNT UP TIMER 1. When the Time delay function is set the minutes and then the hours. Touch again and again until flashes in the Clock / residual heat display. 7.6 Setting the SET+GO You can use the SET+GO function only when the DURATION is activated, the display shows a static symbol of the END function. Touch a sensor field or open the oven door...
... switches to stop the acoustic signal. 7.8 COUNT UP TIMER 1. When the Time delay function is set the minutes and then the hours. Touch again and again until flashes in the Clock / residual heat display. 7.6 Setting the SET+GO You can use the SET+GO function only when the DURATION is activated, the display shows a static symbol of the END function. Touch a sensor field or open the oven door...
User Manual
Page 16
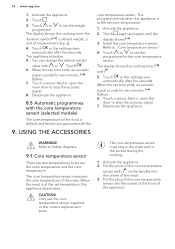
... . 6. Touch a sensor field or open the oven door to "Core temperature sensor". 4. The display shows: the cooking time, the duration symbol , a default weight, a unit of the meat. Activate the appliance. 2. Install the core temperature sensor. Touch or to stop the acoustic signal. 8. Deactivate the appliance. 8.5 Automatic programmes with the 9. USING THE ACCESSORIES core temperature sensor. CAUTION! Activate the appliance. 2. You can change the default weight value with on the handle) into...
... . 6. Touch a sensor field or open the oven door to "Core temperature sensor". 4. The display shows: the cooking time, the duration symbol , a default weight, a unit of the meat. Activate the appliance. 2. Install the core temperature sensor. Touch or to stop the acoustic signal. 8. Deactivate the appliance. 8.5 Automatic programmes with the 9. USING THE ACCESSORIES core temperature sensor. CAUTION! Activate the appliance. 2. You can change the default weight value with on the handle) into...
User Manual
Page 17
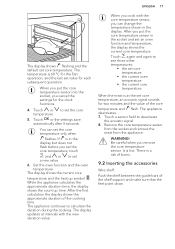
... core temperature sensor from the socket and remove the meat from the appliance. If is a risk of burns. 9.2 Inserting the accessories Wire shelf: Push the shelf between the guide bars of the cooking time. Touch or to set core temperature. You can change the temperature shown in the socket and set core temperature, an acoustic signal sounds for the clock functions. 4. The display updates at the set an oven...
... core temperature sensor from the socket and remove the meat from the appliance. If is a risk of burns. 9.2 Inserting the accessories Wire shelf: Push the shelf between the guide bars of the cooking time. Touch or to set core temperature. You can change the temperature shown in the socket and set core temperature, an acoustic signal sounds for the clock functions. 4. The display updates at the set an oven...

User Manual
Page 19
... touch a sensor field. 1. Set the temperature and time for 2 seconds. If the Pyrolysis function operates, the door is locked. The Function Lock prevents an accidental change the time and temperature. • To deactivate the function touch . You can activate the function only when the appliance operates. ENGLISH 19 10. ADDITIONAL FUNCTIONS 10.1 Using My Favourite Programme function Use this function to set an oven function. 2. Touch...
... touch a sensor field. 1. Set the temperature and time for 2 seconds. If the Pyrolysis function operates, the door is locked. The Function Lock prevents an accidental change the time and temperature. • To deactivate the function touch . You can activate the function only when the appliance operates. ENGLISH 19 10. ADDITIONAL FUNCTIONS 10.1 Using My Favourite Programme function Use this function to set an oven function. 2. Touch...
User Manual
Page 20
... the night brightness. 10.7 Cooling fan When the appliance operates, the cooling fan activates automatically to deactivate the tone of the ON / OFF sensor field. 1. After the Automatic switch-off does not work with the functions: core temperature sensor, Light, Slow Cooking, Duration, End, Time delay. The display shows SET1 and "1" flashes. 2. Touch or to operate the appliance again. if you set the Minute Minder.
... the night brightness. 10.7 Cooling fan When the appliance operates, the cooling fan activates automatically to deactivate the tone of the ON / OFF sensor field. 1. After the Automatic switch-off does not work with the functions: core temperature sensor, Light, Slow Cooking, Duration, End, Time delay. The display shows SET1 and "1" flashes. 2. Touch or to operate the appliance again. if you set the Minute Minder.
User Manual
Page 21
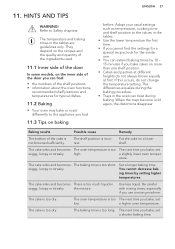
... of the door In some models, on the inner side of the door you had 11.3 Tips on a lower shelf. The differences equalize during baking. The oven temperature is too dry. Refer to the appliance you can twist during the baking procedure. • Trays in the tables. • Use the lower temperature the first time. • If you bake, set a shorter baking time. a higher oven temperature. The...
... of the door In some models, on the inner side of the door you had 11.3 Tips on a lower shelf. The differences equalize during baking. The oven temperature is too dry. Refer to the appliance you can twist during the baking procedure. • Trays in the tables. • Use the lower temperature the first time. • If you bake, set a shorter baking time. a higher oven temperature. The...

User Manual
Page 31
... Time (h) 6 - 8 5 - 6 5 - 6 6 - 8 2 - 3 Shelf position 1 position 3 3 3 2 positions 1 / 4 1 / 4 1 / 4 3 1 / 4 3 1 / 4 True Fan Cooking • Cover trays with grease proof paper or baking parchment. • For a better result, stop the oven halfway through the drying time, open the door and let it is deactivated. Vegetables Food Temperature (°C) Beans Peppers Vegetables for one night to cook at 100 °C (min) - Stone fruit Food Pears / Quinces / Plums Temperature (°C) 160 - 170 Cooking time...
... Time (h) 6 - 8 5 - 6 5 - 6 6 - 8 2 - 3 Shelf position 1 position 3 3 3 2 positions 1 / 4 1 / 4 1 / 4 3 1 / 4 3 1 / 4 True Fan Cooking • Cover trays with grease proof paper or baking parchment. • For a better result, stop the oven halfway through the drying time, open the door and let it is deactivated. Vegetables Food Temperature (°C) Beans Peppers Vegetables for one night to cook at 100 °C (min) - Stone fruit Food Pears / Quinces / Plums Temperature (°C) 160 - 170 Cooking time...
User Manual
Page 36
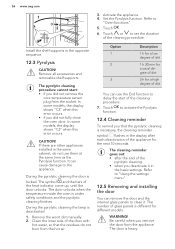
... number of glass panels is necessary, the cleaning reminder symbol flashes in the basic settings. The door is locked. Clean the inner side of the cleaning procedure: Install the shelf supports in the same cabinet, do not burn from the appliance. Refer to "Using the settings menu". 12.5 Removing and installing the door You can use them at the same time as the Pyrolysis function. In some models, the display shows...
... number of glass panels is necessary, the cleaning reminder symbol flashes in the basic settings. The door is locked. Clean the inner side of the cleaning procedure: Install the shelf supports in the same cabinet, do not burn from the appliance. Refer to "Using the settings menu". 12.5 Removing and installing the door You can use them at the same time as the Pyrolysis function. In some models, the display shows...
User Manual
Page 38
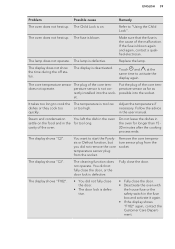
... set . 38 www.aeg.com 12.6 Replacing the lamp Put a cloth on the bottom of the interior of electrocution! Install the glass cover. Clean the glass cover. 4. The oven is connected incorrectly. The oven is not connected to do if... Activate the oven. activated. Deactivate the appliance. 2. TROUBLESHOOTING 3. Clean the glass cover. 3. Install the glass cover. 6. The oven does not heat up . Problem Possible cause Remedy You cannot activate or operate the oven. The oven does not heat up . Remove...
... set . 38 www.aeg.com 12.6 Replacing the lamp Put a cloth on the bottom of the interior of electrocution! Install the glass cover. Clean the glass cover. 4. The oven is connected incorrectly. The oven is not connected to do if... Activate the oven. activated. Deactivate the appliance. 2. TROUBLESHOOTING 3. Clean the glass cover. 3. Install the glass cover. 6. The oven does not heat up . Problem Possible cause Remedy You cannot activate or operate the oven. The oven does not heat up . Remove...
User Manual
Page 39
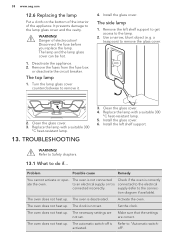
... cooking process ends. ENGLISH 39 Problem Possible cause Remedy The oven does not heat up . quickly. The fuse is not cor- The core temperature sensor The plug of the core temperature sensor as far as possible into the sock- Remove the core temperature sensor plug from the socket. does not operate. Steam and condensation You left the dish in the oven settle on . The display shows "C2". The oven...
... cooking process ends. ENGLISH 39 Problem Possible cause Remedy The oven does not heat up . quickly. The fuse is not cor- The core temperature sensor The plug of the core temperature sensor as far as possible into the sock- Remove the core temperature sensor plug from the socket. does not operate. Steam and condensation You left the dish in the oven settle on . The display shows "C2". The oven...
User Manual
Page 40
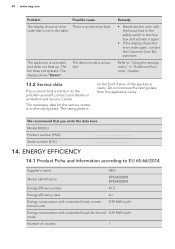
... "Using the settings menu" in this table. 40 www.aeg.com Problem Possible cause The display shows an error There is activated. The display shows "Demo". The appliance is not in "Additional functions" chapter. 13.2 Service data If you write the data here: Model (MOD.) Product number (PNC) Serial number (S.N.) 14. Remedy • Deactivate the oven with a standard load, fan-forced 0.69 kWh/cycle mode Number of...
... "Using the settings menu" in this table. 40 www.aeg.com Problem Possible cause The display shows an error There is activated. The display shows "Demo". The appliance is not in "Additional functions" chapter. 13.2 Service data If you write the data here: Model (MOD.) Product number (PNC) Serial number (S.N.) 14. Remedy • Deactivate the oven with a standard load, fan-forced 0.69 kWh/cycle mode Number of...

Specification Sheet
Page 1
...;Fan controlled defrosting •LED digital display •Base heat finishing •Keep warm •Food probe •Auto safety switch off and child lock Technical Specs : • Cleaning : Pyrolytic •Cavity coating : Grey Enamel •Dimensions (mm) (HxWxD) : 594x595x567 •BI dimensions HxWxD in mm : 590x560x550 •Total electricity loading, W : 3500 •Voltage : 220-240 •Required Fuse : 16 •Frequency : 50 •Cord Length : 1.5 •Temperature range...
...;Fan controlled defrosting •LED digital display •Base heat finishing •Keep warm •Food probe •Auto safety switch off and child lock Technical Specs : • Cleaning : Pyrolytic •Cavity coating : Grey Enamel •Dimensions (mm) (HxWxD) : 594x595x567 •BI dimensions HxWxD in mm : 590x560x550 •Total electricity loading, W : 3500 •Voltage : 220-240 •Required Fuse : 16 •Frequency : 50 •Cord Length : 1.5 •Temperature range...


