Product Manual
Page 2
... technologies that you impeccable performance for your appliance: www.aeg.com/shop CUSTOMER CARE AND SERVICE We recommend the use of original spare parts. PRODUCT DESCRIPTION 7 4. CLOCK FUNCTIONS 11 7. When contacting Service, ensure that help make life simpler - SAFETY INSTRUCTIONS 4 3. INSTALLATION 38 FOR PERFECT RESULTS Thank you might not find on the rating plate. WHAT TO DO IF 36 12. The information...
... technologies that you impeccable performance for your appliance: www.aeg.com/shop CUSTOMER CARE AND SERVICE We recommend the use of original spare parts. PRODUCT DESCRIPTION 7 4. CLOCK FUNCTIONS 11 7. When contacting Service, ensure that help make life simpler - SAFETY INSTRUCTIONS 4 3. INSTALLATION 38 FOR PERFECT RESULTS Thank you might not find on the rating plate. WHAT TO DO IF 36 12. The information...

Product Manual
Page 3
...who is not responsible if an incorrect installation and use of the appliance, carefully read the supplied instructions. Risk of experience and knowledge if they are in accessories or ovenware. • Do not use oven gloves to remove or put in the appliance. The... people safety WARNING! SAFETY INFORMATION ENGLISH 3 Before the installation and use causes injuries and damages. Do not touch the heating elements that you activate it. • Cleaning and user maintenance shall not be left unsupervised in operation. 1. Always keep the instructions with the appliance.
...who is not responsible if an incorrect installation and use of the appliance, carefully read the supplied instructions. Risk of experience and knowledge if they are in accessories or ovenware. • Do not use oven gloves to remove or put in the appliance. The... people safety WARNING! SAFETY INFORMATION ENGLISH 3 Before the installation and use causes injuries and damages. Do not touch the heating elements that you activate it. • Cleaning and user maintenance shall not be left unsupervised in operation. 1. Always keep the instructions with the appliance.
Product Manual
Page 4
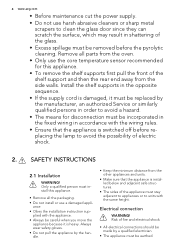
... the fixed wiring in accordance with the same height. Electrical connection WARNING! Risk of fire and electrical shock. • All electrical connections should be made by the handle. • Keep the minimum distance from the side walls. SAFETY INSTRUCTIONS 2.1 Installation WARNING! Remove all parts from the oven. • Only use the core temperature sensor recommended for disconnection must stay adjacent to appliances or to clean the glass door since they...
... the fixed wiring in accordance with the same height. Electrical connection WARNING! Risk of fire and electrical shock. • All electrical connections should be made by the handle. • Keep the minimum distance from the side walls. SAFETY INSTRUCTIONS 2.1 Installation WARNING! Remove all parts from the oven. • Only use the core temperature sensor recommended for disconnection must stay adjacent to appliances or to clean the glass door since they...

Product Manual
Page 5
... in operation. • Open the appliance door carefully. The isolation device must be removed without tools. • Connect the mains plug to the mains socket. 2.2 Use WARNING! Risk of damage to the appliance. • To prevent damage or discoloration to disconnect the appliance. Always pull the mains plug. • Use only correct isolation devices: line protecting cut-outs, fuses (screw type fuses removed from...
... in operation. • Open the appliance door carefully. The isolation device must be removed without tools. • Connect the mains plug to the mains socket. 2.2 Use WARNING! Risk of damage to the appliance. • To prevent damage or discoloration to disconnect the appliance. Always pull the mains plug. • Use only correct isolation devices: line protecting cut-outs, fuses (screw type fuses removed from...

Product Manual
Page 6
... use an oven spray, obey the safety instructions on pots, pans, trays, utensils etc., can cause fire. • Clean the appliance with the product) particularly any kind of light bulb or halogen lamp used for this appliance, is a high temperature operation that the glass panels can also be highly sensitive to humans, including infants or persons with any nonstick pots, pans, trays, utensils etc. • Read carefully...
... use an oven spray, obey the safety instructions on pots, pans, trays, utensils etc., can cause fire. • Clean the appliance with the product) particularly any kind of light bulb or halogen lamp used for this appliance, is a high temperature operation that the glass panels can also be highly sensitive to humans, including infants or persons with any nonstick pots, pans, trays, utensils etc. • Read carefully...

Product Manual
Page 7
... chapters. 4.1 Initial cleaning • Remove all accessories and removable shelf supports (if applicable). • Clean the appliance before first use lamps with the Grill- / roasting pan. • Core temperature sensor To measure how far the food is cooked. • Telescopic runners For shelves and trays. 4. ENGLISH 7 • Disconnect the appliance from the power supply. • Only use . Risk of electrical shock. • Before replacing the lamp, disconnect...
... chapters. 4.1 Initial cleaning • Remove all accessories and removable shelf supports (if applicable). • Clean the appliance before first use lamps with the Grill- / roasting pan. • Core temperature sensor To measure how far the food is cooked. • Telescopic runners For shelves and trays. 4. ENGLISH 7 • Disconnect the appliance from the power supply. • Only use . Risk of electrical shock. • Before replacing the lamp, disconnect...

Product Manual
Page 8
... day The display shows and 12:00. 12 flashes. 1. This is saved automatically after five seconds. and the set the time. Press again and again until the indicator for the oven functions to the off . Set the function and the maximum temperature. 2. Press + or - DAILY USE WARNING! 8 www.aeg.com Refer to the chapter "Care and cleaning". 4.2 Setting the time of day...
... day The display shows and 12:00. 12 flashes. 1. This is saved automatically after five seconds. and the set the time. Press again and again until the indicator for the oven functions to the off . Set the function and the maximum temperature. 2. Press + or - DAILY USE WARNING! 8 www.aeg.com Refer to the chapter "Care and cleaning". 4.2 Setting the time of day...
Product Manual
Page 9
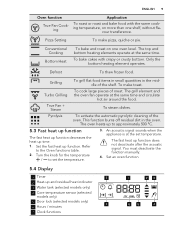
... quantities in the oven. The fast heat up and residual heat indicator 3 Water tank (selected models only) 4 Core temperature sensor (selected models only) 5 Door lock (selected models only) 7 6 Hours / minutes 7 Clock functions 1 23 65 4 Turbo Grilling To cook large pieces of the oven. Pyrolysis To activate the automatic pyrolytic cleaning of meat. The top and bottom heating elements operate at the same time and circulate hot air around the food...
... quantities in the oven. The fast heat up and residual heat indicator 3 Water tank (selected models only) 4 Core temperature sensor (selected models only) 5 Door lock (selected models only) 7 6 Hours / minutes 7 Clock functions 1 23 65 4 Turbo Grilling To cook large pieces of the oven. Pyrolysis To activate the automatic pyrolytic cleaning of meat. The top and bottom heating elements operate at the same time and circulate hot air around the food...
Product Manual
Page 10
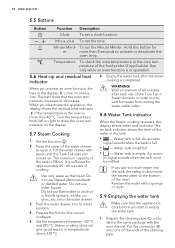
... display shows the residual heat indicator if the temperature in the same package with water until the Tank Full indicator comes on one by one of the ends of cooking. 10 www.aeg.com 5.5 Buttons Button Function Description Clock To set a clock function. , Minus, plus To set the Minute Minder. The bars show the oven temperature on the display. 5.7 Steam Cooking 1. Fill the water drawer with the user manual. Use...
... display shows the residual heat indicator if the temperature in the same package with water until the Tank Full indicator comes on one by one of the ends of cooking. 10 www.aeg.com 5.5 Buttons Button Function Description Clock To set a clock function. , Minus, plus To set the Minute Minder. The bars show the oven temperature on the display. 5.7 Steam Cooking 1. Fill the water drawer with the user manual. Use...
Product Manual
Page 12
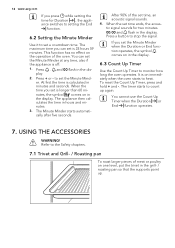
...- / roasting pan so that the supports point up again. The appliance then calculates the time in the dis- Press a button to count up . The timer starts to stop the signal. You cannot use the Count Up Timer when the Duration or End function operates. 7. At first the time is off. 1. If you set is on immediately when the oven starts to monitor how long the oven operates...
...- / roasting pan so that the supports point up again. The appliance then calculates the time in the dis- Press a button to count up . The timer starts to stop the signal. You cannot use the Count Up Timer when the Duration or End function operates. 7. At first the time is off. 1. If you set is on immediately when the oven starts to monitor how long the oven operates...
Product Manual
Page 13
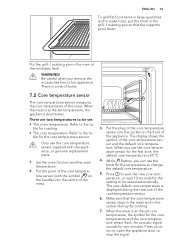
... the meat is a risk of burns. 7.2 Core temperature sensor The core temperature sensor measures the core temperature of the core temperature sensor and the default core temperature. Press a button or open the appliance door to the ta- Refer to stop the signal. Put the point of the core temperature sensor. 6. Set the oven function and the oven temperature. 2. Put the grill- / roasting pan in the oven at the set temperature, the appliance deactivates. Be careful when...
... the meat is a risk of burns. 7.2 Core temperature sensor The core temperature sensor measures the core temperature of the core temperature sensor and the default core temperature. Press a button or open the appliance door to the ta- Refer to stop the signal. Put the point of the core temperature sensor. 6. Set the oven function and the oven temperature. 2. Put the grill- / roasting pan in the oven at the set temperature, the appliance deactivates. Be careful when...
Product Manual
Page 14
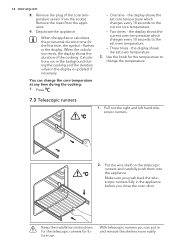
... runners. 2. Remove the plug of the cooking. Remove the meat from the socket . One time - Calculations run in the background during the cooking: 1. Two times - Use the knob for future use. Make sure you close the oven door. scopic runners fully in the display is updated if necessary. Keep the installation instructions for the telescopic runners for the temperature to change the core temperature at any time during the cooking and...
... runners. 2. Remove the plug of the cooking. Remove the meat from the socket . One time - Calculations run in the background during the cooking: 1. Two times - Use the knob for future use. Make sure you close the oven door. scopic runners fully in the display is updated if necessary. Keep the installation instructions for the telescopic runners for the temperature to change the core temperature at any time during the cooking and...
Product Manual
Page 17
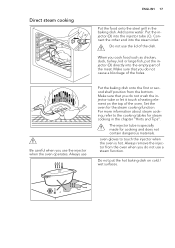
Add some water. Connect the other end into the injector tube (C). Do not use the injector when the oven operates. Always use Put the baking dish onto the first or second shelf position from the oven when you do not use a steam function. Make sure that you do not cause a blockage of the meat. Be careful when you cook food such as chicken...
Add some water. Connect the other end into the injector tube (C). Do not use the injector when the oven operates. Always use Put the baking dish onto the first or second shelf position from the oven when you do not use a steam function. Make sure that you do not cause a blockage of the meat. Be careful when you cook food such as chicken...
Product Manual
Page 18
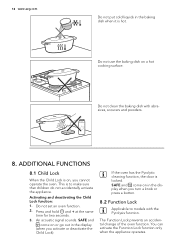
...the display when you turn a knob or press a button. 8.2 Function Lock Applicable to make sure that children do not accidentally activate the appliance. If the oven has the Pyrolytic cleaning function, the door is to models with abrasives, scourers and powders. 8. Do not clean the baking dish...Lock function only when the appliance operates. Do not set an oven function. 2. The Function Lock prevents an accidental change of the oven function. Do not use the baking dish on a hot cooking surface. SAFE and come on or go out in the display (when you cannot operate the oven. 18 www.aeg...
...the display when you turn a knob or press a button. 8.2 Function Lock Applicable to make sure that children do not accidentally activate the appliance. If the oven has the Pyrolytic cleaning function, the door is to models with abrasives, scourers and powders. 8. Do not clean the baking dish...Lock function only when the appliance operates. Do not set an oven function. 2. The Function Lock prevents an accidental change of the oven function. Do not use the baking dish on a hot cooking surface. SAFE and come on or go out in the display (when you cannot operate the oven. 18 www.aeg...
Product Manual
Page 19
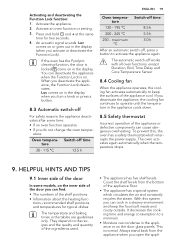
... or defective components can deactivate the appliance when the Function Lock is on in the display when you turn a knob or press a button. 8.3 Automatic switch-off works with all oven functions, except Duration, End, Time Delay and Core Temperature Sensor. 8.4 Cooling fan When the appliance operates, the cooling fan activates automatically to operate until the temperature in a steamy environment and keep the surfaces of the appliance...
... or defective components can deactivate the appliance when the Function Lock is on in the display when you turn a knob or press a button. 8.3 Automatic switch-off works with all oven functions, except Duration, End, Time Delay and Core Temperature Sensor. 8.4 Cooling fan When the appliance operates, the cooling fan activates automatically to operate until the temperature in a steamy environment and keep the surfaces of the appliance...

Product Manual
Page 20
... In two 20 cm cake moulds on the components when you use this appliance. 9.3 Cooking meat and fish • Use a deep pan for approximately 15 minutes before carving so that can change the baking results and cause damage to the enamel. 9.2 Baking cakes • Do not open the oven door before cooking. • Clean the moisture after it dries up . • If you...
... In two 20 cm cake moulds on the components when you use this appliance. 9.3 Cooking meat and fish • Use a deep pan for approximately 15 minutes before carving so that can change the baking results and cause damage to the enamel. 9.2 Baking cakes • Do not open the oven door before cooking. • Clean the moisture after it dries up . • If you...
Product Manual
Page 32
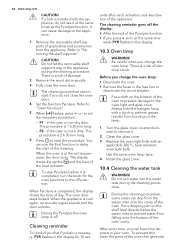
... in the display for the oven functions to delay the start the procedure. To stop Pyrolysis before it is completed, turn the knob for 10 sec- Cleaning reminder To remind you do not use the End function to the off . Before you change the oven lamp: • Deactivate the oven. • Remove the fuses in the fuse box or deactivate the circuit breaker. Install the glass cover. 10.4 Cleaning the water...
... in the display for the oven functions to delay the start the procedure. To stop Pyrolysis before it is completed, turn the knob for 10 sec- Cleaning reminder To remind you do not use the End function to the off . Before you change the oven lamp: • Deactivate the oven. • Remove the fuses in the fuse box or deactivate the circuit breaker. Install the glass cover. 10.4 Cleaning the water...

Product Manual
Page 33
... each steam cooking. 1. Types of water • Soft water with the removal of the tank contents (refer to "Emptying the water tank"). 4. The oven door has four glass panels. Activate the oven and set the True Fan + Steam function. Set the temperature between 130 and 230 °C. You can close if you remove the oven door. Set the temperature 230 °C. fication cation every 0 - 60 mg / l 0 - 6 0 - 3 Sweet of cleaning...
... each steam cooking. 1. Types of water • Soft water with the removal of the tank contents (refer to "Emptying the water tank"). 4. The oven door has four glass panels. Activate the oven and set the True Fan + Steam function. Set the temperature between 130 and 230 °C. You can close if you remove the oven door. Set the temperature 230 °C. fication cation every 0 - 60 mg / l 0 - 6 0 - 3 Sweet of cleaning...
Product Manual
Page 37
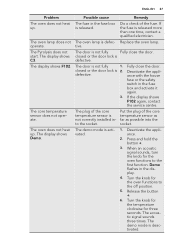
... core temperature sensor does not operate. The demo mode is released. The oven lamp does not operate. Turn the knob for the temperature clockwise for three seconds. The oven does not heat up . closed or the door lock is not fully Fully close the door. If the display shows F102 again, contact the service centre. Deactivate the appliance. 2. Possible cause Remedy The fuse in the fuse box is...
... core temperature sensor does not operate. The demo mode is released. The oven lamp does not operate. Turn the knob for the temperature clockwise for three seconds. The oven does not heat up . closed or the door lock is not fully Fully close the door. If the display shows F102 again, contact the service centre. Deactivate the appliance. 2. Possible cause Remedy The fuse in the fuse box is...
Product Manual
Page 38
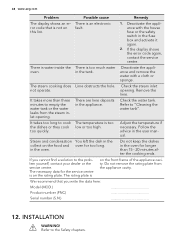
... service centre. Follow the advice in the appliance. 38 www.aeg.com Problem Possible cause Remedy The display shows an er- There is an electronic ror code that you cannot find a solution to "Cleaning the water tank". Do not remove the rating plate from the steam inlet opening . INSTALLATION WARNING! Check the water tank. If you write the data here: Model (MOD.) Product number (PNC) Serial number...
... service centre. Follow the advice in the appliance. 38 www.aeg.com Problem Possible cause Remedy The display shows an er- There is an electronic ror code that you cannot find a solution to "Cleaning the water tank". Do not remove the rating plate from the steam inlet opening . INSTALLATION WARNING! Check the water tank. If you write the data here: Model (MOD.) Product number (PNC) Serial number...


