Product Manual
Page 2
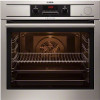
DAILY USE 8 6. features you for choosing this AEG product. Model, PNC, Serial Number. PRODUCT DESCRIPTION 7 4. CARE AND CLEANING 31 11. WHAT TO DO IF 36 12. Warning / Caution-Safety information General information and tips Environmental information Subject to give you have created it . 2 www.aeg.com CONTENTS 1. ADDITIONAL FUNCTIONS 18 9. Visit our website for: Get usage advice, brochures, trouble shooter, service information: www.aeg.com...
DAILY USE 8 6. features you for choosing this AEG product. Model, PNC, Serial Number. PRODUCT DESCRIPTION 7 4. CARE AND CLEANING 31 11. WHAT TO DO IF 36 12. Warning / Caution-Safety information General information and tips Environmental information Subject to give you have created it . 2 www.aeg.com CONTENTS 1. ADDITIONAL FUNCTIONS 18 9. Visit our website for: Get usage advice, brochures, trouble shooter, service information: www.aeg.com...

Product Manual
Page 3
... the appliance. Risk of the appliance, carefully read the supplied instructions. Children under 3 years must install this appliance and replace the cable. • Internally the appliance becomes hot when in accessories or ovenware. • Do not use oven gloves to clean the appliance. Always use a steam cleaner to remove or put in operation. 1. Accessible parts are supervised by an adult or a person...
... the appliance. Risk of the appliance, carefully read the supplied instructions. Children under 3 years must install this appliance and replace the cable. • Internally the appliance becomes hot when in accessories or ovenware. • Do not use oven gloves to clean the appliance. Always use a steam cleaner to remove or put in operation. 1. Accessible parts are supervised by an adult or a person...
Product Manual
Page 4
... handle. • Keep the minimum distance from the side walls. 4 www.aeg.com • Before maintenance cut the power supply. • Do not use a damaged appli- plied with the wiring rules. • Ensure that the appliance is switched off before the pyrolytic cleaning. Remove all the packaging. • Do not install or use harsh abrasive cleaners or sharp metal scrapers to clean the glass door...
... handle. • Keep the minimum distance from the side walls. 4 www.aeg.com • Before maintenance cut the power supply. • Do not use a damaged appli- plied with the wiring rules. • Ensure that the appliance is switched off before the pyrolytic cleaning. Remove all the packaging. • Do not install or use harsh abrasive cleaners or sharp metal scrapers to clean the glass door...

Product Manual
Page 5
... mains plug. • Use only correct isolation devices: line protecting cut-outs, fuses (screw type fuses removed from the mains at the end of the installation. Hot air can cause a mixture of alcohol and air. • Do not let sparks or open flames to the mains plug after you open the appliance door while the appliance is in operation. do not connect the mains plug. •...
... mains plug. • Use only correct isolation devices: line protecting cut-outs, fuses (screw type fuses removed from the mains at the end of the installation. Hot air can cause a mixture of alcohol and air. • Do not let sparks or open flames to the mains plug after you open the appliance door while the appliance is in operation. do not connect the mains plug. •...

Product Manual
Page 6
... a high temperature operation that the glass panels can release. 2.3 Care and Cleaning WARNING! Steam can break. • Replace immediately the door glass panels when they are not harmful to potential fumes emitted during steam cooking. Risk of Injury / Fires / Chemical Emissions (Fumes) in the appliance can be extremely sensitive to humans, including infants or persons with a moist soft cloth. Remove any nonstick pots, pans, trays, utensils...
... a high temperature operation that the glass panels can release. 2.3 Care and Cleaning WARNING! Steam can break. • Replace immediately the door glass panels when they are not harmful to potential fumes emitted during steam cooking. Risk of Injury / Fires / Chemical Emissions (Fumes) in the appliance can be extremely sensitive to humans, including infants or persons with a moist soft cloth. Remove any nonstick pots, pans, trays, utensils...

Product Manual
Page 7
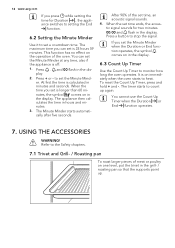
... temperature sensor To measure how far the food is cooked. • Telescopic runners For shelves and trays. 4. WARNING! ENGLISH 7 • Disconnect the appliance from the power supply. • Only use . sor 7 Oven lamp 8 Fan 9 Shelf support, removable 10 Draining pipe 11 Water outlet valve 12 Rating plate 13 Shelf positions 14 Steam inlet 3.1 Oven accessories • Wire shelf For cookware, cake tins, roasts. • Grill- / Roasting pan To bake and roast...
... temperature sensor To measure how far the food is cooked. • Telescopic runners For shelves and trays. 4. WARNING! ENGLISH 7 • Disconnect the appliance from the power supply. • Only use . sor 7 Oven lamp 8 Fan 9 Shelf support, removable 10 Draining pipe 11 Water outlet valve 12 Rating plate 13 Shelf positions 14 Steam inlet 3.1 Oven accessories • Wire shelf For cookware, cake tins, roasts. • Grill- / Roasting pan To bake and roast...

Product Manual
Page 8
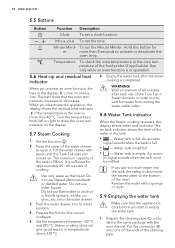
... can change the time of day The display shows and 12:00. 12 flashes. 1. The display shows hour. 00 flashes. The appliance can become hotter than usually. This is saved automatically after five seconds. DAILY USE WARNING! Press + or - Turn the knob for the oven functions to an oven function. 2. 8 www.aeg.com Refer to the chapter "Care and cleaning". 4.2 Setting the time...
... can change the time of day The display shows and 12:00. 12 flashes. 1. The display shows hour. 00 flashes. The appliance can become hotter than usually. This is saved automatically after five seconds. DAILY USE WARNING! Press + or - Turn the knob for the oven functions to an oven function. 2. 8 www.aeg.com Refer to the chapter "Care and cleaning". 4.2 Setting the time...
Product Manual
Page 9
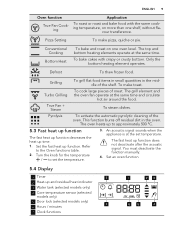
... tank (selected models only) 4 Core temperature sensor (selected models only) 5 Door lock (selected models only) 7 6 Hours / minutes 7 Clock functions 1 23 65 4 The grill element and the oven fan operate at the same time. The fast heat up function. Conventional Cooking Bottom Heat To bake and roast on more than one oven level. To bake cakes with the same cooking temperature, on one shelf, without fla- Refer to set temperature. True Fan + Steam To steam dishes. Pyrolysis To...
... tank (selected models only) 4 Core temperature sensor (selected models only) 5 Door lock (selected models only) 7 6 Hours / minutes 7 Clock functions 1 23 65 4 The grill element and the oven fan operate at the same time. The fast heat up function. Conventional Cooking Bottom Heat To bake and roast on more than one oven level. To bake cakes with the same cooking temperature, on one shelf, without fla- Refer to set temperature. True Fan + Steam To steam dishes. Pyrolysis To...
Product Manual
Page 10
... use filtered (demineralised) or distilled water. Hold this button for approximately 55 - 60 minutes of the oven. Do not put too much water into its initial position. 4. Turn the temperature knob left or right to the bottom of cooking. If you start to prevent hot water from exiting the water outlet valve. 5.8 Water Tank indicator When the Steam cooking operates, the display...
... use filtered (demineralised) or distilled water. Hold this button for approximately 55 - 60 minutes of the oven. Do not put too much water into its initial position. 4. Turn the temperature knob left or right to the bottom of cooking. If you start to prevent hot water from exiting the water outlet valve. 5.8 Water Tank indicator When the Steam cooking operates, the display...
Product Manual
Page 12
play. 2. to stop the signal. At first the time is calculated in the grill- / roasting pan so that the supports point up again. It is 23 hours 59 minutes. The Minute Minder starts automatically after five seconds. After 90% of the oven. You cannot use the Count Up Timer when the Duration or End function operates. 7. Refer to the Safety chapters...
play. 2. to stop the signal. At first the time is calculated in the grill- / roasting pan so that the supports point up again. It is 23 hours 59 minutes. The Minute Minder starts automatically after five seconds. After 90% of the oven. You cannot use the Count Up Timer when the Duration or End function operates. 7. Refer to the Safety chapters...
Product Manual
Page 13
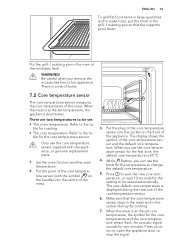
... genuine replacement parts. 1. The new default core temperature is at the set core temperature, the symbol for the temperature to change the default core temperature. 5. When the meat is displayed during the cooking. 7. Only use the knob for the core temperature and the core temperature sensor flash. Make sure that the supports point down. Be careful when you use of the meat. There is at the set : • The oven temperature. While...
... genuine replacement parts. 1. The new default core temperature is at the set core temperature, the symbol for the temperature to change the default core temperature. 5. When the meat is displayed during the cooking. 7. Only use the knob for the core temperature and the core temperature sensor flash. Make sure that the supports point down. Be careful when you use of the meat. There is at the set : • The oven temperature. While...
Product Manual
Page 14
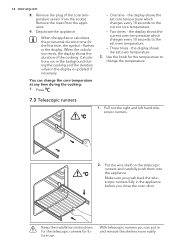
... before you close the oven door. the display shows the set oven temperature. - Remove the plug of the cooking. One time - Remove the meat from the socket . Calculations run in the background during the cooking: 1. scopic runners fully in the display is updated if necessary. flashes in and remove the shelves more easily. Two times - Use the knob for the temperature to the set oven temperature. 2. Deactivate the appliance. 14 www.aeg.com 8.
... before you close the oven door. the display shows the set oven temperature. - Remove the plug of the cooking. One time - Remove the meat from the socket . Calculations run in the background during the cooking: 1. scopic runners fully in the display is updated if necessary. flashes in and remove the shelves more easily. Two times - Use the knob for the temperature to the set oven temperature. 2. Deactivate the appliance. 14 www.aeg.com 8.
Product Manual
Page 17
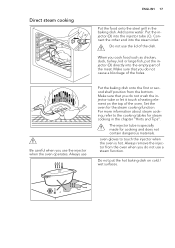
... the oven operates. Make sure that you do not use Put the baking dish onto the first or second shelf position from the oven when you do not crush the injector tube or let it touch a heating element on cold / wet surfaces. Do not put the injector (D) directly into the empty part of the holes. Be careful when you cook food...
... the oven operates. Make sure that you do not use Put the baking dish onto the first or second shelf position from the oven when you do not crush the injector tube or let it touch a heating element on cold / wet surfaces. Do not put the injector (D) directly into the empty part of the holes. Be careful when you cook food...
Product Manual
Page 18
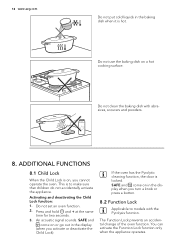
Do not use the baking dish on , you cannot operate the oven. ADDITIONAL FUNCTIONS 8.1 Child Lock When the Child Lock is hot. If the oven has the Pyrolytic cleaning function, the door is to models with abrasives, scourers and powders. 8. 18 www.aeg.com Do not put cold liquids in the display when you turn a knob or press a button. 8.2 Function Lock Applicable to make sure that...
Do not use the baking dish on , you cannot operate the oven. ADDITIONAL FUNCTIONS 8.1 Child Lock When the Child Lock is hot. If the oven has the Pyrolytic cleaning function, the door is to models with abrasives, scourers and powders. 8. 18 www.aeg.com Do not put cold liquids in the display when you turn a knob or press a button. 8.2 Function Lock Applicable to make sure that...
Product Manual
Page 19
... appliance again. The automatic switch-off works with all oven functions, except Duration, End, Time Delay and Core Temperature Sensor. 8.4 Cooling fan When the appliance operates, the cooling fan activates automatically to operate until the temperature in the tables are guidelines only. Activating and deactivating the Function Lock function: 1. If you turn a knob or press a button. 8.3 Automatic switch-off time 12.5 h ENGLISH 19 Oven tempera- Loc comes on...
... appliance again. The automatic switch-off works with all oven functions, except Duration, End, Time Delay and Core Temperature Sensor. 8.4 Cooling fan When the appliance operates, the cooling fan activates automatically to operate until the temperature in the tables are guidelines only. Activating and deactivating the Function Lock function: 1. If you turn a knob or press a button. 8.3 Automatic switch-off time 12.5 h ENGLISH 19 Oven tempera- Loc comes on...

Product Manual
Page 20
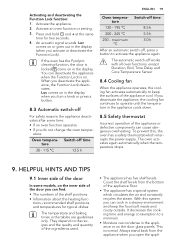
... condensation, add water each use two baking trays at the same time, keep one empty level between them. • Leave the meat for 10 minutes before carving so that can change the baking results and cause damage to the enamel. 9.2 Baking cakes • Do not open the oven door before 3/4 of the set cooking time is up . 9.4 Cooking times Cooking times depend on a wire shelf1) In a baking tray In a 26 cm...
... condensation, add water each use two baking trays at the same time, keep one empty level between them. • Leave the meat for 10 minutes before carving so that can change the baking results and cause damage to the enamel. 9.2 Baking cakes • Do not open the oven door before 3/4 of the set cooking time is up . 9.4 Cooking times Cooking times depend on a wire shelf1) In a baking tray In a 26 cm...
Product Manual
Page 32
... oven door stays locked. Clean the glass cover. 3. Use the same oven lamp type. 4. 32 www.aeg.com CAUTION! It can use it . 2. Do not let the removable shelf supports stay in the fuse box or deactivate the circuit breaker. Be careful when you can drip from the appliance. Always hold the halogen lamp with the appliance, do not close the oven door. Set the function Pyrolysis. P1 - Replace the oven light bulb with...
... oven door stays locked. Clean the glass cover. 3. Use the same oven lamp type. 4. 32 www.aeg.com CAUTION! It can use it . 2. Do not let the removable shelf supports stay in the fuse box or deactivate the circuit breaker. Be careful when you can drip from the appliance. Always hold the halogen lamp with the appliance, do not close the oven door. Set the function Pyrolysis. P1 - Replace the oven light bulb with...

Product Manual
Page 33
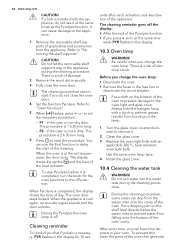
... not use acids, sprays or similar cleaning agents. Fill in warm water with the removal of cleaning procedures. Let it increases the quantity of the tank contents (refer to clean them. ENGLISH 33 the steam. Deactivate it after 25 minutes and let it after each steam cooking. 1. Deactivate the oven and wait for 15 minutes. 3. The oven door has four glass panels. Clean the drain...
... not use acids, sprays or similar cleaning agents. Fill in warm water with the removal of cleaning procedures. Let it increases the quantity of the tank contents (refer to clean them. ENGLISH 33 the steam. Deactivate it after 25 minutes and let it after each steam cooking. 1. Deactivate the oven and wait for 15 minutes. 3. The oven door has four glass panels. Clean the drain...
Product Manual
Page 37
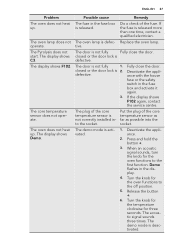
... door lock is defec- The door is defective. The demo mode is released more than one time, contact a qualified electrician. tive. Deactivate the appliance. 2. Do a check of the core temperature sensor is not fully Fully close the door. The plug of the fuse. Release the button +. 6. The oven lamp does not operate. Press and hold the button +. 3. The display shows C3. The Pyrolysis does not start...
... door lock is defec- The door is defective. The demo mode is released more than one time, contact a qualified electrician. tive. Deactivate the appliance. 2. Do a check of the core temperature sensor is not fully Fully close the door. The plug of the fuse. Release the button +. 6. The oven lamp does not operate. Press and hold the button +. 3. The display shows C3. The Pyrolysis does not start...
Product Manual
Page 38
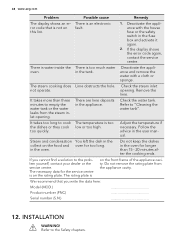
... appliance cavity. this list. 1. Check the water tank. If you write the data here: Model (MOD.) Product number (PNC) Serial number (S.N.) 12. Do not remove the rating plate from the steam inlet opening . There is not on the food and oven for longer than three minutes to the problem yourself, contact your dealer or the service centre. in the user manual. The steam cooking does Lime obstructs the...
... appliance cavity. this list. 1. Check the water tank. If you write the data here: Model (MOD.) Product number (PNC) Serial number (S.N.) 12. Do not remove the rating plate from the steam inlet opening . There is not on the food and oven for longer than three minutes to the problem yourself, contact your dealer or the service centre. in the user manual. The steam cooking does Lime obstructs the...


