

Operating Guide
Page 3
...;ʜ20 Displaying The Child Window ʜ21 Selecting An Audio Input ʜʜʜ21 Multifunctional Settings ʜʜʜʜ22 Using The Menu Functions ʜʜ22 MAIN Menu 23 PICTURE-1 Menu 24 PICTURE-2 Menu 26 INPUT Menu 27 AUTO Menu 29 SCREEN Menu 31 OPTION Menu 33 NETWORK Menu 35 Network Setting Up 36 Lamp 37 Replacing The Lamp ʜʜʜʜʜ38 Air Filter 39 Caring For The Air Filterʜʜʜ...
...;ʜ20 Displaying The Child Window ʜ21 Selecting An Audio Input ʜʜʜ21 Multifunctional Settings ʜʜʜʜ22 Using The Menu Functions ʜʜ22 MAIN Menu 23 PICTURE-1 Menu 24 PICTURE-2 Menu 26 INPUT Menu 27 AUTO Menu 29 SCREEN Menu 31 OPTION Menu 33 NETWORK Menu 35 Network Setting Up 36 Lamp 37 Replacing The Lamp ʜʜʜʜʜ38 Air Filter 39 Caring For The Air Filterʜʜʜ...
Operating Guide
Page 6
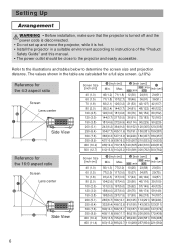
... Arrangement WARNING • Before installation, make sure that the projector is turned off and the power code is disconnected. • Do not set up and move the projector, while it is hot. • Install the projector in the table are calculated for a full size screen. (±10%) Reference for the 4:3 aspect ratio b C Screen Lens center Side View a Reference for the 16:9 aspect ratio C b Screen Lens center a Side View Screen Size...
... Arrangement WARNING • Before installation, make sure that the projector is turned off and the power code is disconnected. • Do not set up and move the projector, while it is hot. • Install the projector in the table are calculated for a full size screen. (±10%) Reference for the 4:3 aspect ratio b C Screen Lens center Side View a Reference for the 16:9 aspect ratio C b Screen Lens center a Side View Screen Size...

Operating Guide
Page 8
... screws on an input, automatic adjust function may take advantage of this function by connecting this projector to computers that have multiple display screen modes. In this case, you connect devices to the correct port. Then the resolution will go back to the projector. Setting Up (continued) Connecting Your Devices WARNING • Whenever attempting to connect other devices to the projector, read thoroughly the "Product Safety Guide", this manual...
... screws on an input, automatic adjust function may take advantage of this function by connecting this projector to computers that have multiple display screen modes. In this case, you connect devices to the correct port. Then the resolution will go back to the projector. Setting Up (continued) Connecting Your Devices WARNING • Whenever attempting to connect other devices to the projector, read thoroughly the "Product Safety Guide", this manual...

Operating Guide
Page 13
... available. LASER INDICATOR STANDBY/ON VIDEO RGB ++ LENS SHIFT FOCUS -- + ZOOM - BLANK ASPECT LASER PREVIOUS NEXT MOUSE ESC MENU POSITION RESET AUTO MAGNFY PinP VOLUME ON FREEZE MUTE OFF KEYSTONE SEARCH 1 2 3 ID CHANGE ID CHANGE switch 13 memo You can use two or three same type projectors at the same time. Using The Remote ID Feature This is controlled by connecting the REMOTE CONTROL ports of a remote sensor). may result in the screen etc. memo...
... available. LASER INDICATOR STANDBY/ON VIDEO RGB ++ LENS SHIFT FOCUS -- + ZOOM - BLANK ASPECT LASER PREVIOUS NEXT MOUSE ESC MENU POSITION RESET AUTO MAGNFY PinP VOLUME ON FREEZE MUTE OFF KEYSTONE SEARCH 1 2 3 ID CHANGE ID CHANGE switch 13 memo You can use two or three same type projectors at the same time. Using The Remote ID Feature This is controlled by connecting the REMOTE CONTROL ports of a remote sensor). may result in the screen etc. memo...

Operating Guide
Page 14
... LASER PREVIOUS NEXT MOUSE ESC MENU POSITION RESET AUTO MAGNFY PinP VOLUME ON FREEZE MUTE OFF KEYSTONE SEARCH 1 2 3 ID CHANGE (Front) Mouse left button Mouse move pointer Keyboard Arrow keys / / / Mouse right button Keyboard ESC key (Rear) 14 Then functions illustrated below will connect. LASER INDICATOR STANDBY/ON VIDEO RGB ++ LENS SHIFT FOCUS -- + ZOOM - Using the USB control feature, you will be used with Windows 95 OSR 2.1 or higher...
... LASER PREVIOUS NEXT MOUSE ESC MENU POSITION RESET AUTO MAGNFY PinP VOLUME ON FREEZE MUTE OFF KEYSTONE SEARCH 1 2 3 ID CHANGE (Front) Mouse left button Mouse move pointer Keyboard Arrow keys / / / Mouse right button Keyboard ESC key (Rear) 14 Then functions illustrated below will connect. LASER INDICATOR STANDBY/ON VIDEO RGB ++ LENS SHIFT FOCUS -- + ZOOM - Using the USB control feature, you will be used with Windows 95 OSR 2.1 or higher...

Operating Guide
Page 15
... standby/on /off ?" The projector lamp will light up and the standby/on indicator will stop blinking and light green. 4 Use the LENS SHIFT buttons to solid orange. 3 Press the STANDBY/ON button. BLANK ASPECT LASER LENS SHIFT buttons 5 Select an input signal according to [ | ] (ON). Power ON/OFF WARNING • When the power is ON, a strong light is visible. Then the standby/on indicator will begin blinking green. the message is emitted. NOTE • Turn the power on button / indicator 2 Set the power switch...
... standby/on /off ?" The projector lamp will light up and the standby/on indicator will stop blinking and light green. 4 Use the LENS SHIFT buttons to solid orange. 3 Press the STANDBY/ON button. BLANK ASPECT LASER LENS SHIFT buttons 5 Select an input signal according to [ | ] (ON). Power ON/OFF WARNING • When the power is ON, a strong light is visible. Then the standby/on indicator will begin blinking green. the message is emitted. NOTE • Turn the power on button / indicator 2 Set the power switch...

Operating Guide
Page 20
... aspect, the signal type mode of video or the signal input state is changed. blanking the screen, displaying a dialog or a menu, adjusting the picture, changing the input signal) is pressed. memo The magnify feature will automatically finish if a remote control's button that changes some display state (ex. Using The Magnify Feature 1 Press the MAGNIFY ON button. Do not leave the projector in magnifying the picture. 2 Press the POSITION button, then use the cursor buttons / / / to select...
... aspect, the signal type mode of video or the signal input state is changed. blanking the screen, displaying a dialog or a menu, adjusting the picture, changing the input signal) is pressed. memo The magnify feature will automatically finish if a remote control's button that changes some display state (ex. Using The Magnify Feature 1 Press the MAGNIFY ON button. Do not leave the projector in magnifying the picture. 2 Press the POSITION button, then use the cursor buttons / / / to select...

Operating Guide
Page 22
... the button. MENU MAIN PICTURE-1 PICTURE-2 INPUT AUTO SCREEN OPTION NETWORK : SELECT VOLUME SPEAKER IR REMOTE IR REMOTE ID LAMP TIME FILTER TIME SERVICE RESET 16 TURN ON ALL 1234 h 4321 h OPTION SPEAKER TURN ON TURN OFF 4) Use the cursor button to operate the item. PREVIOUS NEXT MOUSE ESC MENU POSITION RESET AUTO MAGNFY PinP VOLUME ON FREEZE MUTE OFF KEYSTONE SEARCH 1 2 3 ID CHANGE Cursor buttons MENU button RESET button ESC button ex. LASER INDICATOR STANDBY/ON VIDEO RGB ++ LENS SHIFT FOCUS -- + ZOOM - The display of these menus is operated using the button...
... the button. MENU MAIN PICTURE-1 PICTURE-2 INPUT AUTO SCREEN OPTION NETWORK : SELECT VOLUME SPEAKER IR REMOTE IR REMOTE ID LAMP TIME FILTER TIME SERVICE RESET 16 TURN ON ALL 1234 h 4321 h OPTION SPEAKER TURN ON TURN OFF 4) Use the cursor button to operate the item. PREVIOUS NEXT MOUSE ESC MENU POSITION RESET AUTO MAGNFY PinP VOLUME ON FREEZE MUTE OFF KEYSTONE SEARCH 1 2 3 ID CHANGE Cursor buttons MENU button RESET button ESC button ex. LASER INDICATOR STANDBY/ON VIDEO RGB ++ LENS SHIFT FOCUS -- + ZOOM - The display of these menus is operated using the button...

Operating Guide
Page 24
... at a video signal. MENU MAIN PICTURE-1 PICTURE-2 INPUT AUTO SCREEN OPTION NETWORK : SELECT GAMMA COLOR BAL R COLOR BAL G COLOR BAL B SHARPNESS COLOR TINT MY MEMORY NORMAL +0 +0 +0 +0 +0 +0 LOAD1 Item Description Select a gamma mode using the / buttons. : Clear Soft memo This item can be selected only when the : SELECT USER is continued to perform each operation in accordance with the instructions in the table below . Multifunctional Settings (continued) PICTURE-1 Menu With the PICTURE-1 menu, the items...
... at a video signal. MENU MAIN PICTURE-1 PICTURE-2 INPUT AUTO SCREEN OPTION NETWORK : SELECT GAMMA COLOR BAL R COLOR BAL G COLOR BAL B SHARPNESS COLOR TINT MY MEMORY NORMAL +0 +0 +0 +0 +0 +0 LOAD1 Item Description Select a gamma mode using the / buttons. : Clear Soft memo This item can be selected only when the : SELECT USER is continued to perform each operation in accordance with the instructions in the table below . Multifunctional Settings (continued) PICTURE-1 Menu With the PICTURE-1 menu, the items...

Operating Guide
Page 27
... the TURN OFF using the / buttons. : COMPONENT SCART RGB When the SCART RGB is selected, the 3D-YCS mode works for a HDTV signal. Perform each operation in the table below can be performed. MENU MAIN PICTURE-1 PICTURE-2 INPUT AUTO SCREEN OPTION NETWORK : SELECT COLOR SPACE AUTO COMPONENT COMPONENT VIDEO AUTO 3D-YCS TURN OFF VIDEO NR LOW P. memo This item performs only at a RGB signal or a component video signal other than a COMPONENT port input of...
... the TURN OFF using the / buttons. : COMPONENT SCART RGB When the SCART RGB is selected, the 3D-YCS mode works for a HDTV signal. Perform each operation in the table below can be performed. MENU MAIN PICTURE-1 PICTURE-2 INPUT AUTO SCREEN OPTION NETWORK : SELECT COLOR SPACE AUTO COMPONENT COMPONENT VIDEO AUTO 3D-YCS TURN OFF VIDEO NR LOW P. memo This item performs only at a RGB signal or a component video signal other than a COMPONENT port input of...

Operating Guide
Page 28
... picture more smoothly. Select a signal input port to the initial setting. This function automatically works when a RGB signal with vertical frequency of the INPUT menu are collectively returned to display just when the projector is working as illustrated below. INFORMATION INPUT-INFORMATION RGB 1024x768 @60.0 FRAME LOCK INPUT-INFORMATION S-VIDEO SECAM AUTO INPUT-INFORMATION COMPONENT 575i @50 SCART RGB memo The "FRAME LOCK" message means the frame lock function is turned on, using...
... picture more smoothly. Select a signal input port to the initial setting. This function automatically works when a RGB signal with vertical frequency of the INPUT menu are collectively returned to display just when the projector is working as illustrated below. INFORMATION INPUT-INFORMATION RGB 1024x768 @60.0 FRAME LOCK INPUT-INFORMATION S-VIDEO SECAM AUTO INPUT-INFORMATION COMPONENT 575i @50 SCART RGB memo The "FRAME LOCK" message means the frame lock function is turned on, using...

Operating Guide
Page 29
....) 29 Set the time using the / buttons.: TURN ON TURN OFF When the TURN ON is displayed during the operation. MENU MAIN PICTURE-1 PICTURE-2 INPUT AUTO SCREEN OPTION NETWORK : SELECT ADJUST POWER OFF POWER ON SEARCH RESET 0 min TURN ON TURN ON Item ADJUST POWER OFF POWER ON Description Pressing the (or the ENTER) button performs the automatic adjustment. Perform each operation in accordance with a proper signal (without pressing the STANDBY/ON button. Use a bright screen when adjusting. Please refer to 99, the projector lamp will...
....) 29 Set the time using the / buttons.: TURN ON TURN OFF When the TURN ON is displayed during the operation. MENU MAIN PICTURE-1 PICTURE-2 INPUT AUTO SCREEN OPTION NETWORK : SELECT ADJUST POWER OFF POWER ON SEARCH RESET 0 min TURN ON TURN ON Item ADJUST POWER OFF POWER ON Description Pressing the (or the ENTER) button performs the automatic adjustment. Perform each operation in accordance with a proper signal (without pressing the STANDBY/ON button. Use a bright screen when adjusting. Please refer to 99, the projector lamp will...

Operating Guide
Page 31
... PICTURE-1 PICTURE-2 INPUT AUTO SCREEN OPTION NETWORK : SELECT BLANK BLACK START UP ORIGINAL MyScreen MyScreen SIZE x1 MyScreen LOCK TURN OFF MENU POSITION MESSAGE TURN ON RESET Item Description BLANK Select a type of the START UP screen using the / buttons.: TURN ON TURN OFF The TURN ON disables the operation of the item "MyScreen" of this table. memo For the MyScreen, please refer to the item "MyScreen" in this table. Multifunctional Settings (continued) SCREEN Menu...
... PICTURE-1 PICTURE-2 INPUT AUTO SCREEN OPTION NETWORK : SELECT BLANK BLACK START UP ORIGINAL MyScreen MyScreen SIZE x1 MyScreen LOCK TURN OFF MENU POSITION MESSAGE TURN ON RESET Item Description BLANK Select a type of the START UP screen using the / buttons.: TURN ON TURN OFF The TURN ON disables the operation of the item "MyScreen" of this table. memo For the MyScreen, please refer to the item "MyScreen" in this table. Multifunctional Settings (continued) SCREEN Menu...

Operating Guide
Page 33
... works. Pressing the RESET button for about the air filter. memo About replacing the lamp, please refer to display the messages about 3 seconds displays the FILTER TIME menu. The filter timer counts the used time of the lamp timer to display the messages about 3 seconds displays the LAMP TIME menu. Always at least one sensor is controlled by a remote control irrespective of the position of the lamp timer to 0. When the ALL is selected, the projector is controlled by the remote control whose ID CHANGE switch...
... works. Pressing the RESET button for about the air filter. memo About replacing the lamp, please refer to display the messages about 3 seconds displays the FILTER TIME menu. The filter timer counts the used time of the lamp timer to display the messages about 3 seconds displays the LAMP TIME menu. Always at least one sensor is controlled by a remote control irrespective of the position of the lamp timer to 0. When the ALL is selected, the projector is controlled by the remote control whose ID CHANGE switch...
Operating Guide
Page 38
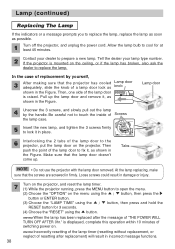
... a new lamp. Then, one side of Screws the lamp case. memo Incorrectly resetting of the lamp timer (resetting without replacement, or neglect of resetting after the message of the lamp door to fix it in place. PC 5 Insert the new lamp, and tighten the 3 screws firmly to lock it , as possible. 1 Turn off the projector, and unplug the power cord. Lamp (continued) Replacing The Lamp If the indicators or a message prompts you to replace the lamp, replace the lamp as...
... a new lamp. Then, one side of Screws the lamp case. memo Incorrectly resetting of the lamp timer (resetting without replacement, or neglect of resetting after the message of the lamp door to fix it in place. PC 5 Insert the new lamp, and tighten the 3 screws firmly to lock it , as possible. 1 Turn off the projector, and unplug the power cord. Lamp (continued) Replacing The Lamp If the indicators or a message prompts you to replace the lamp, replace the lamp as...

Operating Guide
Page 41
... this projector. 41 Troubleshooting Related Messages When the unit's power is on, messages such as described below may thus fail to light even prior to the functioning of the automatic shut-down function, such that the power will automatically be sure to reset the lamp timer. If the same message is recommended. After you have changed the lamp, please be turned off , and change within ** hours is displayed...
... this projector. 41 Troubleshooting Related Messages When the unit's power is on, messages such as described below may thus fail to light even prior to the functioning of the automatic shut-down function, such that the power will automatically be sure to reset the lamp timer. If the same message is recommended. After you have changed the lamp, please be turned off , and change within ** hours is displayed...

Operating Guide
Page 43
... lamp and lamp door, and then turn the power on again. • Is there blockage of the air passage aperture? • Is the air filter dirty? • Does the peripheral temperature exceed 35°C? standby/on indicator Lighting in Orange Blinking in Green Lighting in Green Blinking in Orange Blinking in Red lamp temp indicator indicator Description Turned Turned The projector is displayed, please contact your dealer or service company. If the same indication is displayed after the treatment, please change the lamp...
... lamp and lamp door, and then turn the power on again. • Is there blockage of the air passage aperture? • Is the air filter dirty? • Does the peripheral temperature exceed 35°C? standby/on indicator Lighting in Orange Blinking in Green Lighting in Green Blinking in Orange Blinking in Red lamp temp indicator indicator Description Turned Turned The projector is displayed, please contact your dealer or service company. If the same indication is displayed after the treatment, please change the lamp...
Operating Guide
Page 45
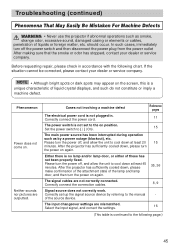
... lamp door, or either of the source device. Correctly set to the manual - Phenomenon Power does not come on again. 35, 36 The signal cables are not correctly connected. Please turn the power off , and allow the unit to cool down at least 45 minutes. Troubleshooting (continued) Phenomena That May Easily Be Mistaken For Machine Defects WARNING • Never use the projector if abnormal operations...
... lamp door, or either of the source device. Correctly set to the manual - Phenomenon Power does not come on again. 35, 36 The signal cables are not correctly connected. Please turn the power off , and allow the unit to cool down at least 45 minutes. Troubleshooting (continued) Phenomena That May Easily Be Mistaken For Machine Defects WARNING • Never use the projector if abnormal operations...

Safety Guide
Page 10
... of projection lamp in this product contains mercury. The reset menu will blink at www.epsc.ca Display Lamp Operation Hours To determine the lamp operation hours, follow these steps: 1. WARNING • To reduce the risk associated with the button. 10 3M™ Multimedia Projector X70/X80 Product Safety Guide © 3M 2004 Dispose of the normal lamp life. Choose the "OPTION" using the button, and press and hold the RESET button on the remote control. The message "CHANGE THE LAMP...
... of projection lamp in this product contains mercury. The reset menu will blink at www.epsc.ca Display Lamp Operation Hours To determine the lamp operation hours, follow these steps: 1. WARNING • To reduce the risk associated with the button. 10 3M™ Multimedia Projector X70/X80 Product Safety Guide © 3M 2004 Dispose of the normal lamp life. Choose the "OPTION" using the button, and press and hold the RESET button on the remote control. The message "CHANGE THE LAMP...
Safety Guide
Page 13
... when operated in accordance with the projector or specified. Note: Changes or modifications not expressly approved by one or more of their respective companies. © 3M 2004 3M™ Multimedia Projector X70/X80 Product Safety Guide 13 If normal coaxial cables are designed to operate the equipment. All other rights which vary from that interference will be required with the instruction manual may...
... when operated in accordance with the projector or specified. Note: Changes or modifications not expressly approved by one or more of their respective companies. © 3M 2004 3M™ Multimedia Projector X70/X80 Product Safety Guide 13 If normal coaxial cables are designed to operate the equipment. All other rights which vary from that interference will be required with the instruction manual may...


