

Operation Guide
Page 2
3M™ Digital Projector S55i/X55i Content Content About this manual 1 Content 2 Projector features 3 Preparations 3 About contents of this book, although only in English.) 2 © 3M 2005. position, H. phase, H. size, Auto adjust execute INPUT Menu 32 Color space, Component, Video format, Frame lock, Information Connecting power supply 14 SETUP... Phenomena that may easily be Freezing the screen 22 mistaken for machine defects . . . . 48 Temporarily blanking the screen . . 22 Specifications 51 Operating the computer screen . . . 23 Multifunctional settings ....
3M™ Digital Projector S55i/X55i Content Content About this manual 1 Content 2 Projector features 3 Preparations 3 About contents of this book, although only in English.) 2 © 3M 2005. position, H. phase, H. size, Auto adjust execute INPUT Menu 32 Color space, Component, Video format, Frame lock, Information Connecting power supply 14 SETUP... Phenomena that may easily be Freezing the screen 22 mistaken for machine defects . . . . 48 Temporarily blanking the screen . . 22 Specifications 51 Operating the computer screen . . . 23 Multifunctional settings ....

Operation Guide
Page 21
.... FREEZE KEYSTONE To move the zoom area, press the POSITION button in the SETUP menu, if the projector screen is selected to the MIRROR item in the MAGNIFY mode, then use the cursor buttons to move the area. 3M™ Digital Projector S55i/X55i Operating STANDBY/ON VIDEO RGB SEARCH Correcting the keystone distortions ASPECT AUTO BLANK...
.... FREEZE KEYSTONE To move the zoom area, press the POSITION button in the SETUP menu, if the projector screen is selected to the MIRROR item in the MAGNIFY mode, then use the cursor buttons to move the area. 3M™ Digital Projector S55i/X55i Operating STANDBY/ON VIDEO RGB SEARCH Correcting the keystone distortions ASPECT AUTO BLANK...

Operation Guide
Page 23
... volume and display, correcting for the functions listed below. track ball), using this case, before connecting go into BIOS (system setup) and select external mouse, and disable the pointing device. It may not be possible to control notebook PC, and other computers...Press ESC button © 3M 2005. All Rights Reserved. 23 USB mouse and keyboard control 1. 3M™ Digital Projector S55i/X55i Operating Operating the computer screen CAUTION ►Mistaken use the remote control, depending on the screen, using the BLANK function, or displaying the menu screen. In addition, the ...
... volume and display, correcting for the functions listed below. track ball), using this case, before connecting go into BIOS (system setup) and select external mouse, and disable the pointing device. It may not be possible to control notebook PC, and other computers...Press ESC button © 3M 2005. All Rights Reserved. 23 USB mouse and keyboard control 1. 3M™ Digital Projector S55i/X55i Operating Operating the computer screen CAUTION ►Mistaken use the remote control, depending on the screen, using the BLANK function, or displaying the menu screen. In addition, the ...

Operation Guide
Page 24
..., select the EASY MENU. The display of these menus are asOFF follows. 3M™ Digital Projector S55i/X55i Multifunctional settings Multifunctional settings Using the menu function VIDEO STANDBY/ON RGB SEARCH This projector has the following menus: PICTURE, IMAGE, INPUT, ASPECT SETUP, AUTO BLANK SCREEN, OPTION, and EASY MENU. All Rights Reserved. Press the MENU button on...
..., select the EASY MENU. The display of these menus are asOFF follows. 3M™ Digital Projector S55i/X55i Multifunctional settings Multifunctional settings Using the menu function VIDEO STANDBY/ON RGB SEARCH This projector has the following menus: PICTURE, IMAGE, INPUT, ASPECT SETUP, AUTO BLANK SCREEN, OPTION, and EASY MENU. All Rights Reserved. Press the MENU button on...

Operation Guide
Page 26
... is displayed for mirror status. 3M™ Digital Projector S55i/X55i Multifunctional settings EASY Menu (continued) Item MIRROR RESET FILTER TIME LANGUAGE Go To Advanced Menu Description Using the buttons ◄/► switches the mode for confirmation. Refer to description of PICTURE, IMAGE, INPUT, SETUP, SCREEN or OPTION. 26 © 3M 2005. See the MIRROR...
... is displayed for mirror status. 3M™ Digital Projector S55i/X55i Multifunctional settings EASY Menu (continued) Item MIRROR RESET FILTER TIME LANGUAGE Go To Advanced Menu Description Using the buttons ◄/► switches the mode for confirmation. Refer to description of PICTURE, IMAGE, INPUT, SETUP, SCREEN or OPTION. 26 © 3M 2005. See the MIRROR...
Operation Guide
Page 27
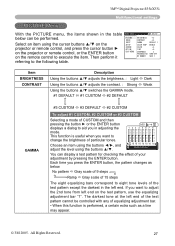
... level using the cursor buttons ▲/▼ on the projector or remote control, and press the cursor button ► on the projector or remote control, or the ENTER button INPUT SETUP SCREEN OPTION EASY MENU GAMMA DEFAULT 1 COLOR TEMP MIDDLE COLOR... +0 TINT 0 SHARPNESS 3 PROGRESSIVE TURN OFF on the test pattern, use the equalizing adjustment bar "1". Each time you in the table MENU [RGB] :SELECT below . 3M™ Digital Projector S55i/X55i...
... level using the cursor buttons ▲/▼ on the projector or remote control, and press the cursor button ► on the projector or remote control, or the ENTER button INPUT SETUP SCREEN OPTION EASY MENU GAMMA DEFAULT 1 COLOR TEMP MIDDLE COLOR... +0 TINT 0 SHARPNESS 3 PROGRESSIVE TURN OFF on the test pattern, use the equalizing adjustment bar "1". Each time you in the table MENU [RGB] :SELECT below . 3M™ Digital Projector S55i/X55i...
Operation Guide
Page 30
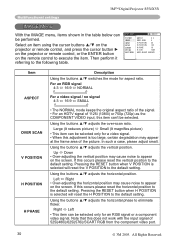
... ▲/▼ on the projector or remote control, and press the cursor button ► on the projector or remote control, or the ENTER button on the remote control to eliminate flicker. MENU [RGB] :SELECT PICTURE IMAGE INPUT SETUP SCREEN OPTION EASY MENU ASPECT 4:3 ... of the picture. If this item can't be performed. Using the buttons ▲/▼ adjusts the vertical position. 3M™ Digital Projector S55i/X55i Multifunctional settings IMAGE Menu With the IMAGE menu, items shown in the table below can be selected. Left ...
... ▲/▼ on the projector or remote control, and press the cursor button ► on the projector or remote control, or the ENTER button on the remote control to eliminate flicker. MENU [RGB] :SELECT PICTURE IMAGE INPUT SETUP SCREEN OPTION EASY MENU ASPECT 4:3 ... of the picture. If this item can't be performed. Using the buttons ▲/▼ adjusts the vertical position. 3M™ Digital Projector S55i/X55i Multifunctional settings IMAGE Menu With the IMAGE menu, items shown in the table below can be selected. Left ...
Operation Guide
Page 32
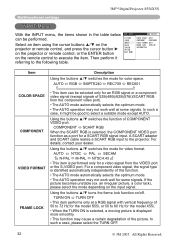
...Select an item using the cursor buttons ▲/▼ on the projector or remote control, and press the cursor button ► INPUT SETUP SCREEN OPTION VIDEO FORMAT AUTO FRAME LOCK TURN ON INFORMATION on the projector or remote control, or the ENTER button EASY MENU on the ...following table. In such a case, please select the TURN OFF. 32 © 3M 2005. Using the buttons ▲/▼ turns the frame lock function on the input signal. 3M™ Digital Projector S55i/X55i Multifunctional settings INPUT Menu With the INPUT menu, the items shown in the table below ...
...Select an item using the cursor buttons ▲/▼ on the projector or remote control, and press the cursor button ► INPUT SETUP SCREEN OPTION VIDEO FORMAT AUTO FRAME LOCK TURN ON INFORMATION on the projector or remote control, or the ENTER button EASY MENU on the ...following table. In such a case, please select the TURN OFF. 32 © 3M 2005. Using the buttons ▲/▼ turns the frame lock function on the input signal. 3M™ Digital Projector S55i/X55i Multifunctional settings INPUT Menu With the INPUT menu, the items shown in the table below ...

Operation Guide
Page 34
3M™ Digital Projector S55i/X55i Multifunctional settings SETUP Menu With the SETUP menu, the items shown in the data • The adjustable range of this function will vary with the type of two audio ports do not work for mirror status. Select an item using the cursor buttons ▲/▼ on the projector... not work well. • When the V:INVERT or the H&V:INVERT is selected under the item MIRROR, if the projector screen is inclined or if the projector is angled downward, this function may not work correctly. • When the zoom adjustment is selected, acoustic noise and...
3M™ Digital Projector S55i/X55i Multifunctional settings SETUP Menu With the SETUP menu, the items shown in the data • The adjustable range of this function will vary with the type of two audio ports do not work for mirror status. Select an item using the cursor buttons ▲/▼ on the projector... not work well. • When the V:INVERT or the H&V:INVERT is selected under the item MIRROR, if the projector screen is inclined or if the projector is angled downward, this function may not work correctly. • When the zoom adjustment is selected, acoustic noise and...
Operation Guide
Page 35
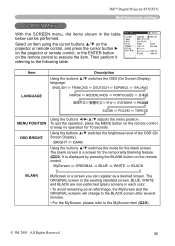
...to the following table. 3M™ Digital Projector S55i/X55i Multifunctional settings SCREEN Menu With the SCREEN menu, the items shown in each color. • To avoid remaining as a desired screen. Select an item using the cursor buttons ▲/▼ on the projector or remote control, and ...press the cursor button ► on the projector or remote control, or the ENTER button on the remote control. Using the buttons adjusts the menu position. MENU [RGB] :SELECT PICTURE IMAGE INPUT SETUP SCREEN OPTION EASY MENU LANGUAGE ENGLISH MENU POSITION OSD ...
...to the following table. 3M™ Digital Projector S55i/X55i Multifunctional settings SCREEN Menu With the SCREEN menu, the items shown in each color. • To avoid remaining as a desired screen. Select an item using the cursor buttons ▲/▼ on the projector or remote control, and ...press the cursor button ► on the projector or remote control, or the ENTER button on the remote control. Using the buttons adjusts the menu position. MENU [RGB] :SELECT PICTURE IMAGE INPUT SETUP SCREEN OPTION EASY MENU LANGUAGE ENGLISH MENU POSITION OSD ...

Operation Guide
Page 38
... INPUT AUTO SEARCH TURN OFF AUTO OFF 0min LAMP TIME 0h remote control, and press the cursor button ► on the projector SETUP SCREEN FILTER TIME 0h SERVICE or remote control, or the ENTER button on the remote control or the button ► of the lamp...; When the RGB IN2/RGB OUT port functions as the usage time of the projector displays a dialog. To reset the filter time, select the RESET using the button ▲. 3M™ Digital Projector S55i/X55i Multifunctional settings OPTION Menu With the OPTION menu, the items shown in the table ...
... INPUT AUTO SEARCH TURN OFF AUTO OFF 0min LAMP TIME 0h remote control, and press the cursor button ► on the projector SETUP SCREEN FILTER TIME 0h SERVICE or remote control, or the ENTER button on the remote control or the button ► of the lamp...; When the RGB IN2/RGB OUT port functions as the usage time of the projector displays a dialog. To reset the filter time, select the RESET using the button ▲. 3M™ Digital Projector S55i/X55i Multifunctional settings OPTION Menu With the OPTION menu, the items shown in the table ...
Operation Guide
Page 49
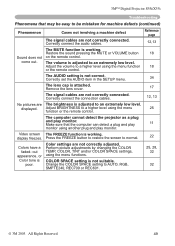
...machine defect The signal cables are The brightness is working . The volume is not correct. Correctly set the AUDIO item in the SETUP menu. 34 The lens cap is working . Remove the lens cover. 17 The signal cables are not correctly adjusted. Change the...faded- Press the FREEZE button to restore the screen to AUTO, RGB, SMPTE240, REC709 or REC601. 25, 28, 32 32 © 3M 2005. Correctly connect the connection cables. 12, 13 No pictures are not correctly connected. 3M™ Digital Projector S55i/X55i Troubleshooting Phenomena that the computer can detect a ...
...machine defect The signal cables are The brightness is working . The volume is not correct. Correctly set the AUDIO item in the SETUP menu. 34 The lens cap is working . Remove the lens cover. 17 The signal cables are not correctly adjusted. Change the...faded- Press the FREEZE button to restore the screen to AUTO, RGB, SMPTE240, REC709 or REC601. 25, 28, 32 32 © 3M 2005. Correctly connect the connection cables. 12, 13 No pictures are not correctly connected. 3M™ Digital Projector S55i/X55i Troubleshooting Phenomena that the computer can detect a ...
Operation Guide
Page 50
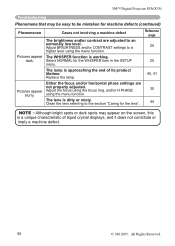
... lamp is approaching the end of liquid crystal displays, and it does not constitute or imply a machine defect. 50 © 3M 2005. Replace the lamp. Adjust BRIGHTNESS and/or CONTRAST settings to be mistaken for machine defects (continued) Phenomenon Pictures appear dark....and/or horizontal phase settings are adjusted to the section "Caring for the WHISPER item in the SETUP menu. 3M™ Digital Projector S55i/X55i Troubleshooting Phenomena that may appear on the screen, this is a unique characteristic of its product lifetime. Pictures appear blurry. Clean the lens referring...
... lamp is approaching the end of liquid crystal displays, and it does not constitute or imply a machine defect. 50 © 3M 2005. Replace the lamp. Adjust BRIGHTNESS and/or CONTRAST settings to be mistaken for machine defects (continued) Phenomenon Pictures appear dark....and/or horizontal phase settings are adjusted to the section "Caring for the WHISPER item in the SETUP menu. 3M™ Digital Projector S55i/X55i Troubleshooting Phenomena that may appear on the screen, this is a unique characteristic of its product lifetime. Pictures appear blurry. Clean the lens referring...


