Operation Guide
Page 1
Document téléchargé sur www.lampe-videoprojecteur.info MP8795 Multimedia Projector Operator's Guide © 3M 2003. All Rights Reserved.
Document téléchargé sur www.lampe-videoprojecteur.info MP8795 Multimedia Projector Operator's Guide © 3M 2003. All Rights Reserved.
Operation Guide
Page 2
... observe the trademarks and registered trademarks of the Video Electronics Standard Association. No Signal Menu 16 Table 9. OSD Message 20 Table 10. ENGLISH 3M™ Multimedia Projector MP8795 Liquid Crystal Projector Operator's Guide Thank you for any errors that may appear in this manual • The reproduction, transmission or use of this document or...
... observe the trademarks and registered trademarks of the Video Electronics Standard Association. No Signal Menu 16 Table 9. OSD Message 20 Table 10. ENGLISH 3M™ Multimedia Projector MP8795 Liquid Crystal Projector Operator's Guide Thank you for any errors that may appear in this manual • The reproduction, transmission or use of this document or...
Operation Guide
Page 3
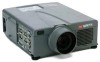
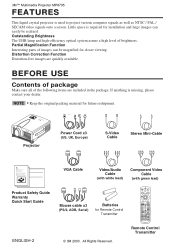
...) Component Video Cable (with green lead) STANDBY/ON BLANK LASER VIDEO RGB Mouse cable x3 (PS/2, ADB, Serial) Batteries for future reshipment. 3M™ Multimedia Projector MP8795 FEATURES This liquid crystal projector is missing, please contact your dealer. Partial Magnification Function Interesting parts of images can easily be magnified for installation and large images...
...) Component Video Cable (with green lead) STANDBY/ON BLANK LASER VIDEO RGB Mouse cable x3 (PS/2, ADB, Serial) Batteries for future reshipment. 3M™ Multimedia Projector MP8795 FEATURES This liquid crystal projector is missing, please contact your dealer. Partial Magnification Function Interesting parts of images can easily be magnified for installation and large images...
Operation Guide
Page 4
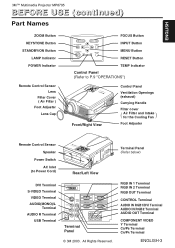
... OUT Terminal COMPONENT VIDEO Y Terminal CB/PB Terminal CR/PR Terminal ENGLISH-3 All Rights Reserved. ZOOM + - ENGLISH 3M™ Multimedia Projector MP8795 BEFORE USE (continued) Part Names ZOOM Button KEYSTONE Button STANDBY/ON Button LAMP Indicator POWER Indicator Remote Control Sensor Lens...LAMP RESET TEMP FOCUS Button INPUT Button MENU Button RESET Button TEMP Indicator Control Panel (Refer to P.9 "OPERATIONS") MP8795 Front/Right View PORTABLE PROJECTOR MP8795 Control Panel Ventilation Openings (exhaust) Carrying Handle Filter cover ( ) Air Filter and Intake for the Cooling Fan ...
... OUT Terminal COMPONENT VIDEO Y Terminal CB/PB Terminal CR/PR Terminal ENGLISH-3 All Rights Reserved. ZOOM + - ENGLISH 3M™ Multimedia Projector MP8795 BEFORE USE (continued) Part Names ZOOM Button KEYSTONE Button STANDBY/ON Button LAMP Indicator POWER Indicator Remote Control Sensor Lens...LAMP RESET TEMP FOCUS Button INPUT Button MENU Button RESET Button TEMP Indicator Control Panel (Refer to P.9 "OPERATIONS") MP8795 Front/Right View PORTABLE PROJECTOR MP8795 Control Panel Ventilation Openings (exhaust) Carrying Handle Filter cover ( ) Air Filter and Intake for the Cooling Fan ...
Operation Guide
Page 5
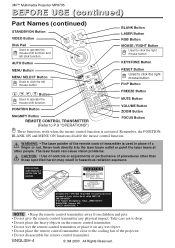
...: 1mW WAVE LENGTH: 650nm CLASS2 LASER PRODUCT LASER RADIATION DO NOT STARE INTO BEAM CLASS2 LASER PRODUCT MAX. ENGLISH-4 © 3M 2003. BLANK STANDBY/ON LASER RGB VIDEO BLANK Button LASER Button RGB Button MOUSE / RIGHT Button Used to the cooling fan of...Do not disassemble the remote control transmitter. AVOID EXPOSURELASER RADIATIONS IS EMITTED FROM THIS APERTURE CAUTION LASER RADIATIONDO NOT STARE INTO BEAM MAX. 3M™ Multimedia Projector MP8795 BEFORE USE (continued) Part Names (continued) STANDBY/ON Button VIDEO Button Disk Pad Used to operate the mouse shift function and ...
...: 1mW WAVE LENGTH: 650nm CLASS2 LASER PRODUCT LASER RADIATION DO NOT STARE INTO BEAM CLASS2 LASER PRODUCT MAX. ENGLISH-4 © 3M 2003. BLANK STANDBY/ON LASER RGB VIDEO BLANK Button LASER Button RGB Button MOUSE / RIGHT Button Used to the cooling fan of...Do not disassemble the remote control transmitter. AVOID EXPOSURELASER RADIATIONS IS EMITTED FROM THIS APERTURE CAUTION LASER RADIATIONDO NOT STARE INTO BEAM MAX. 3M™ Multimedia Projector MP8795 BEFORE USE (continued) Part Names (continued) STANDBY/ON Button VIDEO Button Disk Pad Used to operate the mouse shift function and ...
Operation Guide
Page 6
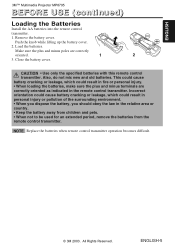
...law in the remote control transmitter. All Rights Reserved. NOTE Replace the batteries when remote control transmitter operation becomes difficult. © 3M 2003. This could cause battery cracking or leakage, which could result in fire or personal injury. • When loading the ...pets. • When not to be used for an extended period, remove the batteries from the remote control transmitter. ENGLISH 3M™ Multimedia Projector MP8795 BEFORE USE (continued) Loading the Batteries Install the AA batteries into the remote control transmitter. 1. Remove the battery cover....
...law in the remote control transmitter. All Rights Reserved. NOTE Replace the batteries when remote control transmitter operation becomes difficult. © 3M 2003. This could cause battery cracking or leakage, which could result in fire or personal injury. • When loading the ...pets. • When not to be used for an extended period, remove the batteries from the remote control transmitter. ENGLISH 3M™ Multimedia Projector MP8795 BEFORE USE (continued) Loading the Batteries Install the AA batteries into the remote control transmitter. 1. Remove the battery cover....

Operation Guide
Page 7
... size [inches (m)] 40 (1.0) 60 (1.5) 80 (2.0) 100 (2.5) 120 (3.0) 150 (3.8) 200 (5.0) a [inches (m)] Min. This could get caught and cause personal injury. ENGLISH-6 © 3M 2003. 3M™ Multimedia Projector MP8795 INSTALLATION Installation of the Projector and Screen Refer to the drawing and table below are for full size (1024 x 768 dots). b [inches (cm)] 55 (1.4) 73 (1.9) 1 (3) 85 (2.2) 114...
... size [inches (m)] 40 (1.0) 60 (1.5) 80 (2.0) 100 (2.5) 120 (3.0) 150 (3.8) 200 (5.0) a [inches (m)] Min. This could get caught and cause personal injury. ENGLISH-6 © 3M 2003. 3M™ Multimedia Projector MP8795 INSTALLATION Installation of the Projector and Screen Refer to the drawing and table below are for full size (1024 x 768 dots). b [inches (cm)] 55 (1.4) 73 (1.9) 1 (3) 85 (2.2) 114...
Operation Guide
Page 8
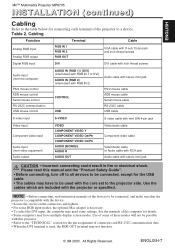
... connecting, turn off to all devices to be connected, except for the USB cable. • The cables may have multiple display screen modes. ENGLISH 3M™ Multimedia Projector MP8795 INSTALLATION (continued) Cabling Refer to the table below for details. • Some computers may have to be used , the RGB OUT terminal may not...
... connecting, turn off to all devices to be connected, except for the USB cable. • The cables may have multiple display screen modes. ENGLISH 3M™ Multimedia Projector MP8795 INSTALLATION (continued) Cabling Refer to the table below for details. • Some computers may have to be used , the RGB OUT terminal may not...
Operation Guide
Page 9
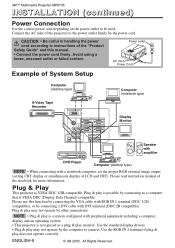
... DIGITAL Display Monitor Speaker with amplifier DVD Player Computer (desktop type) NOTE • When connecting with DVI terminal (DDC 2B compatible). ENGLISH-8 © 3M 2003. 3M™ Multimedia Projector MP8795 INSTALLATION (continued) Power Connection Use the correct power cord depending on the power outlet to a computer that is VESA DDC (Display Data Channel) compatible...
... DIGITAL Display Monitor Speaker with amplifier DVD Player Computer (desktop type) NOTE • When connecting with DVI terminal (DDC 2B compatible). ENGLISH-8 © 3M 2003. 3M™ Multimedia Projector MP8795 INSTALLATION (continued) Power Connection Use the correct power cord depending on the power outlet to a computer that is VESA DDC (Display Data Channel) compatible...
Operation Guide
Page 10
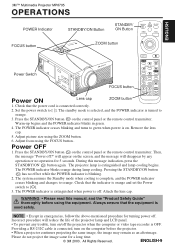
...equipment. Adjust picture size using the FOCUS button . Then, the message "Power off . Attach the lens cap. 3M™ Multimedia Projector MP8795 OPERATIONS ENGLISH POWER Indicator STANDBY/ON Button STANDBY/ ON Button STANDBY/ON BLANK LASER VIDEO RGB FOCUS button PORTABLE... PROJECTOR MP8795 ZOOM button STANDBY ON LAMP PWER TEMP - ZOOM + MUTE MENU RESET - Warm-up begins and the POWER indicator blinks in emergencies, follow the above-mentioned procedure for a long time. © 3M 2003. Adjust focus using the ZOOM ...
...equipment. Adjust picture size using the FOCUS button . Then, the message "Power off . Attach the lens cap. 3M™ Multimedia Projector MP8795 OPERATIONS ENGLISH POWER Indicator STANDBY/ON Button STANDBY/ ON Button STANDBY/ON BLANK LASER VIDEO RGB FOCUS button PORTABLE... PROJECTOR MP8795 ZOOM button STANDBY ON LAMP PWER TEMP - ZOOM + MUTE MENU RESET - Warm-up begins and the POWER indicator blinks in emergencies, follow the above-mentioned procedure for a long time. © 3M 2003. Adjust focus using the ZOOM ...
Operation Guide
Page 11
...icon is extinguished and the POSITION mode is cleared automatically. • , , and buttons may be used from the supplied remote control transmitter or the projector control panel. Refer to page 4. The [ ] icon is displayed in the POSITION mode. Image Position Adjustment: Press the , , and buttons in... 2/DVI RGB IN 1 → RGB IN 2 → DVI (→ RGB IN 1) Select Video Input : Press the VIDEO button. 3M™ Multimedia Projector MP8795 OPERATIONS (continued) Basic Operation The basic operations shown in Table 3 is performed from the control panel. All Rights Reserved.
...icon is extinguished and the POSITION mode is cleared automatically. • , , and buttons may be used from the supplied remote control transmitter or the projector control panel. Refer to page 4. The [ ] icon is displayed in the POSITION mode. Image Position Adjustment: Press the , , and buttons in... 2/DVI RGB IN 1 → RGB IN 2 → DVI (→ RGB IN 1) Select Video Input : Press the VIDEO button. 3M™ Multimedia Projector MP8795 OPERATIONS (continued) Basic Operation The basic operations shown in Table 3 is performed from the control panel. All Rights Reserved.
Operation Guide
Page 12
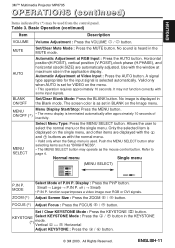
... MENU SELECT button. FOCUS (*) Adjust Focus : Press the FOCUS / button. Vertical ↔ Horizontal Adjust KEYSTONE : Press the / button. © 3M 2003. Basic Operation (continued) Item Description VOLUME Volume Adjustment : Press the VOLUME / button. BLANK ON/OFF Set/Clear Blank Mode: Press the BLANK ...the KEYSTONE (*) mode. All Rights Reserved. Allows the user to page 4. off ( → Small) • P.IN P. ENGLISH 3M™ Multimedia Projector MP8795 OPERATIONS (continued) Items indicated by (*) may be used . Table 3. The screen color is as the mouse control button.
... MENU SELECT button. FOCUS (*) Adjust Focus : Press the FOCUS / button. Vertical ↔ Horizontal Adjust KEYSTONE : Press the / button. © 3M 2003. Basic Operation (continued) Item Description VOLUME Volume Adjustment : Press the VOLUME / button. BLANK ON/OFF Set/Clear Blank Mode: Press the BLANK ...the KEYSTONE (*) mode. All Rights Reserved. Allows the user to page 4. off ( → Small) • P.IN P. ENGLISH 3M™ Multimedia Projector MP8795 OPERATIONS (continued) Items indicated by (*) may be used . Table 3. The screen color is as the mouse control button.
Operation Guide
Page 13
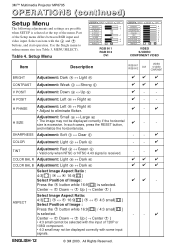
...; Strong ✔✔ ✔ V POSIT Adjustment: Down ↔ Up ✔- - and initialize the horizontal size. ENGLISH-12 © 3M 2003. Table 4. SHARPNESS Adjustment: Soft ↔ Clear -- ✔ COLOR Adjustment: Light ↔ Dark -- ✔ TINT Adjustment: Red ↔... cannot be selected with the input of Image : Press the button while 16:9[ ] / 4:3 small[ ] is selected. 3M™ Multimedia Projector MP8795 OPERATIONS (continued) Setup Menu The following adjustments and settings are possible when SETUP is excessive. Part of the menu. Use the...
...; Strong ✔✔ ✔ V POSIT Adjustment: Down ↔ Up ✔- - and initialize the horizontal size. ENGLISH-12 © 3M 2003. Table 4. SHARPNESS Adjustment: Soft ↔ Clear -- ✔ COLOR Adjustment: Light ↔ Dark -- ✔ TINT Adjustment: Red ↔... cannot be selected with the input of Image : Press the button while 16:9[ ] / 4:3 small[ ] is selected. 3M™ Multimedia Projector MP8795 OPERATIONS (continued) Setup Menu The following adjustments and settings are possible when SETUP is excessive. Part of the menu. Use the...
Operation Guide
Page 14
...input signal with some input signals. The TV mode and the FILM mode convert the interlaced video signal into the progressive signal. ENGLISH 3M™ Multimedia Projector MP8795 OPERATIONS (continued) Input Menu The following functions are automatically adjusted. Select NTSC, PAL, SECAM, NTSC4.43, M-PAL, or N-PAL... the P.IN P. VIDEO NR (**) Set/Clear Noise Reduction Mode: Select the TURN ON / TURN OFF with the / button. © 3M 2003. The function indicated (**) are effective on video input mode only, not on RGB input mode. Input Menu Item Description AUTO RGB Automatic ...
...input signal with some input signals. The TV mode and the FILM mode convert the interlaced video signal into the progressive signal. ENGLISH 3M™ Multimedia Projector MP8795 OPERATIONS (continued) Input Menu The following functions are automatically adjusted. Select NTSC, PAL, SECAM, NTSC4.43, M-PAL, or N-PAL... the P.IN P. VIDEO NR (**) Set/Clear Noise Reduction Mode: Select the TURN ON / TURN OFF with the / button. © 3M 2003. The function indicated (**) are effective on video input mode only, not on RGB input mode. Input Menu Item Description AUTO RGB Automatic ...

Operation Guide
Page 15
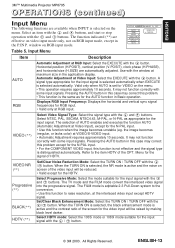
... the magnification, press the KEYSTONE button to go to display the MyScreen menu and set the MyScreen mode for about 20 seconds. 3M™ Multimedia Projector MP8795 OPERATIONS (continued) Image Menu The following adjustments and settings are available when IMAGE is going to the CAPT. mode and start or...freeze to go to the description of MyScreen below . ORIGINAL is a mode that the factory fixed screen is displayed. ENGLISH-14 © 3M 2003. Select an item with the and buttons, and start capturing. INPUT GAMMA IMAGE OPT. START UP Select Start Up Screen:Select the ...
... the magnification, press the KEYSTONE button to go to display the MyScreen menu and set the MyScreen mode for about 20 seconds. 3M™ Multimedia Projector MP8795 OPERATIONS (continued) Image Menu The following adjustments and settings are available when IMAGE is going to the CAPT. mode and start or...freeze to go to the description of MyScreen below . ORIGINAL is a mode that the factory fixed screen is displayed. ENGLISH-14 © 3M 2003. Select an item with the and buttons, and start capturing. INPUT GAMMA IMAGE OPT. START UP Select Start Up Screen:Select the ...
Operation Guide
Page 16
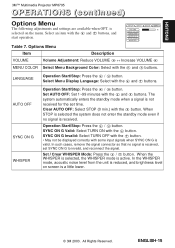
ENGLISH 3M™ Multimedia Projector MP8795 OPERATIONS (continued) Options Menu The following adjustments and settings are available when OPT. Options Menu Item Description SETUP INPUT VOLUME MENU COLOR LANGUAGE AUTO OFF ... Start/Stop: Press the / button. When STOP is selected the system does not enter the standby mode even if no signal is a little lower. © 3M 2003. ENGLISH-15 In such cases, remove the signal connector so that no signal is active. LANGUAGE Operation Start/Stop: Press the / button. In the...
ENGLISH 3M™ Multimedia Projector MP8795 OPERATIONS (continued) Options Menu The following adjustments and settings are available when OPT. Options Menu Item Description SETUP INPUT VOLUME MENU COLOR LANGUAGE AUTO OFF ... Start/Stop: Press the / button. When STOP is selected the system does not enter the standby mode even if no signal is a little lower. © 3M 2003. ENGLISH-15 In such cases, remove the signal connector so that no signal is active. LANGUAGE Operation Start/Stop: Press the / button. In the...
Operation Guide
Page 17
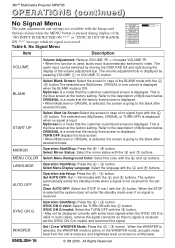
3M™ Multimedia Projector MP8795 OPERATIONS (continued) No Signal Menu VOLUME 16 The same adjustments and settings are available with the Image and BLANK START UP Options menus when the ... is displayed. Clear AUTO OFF: Select the STOP (0 min.) with the button. SYNC ON G Valid: Select the TURN ON with the button. ENGLISH-16 © 3M 2003. Refer to video. Select Mirror Status: Select the mirror status with the and buttons. LANGUAGE Operation Start/Stop: Press the / button. No Signal Menu...
3M™ Multimedia Projector MP8795 OPERATIONS (continued) No Signal Menu VOLUME 16 The same adjustments and settings are available with the Image and BLANK START UP Options menus when the ... is displayed. Clear AUTO OFF: Select the STOP (0 min.) with the button. SYNC ON G Valid: Select the TURN ON with the button. ENGLISH-16 © 3M 2003. Refer to video. Select Mirror Status: Select the mirror status with the and buttons. LANGUAGE Operation Start/Stop: Press the / button. No Signal Menu...
Operation Guide
Page 18
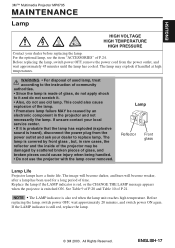
... approximately 20 minutes, and switch power ON again. If the LAMP indicator is also red when the lamp unit reaches high temperature. ENGLISH-17 ENGLISH 3M™ Multimedia Projector MP8795 MAINTENANCE Lamp HIGH VOLTAGE HIGH TEMPERATURE HIGH PRESSURE Contact your dealer to it and do not use the...
... approximately 20 minutes, and switch power ON again. If the LAMP indicator is also red when the lamp unit reaches high temperature. ENGLISH-17 ENGLISH 3M™ Multimedia Projector MP8795 MAINTENANCE Lamp HIGH VOLTAGE HIGH TEMPERATURE HIGH PRESSURE Contact your dealer to it and do not use the...
Operation Guide
Page 19
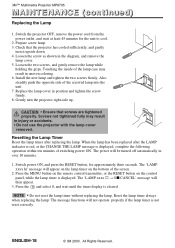
... always when replacing the lamp. ENGLISH-18 © 3M 2003. Loosen the two screws, and gently remove the lamp while holding the grips. CAUTION • Ensure that the projector has cooled sufficiently, and gently turn the projector right-side up. Press the MENU button on the remote...When the lamp has been replaced after replacing the lamp. NOTE • Do not reset the lamp timer without replacing the lamp. 3M™ Multimedia Projector MP8795 MAINTENANCE (continued) Replacing the Lamp 1. The power will appear on the lamp timer on the control panel, while the lamp timer ...
... always when replacing the lamp. ENGLISH-18 © 3M 2003. Loosen the two screws, and gently remove the lamp while holding the grips. CAUTION • Ensure that the projector has cooled sufficiently, and gently turn the projector right-side up. Press the MENU button on the remote...When the lamp has been replaced after replacing the lamp. NOTE • Do not reset the lamp timer without replacing the lamp. 3M™ Multimedia Projector MP8795 MAINTENANCE (continued) Replacing the Lamp 1. The power will appear on the lamp timer on the control panel, while the lamp timer ...
Operation Guide
Page 20
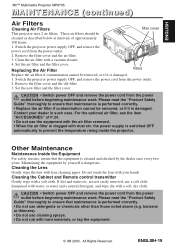
... with water, or water and a neutral detergent, and wipe dry with hard materials, or tap the equipment. © 3M 2003. ENGLISH-19 Switch the projector power supply OFF, and remove the power cord from the power outlet. 2. Other Maintenance Maintenance Inside the Equipment For safety ... approximately 100 hours. ZOOM + MUTE MENU RESET - These air filters should be removed, or if it is dangerous. ENGLISH 3M™ Multimedia Projector MP8795 MAINTENANCE (continued) Air Filters PORTABLE PROJECTOR MP8795 Cleaning Air Filters STANDBY ON filter cover LAMP PWER TEMP -
... with water, or water and a neutral detergent, and wipe dry with hard materials, or tap the equipment. © 3M 2003. ENGLISH-19 Switch the projector power supply OFF, and remove the power cord from the power outlet. 2. Other Maintenance Maintenance Inside the Equipment For safety ... approximately 100 hours. ZOOM + MUTE MENU RESET - These air filters should be removed, or if it is dangerous. ENGLISH 3M™ Multimedia Projector MP8795 MAINTENANCE (continued) Air Filters PORTABLE PROJECTOR MP8795 Cleaning Air Filters STANDBY ON filter cover LAMP PWER TEMP -


