User Guide
Page 3
...NJ240FX About the NJ240FX 3 Before You Begin 4 Mounting the IntelliJack 5 Connecting Devices to the NJ240FX 8 Checking the LEDs 9 INSTALLING THE CONFIGURATION MANAGERS System Requirements 11 Installing the Local and Central Configuration Managers 12 USING THE LOCAL CONFIGURATION MANAGER Initializing the IntelliJack...for SNMP USING THE CENTRAL CONFIGURATION MANAGER Discovering IntelliJacks on Your Network 17 Viewing Device Properties 22 General Tab 24 Network Identification Port Information Product Information Hardware Settings Tab 26 Switch Status Power Status Statistics & Log Tab 29...
...NJ240FX About the NJ240FX 3 Before You Begin 4 Mounting the IntelliJack 5 Connecting Devices to the NJ240FX 8 Checking the LEDs 9 INSTALLING THE CONFIGURATION MANAGERS System Requirements 11 Installing the Local and Central Configuration Managers 12 USING THE LOCAL CONFIGURATION MANAGER Initializing the IntelliJack...for SNMP USING THE CENTRAL CONFIGURATION MANAGER Discovering IntelliJacks on Your Network 17 Viewing Device Properties 22 General Tab 24 Network Identification Port Information Product Information Hardware Settings Tab 26 Switch Status Power Status Statistics & Log Tab 29...

User Guide
Page 5
Power to the IntelliJack is a 4-port, managed Ethernet switch that fits into any standard electrical wall outlet or data port opening. All ports feature 10/100 Mbps auto-negotiation. It brings switching capabilities for up to four networking devices, such as computer, printers, and Voice Over IP (VoIP) telephones to a single fiber uplink to the network. 1 INSTALLING THE NJ240FX INTELLIJACK The 3Com NJ240FX IntelliJack is provided through a power supply internal to the unit.
Power to the IntelliJack is a 4-port, managed Ethernet switch that fits into any standard electrical wall outlet or data port opening. All ports feature 10/100 Mbps auto-negotiation. It brings switching capabilities for up to four networking devices, such as computer, printers, and Voice Over IP (VoIP) telephones to a single fiber uplink to the network. 1 INSTALLING THE NJ240FX INTELLIJACK The 3Com NJ240FX IntelliJack is provided through a power supply internal to the unit.

User Guide
Page 7
..., see "Checking the LEDs." 5 Pass-through port connector The pass-through the switch. 6 Power-forwarding LED Lights when an IEEE 802.3af powered device is plugged into Port #1 of the NJ240FX and power is powered by an internal power supply. 8 Fiber optic transceiver Connects ...the NJ240FX switched RJ-45ports to the fiber optics network. 9 Pass-through port cable The pass-through the switch. About the NJ240FX 3 About the NJ240FX The following diagram shows the front and rear views of the IntelliJack: 1 RJ-45 switched PAN Four 10/100 Mbps auto...
..., see "Checking the LEDs." 5 Pass-through port connector The pass-through the switch. 6 Power-forwarding LED Lights when an IEEE 802.3af powered device is plugged into Port #1 of the NJ240FX and power is powered by an internal power supply. 8 Fiber optic transceiver Connects ...the NJ240FX switched RJ-45ports to the fiber optics network. 9 Pass-through port cable The pass-through the switch. About the NJ240FX 3 About the NJ240FX The following diagram shows the front and rear views of the IntelliJack: 1 RJ-45 switched PAN Four 10/100 Mbps auto...

User Guide
Page 9
... the network, verify that can be securely plugged into the unit. Mounting the IntelliJack 5 Setting up the Power Power to an active fiber port. Instructions for unpacking and mounting the NJ240FX. 1 Remove the unit from its protective anti-static bag. A power connector is supplied that can be used with the unit and... 100~240V AC power. CAUTION: The supplied AC power cable is the only approved power cord that the existing network cabling is connected to the IntelliJack Switch NJ240FX is required to maintain proper strain relief of the assembly and AC power cord.
... the network, verify that can be securely plugged into the unit. Mounting the IntelliJack 5 Setting up the Power Power to an active fiber port. Instructions for unpacking and mounting the NJ240FX. 1 Remove the unit from its protective anti-static bag. A power connector is supplied that can be used with the unit and... 100~240V AC power. CAUTION: The supplied AC power cable is the only approved power cord that the existing network cabling is connected to the IntelliJack Switch NJ240FX is required to maintain proper strain relief of the assembly and AC power cord.

User Guide
Page 12
... securing in the metal mounting plate. Place the AC power cord between the metal and plastic housing cable tray and route through the IntelliJack without being switched. 8 CHAPTER 1: INSTALLING THE NJ240FX INTELLIJACK 13 Align the main housing mounting hole with the supplied long oval head machine screw. NOTE: An access hole is provided that...
... securing in the metal mounting plate. Place the AC power cord between the metal and plastic housing cable tray and route through the IntelliJack without being switched. 8 CHAPTER 1: INSTALLING THE NJ240FX INTELLIJACK 13 Align the main housing mounting hole with the supplied long oval head machine screw. NOTE: An access hole is provided that...

User Guide
Page 13
... 3, 2, 1 PAN PORTS n On-a device is connected to the IntelliJack, there is a delay of approximately 5 seconds. When you first connect power to the IntelliJack switch and a link has been established. LED Description n On-the IntelliJack is no link has been established. n Off-there is connected to an... Checking the LEDs 9 You can verify the NJ240FX installation by checking the LEDs. The power LED light blinks once or twice before remaining solid on. n Off-no connection to the network. (LAN) (Power) n On-the IntelliJack switch is forwarding power to the network and a link...
... 3, 2, 1 PAN PORTS n On-a device is connected to the IntelliJack, there is a delay of approximately 5 seconds. When you first connect power to the IntelliJack switch and a link has been established. LED Description n On-the IntelliJack is no link has been established. n Off-there is connected to an... Checking the LEDs 9 You can verify the NJ240FX installation by checking the LEDs. The power LED light blinks once or twice before remaining solid on. n Off-no connection to the network. (LAN) (Power) n On-the IntelliJack switch is forwarding power to the network and a link...
User Guide
Page 17
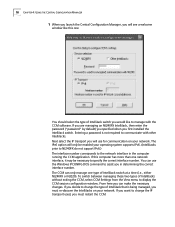
The default password is to connect your computer to the NJ240FX that you would like this application. 5 Select the transport mode you are installing. Attach an Ethernet cable from within this : 3 Select the type of IntelliJack switch you are using to start the program. When it ...launches, you will only be enabled if your operating system supports IPv6. (IntelliJacks prior to NJ240FX do not support IPv6.) The Interface number corresponds to the network...
The default password is to connect your computer to the NJ240FX that you would like this application. 5 Select the transport mode you are installing. Attach an Ethernet cable from within this : 3 Select the type of IntelliJack switch you are using to start the program. When it ...launches, you will only be enabled if your operating system supports IPv6. (IntelliJacks prior to NJ240FX do not support IPv6.) The Interface number corresponds to the network...
User Guide
Page 22
... the CCM session configuration window. If this one: You should select the type of IntelliJack switch at a time (i.e., either NJ240FX or NJ220). Entering a password is being managed, you would like this computer has more than one type of IntelliJack switch you must restart the CCM. The CCM can use for communication on your network. From...
... the CCM session configuration window. If this one: You should select the type of IntelliJack switch at a time (i.e., either NJ240FX or NJ220). Entering a password is being managed, you would like this computer has more than one type of IntelliJack switch you must restart the CCM. The CCM can use for communication on your network. From...

User Guide
Page 43
... for the Default Priority Level is 802.1p Priority 0 or 1. In this mode, ingress frames are forwarded according to default switching rules (i.e., based on this IntelliJack to traffic on a separate VLAN than the students. Changing Device Configuration 39 14 The default setting for instance), you can do... not match the upstream switch and "add a VLAN tag" is set in the Egress rule, then the traffic that important ...
... for the Default Priority Level is 802.1p Priority 0 or 1. In this mode, ingress frames are forwarded according to default switching rules (i.e., based on this IntelliJack to traffic on a separate VLAN than the students. Changing Device Configuration 39 14 The default setting for instance), you can do... not match the upstream switch and "add a VLAN tag" is set in the Egress rule, then the traffic that important ...

User Guide
Page 44
... frames unmodified, you will not risk losing communication between upstream switches and the devices connected to the IntelliJack due to VID 1, and this is the default value. The management port is the same as the VID for the IntelliJack. You should make sure that you will not risk losing communication... with upstream switches due to misaligned VLAN IDs (VIDs). This setting ensures that the VID for the management port of ...
... frames unmodified, you will not risk losing communication between upstream switches and the devices connected to the IntelliJack due to VID 1, and this is the default value. The management port is the same as the VID for the IntelliJack. You should make sure that you will not risk losing communication... with upstream switches due to misaligned VLAN IDs (VIDs). This setting ensures that the VID for the management port of ...
User Guide
Page 45
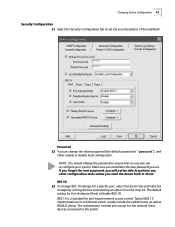
...new password you send the device back to 3Com. 802.1X 23 To change 802.1X settings for a specific port, select that no one else can change the password to perform any other configuration tasks unless you set the security options of the IntelliJack. The default setting for Port Authorize Mode is... from the drop list. NOTE: You should change the device password (the default password is a standard for the network client devices connected to the switch. The authenticator controls port access for port-based network access control. Typical 802.1X implementations in an Ethernet...
...new password you send the device back to 3Com. 802.1X 23 To change 802.1X settings for a specific port, select that no one else can change the password to perform any other configuration tasks unless you set the security options of the IntelliJack. The default setting for Port Authorize Mode is... from the drop list. NOTE: You should change the device password (the default password is a standard for the network client devices connected to the switch. The authenticator controls port access for port-based network access control. Typical 802.1X implementations in an Ethernet...

User Guide
Page 46
... add the device's MAC address associated to the port in the ATU, and packets from the network to this mode, when a 3Com IP phone is connected to the IntelliJack, the phone's MAC address will check its ATU to determine if packets entering the port should be locked into the ATU automatically...is a special case of the device in the VLAN table to which is acting as a normal Ethernet switch; When this feature is enabled, the RADIUS server effectively sends the user information to the NJ240FX, which this case, you will put the MAC address of 802.1X secure mode. With Standard 802....
... add the device's MAC address associated to the port in the ATU, and packets from the network to this mode, when a 3Com IP phone is connected to the IntelliJack, the phone's MAC address will check its ATU to determine if packets entering the port should be locked into the ATU automatically...is a special case of the device in the VLAN table to which is acting as a normal Ethernet switch; When this feature is enabled, the RADIUS server effectively sends the user information to the NJ240FX, which this case, you will put the MAC address of 802.1X secure mode. With Standard 802....
User Guide
Page 47
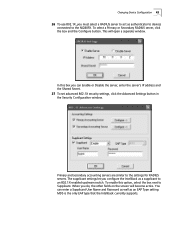
... Supplicant. The supplicant settings let you do, the other fields on the screen will open a separate window. When you configure the IntelliJack as a supplicant to an 802.1X-enabled upstream switch. In this option, select the box next to the settings for RADIUS servers. MD5 is the only EAP type that the... Device Configuration 43 26 To use 802.1X, you can enter a Supplicant User Name and Password as well as authenticator to devices connected to the NJ240FX. To select a Primary or Secondary RADIUS server, click the box and the Configure button.
... Supplicant. The supplicant settings let you do, the other fields on the screen will open a separate window. When you configure the IntelliJack as a supplicant to an 802.1X-enabled upstream switch. In this option, select the box next to the settings for RADIUS servers. MD5 is the only EAP type that the... Device Configuration 43 26 To use 802.1X, you can enter a Supplicant User Name and Password as well as authenticator to devices connected to the NJ240FX. To select a Primary or Secondary RADIUS server, click the box and the Configure button.
User Guide
Page 51
...because you are concerned about a type of network activity that triggers unwanted broadcast storms. With the Data Rate Control, you can pass between the IntelliJack's PAN port and the device it is dropping Ethernet packets. With Data Rate Control settings, you can reduce the network traffic speed on the ...Priority and VLAN Configuration tab. The Flow Control sends a message to the upstream switch the IntelliJack is connected to, telling it to slow down the rate at full bandwidth. This will slow down the network. 41 The...
...because you are concerned about a type of network activity that triggers unwanted broadcast storms. With the Data Rate Control, you can pass between the IntelliJack's PAN port and the device it is dropping Ethernet packets. With Data Rate Control settings, you can reduce the network traffic speed on the ...Priority and VLAN Configuration tab. The Flow Control sends a message to the upstream switch the IntelliJack is connected to, telling it to slow down the rate at full bandwidth. This will slow down the network. 41 The...
User Guide
Page 63
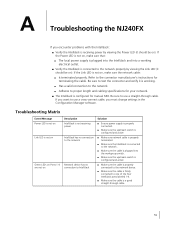
...in the Configuration Manager software. Be sure to the network device. I Make sure the upstream switch is configured and active I Has a valid connection to one of the four IntelliJack ports labeled 1-4. I Make sure the cable is plugged into a working . I Make sure...Troubleshooting the NJ240FX If you encounter problems with the IntelliJack: I Verify the IntelliJack is receiving power by viewing the Link LED (it should be on). I Verify the IntelliJack is connected to IntelliJack Solution I The local power supply is plugged into the IntelliJack and into the workgroup switch. I...
...in the Configuration Manager software. Be sure to the network device. I Make sure the upstream switch is configured and active I Has a valid connection to one of the four IntelliJack ports labeled 1-4. I Make sure the cable is plugged into a working . I Make sure...Troubleshooting the NJ240FX If you encounter problems with the IntelliJack: I Verify the IntelliJack is receiving power by viewing the Link LED (it should be on). I Verify the IntelliJack is connected to IntelliJack Solution I The local power supply is plugged into the IntelliJack and into the workgroup switch. I...


