User Guide
Page 3
...12 USING THE LOCAL CONFIGURATION MANAGER Initializing the IntelliJack 13 Setting Location Information Setting the Group Name Setting the IP Address Setting Advanced Options 15 Changing the Password Configuring for SNMP USING THE CENTRAL CONFIGURATION MANAGER Discovering IntelliJacks on Your Network 17 Viewing Device Properties 22 General Tab 24 Network Identification Port Information Product Information Hardware Settings Tab 26 Switch Status Power Status Statistics & Log Tab 29 General Counters RMON Counters Saving to a Log File SNMP Settings Tab 30 SNMP Management SNMP v3 User Profile
...12 USING THE LOCAL CONFIGURATION MANAGER Initializing the IntelliJack 13 Setting Location Information Setting the Group Name Setting the IP Address Setting Advanced Options 15 Changing the Password Configuring for SNMP USING THE CENTRAL CONFIGURATION MANAGER Discovering IntelliJacks on Your Network 17 Viewing Device Properties 22 General Tab 24 Network Identification Port Information Product Information Hardware Settings Tab 26 Switch Status Power Status Statistics & Log Tab 29 General Counters RMON Counters Saving to a Log File SNMP Settings Tab 30 SNMP Management SNMP v3 User Profile
User Guide
Page 4
... Hardware Settings Priority & VLAN Configuration Tab 38 Port-Based Settings Other VLAN Settings Security Configuration Tab 41 Device Password 802.1X SNMP Configuration Tab 44 SNMP management SNMP v3 User Profile Advanced Configuration Tab 46 Event Alerts Port-Based Configuration (Flow Control, AutoMDI(X), Data Rate Control) Restoring to Base Configurations 48 System Log Settings Tab 50 Finding Computers Connected to IntelliJacks 52 Upgrading the NJ240FX Firmware 53 Viewing Log Files 56 Viewing and Canceling Scheduled Firmware Upgrades 57 TROUBLESHOOTING THE NJ240FX Troubleshooting...
... Hardware Settings Priority & VLAN Configuration Tab 38 Port-Based Settings Other VLAN Settings Security Configuration Tab 41 Device Password 802.1X SNMP Configuration Tab 44 SNMP management SNMP v3 User Profile Advanced Configuration Tab 46 Event Alerts Port-Based Configuration (Flow Control, AutoMDI(X), Data Rate Control) Restoring to Base Configurations 48 System Log Settings Tab 50 Finding Computers Connected to IntelliJacks 52 Upgrading the NJ240FX Firmware 53 Viewing Log Files 56 Viewing and Canceling Scheduled Firmware Upgrades 57 TROUBLESHOOTING THE NJ240FX Troubleshooting...

User Guide
Page 6
... 1: INSTALLING THE NJ240FX INTELLIJACK You can also use a supported SNMP management console as you would with any managed device on your network, but greater management and control is available through the Configuration Manager software. You can manage the NJ240FX using the included Central Configuration Manager. Management features include: • Device discovery • Port status (state, duplex, speed) • Statistics • Port control (port state, flow control, AutoMDI(X), frame rate limit) • IPv4, IPv6 support • 802.1P QoS/Priority • 802.1Q compatible VLAN...
... 1: INSTALLING THE NJ240FX INTELLIJACK You can also use a supported SNMP management console as you would with any managed device on your network, but greater management and control is available through the Configuration Manager software. You can manage the NJ240FX using the included Central Configuration Manager. Management features include: • Device discovery • Port status (state, duplex, speed) • Statistics • Port control (port state, flow control, AutoMDI(X), frame rate limit) • IPv4, IPv6 support • 802.1P QoS/Priority • 802.1Q compatible VLAN...

User Guide
Page 7
... connections network) ports automatically. 2 Port LEDs and corresponding port numbers Indicate network link status of each of the four RJ-45 PAN ports. 3 LAN LED Indicates the link status of the NJ240FX and power is powered by an internal power supply. 8 Fiber optic transceiver Connects the NJ240FX switched RJ-45ports to the fiber optics network. 9 Pass-through port cable The pass-through the switch. The data or voice traffic on this port does not flow through the switch. 6 Power-forwarding LED Lights when an IEEE 802.3af powered...
... connections network) ports automatically. 2 Port LEDs and corresponding port numbers Indicate network link status of each of the four RJ-45 PAN ports. 3 LAN LED Indicates the link status of the NJ240FX and power is powered by an internal power supply. 8 Fiber optic transceiver Connects the NJ240FX switched RJ-45ports to the fiber optics network. 9 Pass-through port cable The pass-through the switch. The data or voice traffic on this port does not flow through the switch. 6 Power-forwarding LED Lights when an IEEE 802.3af powered...

User Guide
Page 9
... connecting the IntelliJack to the network, verify that can accept 100~240V AC power. CAUTION: The supplied AC power cable is the only approved power cord that can be used with the unit and is connected to an active fiber port. A power connector is provided via AC power. Instructions for unpacking and mounting the NJ240FX. 1 Remove the unit from its protective anti-static bag. Mounting the IntelliJack 5 Setting up the Power Power to the IntelliJack Switch NJ240FX...
... connecting the IntelliJack to the network, verify that can accept 100~240V AC power. CAUTION: The supplied AC power cable is the only approved power cord that can be used with the unit and is connected to an active fiber port. A power connector is provided via AC power. Instructions for unpacking and mounting the NJ240FX. 1 Remove the unit from its protective anti-static bag. Mounting the IntelliJack 5 Setting up the Power Power to the IntelliJack Switch NJ240FX...

User Guide
Page 10
.... 6 CHAPTER 1: INSTALLING THE NJ240FX INTELLIJACK 2 Remove any shipping tape from the unit and separate the metal plate from the backside of the main housing. Pull through enough cable to allow yourself room to terminate the connections. 4 Route both fiber optic cables to the fiber transceiver module located on the backside of the main unit. 6 Route the two fiber cables around the cable management feature approximately one turn until...
.... 6 CHAPTER 1: INSTALLING THE NJ240FX INTELLIJACK 2 Remove any shipping tape from the unit and separate the metal plate from the backside of the main housing. Pull through enough cable to allow yourself room to terminate the connections. 4 Route both fiber optic cables to the fiber transceiver module located on the backside of the main unit. 6 Route the two fiber cables around the cable management feature approximately one turn until...

User Guide
Page 13
...-compliant device. 4, 3, 2, 1 PAN PORTS n On-a device is connected to the IntelliJack, there is forwarding power to the network and a link has been established. n Off-no connection to the network. (LAN) (Power) n On-the IntelliJack switch is connected to an IEEE 802.3af-compliant device. n Off-the IntelliJack is not receiving power. (Power-forwarding) n On-the IntelliJack is connected to and is a delay of approximately 5 seconds. The power LED light blinks once or twice...
...-compliant device. 4, 3, 2, 1 PAN PORTS n On-a device is connected to the IntelliJack, there is forwarding power to the network and a link has been established. n Off-no connection to the network. (LAN) (Power) n On-the IntelliJack switch is connected to an IEEE 802.3af-compliant device. n Off-the IntelliJack is not receiving power. (Power-forwarding) n On-the IntelliJack is connected to and is a delay of approximately 5 seconds. The power LED light blinks once or twice...
User Guide
Page 17
... Local Config Mgr to any one of the four personal area network (PAN) ports on the front of the IntelliJack. 1 The first step is "password" (without the quotes). The IPv6 option will have installed the NJ240FX hardware on your operating system supports IPv6. (IntelliJacks prior to NJ240FX do not support IPv6.) The Interface number corresponds to the network interface in the computer running the Local Configuration Manager software to...
... Local Config Mgr to any one of the four personal area network (PAN) ports on the front of the IntelliJack. 1 The first step is "password" (without the quotes). The IPv6 option will have installed the NJ240FX hardware on your operating system supports IPv6. (IntelliJacks prior to NJ240FX do not support IPv6.) The Interface number corresponds to the network interface in the computer running the Local Configuration Manager software to...
User Guide
Page 19
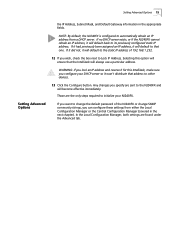
... that the IntelliJack will default back to Lock IP Address. Any changes you can configure these settings from a DHCP server. Those are the only steps required to other devices. 13 Click the Configure button. Setting Advanced Options 15 the IP Address, Subnet Mask, and Default Gateway information in the next chapter). WARNING: If you configure your NJ240FX. Setting Advanced Options If you want to change the default password of 192...
... that the IntelliJack will default back to Lock IP Address. Any changes you can configure these settings from a DHCP server. Those are the only steps required to other devices. 13 Click the Configure button. Setting Advanced Options 15 the IP Address, Subnet Mask, and Default Gateway information in the next chapter). WARNING: If you configure your NJ240FX. Setting Advanced Options If you want to change the default password of 192...
User Guide
Page 22
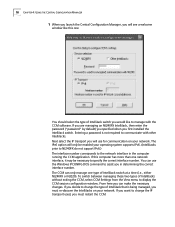
... support IPv6.) The interface number corresponds to the network interface in determining the correct interface number. If you want to change the type of IntelliJacks without exiting the CCM, select CCM Settings from the View menu to display the CCM session configuration window. Entering a password is being managed, you must restart the CCM. If you are managing an NJ240FX IntelliJack, then enter the password ("password" by default) you specified when you first installed...
... support IPv6.) The interface number corresponds to the network interface in determining the correct interface number. If you want to change the type of IntelliJacks without exiting the CCM, select CCM Settings from the View menu to display the CCM session configuration window. Entering a password is being managed, you must restart the CCM. If you are managing an NJ240FX IntelliJack, then enter the password ("password" by default) you specified when you first installed...

User Guide
Page 40
... one or more IntelliJacks. By default, the Central Configuration Manager will display a count of the window has buttons labeled Load and Save. 36 CHAPTER 4: USING THE CENTRAL CONFIGURATION MANAGER This window has six tabs across the top--General Configuration, Priority & VLAN Configuration, Security Configuration, SNMP Configuration, Advanced Configuration, and System Log Settings. Check the box next to any setting you want to restrict access to all of all network interface cards (NICs) use area such as...
... one or more IntelliJacks. By default, the Central Configuration Manager will display a count of the window has buttons labeled Load and Save. 36 CHAPTER 4: USING THE CENTRAL CONFIGURATION MANAGER This window has six tabs across the top--General Configuration, Priority & VLAN Configuration, Security Configuration, SNMP Configuration, Advanced Configuration, and System Log Settings. Check the box next to any setting you want to restrict access to all of all network interface cards (NICs) use area such as...

User Guide
Page 43
... IntelliJack has four traffic queues with the same VLAN ID are forwarded within the same VLAN, and management packets are used to separate network traffic to make it ensures that passes from the drop list to default switching rules (i.e., based on this mode, ingress frames are forwarded within the VLAN. The lowest numbers (0 and 1) have set in the Egress rule, then the traffic that important traffic is prioritized but still allows traffic flow...
... IntelliJack has four traffic queues with the same VLAN ID are forwarded within the same VLAN, and management packets are used to separate network traffic to make it ensures that passes from the drop list to default switching rules (i.e., based on this mode, ingress frames are forwarded within the VLAN. The lowest numbers (0 and 1) have set in the Egress rule, then the traffic that important traffic is prioritized but still allows traffic flow...
User Guide
Page 45
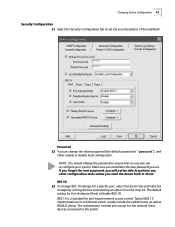
... IntelliJack. NOTE: You should change the device password (the default password is a standard for the network client devices connected to the switch. The default setting for Port Authorize Mode is Disable 802.1X. 802.1X is "password"), and either enable or disable local configuration. The authenticator controls port access for port-based network access control. Make sure you remember the new password you send the device back to 3Com. 802.1X 23 To change 802.1X settings for a specific port...
... IntelliJack. NOTE: You should change the device password (the default password is a standard for the network client devices connected to the switch. The default setting for Port Authorize Mode is Disable 802.1X. 802.1X is "password"), and either enable or disable local configuration. The authenticator controls port access for port-based network access control. Make sure you remember the new password you send the device back to 3Com. 802.1X 23 To change 802.1X settings for a specific port...
User Guide
Page 46
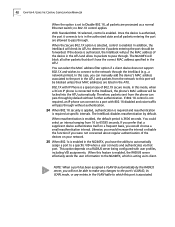
... VLAN mode, or any entries in the ATU. This option depends on a frequent basis, you have the correct MAC address specified in the VLAN table to which is acting as a normal Ethernet switch; 42 CHAPTER 4: USING THE CENTRAL CONFIGURATION MANAGER When the option is set to Disable 802.1X, all other packets that don't have the ability to automatically assign a port to a specific VID when a user connects and...
... VLAN mode, or any entries in the ATU. This option depends on a frequent basis, you have the correct MAC address specified in the VLAN table to which is acting as a normal Ethernet switch; 42 CHAPTER 4: USING THE CENTRAL CONFIGURATION MANAGER When the option is set to Disable 802.1X, all other packets that don't have the ability to automatically assign a port to a specific VID when a user connects and...
User Guide
Page 51
... all types of traffic to pass through cables (not cross-over cables to connect devices to your network, you have by the IntelliJack. Setting Flow Control to turn on the Priority and VLAN Configuration tab. Manual MDI configuration (the default value) assumes that triggers unwanted broadcast storms. With the Data Rate Control, you only want to Off (the default setting) allows full passage of traffic regardless of how quickly it forwards traffic. The default settings allow unicast traffic to configure...
... all types of traffic to pass through cables (not cross-over cables to connect devices to your network, you have by the IntelliJack. Setting Flow Control to turn on the Priority and VLAN Configuration tab. Manual MDI configuration (the default value) assumes that triggers unwanted broadcast storms. With the Data Rate Control, you only want to Off (the default setting) allows full passage of traffic regardless of how quickly it forwards traffic. The default settings allow unicast traffic to configure...

User Guide
Page 52
... Duplex settings will not work for LAN Port (ingress) Power Forward Local Configuration SNMP SET SNMP Traps Event Alert Default Value 1518 or 1522 if tagged Count good frames 8, 4, 2, 1 weighted Egress frame unmodified Ingress frame unmodified Auto detection Enable Enable Disabled Level 2 If you check this window is the default setting. 48 CHAPTER 4: USING THE CENTRAL CONFIGURATION MANAGER The following settings will be grayed out if you are using the Configuration Management software with an NJ240FX. 44 You can change the Maximum Frame Size setting...
... Duplex settings will not work for LAN Port (ingress) Power Forward Local Configuration SNMP SET SNMP Traps Event Alert Default Value 1518 or 1522 if tagged Count good frames 8, 4, 2, 1 weighted Egress frame unmodified Ingress frame unmodified Auto detection Enable Enable Disabled Level 2 If you check this window is the default setting. 48 CHAPTER 4: USING THE CENTRAL CONFIGURATION MANAGER The following settings will be grayed out if you are using the Configuration Management software with an NJ240FX. 44 You can change the Maximum Frame Size setting...

User Guide
Page 53
Changing Device Configuration 49 Global Setting ATU Table VTU Table All RADIUS settings 802.1X Supplicant Status 802.1X Supplicant User Name and Password Default Value Blank Blank Blank Disabled Blank Port Setting State Link Flow Control MDI[X] Multicast Limit Priority Lookup Port Priority VLAN ID 802.1Q VLAN Mode Data Rate Limit Maximum Data Rate Default Value Forwarding Auto negotiation Off Force MDI 3% Tag & IPV4 0 or 1 1 Disable VLANs All frames No limit The values that remain unchanged when you click Restore Base Configuration are...
Changing Device Configuration 49 Global Setting ATU Table VTU Table All RADIUS settings 802.1X Supplicant Status 802.1X Supplicant User Name and Password Default Value Blank Blank Blank Disabled Blank Port Setting State Link Flow Control MDI[X] Multicast Limit Priority Lookup Port Priority VLAN ID 802.1Q VLAN Mode Data Rate Limit Maximum Data Rate Default Value Forwarding Auto negotiation Off Force MDI 3% Tag & IPV4 0 or 1 1 Disable VLANs All frames No limit The values that remain unchanged when you click Restore Base Configuration are...
User Guide
Page 64
... correct password and retype. If the problem persists, try to 7 watts. I Make sure the cable is properly connected to match the cable - I Make sure the cable is IEEE 802.3af compatible. Troubleshooting the NJ240FX Event/Message Amber LED on Port 1 is not on Power LED is blinking continuously Authentication Failure Timeout Attributes Error General Error Description Power is not being forwarded to the user under normal conditions. Traffic can only forward...
... correct password and retype. If the problem persists, try to 7 watts. I Make sure the cable is properly connected to match the cable - I Make sure the cable is IEEE 802.3af compatible. Troubleshooting the NJ240FX Event/Message Amber LED on Port 1 is not on Power LED is blinking continuously Authentication Failure Timeout Attributes Error General Error Description Power is not being forwarded to the user under normal conditions. Traffic can only forward...
User Guide
Page 65
... and support information. Connection Assistant helps you troubleshoot 3Com products. B Obtaining Support 3Com provides easy access to your network. This appendix describes these Software Updates you must first register your authorized 3Com reseller. You will find support tools posted on the 3Com web site at www.3com.com Troubleshoot Online 3Com Knowledgebase helps you install, configure and troubleshoot 3Com desktop and server NICs, wireless cards and Bluetooth devices. This diagnostic software is available at time...
... and support information. Connection Assistant helps you troubleshoot 3Com products. B Obtaining Support 3Com provides easy access to your network. This appendix describes these Software Updates you must first register your authorized 3Com reseller. You will find support tools posted on the 3Com web site at www.3com.com Troubleshoot Online 3Com Knowledgebase helps you install, configure and troubleshoot 3Com desktop and server NICs, wireless cards and Bluetooth devices. This diagnostic software is available at time...
User Guide
Page 66
... http://eSupport.3com.com/ When you contact 3Com for assistance, please have the following information ready: I Product model name, part number, and serial number I A list of system hardware and software, including rev level I Diagnostic error messages I Details about recent configuration changes, if applicable To send a product directly to 3Com for a user name and password. In order to access upgrades and related documentation you must first purchase a service contract from 3Com or your...
... http://eSupport.3com.com/ When you contact 3Com for assistance, please have the following information ready: I Product model name, part number, and serial number I A list of system hardware and software, including rev level I Diagnostic error messages I Details about recent configuration changes, if applicable To send a product directly to 3Com for a user name and password. In order to access upgrades and related documentation you must first purchase a service contract from 3Com or your...


