User Guide
Page 3
... 9 1 INTRODUCING THE ROUTER OfficeConnect ADSL Wireless 11g Firewall Router 11 Router Advantages 13 Package Contents 13 Minimum System and Component Requirements 14 Front Panel 14 Rear Panel 15 2 HARDWARE INSTALLATION Introduction 17 Safety Information 17 Positioning the Router 17 Using the Rubber Feet 18 Powering Up the Router 18 Connecting the Router 18 3 SETTING UP YOUR COMPUTERS Obtaining an IP Address Automatically...
... 9 1 INTRODUCING THE ROUTER OfficeConnect ADSL Wireless 11g Firewall Router 11 Router Advantages 13 Package Contents 13 Minimum System and Component Requirements 14 Front Panel 14 Rear Panel 15 2 HARDWARE INSTALLATION Introduction 17 Safety Information 17 Positioning the Router 17 Using the Rubber Feet 18 Powering Up the Router 18 Connecting the Router 18 3 SETTING UP YOUR COMPUTERS Obtaining an IP Address Automatically...
User Guide
Page 4
...Accessing the Setup Wizard 27 Setup Wizard - Connection Type 29 5 ROUTER CONFIGURATION Navigating Through the Router Configuration Pages 39 Main Menu 39 Status Screen 39 Status 40 LAN Setup 40 LAN Settings 41 Wireless Settings 43 Configuring Wireless 43 Encryption 44 Internet Settings 50 Connection Type 50 DNS 55 ...Hostname & MAC 56 Routing 57 Static Routes 57 RIP Parameters 58 Routing Table 59 Firewall 59 Special Applications 60 Virtual Servers 61 Client IP Filters 62 MAC ...
...Accessing the Setup Wizard 27 Setup Wizard - Connection Type 29 5 ROUTER CONFIGURATION Navigating Through the Router Configuration Pages 39 Main Menu 39 Status Screen 39 Status 40 LAN Setup 40 LAN Settings 41 Wireless Settings 43 Configuring Wireless 43 Encryption 44 Internet Settings 50 Connection Type 50 DNS 55 ...Hostname & MAC 56 Routing 57 Static Routes 57 RIP Parameters 58 Routing Table 59 Firewall 59 Special Applications 60 Virtual Servers 61 Client IP Filters 62 MAC ...
User Guide
Page 5
... Recovering from Corrupted Software 83 Frequently Asked Questions 84 A IP ADDRESSING The Internet Protocol Suite 85 Managing the Router over the Network 85 IP Addresses and Subnet Masks 85 How does a Device Obtain an IP Address and Subnet Mask? 87 DHCP Addressing 87 Static Addressing 87 Auto-IP Addressing 87 B TECHNICAL SPECIFICATIONS OfficeConnect ADSL Wireless 11g Firewall Router 89 Standards 90
... Recovering from Corrupted Software 83 Frequently Asked Questions 84 A IP ADDRESSING The Internet Protocol Suite 85 Managing the Router over the Network 85 IP Addresses and Subnet Masks 85 How does a Device Obtain an IP Address and Subnet Mask? 87 DHCP Addressing 87 Static Addressing 87 Auto-IP Addressing 87 B TECHNICAL SPECIFICATIONS OfficeConnect ADSL Wireless 11g Firewall Router 89 Standards 90
User Guide
Page 14
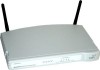
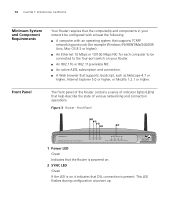
...ROUTER Minimum System and Component Requirements Your Router requires that the computer(s) and components in your network be connected to be configured with at power up. This LED flashes during configuration at least the following: ■ A computer with an operating system that supports TCP/IP... Mozilla 1.2.1 or higher. Front Panel The front panel of the Router contains a series of various networking and connection operations. Figure 3 Router - Front Panel 1 2 3 5 4 3CRWDR100A-72 OfficeConnect ADSL Wireless 11g Firewall Router Power SYNC OnlineWLAN LAN Status 1 2 34 Green = 100M, ...
...ROUTER Minimum System and Component Requirements Your Router requires that the computer(s) and components in your network be connected to be configured with at power up. This LED flashes during configuration at least the following: ■ A computer with an operating system that supports TCP/IP... Mozilla 1.2.1 or higher. Front Panel The front panel of the Router contains a series of various networking and connection operations. Figure 3 Router - Front Panel 1 2 3 5 4 3CRWDR100A-72 OfficeConnect ADSL Wireless 11g Firewall Router Power SYNC OnlineWLAN LAN Status 1 2 34 Green = 100M, ...
User Guide
Page 23
... instructions in this to take place. Select Internet Protocol TCP/IP and click on Properties. 5 A screen similar to Figure 8 should be configured correctly for this chapter. 3 SETTING UP YOUR COMPUTERS The Router has the ability to dynamically allocate network addresses to the computers... on your computers need to be displayed. Obtaining an IP Address Automatically Windows 2000 If you are using DHCP. However, your network...
... instructions in this to take place. Select Internet Protocol TCP/IP and click on Properties. 5 A screen similar to Figure 8 should be configured correctly for this chapter. 3 SETTING UP YOUR COMPUTERS The Router has the ability to dynamically allocate network addresses to the computers... on your computers need to be displayed. Obtaining an IP Address Automatically Windows 2000 If you are using DHCP. However, your network...
User Guide
Page 24
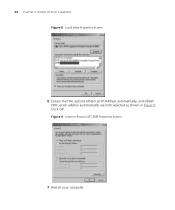
Click OK. Figure 9 Internet Protocol (TCP/IP) Properties Screen 7 Restart your computer. 24 CHAPTER 3: SETTING UP YOUR COMPUTERS Figure 8 Local Area Properties Screen 6 Ensure that the options Obtain an IP Address automatically, and Obtain DNS server address automatically are both selected as shown in Figure 9.
Click OK. Figure 9 Internet Protocol (TCP/IP) Properties Screen 7 Restart your computer. 24 CHAPTER 3: SETTING UP YOUR COMPUTERS Figure 8 Local Area Properties Screen 6 Ensure that the options Obtain an IP Address automatically, and Obtain DNS server address automatically are both selected as shown in Figure 9.
User Guide
Page 25
...Control Panel. 2 Click on Network and Internet Connections. 3 Click on the Network Connections icon. 4 Double click on Network. Select the TCP/IP item for your computer. Macintosh If you are both selected. Windows 95/98/ME 1 From the Windows Start Menu, select Settings > Control ... screen titled Local Area Connection Status will appear. 5 Select Internet Protocol TCP/IP and click on Properties. 3 In the TCP/IP dialog, select the IP Address tab, and ensure that the options Obtain an IP Address automatically, and Obtain DNS servers automatically are using a Macintosh computer, use...
...Control Panel. 2 Click on Network and Internet Connections. 3 Click on the Network Connections icon. 4 Double click on Network. Select the TCP/IP item for your computer. Macintosh If you are both selected. Windows 95/98/ME 1 From the Windows Start Menu, select Settings > Control ... screen titled Local Area Connection Status will appear. 5 Select Internet Protocol TCP/IP and click on Properties. 3 In the TCP/IP dialog, select the IP Address tab, and ensure that the options Obtain an IP Address automatically, and Obtain DNS servers automatically are using a Macintosh computer, use...
User Guide
Page 29
Before setting up the Router for the type of Internet connection you to set up your connection type, have . For further information on selecting a mode see page 35 and click ... over Ethernet, providing routing for multiple PCs), see "Internet Settings" on page 50. RFC1483 Routed Mode, for multiple PCs, see page 34 ■ Dynamic/Fixed IP in 1483 Bridge Mode (for multiple PCs, see page 30 ■ PPPoA - PPP over ATM, providing routing for a single PC) - Select a DSL mode from your...
Before setting up the Router for the type of Internet connection you to set up your connection type, have . For further information on selecting a mode see page 35 and click ... over Ethernet, providing routing for multiple PCs), see "Internet Settings" on page 50. RFC1483 Routed Mode, for multiple PCs, see page 34 ■ Dynamic/Fixed IP in 1483 Bridge Mode (for multiple PCs, see page 30 ■ PPPoA - PPP over ATM, providing routing for a single PC) - Select a DSL mode from your...
User Guide
Page 34
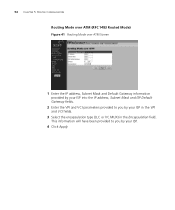
...MUX) in the DNS text box. 5 Enter your settings, and then click Next.The Wireless Settings screen is displayed. 34 CHAPTER 4: RUNNING THE SETUP WIZARD Routing Mode over ATM (RFC 1483 Routed Mode) To setup the Router for use with an RFC1483 routed connection: Figure 21 Routing Mode Screen 1 Enter your ...Internet IP address in the WAN IP text box. 2 Enter the subnet mask in the Subnet Mask text box. 3 Enter the ...
...MUX) in the DNS text box. 5 Enter your settings, and then click Next.The Wireless Settings screen is displayed. 34 CHAPTER 4: RUNNING THE SETUP WIZARD Routing Mode over ATM (RFC 1483 Routed Mode) To setup the Router for use with an RFC1483 routed connection: Figure 21 Routing Mode Screen 1 Enter your ...Internet IP address in the WAN IP text box. 2 Enter the subnet mask in the Subnet Mask text box. 3 Enter the ...
User Guide
Page 35
... by your Wireless Network in the Subnet Mask text box. Dynamic/Fixed IP in 1483 Bridge Mode (For Multiple PCs) Figure 23 Dynamic/Fixed IP for Bridge Mode Screen 1 Check the Get WAN IP By DCHP field if your ISP allocates IP addresses using DHCP. 2 Enter your Internet IP address in ...the WAN IP text box. 3 Enter the subnet mask in the SSID field. Accessing the Setup Wizard 35 Figure 22 Wireless Settings Screen 8 Set the Wireless Channel you should give your wireless network a unique...
... by your Wireless Network in the Subnet Mask text box. Dynamic/Fixed IP in 1483 Bridge Mode (For Multiple PCs) Figure 23 Dynamic/Fixed IP for Bridge Mode Screen 1 Check the Get WAN IP By DCHP field if your ISP allocates IP addresses using DHCP. 2 Enter your Internet IP address in ...the WAN IP text box. 3 Enter the subnet mask in the SSID field. Accessing the Setup Wizard 35 Figure 22 Wireless Settings Screen 8 Set the Wireless Channel you should give your wireless network a unique...

User Guide
Page 39
...you changed the Router LAN IP address during initial configuration, use the new IP address instead. Status Screen The Status screen allows you click on page 40. 5 ROUTER CONFIGURATION Navigating Through the Router Configuration Pages This chapter describes all the screens available through the Router configuration pages,...is a main menu, as a reference. To get to the configuration pages, browse to the Router, log in the location bar of the Router configuration, including the current Router status. Main Menu At the left side of the screen. When you to view a summary of...
...you changed the Router LAN IP address during initial configuration, use the new IP address instead. Status Screen The Status screen allows you click on page 40. 5 ROUTER CONFIGURATION Navigating Through the Router Configuration Pages This chapter describes all the screens available through the Router configuration pages,...is a main menu, as a reference. To get to the configuration pages, browse to the Router, log in the location bar of the Router configuration, including the current Router status. Main Menu At the left side of the screen. When you to view a summary of...
User Guide
Page 40
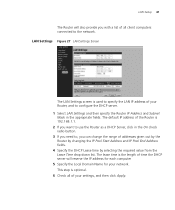
...Mask. The default is Starting: 2 / Ending: 254 ■ Specify the IP address Lease Time. The factory default settings for the DHCP server will automatically assign IP addresses to manually connect or disconnect your router from your network. The default is NONE To make are two buttons on your... ISP's service. Your Router is equipped with a DHCP server that you can do ...
...Mask. The default is Starting: 2 / Ending: 254 ■ Specify the IP address Lease Time. The factory default settings for the DHCP server will automatically assign IP addresses to manually connect or disconnect your router from your network. The default is NONE To make are two buttons on your... ISP's service. Your Router is equipped with a DHCP server that you can do ...
User Guide
Page 41
...screen is 192.168.1.1. 2 If you need to the network. The default IP address of the Router is used to specify the LAN IP address of your Router, and to configure the DHCP server. 1 Select LAN Settings and then specify the Router IP Address and Subnet Mask in the On check radio button. 3 If you ... time is optional. 6 Check all client computers connected to , you with a list of all of addresses given out by the Router by changing the IP Pool Start Address and IP Pool End Address fields. 4 Specify the DHCP Lease time by selecting the required value from the Lease Time drop down list. This...
...screen is 192.168.1.1. 2 If you need to the network. The default IP address of the Router is used to specify the LAN IP address of your Router, and to configure the DHCP server. 1 Select LAN Settings and then specify the Router IP Address and Subnet Mask in the On check radio button. 3 If you ... time is optional. 6 Check all client computers connected to , you with a list of all of addresses given out by the Router by changing the IP Pool Start Address and IP Pool End Address fields. 4 Specify the DHCP Lease time by selecting the required value from the Lease Time drop down list. This...
User Guide
Page 42
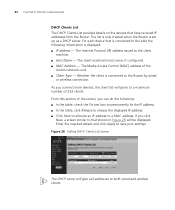
The Internet Protocol (IP) address issued to the Router by wired or wireless connection. If you click New, a screen similar to that have received IP addresses from the Router. 42 CHAPTER 5: ROUTER CONFIGURATION DHCP Clients List The DHCP Clients List provides details on the devices that shown in Figure ...Figure 28 Editing DHCP Clients List Screen The DHCP server will grow to save your settings. The list is only created when the Router is displayed: ■ IP address - Whether the client is connected to the client machine. ■ Host Name - The client machine's host name, ...
The Internet Protocol (IP) address issued to the Router by wired or wireless connection. If you click New, a screen similar to that have received IP addresses from the Router. 42 CHAPTER 5: ROUTER CONFIGURATION DHCP Clients List The DHCP Clients List provides details on the devices that shown in Figure ...Figure 28 Editing DHCP Clients List Screen The DHCP server will grow to save your settings. The list is only created when the Router is displayed: ■ IP address - Whether the client is connected to the client machine. ■ Host Name - The client machine's host name, ...
User Guide
Page 48
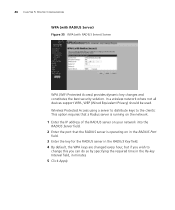
... 5: ROUTER CONFIGURATION WPA (with RADIUS Server) Figure 35 WPA (with RADIUS Server) Screen WPA (WiFi Protected Access) provides dynamic key changes and constitutes the best security solution. Wireless Protected Access using a server to distribute keys to the clients: This option requires that a Radius server is running on the network. 1 Enter the IP address... you wish to change this you can do so by specifying the required time in the Re-key Interval field, in minutes 5 Click Apply. In a wireless network where not all devices support WPA, WEP (Wired Equivalent Privacy) should be used.
... 5: ROUTER CONFIGURATION WPA (with RADIUS Server) Figure 35 WPA (with RADIUS Server) Screen WPA (WiFi Protected Access) provides dynamic key changes and constitutes the best security solution. Wireless Protected Access using a server to distribute keys to the clients: This option requires that a Radius server is running on the network. 1 Enter the IP address... you wish to change this you can do so by specifying the required time in the Re-key Interval field, in minutes 5 Click Apply. In a wireless network where not all devices support WPA, WEP (Wired Equivalent Privacy) should be used.
User Guide
Page 50
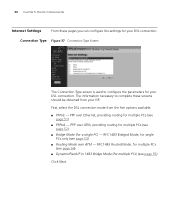
...PPP over ATM, providing routing for multiple PCs (see page 52) ■ Bridge Mode (for multiple PCs) (see page 54) ■ Dynamic/Fixed IP in 1483 Bridge Mode (for a single PC) - RFC1483 Routed Mode, for multiple PCs (see page 55) Click Next. First, select the DSL connection ...mode from your ISP. 50 CHAPTER 5: ROUTER CONFIGURATION Internet Settings From these screens should be obtained from the five options available: ■ PPPoE - Connection Type Figure 37 Connection Type Screen The ...
...PPP over ATM, providing routing for multiple PCs (see page 52) ■ Bridge Mode (for multiple PCs) (see page 54) ■ Dynamic/Fixed IP in 1483 Bridge Mode (for a single PC) - RFC1483 Routed Mode, for multiple PCs (see page 55) Click Next. First, select the DSL connection ...mode from your ISP. 50 CHAPTER 5: ROUTER CONFIGURATION Internet Settings From these screens should be obtained from the five options available: ■ PPPoE - Connection Type Figure 37 Connection Type Screen The ...

User Guide
Page 51
... and Subnet Mask information provided by your ISP into the IP address and Subnet Mask fields. 5 Enter the VPI and VCI parameters provided to step 5. This information will have been provided to you by your ISP. 7 If you want your Router to connect to the Internet every time a PC needs to access... it . 4 If your ISP assigns your IP address dynamically then select Yes in the IP assigned by ISP field and proceed to you by your ISP in the...
... and Subnet Mask information provided by your ISP into the IP address and Subnet Mask fields. 5 Enter the VPI and VCI parameters provided to step 5. This information will have been provided to you by your ISP. 7 If you want your Router to connect to the Internet every time a PC needs to access... it . 4 If your ISP assigns your IP address dynamically then select Yes in the IP assigned by ISP field and proceed to you by your ISP in the...
User Guide
Page 52
... Subnet Mask information provided by your ISP into the IP address and Subnet Mask fields. 4 Enter the VPI and VCI parameters provided to you by ISP field and proceed to you by your ISP. 52 CHAPTER 5: ROUTER CONFIGURATION 8 If you want your Router to disable this , leave it at the default ...value. 10 Click Apply. Re-enter your password in the Retype Password field. 3 If your ISP assigns your IP address dynamically then select Yes in the User Name field...
... Subnet Mask information provided by your ISP into the IP address and Subnet Mask fields. 4 Enter the VPI and VCI parameters provided to you by ISP field and proceed to you by your ISP. 52 CHAPTER 5: ROUTER CONFIGURATION 8 If you want your Router to disable this , leave it at the default ...value. 10 Click Apply. Re-enter your password in the Retype Password field. 3 If your ISP assigns your IP address dynamically then select Yes in the User Name field...
User Guide
Page 54
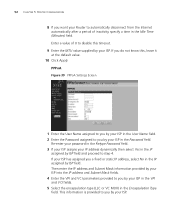
54 CHAPTER 5: ROUTER CONFIGURATION Routing Mode over ATM (RFC 1483 Routed Mode) Figure 41 Routing Mode over ATM Screen 1 Enter the IP address, Subnet Mask and Default Gateway information provided by your ISP into the IP address, Subnet Mask and ISP Default Gateway fields. 2 Enter the VPI and VCI parameters provided to you by your ISP in the VPI and VCI fields. 3 Select the encapsulation type (LLC or VC MUX) in the Encapsulation field. This information will have been provided to you by your ISP. 4 Click Apply.
54 CHAPTER 5: ROUTER CONFIGURATION Routing Mode over ATM (RFC 1483 Routed Mode) Figure 41 Routing Mode over ATM Screen 1 Enter the IP address, Subnet Mask and Default Gateway information provided by your ISP into the IP address, Subnet Mask and ISP Default Gateway fields. 2 Enter the VPI and VCI parameters provided to you by your ISP in the VPI and VCI fields. 3 Select the encapsulation type (LLC or VC MUX) in the Encapsulation field. This information will have been provided to you by your ISP. 4 Click Apply.
User Guide
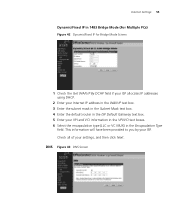
Page 55
... PCs) Figure 42 Dynamic/Fixed IP for Bridge Mode Screen 1 Check the Get WAN IP By DCHP field if your ISP allocates IP addresses using DHCP. 2 Enter your Internet IP address in the WAN IP text box. 3 Enter the subnet mask in the Subnet Mask text box. 4 Enter the default router in the ISP Default Gateway...
... PCs) Figure 42 Dynamic/Fixed IP for Bridge Mode Screen 1 Check the Get WAN IP By DCHP field if your ISP allocates IP addresses using DHCP. 2 Enter your Internet IP address in the WAN IP text box. 3 Enter the subnet mask in the Subnet Mask text box. 4 Enter the default router in the ISP Default Gateway...

