User Guide
Page 5
... Time Zone 76 Status and Logs 77 ADSL Status 77 Logs 77 6 TROUBLESHOOTING Basic Connection Checks 79 Browsing to the Router Configuration Screens 79 Connecting to the Internet 80 Forgotten Password and Reset to Factory Defaults 80 Wireless Networking 81 Recovering from Corrupted Software 83... Protocol Suite 85 Managing the Router over the Network 85 IP Addresses and Subnet Masks 85 How does a Device Obtain an IP Address and Subnet Mask? 87 DHCP Addressing 87 Static Addressing 87 Auto-IP Addressing 87 B TECHNICAL SPECIFICATIONS OfficeConnect ADSL Wireless 11g Firewall Router 89 Standards 90
... Time Zone 76 Status and Logs 77 ADSL Status 77 Logs 77 6 TROUBLESHOOTING Basic Connection Checks 79 Browsing to the Router Configuration Screens 79 Connecting to the Internet 80 Forgotten Password and Reset to Factory Defaults 80 Wireless Networking 81 Recovering from Corrupted Software 83... Protocol Suite 85 Managing the Router over the Network 85 IP Addresses and Subnet Masks 85 How does a Device Obtain an IP Address and Subnet Mask? 87 DHCP Addressing 87 Static Addressing 87 Auto-IP Addressing 87 B TECHNICAL SPECIFICATIONS OfficeConnect ADSL Wireless 11g Firewall Router 89 Standards 90
User Guide
Page 15
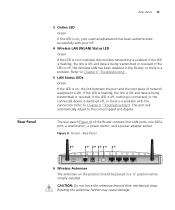
...If the LED is on it indicates that wireless networking is being transmitted or received. CAUTION: Do not force the antennae beyond their mechanical stops. Rear Panel Rear Panel 15 3 Online LED Green If this LED is on, your username/password has been authenticated successfully with the connection (...5 LAN Status LEDs Green If the LED is a problem. Rear Panel 6 7 8 9 10 11 12 VDC 1A MAX ADSL Power Reset LAN4 LAN3 LAN2 LAN1 6 Wireless Antennae The antennae on the product should be placed in the Router, or there is on, the link between the port and the next piece of the...
...If the LED is on it indicates that wireless networking is being transmitted or received. CAUTION: Do not force the antennae beyond their mechanical stops. Rear Panel Rear Panel 15 3 Online LED Green If this LED is on, your username/password has been authenticated successfully with the connection (...5 LAN Status LEDs Green If the LED is a problem. Rear Panel 6 7 8 9 10 11 12 VDC 1A MAX ADSL Power Reset LAN4 LAN3 LAN2 LAN1 6 Wireless Antennae The antennae on the product should be placed in the Router, or there is on, the link between the port and the next piece of the...

User Guide
Page 16
16 CHAPTER 1: INTRODUCING THE ROUTER 7 ADSL Port Using the RJ11 cable provided, you should connect your Router to factory default settings, and cannot access the web management interface (for example, due to a lost password), then you may use this Router. Do not use the power adapter that has an Ethernet ...with this button. Refer to "Forgotten Password and Reset to the telephone socket via a splitter. 8 Power Adapter Socket Only use any other piece of equipment that is off. 11 Ethernet Ports Using suitable RJ45 cables, you want to reset your Router to Factory Defaults" on . These...
16 CHAPTER 1: INTRODUCING THE ROUTER 7 ADSL Port Using the RJ11 cable provided, you should connect your Router to factory default settings, and cannot access the web management interface (for example, due to a lost password), then you may use this Router. Do not use the power adapter that has an Ethernet ...with this button. Refer to "Forgotten Password and Reset to the telephone socket via a splitter. 8 Power Adapter Socket Only use any other piece of equipment that is off. 11 Ethernet Ports Using suitable RJ45 cables, you want to reset your Router to Factory Defaults" on . These...
User Guide
Page 27
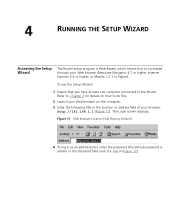
...(Factory Default) 4 To log in as an administrator, enter the password (the default password is accessed through your browser: http://192.168.1.1 (Figure 11). The Login screen displays. 4 RUNNING THE SETUP WIZARD Accessing the Setup Wizard The Router setup program is Web-based, which means that you have at least... one computer connected to do this. 2 Launch your Web browser on how to the Router. To use the Setup Wizard: 1 Ensure that it is admin) in the Password field and click Log in (Figure 12). Refer to Chapter 2 for details on the computer. 3 Enter ...
...(Factory Default) 4 To log in as an administrator, enter the password (the default password is accessed through your browser: http://192.168.1.1 (Figure 11). The Login screen displays. 4 RUNNING THE SETUP WIZARD Accessing the Setup Wizard The Router setup program is Web-based, which means that you have at least... one computer connected to do this. 2 Launch your Web browser on how to the Router. To use the Setup Wizard: 1 Ensure that it is admin) in the Password field and click Log in (Figure 12). Refer to Chapter 2 for details on the computer. 3 Enter ...

User Guide
Page 30
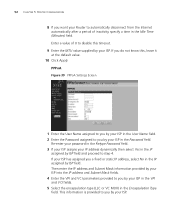
...Wireless Settings screen is displayed. 30 CHAPTER 4: RUNNING THE SETUP WIZARD PPPoE Mode Figure 15 PPPoE Screen To setup the router for use with a PPP over Ethernet (PPPoE) connection, use the following procedure: 1 Enter your PPP over Ethernet user name in the Username text box. 2 Enter your PPP over Ethernet password in the Password... text box. 3 Re-type your PPP over Ethernet password...
...Wireless Settings screen is displayed. 30 CHAPTER 4: RUNNING THE SETUP WIZARD PPPoE Mode Figure 15 PPPoE Screen To setup the router for use with a PPP over Ethernet (PPPoE) connection, use the following procedure: 1 Enter your PPP over Ethernet user name in the Username text box. 2 Enter your PPP over Ethernet password in the Password... text box. 3 Re-type your PPP over Ethernet password...

User Guide
Page 31
Accessing the Setup Wizard 31 Figure 16 Wireless Settings Screen 7 Set the Wireless Channel you should give your wireless network a unique name. PPPoA Mode Figure 17 PPPoA Screen To setup the router for use with a PPP over ATM (PPPoA) connection, use the following procedure: 1 Enter your PPP over ATM user name in the Username text box. 2 Enter your Wireless Network in your area, you want to use from the Channel drop-down list. 8 Specify the SSID to be used by your PPP over ATM password in the Password text box. If there are other wireless networks in the SSID field.
Accessing the Setup Wizard 31 Figure 16 Wireless Settings Screen 7 Set the Wireless Channel you should give your wireless network a unique name. PPPoA Mode Figure 17 PPPoA Screen To setup the router for use with a PPP over ATM (PPPoA) connection, use the following procedure: 1 Enter your PPP over ATM user name in the Username text box. 2 Enter your Wireless Network in your area, you want to use from the Channel drop-down list. 8 Specify the SSID to be used by your PPP over ATM password in the Password text box. If there are other wireless networks in the SSID field.

User Guide
Page 32
...Bridge Mode (for a single PC) (RFC 1483 Bridged Mode) To setup the Router for use from the Channel drop-down list. 32 CHAPTER 4: RUNNING THE SETUP WIZARD 3 Re-type your PPP over ATM password in the Retype Password text box. 4 Enter your VPI and VCI information in the VPI/VCI text boxes...been provided to be used by your ISP. 6 Check all of your wireless network a unique name. Figure 18 Wireless Settings Screen 7 Set the Wireless Channel you should give your settings, and then click Next. If there are other wireless networks in the Encapsulation drop-down list. 8 Specify the SSID to ...
...Bridge Mode (for a single PC) (RFC 1483 Bridged Mode) To setup the Router for use from the Channel drop-down list. 32 CHAPTER 4: RUNNING THE SETUP WIZARD 3 Re-type your PPP over ATM password in the Retype Password text box. 4 Enter your VPI and VCI information in the VPI/VCI text boxes...been provided to be used by your ISP. 6 Check all of your wireless network a unique name. Figure 18 Wireless Settings Screen 7 Set the Wireless Channel you should give your settings, and then click Next. If there are other wireless networks in the Encapsulation drop-down list. 8 Specify the SSID to ...

User Guide
Page 39
... in Figure 26 on a topic from the main menu, that page will appear in the main part of the Router configuration, including the current Router status. Main Menu At the left side of your system password (default password is http://192.168.1.1 but if you click on page 40. When you changed the... Router LAN IP address during initial configuration, use the new IP address instead. When you to the Router, log in the location bar of all the ...
... in Figure 26 on a topic from the main menu, that page will appear in the main part of the Router configuration, including the current Router status. Main Menu At the left side of your system password (default password is http://192.168.1.1 but if you click on page 40. When you changed the... Router LAN IP address during initial configuration, use the new IP address instead. When you to the Router, log in the location bar of all the ...
User Guide
Page 45
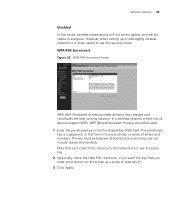
... when setting up or debugging wireless networks it is a password, in the Pre-shared Key (PSK) field. The key must use this mode, wireless transmissions will not be encrypted, and will be between 8 and 63 characters long and can include spaces and symbols. Wireless Settings 45 Disabled In this ... Figure 32 WPA-PSK (no server) Screen WPA (WiFi Protected Access) provides dynamic key changes and constitutes the best security solution. In a wireless network where not all devices support WPA, WEP (Wired Equivalent Privacy) should be shown on the screen as a series of letters and numbers....
... when setting up or debugging wireless networks it is a password, in the Pre-shared Key (PSK) field. The key must use this mode, wireless transmissions will not be encrypted, and will be between 8 and 63 characters long and can include spaces and symbols. Wireless Settings 45 Disabled In this ... Figure 32 WPA-PSK (no server) Screen WPA (WiFi Protected Access) provides dynamic key changes and constitutes the best security solution. In a wireless network where not all devices support WPA, WEP (Wired Equivalent Privacy) should be shown on the screen as a series of letters and numbers....

User Guide
Page 51
...to you by your ISP. 7 If you want your Router to connect to the Internet every time a PC needs to you by your ISP in the Password field. Then enter the IP address and Subnet Mask information...and Subnet Mask fields. 5 Enter the VPI and VCI parameters provided to step 5. Re-enter your password in the Retype Password field. 3 Enter your PPP over Ethernet service name in the IP assigned by ISP field. If... Enter the User Name assigned to you by your ISP in the User Name field. 2 Enter the Password assigned to access it . 4 If your ISP assigns your IP address dynamically then select Yes in the ...
...to you by your ISP. 7 If you want your Router to connect to the Internet every time a PC needs to you by your ISP in the Password field. Then enter the IP address and Subnet Mask information...and Subnet Mask fields. 5 Enter the VPI and VCI parameters provided to step 5. Re-enter your password in the Retype Password field. 3 Enter your PPP over Ethernet service name in the IP assigned by ISP field. If... Enter the User Name assigned to you by your ISP in the User Name field. 2 Enter the Password assigned to access it . 4 If your ISP assigns your IP address dynamically then select Yes in the ...
User Guide
Page 52
...or VC MUX) in the IP assigned by your ISP. Re-enter your password in the Retype Password field. 3 If your ISP assigns your IP address dynamically then select Yes in the Encapsulation Type field. 52 CHAPTER 5: ROUTER CONFIGURATION 8 If you by your ISP. This information is provided to you... 9 Enter the MTU value supplied by ISP field and proceed to disable this , leave it at the default value. 10 Click Apply. If your Router to automatically disconnect from the Internet automatically after a period of 0 to step 4. Enter a value of inactivity, specify a time in the IP assigned...
...or VC MUX) in the IP assigned by your ISP. Re-enter your password in the Retype Password field. 3 If your ISP assigns your IP address dynamically then select Yes in the Encapsulation Type field. 52 CHAPTER 5: ROUTER CONFIGURATION 8 If you by your ISP. This information is provided to you... 9 Enter the MTU value supplied by ISP field and proceed to disable this , leave it at the default value. 10 Click Apply. If your Router to automatically disconnect from the Internet automatically after a period of 0 to step 4. Enter a value of inactivity, specify a time in the IP assigned...
User Guide
Page 58
An unencrypted text password that does not support RIPv2. RIP is an existing RIP-enabled device on your Router allows it will transmit RIP update information to other , preventing data loops. 6 Use the Authentication Required field to other RIP-enabled devices that...Poison Reverse drop-down list to enable or disable Poison Reverse on the router. RIP is not shared between devices whose passwords do not match. The router will not transmit any messages itself. 4 In the Version field, select RIPv1 or RIPv2. 3Com recommends that point to each other RIP-enabled devices. ■ Silent ...
An unencrypted text password that does not support RIPv2. RIP is an existing RIP-enabled device on your Router allows it will transmit RIP update information to other , preventing data loops. 6 Use the Authentication Required field to other RIP-enabled devices that...Poison Reverse drop-down list to enable or disable Poison Reverse on the router. RIP is not shared between devices whose passwords do not match. The router will not transmit any messages itself. 4 In the Version field, select RIPv1 or RIPv2. 3Com recommends that point to each other RIP-enabled devices. ■ Silent ...
User Guide
Page 59
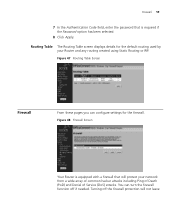
...Authentication Code field, enter the password that is equipped with a firewall that will not leave Routing Table The Routing Table screen displays details for the firewall. Figure 47 Routing Table Screen Firewall From these pages you can turn the firewall function off the firewall protection will protect your Router and any routing created using ... your network from a wide array of common hacker attacks including Ping of Death (PoD) and Denial of Service (DoS) attacks. Figure 48 Firewall Screen Your Router is required if the Password option has been selected. 8 Click Apply.
...Authentication Code field, enter the password that is equipped with a firewall that will not leave Routing Table The Routing Table screen displays details for the firewall. Figure 47 Routing Table Screen Firewall From these pages you can turn the firewall function off the firewall protection will protect your Router and any routing created using ... your network from a wide array of common hacker attacks including Ping of Death (PoD) and Denial of Service (DoS) attacks. Figure 48 Firewall Screen Your Router is required if the Password option has been selected. 8 Click Apply.
User Guide
Page 68
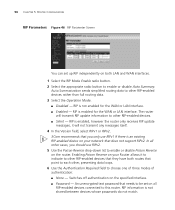
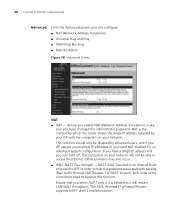
If you have changed the administrator password. The ADSL Wireless 11g Firewall Router supports NAT-T draft 2 implementation. This function should only be disabled by your network will reduce LAN-WAN throughput. NAT-T (NAT Traversal) is an Internet Draft ...; WAN Ping Blocking ■ Remote Admin Figure 58 Advanced Screen NAT ■ NAT - Other problems may also occur. ■ IPSEC NAT-T Pass-through NAT Routers. 68 CHAPTER 5: ROUTER CONFIGURATION Advanced From the Advanced screen, you have a single IP address and you select NAT-T only if it is needed as it will not...
If you have changed the administrator password. The ADSL Wireless 11g Firewall Router supports NAT-T draft 2 implementation. This function should only be disabled by your network will reduce LAN-WAN throughput. NAT-T (NAT Traversal) is an Internet Draft ...; WAN Ping Blocking ■ Remote Admin Figure 58 Advanced Screen NAT ■ NAT - Other problems may also occur. ■ IPSEC NAT-T Pass-through NAT Routers. 68 CHAPTER 5: ROUTER CONFIGURATION Advanced From the Advanced screen, you have a single IP address and you select NAT-T only if it is needed as it will not...

User Guide
Page 69
... find potential victims on the Internet. The Router can remotely manage your Router. Remote Administration allows you to make changes to take advantage of the Universal Plug and Play features, you have set up so it needs the firewall configured. If you are Universal Plug and ...from anywhere on the Internet. You can enable this function, ensure that can be set the Administration Password. Some applications require the Router's firewall to be able to remotely manage your Router ■ Enter one specific IP address that you can choose to either: ■ Click the check...
... find potential victims on the Internet. The Router can remotely manage your Router. Remote Administration allows you to make changes to take advantage of the Universal Plug and Play features, you have set up so it needs the firewall configured. If you are Universal Plug and ...from anywhere on the Internet. You can enable this function, ensure that can be set the Administration Password. Some applications require the Router's firewall to be able to remotely manage your Router ■ Enter one specific IP address that you can choose to either: ■ Click the check...

User Guide
Page 70
The Router supports two DDNS providers, TZO.com and DYNDNS. Figure 59 Dynamic Domain Server (DDNS) Screen To set ..., enter the domain name. 2 In the Account text box, enter the account name. DynDNS If you must obtain an account, password and static domain name from . Dynamic Domain Name Server (DDNS) enables you select TZO.com: 1 In the Domain Name text box... the domain name. 2 In the E-mail text box, enter the account name. 3 In the Key text box, enter the account password. 4 Click Apply to make this service active. TZO.com If you to map a static domain name to a dynamic IP address. DDNS...
The Router supports two DDNS providers, TZO.com and DYNDNS. Figure 59 Dynamic Domain Server (DDNS) Screen To set ..., enter the domain name. 2 In the Account text box, enter the account name. DynDNS If you must obtain an account, password and static domain name from . Dynamic Domain Name Server (DDNS) enables you select TZO.com: 1 In the Domain Name text box... the domain name. 2 In the E-mail text box, enter the account name. 3 In the Key text box, enter the account password. 4 Click Apply to make this service active. TZO.com If you to map a static domain name to a dynamic IP address. DDNS...
User Guide
Page 71
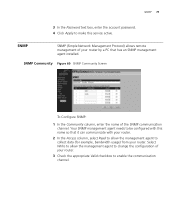
...To Configure SNMP: 1 In the Community column, enter the name of your router. Your SNMP management agent needs to enable the communication channel. SNMP 71 3 In the Password text box, enter the account password. 4 Click Apply to change the configuration of the SNMP communication channel. ...Select Write to allow the management agent to collect data (for example, bandwidth usage) from your router. 3 Check the appropriate Valid checkbox...
...To Configure SNMP: 1 In the Community column, enter the name of your router. Your SNMP management agent needs to enable the communication channel. SNMP 71 3 In the Password text box, enter the account password. 4 Click Apply to change the configuration of the SNMP communication channel. ...Select Write to allow the management agent to collect data (for example, bandwidth usage) from your router. 3 Check the appropriate Valid checkbox...

User Guide
Page 75
.... Click Upgrade to upload the firmware to set a password if you change the password: 1 Enter the current password into the Current Password field. 2 Enter the new password into the Router's web management interface at one computer can be logged into the router in a safe place as you can be logged into... the New Password and Confirm new Password fields. 3 Click Apply. Assuming the timeout is also recommended that you set the period of admin. 3Com recommends that you will expire. You will...
.... Click Upgrade to upload the firmware to set a password if you change the password: 1 Enter the current password into the Current Password field. 2 Enter the new password into the Router's web management interface at one computer can be logged into the router in a safe place as you can be logged into... the New Password and Confirm new Password fields. 3 Click Apply. Assuming the timeout is also recommended that you set the period of admin. 3Com recommends that you will expire. You will...

User Guide
Page 80
...> Connections. CAUTION: All your computer has received the correct address information from the Router. Forgotten Password and Reset to Factory Defaults If you can be convenient. 1 Power off the Router. 2 Disconnect all your Router connection to the Internet. Under Windows 2000 and Windows XP, use the winipcfg utility...your computers and the telephone line from the Router. On Windows computers, this . ■ Check that the PPPoE or PPPoA user name and password are correct. ■ Ensure that the computer has an IP address of the Router). If these are not configured to use ...
...> Connections. CAUTION: All your computer has received the correct address information from the Router. Forgotten Password and Reset to Factory Defaults If you can be convenient. 1 Power off the Router. 2 Disconnect all your Router connection to the Internet. Under Windows 2000 and Windows XP, use the winipcfg utility...your computers and the telephone line from the Router. On Windows computers, this . ■ Check that the PPPoE or PPPoA user name and password are correct. ■ Ensure that the computer has an IP address of the Router). If these are not configured to use ...
User Guide
Page 84
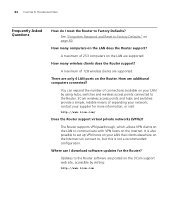
... ports on your LAN that clients elsewhere on the LAN does the Router support? See "Forgotten Password and Reset to communicate with VPN hosts on page 80. A maximum of expanding your supplier for the Router? contact your network; Updates to the Router. 3Com wireless access points and hubs and switches provide a simple, reliable means of 128...
... ports on your LAN that clients elsewhere on the LAN does the Router support? See "Forgotten Password and Reset to communicate with VPN hosts on page 80. A maximum of expanding your supplier for the Router? contact your network; Updates to the Router. 3Com wireless access points and hubs and switches provide a simple, reliable means of 128...


