User Guide
Page 3
... 9 1 INTRODUCING THE ROUTER OfficeConnect Cable/DSL Router 11 Router Advantages 13 Package Contents 13 Minimum System and Component Requirements 14 Front Panel 14 Rear Panel 16 2 HARDWARE INSTALLATION Introduction 17 Safety Information 17 Positioning the Router 17 Using the Rubber Feet 18 Wall Mounting 18 Connecting the Router 18 3 SETTING UP YOUR COMPUTERS Obtaining an IP Address Automatically 21...
... 9 1 INTRODUCING THE ROUTER OfficeConnect Cable/DSL Router 11 Router Advantages 13 Package Contents 13 Minimum System and Component Requirements 14 Front Panel 14 Rear Panel 16 2 HARDWARE INSTALLATION Introduction 17 Safety Information 17 Positioning the Router 17 Using the Rubber Feet 18 Wall Mounting 18 Connecting the Router 18 3 SETTING UP YOUR COMPUTERS Obtaining an IP Address Automatically 21...
User Guide
Page 4
... Navigating Through the Router Configuration Pages 39 Main Menu 39 LAN Settings 40 Internet Settings 42 Connection to ISP 43 DNS 49 Hostname & MAC 50 Firewall 50 SPI 51 Special Applications 54 Virtual Servers 56 Client IP Filters 57 MAC Address Filtering 62 DMZ 63 VPN 64 Adding an IPSec Connection... 67 Adding an L2TP over IPSec Connection 68 Adding a PPTP Connection 70 SNMP 71 System Tools 72 Restart Router 73 Reset to Factory Defaults 73 Backup/Restore Settings...
... Navigating Through the Router Configuration Pages 39 Main Menu 39 LAN Settings 40 Internet Settings 42 Connection to ISP 43 DNS 49 Hostname & MAC 50 Firewall 50 SPI 51 Special Applications 54 Virtual Servers 56 Client IP Filters 57 MAC Address Filtering 62 DMZ 63 VPN 64 Adding an IPSec Connection... 67 Adding an L2TP over IPSec Connection 68 Adding a PPTP Connection 70 SNMP 71 System Tools 72 Restart Router 73 Reset to Factory Defaults 73 Backup/Restore Settings...

User Guide
Page 5
...Traffic Metering 88 Logs 88 Support/Feedback 89 Support 89 Feedback 90 6 TROUBLESHOOTING Basic Connection Checks 91 Browsing to the Router Configuration Screens 91 Connecting to the Internet 92 Forgotten Password and Reset to Factory Defaults 93 Alert LED 93 Power... LED or Power Adapter OK LED Not Lit 94 Replacement Power Adapters 94 Recovering from Corrupted Software 95 Frequently Asked Questions 96 A IP ADDRESSING The Internet Protocol Suite 99 Managing the Router...
...Traffic Metering 88 Logs 88 Support/Feedback 89 Support 89 Feedback 90 6 TROUBLESHOOTING Basic Connection Checks 91 Browsing to the Router Configuration Screens 91 Connecting to the Internet 92 Forgotten Password and Reset to Factory Defaults 93 Alert LED 93 Power... LED or Power Adapter OK LED Not Lit 94 Replacement Power Adapters 94 Recovering from Corrupted Software 95 Frequently Asked Questions 96 A IP ADDRESSING The Internet Protocol Suite 99 Managing the Router...
User Guide
Page 14
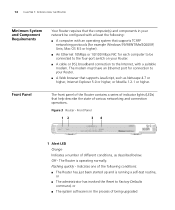
... with an operating system that supports TCP/IP networking protocols (for example Windows 95/98/NT/Me/2000/XP, Unix, Mac OS 8.5 or higher). ■ An Ethernet 10Mbps or 10/100 Mbps NIC for connection to your Router. ■ A cable or DSL broadband connection to Factory Defaults command, or... ■ The system software is operating normally. Front Panel The front panel of the Router contains a series of indicator lights (LEDs) that help describe...
... with an operating system that supports TCP/IP networking protocols (for example Windows 95/98/NT/Me/2000/XP, Unix, Mac OS 8.5 or higher). ■ An Ethernet 10Mbps or 10/100 Mbps NIC for connection to your Router. ■ A cable or DSL broadband connection to Factory Defaults command, or... ■ The system software is operating normally. Front Panel The front panel of the Router contains a series of indicator lights (LEDs) that help describe...
User Guide
Page 21
However, your computers need to be displayed. Obtaining an IP Address Automatically Follow the instructions for this chapter. 3 SETTING UP YOUR COMPUTERS The Router has the ability to dynamically allocate network addresses to the computers on your network, using a Windows 2000-based computer, use the following procedure to change ...
However, your computers need to be displayed. Obtaining an IP Address Automatically Follow the instructions for this chapter. 3 SETTING UP YOUR COMPUTERS The Router has the ability to dynamically allocate network addresses to the computers on your network, using a Windows 2000-based computer, use the following procedure to change ...
User Guide
Page 22
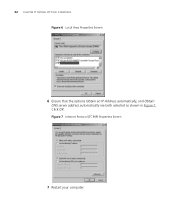
22 CHAPTER 3: SETTING UP YOUR COMPUTERS Figure 6 Local Area Properties Screen 6 Ensure that the options Obtain an IP Address automatically, and Obtain DNS server address automatically are both selected as shown in Figure 7. Figure 7 Internet Protocol (TCP/IP) Properties Screen 7 Restart your computer. Click OK.
22 CHAPTER 3: SETTING UP YOUR COMPUTERS Figure 6 Local Area Properties Screen 6 Ensure that the options Obtain an IP Address automatically, and Obtain DNS server address automatically are both selected as shown in Figure 7. Figure 7 Internet Protocol (TCP/IP) Properties Screen 7 Restart your computer. Click OK.
User Guide
Page 23
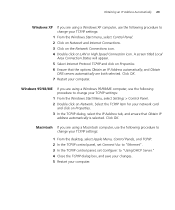
... 95/98/ME If you are using a Windows 95/98/ME computer, use the following procedure to "Using DHCP Server." 4 Close the TCP/IP dialog box, and save your changes. 5 Restart your computer. Click OK. 7 Restart your network card and click on Properties. 3 In the TCP.../IP dialog, select the IP Address tab, and ensure that the options Obtain an IP Address automatically, and Obtain DNS servers automatically are both selected. Macintosh If you are using a Macintosh computer, use the...
... 95/98/ME If you are using a Windows 95/98/ME computer, use the following procedure to "Using DHCP Server." 4 Close the TCP/IP dialog box, and save your changes. 5 Restart your computer. Click OK. 7 Restart your network card and click on Properties. 3 In the TCP.../IP dialog, select the IP Address tab, and ensure that the options Obtain an IP Address automatically, and Obtain DNS servers automatically are both selected. Macintosh If you are using a Macintosh computer, use the...

User Guide
Page 29
...see page 32. ■ L2TP (supported by some DSL users in Europe) - and click Next. Before setting up the Router for daylight savings time automatically. 8 Click Next to display the Connection Type screen. see page 30. ■ PPPoE (typically DSL users only) - see page 34. see "Internet ...see page 32. ■ Static IP Address - Connection Type Figure 13 Connection Type Screen This Connection Type screen allows you to be updated for the type of Internet connection you have the modem setting information from the following: ■ Dynamic IP Address - Accessing the Wizard 29...
...see page 32. ■ L2TP (supported by some DSL users in Europe) - and click Next. Before setting up the Router for daylight savings time automatically. 8 Click Next to display the Connection Type screen. see page 30. ■ PPPoE (typically DSL users only) - see page 34. see "Internet ...see page 32. ■ Static IP Address - Connection Type Figure 13 Connection Type Screen This Connection Type screen allows you to be updated for the type of Internet connection you have the modem setting information from the following: ■ Dynamic IP Address - Accessing the Wizard 29...
User Guide
Page 30
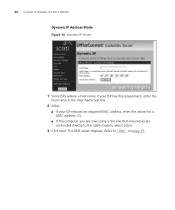
If your ISP has this requirement, enter the host name in the Host Name text box . 2 Either: ■ If your ISP requires an assigned MAC address, enter the values for a MAC address. Refer to the cable modem, select Clone. 3 Click Next. Or, ■ If the computer you are now using is the one that was previously connected directly to "DNS" on page 35. The DNS screen displays. 30 CHAPTER 4: RUNNING THE SETUP WIZARD Dynamic IP Address Mode Figure 14 Dynamic IP Screen 1 Some ISPs require a host name.
If your ISP has this requirement, enter the host name in the Host Name text box . 2 Either: ■ If your ISP requires an assigned MAC address, enter the values for a MAC address. Refer to the cable modem, select Clone. 3 Click Next. Or, ■ If the computer you are now using is the one that was previously connected directly to "DNS" on page 35. The DNS screen displays. 30 CHAPTER 4: RUNNING THE SETUP WIZARD Dynamic IP Address Mode Figure 14 Dynamic IP Screen 1 Some ISPs require a host name.
User Guide
Page 32
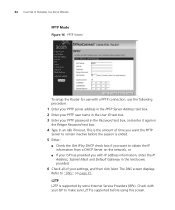
... obtain the IP information from a DHCP Server on page 35. Check with your PPTP password in the Password text box, and enter it again in the Retype Password text box. 4 Type in an Idle Timeout. 32 CHAPTER 4: RUNNING THE SETUP WIZARD PPTP Mode Figure 16 PPTP Screen To setup the Router for... is supported by DHCP check box if you want to "DNS" on the network, or ■ If your ISP has provided you with IP address information, enter the IP Address, Subnet Mask and Default Gateway in the text boxes provided. 6 Check all of your settings, and then click Next. The DNS screen...
... obtain the IP information from a DHCP Server on page 35. Check with your PPTP password in the Password text box, and enter it again in the Retype Password text box. 4 Type in an Idle Timeout. 32 CHAPTER 4: RUNNING THE SETUP WIZARD PPTP Mode Figure 16 PPTP Screen To setup the Router for... is supported by DHCP check box if you want to "DNS" on the network, or ■ If your ISP has provided you with IP address information, enter the IP Address, Subnet Mask and Default Gateway in the text boxes provided. 6 Check all of your settings, and then click Next. The DNS screen...
User Guide
Page 33
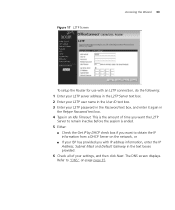
This is the amount of time you want the L2TP Server to remain inactive before the session is ended. 5 Either: ■ Check the Get IP by DHCP check box if you want to "DNS" on the network, or ■ If your ISP has provided you with an L2TP connection, do ... in the Retype Password text box. 4 Type in the text boxes provided. 6 Check all of your settings, and then click Next. Refer to obtain the IP information from a DHCP Server on page page 35. The DNS screen displays. Figure 17 L2TP Screen Accessing the Wizard 33 To setup the...
This is the amount of time you want the L2TP Server to remain inactive before the session is ended. 5 Either: ■ Check the Get IP by DHCP check box if you want to "DNS" on the network, or ■ If your ISP has provided you with an L2TP connection, do ... in the Retype Password text box. 4 Type in the text boxes provided. 6 Check all of your settings, and then click Next. Refer to obtain the IP information from a DHCP Server on page page 35. The DNS screen displays. Figure 17 L2TP Screen Accessing the Wizard 33 To setup the...
User Guide
Page 34
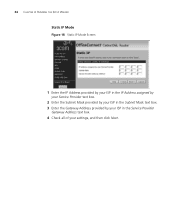
34 CHAPTER 4: RUNNING THE SETUP WIZARD Static IP Mode Figure 18 Static IP Mode Screen 1 Enter the IP Address provided by your ISP in the IP Address assigned by your Service Provider text box. 2 Enter the Subnet Mask provided by your ISP in the Subnet Mask text box. 3 Enter the Gateway Address provided by your ISP in the Service Provider Gateway Address text box. 4 Check all of your settings, and then click Next.
34 CHAPTER 4: RUNNING THE SETUP WIZARD Static IP Mode Figure 18 Static IP Mode Screen 1 Enter the IP Address provided by your ISP in the IP Address assigned by your Service Provider text box. 2 Enter the Subnet Mask provided by your ISP in the Subnet Mask text box. 3 Enter the Gateway Address provided by your ISP in the Service Provider Gateway Address text box. 4 Check all of your settings, and then click Next.
User Guide
Page 35
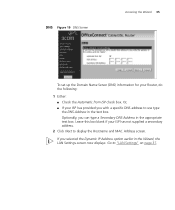
... can type a Secondary DNS Address in the appropriate text box. Leave this box blank if your Router, do the following: 1 Either: ■ Check the Automatic from ISP check box. Optionally, you selected the Dynamic IP Address option earlier in the text box. DNS Figure 19 DNS Screen Accessing the Wizard 35 To...
... can type a Secondary DNS Address in the appropriate text box. Leave this box blank if your Router, do the following: 1 Either: ■ Check the Automatic from ISP check box. Optionally, you selected the Dynamic IP Address option earlier in the text box. DNS Figure 19 DNS Screen Accessing the Wizard 35 To...
User Guide
Page 37
...Activate the DHCP Server by selecting the required value from the Lease Time drop down list. The largest available continuous IP pool will reserve the IP address for the Router. LAN Settings Figure 21 LAN Settings Screen Accessing the Wizard 37 LAN Configuration This section of every computer on ...your network. It also allows you use 3Com NBX telephones, enter the IP address of time the DHCP server will be ...
...Activate the DHCP Server by selecting the required value from the Lease Time drop down list. The largest available continuous IP pool will reserve the IP address for the Router. LAN Settings Figure 21 LAN Settings Screen Accessing the Wizard 37 LAN Configuration This section of every computer on ...your network. It also allows you use 3Com NBX telephones, enter the IP address of time the DHCP server will be ...
User Guide
Page 39
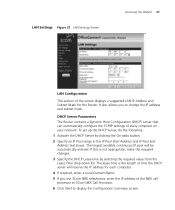
... password (default password is admin). when you have browsed to the Router by entering the URL in using your browser. When you changed the Router LAN IP address during initial configuration, use the new IP address instead. The default URL is http://192.168.1.1 but if ...you click on a topic from the main menu, that screen displays. 5 ROUTER CONFIGURATION Navigating Through the Router Configuration Pages This chapter ...
... password (default password is admin). when you have browsed to the Router by entering the URL in using your browser. When you changed the Router LAN IP address during initial configuration, use the new IP address instead. The default URL is http://192.168.1.1 but if ...you click on a topic from the main menu, that screen displays. 5 ROUTER CONFIGURATION Navigating Through the Router Configuration Pages This chapter ...
User Guide
Page 40
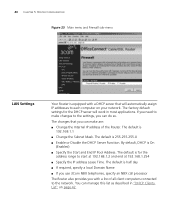
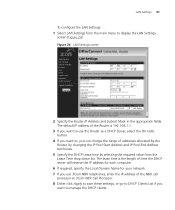
...■ If required, specify a local Domain Name ■ If you use 3Com NBX telephones, specify an NBX call processor The Router also provides you can do so. If you need to make are: ■ Change the Internal IP address of all client computers connected to the network. The default is 255...address range to start at 192.168.1.2 and end at 192.168.1.254 ■ Specify the IP address Lease Time. 40 CHAPTER 5: ROUTER CONFIGURATION Figure 23 Main menu and Firewall sub-menu LAN Settings Your Router is equipped with a DHCP server that you can make changes to the settings, you with a...
...■ If required, specify a local Domain Name ■ If you use 3Com NBX telephones, specify an NBX call processor The Router also provides you can do so. If you need to make are: ■ Change the Internal IP address of all client computers connected to the network. The default is 255...address range to start at 192.168.1.2 and end at 192.168.1.254 ■ Specify the IP address Lease Time. 40 CHAPTER 5: ROUTER CONFIGURATION Figure 23 Main menu and Firewall sub-menu LAN Settings Your Router is equipped with a DHCP server that you can make changes to the settings, you with a...
User Guide
Page 41
... Local Domain Name for your network. 7 If you use 3Com NBX telephones, enter the IP address of the NBX call processor at 3Com NBX Call Processor. 8 Either click Apply to save these settings, or go to DHCP Clients List if you want to use the Router as a DHCP Server, select the On radio button.... 4 If you need to, you can change the range of the Router is...
... Local Domain Name for your network. 7 If you use 3Com NBX telephones, enter the IP address of the NBX call processor at 3Com NBX Call Processor. 8 Either click Apply to save these settings, or go to DHCP Clients List if you want to use the Router as a DHCP Server, select the On radio button.... 4 If you need to, you can change the range of the Router is...
User Guide
Page 42
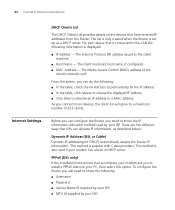
... method is set up as described below: Dynamic IP Address (DSL or Cable) Dynamic IP addressing (or DHCP) automatically assigns the Router IP information. 42 CHAPTER 5: ROUTER CONFIGURATION DHCP Clients List The DHCP Clients List provides details on your ISP. Internet Settings Before you can configure the Router, you can allocate IP information, as a DHCP server. This method is...
... method is set up as described below: Dynamic IP Address (DSL or Cable) Dynamic IP addressing (or DHCP) automatically assigns the Router IP information. 42 CHAPTER 5: ROUTER CONFIGURATION DHCP Clients List The DHCP Clients List provides details on your ISP. Internet Settings Before you can configure the Router, you can allocate IP information, as a DHCP server. This method is...
User Guide
Page 43
... to know the following : ■ Username ■ Password ■ L2TP Server address Static IP Address (DSL or Cable) The ISP provides the IP addressing information for you to enter manually. To configure the Router you will need to know the following : ■ IP Address ■ Subnet Mask ■ ISP Gateway Address These screens enable you to...
... to know the following : ■ Username ■ Password ■ L2TP Server address Static IP Address (DSL or Cable) The ISP provides the IP addressing information for you to enter manually. To configure the Router you will need to know the following : ■ IP Address ■ Subnet Mask ■ ISP Gateway Address These screens enable you to...

User Guide
Page 44
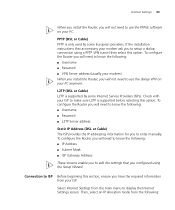
... If your settings and then click Apply. see page 45 ■ PPTP (used by DSL providers only) - see page 46 ■ L2TP (supported by some ISPs) - 44 CHAPTER 5: ROUTER CONFIGURATION ■ Dynamic IP Address (automatically allocated) - see page 44. ■ PPPoE (used by some European ...providers) - see page 47 ■ Static IP Address (to the cable modem, select Clone. 4 Check all of your ISP ...
... If your settings and then click Apply. see page 45 ■ PPTP (used by DSL providers only) - see page 46 ■ L2TP (supported by some ISPs) - 44 CHAPTER 5: ROUTER CONFIGURATION ■ Dynamic IP Address (automatically allocated) - see page 44. ■ PPPoE (used by some European ...providers) - see page 47 ■ Static IP Address (to the cable modem, select Clone. 4 Check all of your ISP ...