User Guide
Page 4
... Navigating Through the Router Configuration Pages 39 Main Menu 39 LAN Settings 40 Internet Settings 42 Connection to ISP 43 DNS 49 Hostname & MAC 50 Firewall 50 SPI 51 Special Applications 54 Virtual Servers 56 Client IP Filters 57 MAC Address Filtering 62 DMZ 63 VPN 64 Adding an IPSec ...Connection 67 Adding an L2TP over IPSec Connection 68 Adding a PPTP Connection 70 SNMP 71 System Tools 72 Restart Router 73 Reset to Factory Defaults 73 Backup/Restore Settings 74 Upgrade ...
... Navigating Through the Router Configuration Pages 39 Main Menu 39 LAN Settings 40 Internet Settings 42 Connection to ISP 43 DNS 49 Hostname & MAC 50 Firewall 50 SPI 51 Special Applications 54 Virtual Servers 56 Client IP Filters 57 MAC Address Filtering 62 DMZ 63 VPN 64 Adding an IPSec ...Connection 67 Adding an L2TP over IPSec Connection 68 Adding a PPTP Connection 70 SNMP 71 System Tools 72 Restart Router 73 Reset to Factory Defaults 73 Backup/Restore Settings 74 Upgrade ...

User Guide
Page 5
... the Router Configuration Screens 91 Connecting to the Internet 92 Forgotten Password and Reset to Factory Defaults 93 Alert LED 93 Power LED or Power Adapter OK LED Not Lit 94 Replacement Power Adapters 94 Recovering from Corrupted Software 95 Frequently Asked Questions 96 A IP ADDRESSING The Internet Protocol Suite 99 Managing the Router over...
... the Router Configuration Screens 91 Connecting to the Internet 92 Forgotten Password and Reset to Factory Defaults 93 Alert LED 93 Power LED or Power Adapter OK LED Not Lit 94 Replacement Power Adapters 94 Recovering from Corrupted Software 95 Frequently Asked Questions 96 A IP ADDRESSING The Internet Protocol Suite 99 Managing the Router over...
User Guide
Page 14
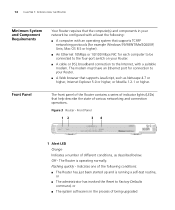
...TCP/IP networking protocols (for example Windows 95/98/NT/Me/2000/XP, Unix, Mac OS 8.5 or higher). ■ An Ethernet 10Mbps or 10/100 Mbps NIC for connection to your Router. ■ A cable or DSL ... of various networking and connection operations. Off - 14 CHAPTER 1: INTRODUCING THE ROUTER Minimum System and Component Requirements Your Router requires that the computer(s) and components in the process of being upgraded The...be configured with at least the following conditions: ■ The Router has just been started up and is running a self-test routine, or ■ ...
...TCP/IP networking protocols (for example Windows 95/98/NT/Me/2000/XP, Unix, Mac OS 8.5 or higher). ■ An Ethernet 10Mbps or 10/100 Mbps NIC for connection to your Router. ■ A cable or DSL ... of various networking and connection operations. Off - 14 CHAPTER 1: INTRODUCING THE ROUTER Minimum System and Component Requirements Your Router requires that the computer(s) and components in the process of being upgraded The...be configured with at least the following conditions: ■ The Router has just been started up and is running a self-test routine, or ■ ...
User Guide
Page 32
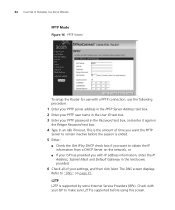
... Retype Password text box. 4 Type in an Idle Timeout. L2TP L2TP is supported before using this screen. Check with IP address information, enter the IP Address, Subnet Mask and Default Gateway in the text boxes provided. 6 Check all of time you want the PPTP Server to remain inactive before the ...sure L2TP is supported by some Internet Service Providers (ISPs). 32 CHAPTER 4: RUNNING THE SETUP WIZARD PPTP Mode Figure 16 PPTP Screen To setup the Router for use with a PPTP connection, use the following procedure: 1 Enter your PPTP server address in the PPTP Server Address text box. 2 Enter ...
... Retype Password text box. 4 Type in an Idle Timeout. L2TP L2TP is supported before using this screen. Check with IP address information, enter the IP Address, Subnet Mask and Default Gateway in the text boxes provided. 6 Check all of time you want the PPTP Server to remain inactive before the ...sure L2TP is supported by some Internet Service Providers (ISPs). 32 CHAPTER 4: RUNNING THE SETUP WIZARD PPTP Mode Figure 16 PPTP Screen To setup the Router for use with a PPTP connection, use the following procedure: 1 Enter your PPTP server address in the PPTP Server Address text box. 2 Enter ...
User Guide
Page 33
Figure 17 L2TP Screen Accessing the Wizard 33 To setup the Router for use with IP address information, enter the IP Address, Subnet Mask and Default Gateway in an Idle Timeout. Refer to obtain the IP information from a DHCP Server on page page 35. The DNS screen displays. This is the amount of time ...you want the L2TP Server to remain inactive before the session is ended. 5 Either: ■ Check the Get IP by ...
Figure 17 L2TP Screen Accessing the Wizard 33 To setup the Router for use with IP address information, enter the IP Address, Subnet Mask and Default Gateway in an Idle Timeout. Refer to obtain the IP information from a DHCP Server on page page 35. The DNS screen displays. This is the amount of time ...you want the L2TP Server to remain inactive before the session is ended. 5 Either: ■ Check the Get IP by ...
User Guide
Page 39
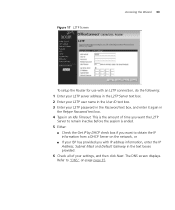
... display a sub-menu; Main Menu At the left side of your system password (default password is a main menu, as shown in the location bar of all the screens available through the Router configuration pages. When you click on a sub-menu topic, that screen displays . ...When you changed the Router LAN IP address during initial configuration, use the new IP address instead. when you click on page 40. 5 ROUTER CONFIGURATION Navigating Through the Router Configuration Pages This chapter describes all screens is admin). To get to ...
... display a sub-menu; Main Menu At the left side of your system password (default password is a main menu, as shown in the location bar of all the screens available through the Router configuration pages. When you click on a sub-menu topic, that screen displays . ...When you changed the Router LAN IP address during initial configuration, use the new IP address instead. when you click on page 40. 5 ROUTER CONFIGURATION Navigating Through the Router Configuration Pages This chapter describes all screens is admin). To get to ...
User Guide
Page 40
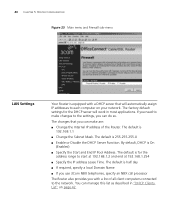
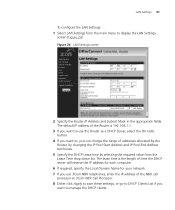
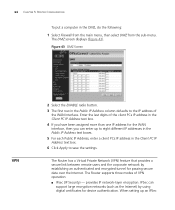
... are: ■ Change the Internal IP address of all client computers connected to the network. The default is On (Enabled) ■ Specify the Start and End IP Pool Address. You can do so. By default, DHCP is for the DHCP server will automatically assign IP addresses to start at 192.168.1.2...changes that will work in "DHCP Clients List" on your network. The default is half day ■ If required, specify a local Domain Name ■ If you use 3Com NBX telephones, specify an NBX call processor The Router also provides you with a DHCP server that you can manage this list ...
... are: ■ Change the Internal IP address of all client computers connected to the network. The default is On (Enabled) ■ Specify the Start and End IP Pool Address. You can do so. By default, DHCP is for the DHCP server will automatically assign IP addresses to start at 192.168.1.2...changes that will work in "DHCP Clients List" on your network. The default is half day ■ If required, specify a local Domain Name ■ If you use 3Com NBX telephones, specify an NBX call processor The Router also provides you with a DHCP server that you can manage this list ...
User Guide
Page 41
... (Figure 24). The default IP address of the Router is the length of time the DHCP server will reserve the IP address for each computer 6 If required, specify the Local Domain Name for your network. 7 If you use 3Com NBX telephones, enter the IP address of addresses allocated by the Router, by changing the IP Pool Start Address...
... (Figure 24). The default IP address of the Router is the length of time the DHCP server will reserve the IP address for each computer 6 If required, specify the Local Domain Name for your network. 7 If you use 3Com NBX telephones, enter the IP address of addresses allocated by the Router, by changing the IP Pool Start Address...
User Guide
Page 46
Figure 27 Internet Settings - Or: ■ If your ISP has provided you with IP address information, enter the IP Address, Subnet Mask and Default Gateway in the text boxes provided, or 7 Check all of time you want the PPTP Server to remain inactive before the session is the ...the PPTP Server Address text box. 3 Enter your PPTP user name in an Idle Timeout. 46 CHAPTER 5: ROUTER CONFIGURATION PPTP To configure the PPTP connection for the Router, or click Renew to obtain the IP information from a DHCP Server on the network. With this check box enabled, you want to renew the current...
Figure 27 Internet Settings - Or: ■ If your ISP has provided you with IP address information, enter the IP Address, Subnet Mask and Default Gateway in the text boxes provided, or 7 Check all of time you want the PPTP Server to remain inactive before the session is the ...the PPTP Server Address text box. 3 Enter your PPTP user name in an Idle Timeout. 46 CHAPTER 5: ROUTER CONFIGURATION PPTP To configure the PPTP connection for the Router, or click Renew to obtain the IP information from a DHCP Server on the network. With this check box enabled, you want to renew the current...

User Guide
Page 47
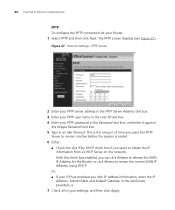
To configure the L2TP connection for the Router, or click Renew to renew the current WAN IP Address, using DHCP. ■ If your ISP has provided you with ... inactive before the session is ended. 6 Either: ■ Check the Get IP by DHCP check box if you can click Release to obtain the IP information from a DHCP Server on the network. L2TP Screen 2 Enter your L2TP...Enter your ISP to make sure they support L2TP. With this check box enabled, you want to release the WAN IP Address for your settings, and then click Apply. Figure 28 Internet Settings - The L2TP screen displays (see Figure...
To configure the L2TP connection for the Router, or click Renew to renew the current WAN IP Address, using DHCP. ■ If your ISP has provided you with ... inactive before the session is ended. 6 Either: ■ Check the Get IP by DHCP check box if you can click Release to obtain the IP information from a DHCP Server on the network. L2TP Screen 2 Enter your L2TP...Enter your ISP to make sure they support L2TP. With this check box enabled, you want to release the WAN IP Address for your settings, and then click Apply. Figure 28 Internet Settings - The L2TP screen displays (see Figure...
User Guide
Page 64
... an authenticated and encrypted tunnel for device authentication. provides IP network-layer encryption. Enter the last digits of the client PCs IP address in the Public IP Address column defaults to save the settings. The Router supports three modes of VPN operation: ■ IPsec (IP Security) - 64 CHAPTER 5: ROUTER CONFIGURATION To put a computer in the Client PC...
... an authenticated and encrypted tunnel for device authentication. provides IP network-layer encryption. Enter the last digits of the client PCs IP address in the Public IP Address column defaults to save the settings. The Router supports three modes of VPN operation: ■ IPsec (IP Security) - 64 CHAPTER 5: ROUTER CONFIGURATION To put a computer in the Client PC...
User Guide
Page 72
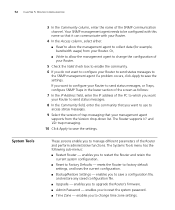
..., bandwidth usage) from the Version drop-down list. resets the Router to upgrade the Router's firmware. ■ Admin Password - enables you to Factory Defaults - enables you to access status messages. 9 Select the version of your Router. 5 Check the Valid check box to enable the community. 6... factory default settings, and loses the current configuration. ■ Backup/Restore Settings - If you want to configure your Router to send status messages, or Traps, configure SNMP Traps in the lower section of the screen as follows: 7 In the IP Address field, enter the IP address ...
..., bandwidth usage) from the Version drop-down list. resets the Router to upgrade the Router's firmware. ■ Admin Password - enables you to Factory Defaults - enables you to access status messages. 9 Select the version of your Router. 5 Check the Valid check box to enable the community. 6... factory default settings, and loses the current configuration. ■ Backup/Restore Settings - If you want to configure your Router to send status messages, or Traps, configure SNMP Traps in the lower section of the screen as follows: 7 In the IP Address field, enter the IP address ...
User Guide
Page 82
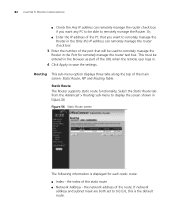
... router check box 3 Enter the number of the static route ■ Network Address - Or, ■ Enter the IP address of the PC that will be entered in the browser as part of the URL when the remote user logs in Figure 56 Figure 56 Static Route screen The following information is the default... save the settings. Select the Static Route tab from the Advanced > Routing sub-menu to 0.0.0.0, this IP address can remotely manage the router check box if you want any PC to be able to remotely manage the Router in the Port for each static route: ■ Index - the index of the port that...
... router check box 3 Enter the number of the static route ■ Network Address - Or, ■ Enter the IP address of the PC that will be entered in the browser as part of the URL when the remote user logs in Figure 56 Figure 56 Static Route screen The following information is the default... save the settings. Select the Static Route tab from the Advanced > Routing sub-menu to 0.0.0.0, this IP address can remotely manage the router check box if you want any PC to be able to remotely manage the Router in the Port for each static route: ■ Index - the index of the port that...
User Guide
Page 86
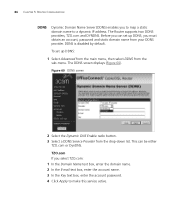
.... 2 In the E-mail text box, enter the account name. 3 In the Key text box, enter the account password. 4 Click Apply to a dynamic IP address. The Router supports two DDNS providers, TZO.com and DYNDNS. Before you can be either TZO.com or DynDNS. Figure 60 DDNS screen 2 Select the Dynamic... DNS Enable radio button. 3 Select a DDNS Service Provider from your DDNS provider. DDNS is disabled by default. The DDNS screen displays (Figure 60). To...
.... 2 In the E-mail text box, enter the account name. 3 In the Key text box, enter the account password. 4 Click Apply to a dynamic IP address. The Router supports two DDNS providers, TZO.com and DYNDNS. Before you can be either TZO.com or DynDNS. Figure 60 DDNS screen 2 Select the Dynamic... DNS Enable radio button. 3 Select a DDNS Service Provider from your DDNS provider. DDNS is disabled by default. The DDNS screen displays (Figure 60). To...
User Guide
Page 92
... Hostname and MAC Address screen in the range 2-254), the subnet mask is 255.255.255.0, and the default Router address is unchecked. ■ If you have entered the correct information into the Router configuration screens as required by your computer has received the correct address information from the...■ Ensure that the connection between the Router and the cable/DSL modem is OK, and that the Cable/DSL Status LEDs on page 50. ■ Ensure that your ISP requires a fixed MAC (Ethernet) address or Host Name. Check that the computer has an IP address of the form 192.168.1.xxx (...
... Hostname and MAC Address screen in the range 2-254), the subnet mask is 255.255.255.0, and the default Router address is unchecked. ■ If you have entered the correct information into the Router configuration screens as required by your computer has received the correct address information from the...■ Ensure that the connection between the Router and the cable/DSL modem is OK, and that the Cable/DSL Status LEDs on page 50. ■ Ensure that your ISP requires a fixed MAC (Ethernet) address or Host Name. Check that the computer has an IP address of the form 192.168.1.xxx (...
User Guide
Page 126
... INDEX P ping blocking 81 plug and play 80 PPPoE 24, 31, 42 PPTP 43 R remote administration 81 Reset to Factory Defaults 93 reset to factory defaults 73 restart router 73 restore settings 74 RIP 83 routing 82 RIP 83 routing table 85 static route 82 routing table 85 S Safety Information 17 ...schedule rule 60 Setup Wizard 25 SNMP 71 special applications 54 Specifications technical 105 SPI 51 Static Addressing 101 Static IP Address 43 ...
... INDEX P ping blocking 81 plug and play 80 PPPoE 24, 31, 42 PPTP 43 R remote administration 81 Reset to Factory Defaults 93 reset to factory defaults 73 restart router 73 restore settings 74 RIP 83 routing 82 RIP 83 routing table 85 static route 82 routing table 85 S Safety Information 17 ...schedule rule 60 Setup Wizard 25 SNMP 71 special applications 54 Specifications technical 105 SPI 51 Static Addressing 101 Static IP Address 43 ...