User Guide
Page 3
... 16 Connecting a Network Device 17 Using SFP Transceivers 18 Approved SFP Transceivers 18 Inserting an SFP Transceiver 18 Removing an SFP Transceiver 19 Performing Spot Checks 19 3 CONNECTING TO THE WEB INTERFACE Requirements for Accessing the Web Interface 21 Running the Discovery Application 21 Logging On to the Web Interface 23 Navigating the Web Interface 23 Menu 23 Buttons 25 Accessing the Interface Without Using Discovery 26 DHCP Assigned IP Address 26 Manually Assigned (Static) IP Address 26 4 CONFIGURING THE SWITCH Configuration...
... 16 Connecting a Network Device 17 Using SFP Transceivers 18 Approved SFP Transceivers 18 Inserting an SFP Transceiver 18 Removing an SFP Transceiver 19 Performing Spot Checks 19 3 CONNECTING TO THE WEB INTERFACE Requirements for Accessing the Web Interface 21 Running the Discovery Application 21 Logging On to the Web Interface 23 Navigating the Web Interface 23 Menu 23 Buttons 25 Accessing the Interface Without Using Discovery 26 DHCP Assigned IP Address 26 Manually Assigned (Static) IP Address 26 4 CONFIGURING THE SWITCH Configuration...
User Guide
Page 4
... Firmware Upgrade 31 Initialize 31 Reboot 32 System Access 32 System Time 34 SNMP 34 Configuring VLANs 35 VLAN 36 Forwarding Tagged/Untagged Frames 39 Sample VLAN Configurations 40 Spanning Tree 41 IGMP Snooping 42 IGMP Query 42 Broadcast Storm 43 Configuring Port Settings 43 Administration 43 Speed/Duplex for 1000 Mbps Connections 45 Link Aggregation 45 Spanning Tree per Port 47 Port Mirroring 49 QoS VoIP Traffic Settings 50 Security 53 RADIUS Client 53 802.1X Settings 54 Monitoring 56 Address Table 56 Cable Diagnostics 56 5 TROUBLESHOOTING Resetting to Factory Defaults 59 Forgotten Password...
... Firmware Upgrade 31 Initialize 31 Reboot 32 System Access 32 System Time 34 SNMP 34 Configuring VLANs 35 VLAN 36 Forwarding Tagged/Untagged Frames 39 Sample VLAN Configurations 40 Spanning Tree 41 IGMP Snooping 42 IGMP Query 42 Broadcast Storm 43 Configuring Port Settings 43 Administration 43 Speed/Duplex for 1000 Mbps Connections 45 Link Aggregation 45 Spanning Tree per Port 47 Port Mirroring 49 QoS VoIP Traffic Settings 50 Security 53 RADIUS Client 53 802.1X Settings 54 Monitoring 56 Address Table 56 Cable Diagnostics 56 5 TROUBLESHOOTING Resetting to Factory Defaults 59 Forgotten Password...
User Guide
Page 6
... tasks using the Web interface. ■ Release Notes - Questions related to technical support or sales should be directed in the first instance to your network supplier. Provide information about 3Com product documentation at this guide, each 3Com Baseline Switch 2250 Plus documentation set includes the following information when contacting us: ■ Document title ■ Document part number (on the title page) ■ Page number (if appropriate) Example: ■ 3Com Baseline Switch 2250 Plus User Guide ■ Part number...
... tasks using the Web interface. ■ Release Notes - Questions related to technical support or sales should be directed in the first instance to your network supplier. Provide information about 3Com product documentation at this guide, each 3Com Baseline Switch 2250 Plus documentation set includes the following information when contacting us: ■ Document title ■ Document part number (on the title page) ■ Page number (if appropriate) Example: ■ 3Com Baseline Switch 2250 Plus User Guide ■ Part number...
User Guide
Page 7
... and helps you get to each port using either half-duplex or full-duplex mode. 1000 Mbps connections, on these SFP transceiver slots for users who want to another switch port, server, or workstation without additional configuration. Use these 1000BASE-T ports can be used to connect to configure advanced features such as VLAN support and link aggregation. This allows you want the high-speed performance of two can operate in either a normal...
... and helps you get to each port using either half-duplex or full-duplex mode. 1000 Mbps connections, on these SFP transceiver slots for users who want to another switch port, server, or workstation without additional configuration. Use these 1000BASE-T ports can be used to connect to configure advanced features such as VLAN support and link aggregation. This allows you want the high-speed performance of two can operate in either a normal...
User Guide
Page 8
... disabled. When an SFP port is in any combination. The spanning tree protocol (STP) is implementing a spanning tree topology across multiples switches, you the flexibility of the Switch to ensure that are present in the following table. This offers you can configure 3Com Baseline Switch 2250 Plus to forward or to block and discard bridge protocol data unit (BPDU) packets to provide connectivity between the Switch and a 1000 Mbps core network. If your network...
... disabled. When an SFP port is in any combination. The spanning tree protocol (STP) is implementing a spanning tree topology across multiples switches, you the flexibility of the Switch to ensure that are present in the following table. This offers you can configure 3Com Baseline Switch 2250 Plus to forward or to block and discard bridge protocol data unit (BPDU) packets to provide connectivity between the Switch and a 1000 Mbps core network. If your network...
User Guide
Page 12
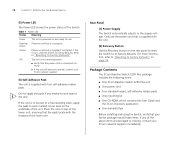
...: ■ One 3Com Baseline Switch 2250 Plus unit ■ One power cord ■ Four standard height, self-adhesive rubber pads ■ One mounting kit ■ One CD-ROM, which contains this occurs, reset the Switch to rack-mount the unit. Do not apply the pads if you intend to factory defaults. Only use Flashing Power-on self-test is to be part of a free-standing stack, apply the...
...: ■ One 3Com Baseline Switch 2250 Plus unit ■ One power cord ■ Four standard height, self-adhesive rubber pads ■ One mounting kit ■ One CD-ROM, which contains this occurs, reset the Switch to rack-mount the unit. Do not apply the pads if you intend to factory defaults. Only use Flashing Power-on self-test is to be part of a free-standing stack, apply the...
User Guide
Page 17
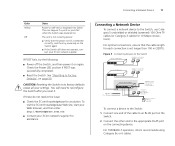
... connect a network device to the appropriate RJ-45 port on self-test or loopback test failed. Check the Power LED and see if POST was powered on again. You will need to Factory Defaults" on page 59. For 1000BASE-T operation, 3Com recommends using Category 5e or 6 cables. Figure 3 Connecting Devices to the Switch Baseline 10/100 switch Endstations on switched 100 Mbps connections Baseline 10/100 switch Endstations on switched 100 Mbps connections Baseline Switch 2250...
... connect a network device to the appropriate RJ-45 port on self-test or loopback test failed. Check the Power LED and see if POST was powered on again. You will need to Factory Defaults" on page 59. For 1000BASE-T operation, 3Com recommends using Category 5e or 6 cables. Figure 3 Connecting Devices to the Switch Baseline 10/100 switch Endstations on switched 100 Mbps connections Baseline 10/100 switch Endstations on switched 100 Mbps connections Baseline Switch 2250...
User Guide
Page 19
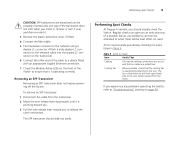
... one way. Attach a male duplex LC connector on the network cable into the duplex LC connector on the transceiver. 6 Connect the other end of the cable to a device fitted with an appropriate Gigabit Ethernet connection. 7 Check the Module Active LEDs on users. 3Com recommends periodically checking the items listed in Table 9. Removing an SFP Transceiver Removing an SFP transceiver does not require powering off the Switch. Performing Spot Checks At frequent intervals, you to...
... one way. Attach a male duplex LC connector on the network cable into the duplex LC connector on the transceiver. 6 Connect the other end of the cable to a device fitted with an appropriate Gigabit Ethernet connection. 7 Check the Module Active LEDs on users. 3Com recommends periodically checking the items listed in Table 9. Removing an SFP Transceiver Removing an SFP transceiver does not require powering off the Switch. Performing Spot Checks At frequent intervals, you to...
User Guide
Page 21
... access to the Web interface using the Discovery application. This chapter provides information on 3Com Baseline Switch 2250 Plus CD-ROM that is supplied with options to configure, modify, and upgrade the Switch. If it does not start automatically. The Discovery application can use Discovery to connect to the Web interface, do not need the following : 1 On a computer that has a Web browser Running the Discovery Application The 3Com Baseline Switch 2250...
... access to the Web interface using the Discovery application. This chapter provides information on 3Com Baseline Switch 2250 Plus CD-ROM that is supplied with options to configure, modify, and upgrade the Switch. If it does not start automatically. The Discovery application can use Discovery to connect to the Web interface, do not need the following : 1 On a computer that has a Web browser Running the Discovery Application The 3Com Baseline Switch 2250...
User Guide
Page 24
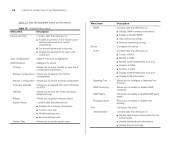
... factory default settings. IP Setup Allows you to setup, modify, or view the IP configuration parameters. Allows you to enable or disable IGMP snooping. Configures the device. Contains tabs that allow you to : ■ Display user summary information. ■ Create a new user. ■ Modify existing users. ■ Remove existing users. Allows you to : ■ Display selected port information for each color coded port. Allows you to backup the Switch's configuration. 24 CHAPTER 3: CONNECTING TO THE WEB INTERFACE Table...
... factory default settings. IP Setup Allows you to setup, modify, or view the IP configuration parameters. Allows you to enable or disable IGMP snooping. Configures the device. Contains tabs that allow you to : ■ Display user summary information. ■ Create a new user. ■ Modify existing users. ■ Remove existing users. Allows you to : ■ Display selected port information for each color coded port. Allows you to backup the Switch's configuration. 24 CHAPTER 3: CONNECTING TO THE WEB INTERFACE Table...
User Guide
Page 26
... to access the Web interface. Manually Assigned (Static) IP Address If you assigned a static IP address to the Switch, you need to use that IP address to access the Web interface the next time you set the IP address mode to DHCP, check the DHCP server for the IP address that is assigned to the Switch, and then using that the Switch will perform auto IP configuration to assign an IP address to the Switch, start your Web browser, and then type...
... to access the Web interface. Manually Assigned (Static) IP Address If you assigned a static IP address to the Switch, you need to use that IP address to access the Web interface the next time you set the IP address mode to DHCP, check the DHCP server for the IP address that is assigned to the Switch, and then using that the Switch will perform auto IP configuration to assign an IP address to the Switch, start your Web browser, and then type...
User Guide
Page 27
... loads after you log on to configure the Switch's advanced features. You only need to identify the Switch. The fields include Product Description, System Location, System Contact, Serial Number, Product 3C Number, MAC Address, Software Version, Unit Uptime, Bootroom Version, and Hardware Version. Topics include: ■ Device Summary Information ■ Administration Settings ■ Configuring VLANs ■ Configuring Port Settings ■ QoS VoIP Traffic Settings ■ Security ■ Monitoring Configuration Overview The Switch is shipped ready for use.
... loads after you log on to configure the Switch's advanced features. You only need to identify the Switch. The fields include Product Description, System Location, System Contact, Serial Number, Product 3C Number, MAC Address, Software Version, Unit Uptime, Bootroom Version, and Hardware Version. Topics include: ■ Device Summary Information ■ Administration Settings ■ Configuring VLANs ■ Configuring Port Settings ■ QoS VoIP Traffic Settings ■ Security ■ Monitoring Configuration Overview The Switch is shipped ready for use.

User Guide
Page 29
... access to the Web interface, you need to assign an IP address to it automatically uses the default IP address 169.254.x.y, where x and y are converted from the last two bytes of its MAC address. Administration Settings The Administration menu includes eight administration items: ■ IP Setup ■ Backup Configuration ■ Restore Configuration ■ Firmware Upgrade ■ Initialize ■ Reboot ■ System Access ■ System Time ■ SNMP Modifying the IP Address Settings...
... access to the Web interface, you need to assign an IP address to it automatically uses the default IP address 169.254.x.y, where x and y are converted from the last two bytes of its MAC address. Administration Settings The Administration menu includes eight administration items: ■ IP Setup ■ Backup Configuration ■ Restore Configuration ■ Firmware Upgrade ■ Initialize ■ Reboot ■ System Access ■ System Time ■ SNMP Modifying the IP Address Settings...

User Guide
Page 32
... be lost. Any network users that are currently accessing the Internet will be up to 8 characters long and is case-sensitive. The default admin account settings are experiencing problems and you set an admin password when you change the password to prevent unauthorized access to your computer to re-establish your Internet connection. Even if you do not access the Web interface, 3Com recommends that you first configure the Switch. No configuration...
... be lost. Any network users that are currently accessing the Internet will be up to 8 characters long and is case-sensitive. The default admin account settings are experiencing problems and you set an admin password when you change the password to prevent unauthorized access to your computer to re-establish your Internet connection. Even if you do not access the Web interface, 3Com recommends that you first configure the Switch. No configuration...
User Guide
Page 36
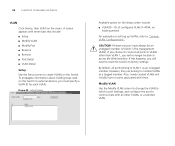
...; Setup ■ Modify VLAN ■ Modify Port ■ Rename ■ Remove ■ Port Detail ■ VLAN Detail Setup Use the Setup screen to create VLANs on setting up VLANs, refer to multiple VLANs as an untagged member. Also, newly created VLANs will need to reset the Switch to VLANs other VLANs, or a selected VLAN. Modify VLAN Use the Modify VLAN screen to change the VLAN to which a port belongs, and configure the port to communicate with all ports to factory settings. ID of VLAN 1 (the management VLAN...
...; Setup ■ Modify VLAN ■ Modify Port ■ Rename ■ Remove ■ Port Detail ■ VLAN Detail Setup Use the Setup screen to create VLANs on setting up VLANs, refer to multiple VLANs as an untagged member. Also, newly created VLANs will need to reset the Switch to VLANs other VLANs, or a selected VLAN. Modify VLAN Use the Modify VLAN screen to change the VLAN to which a port belongs, and configure the port to communicate with all ports to factory settings. ID of VLAN 1 (the management VLAN...
User Guide
Page 40
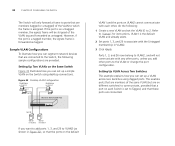
... 2250 Plus Port 26 Server Server in VLAN 2 in Figure 32), so that are members (tagged or untagged) of the VLAN tag and forwarded as tagged. 40 CHAPTER 4: CONFIGURING THE SWITCH The Switch will only forward a frame to ports that the ports on the default VLAN1 and the ports on VLAN2 cannot communicate with each Switch is set to Tagged, and that are connected to the Switch, the following : 1 Create a new VLAN...
... 2250 Plus Port 26 Server Server in VLAN 2 in Figure 32), so that are members (tagged or untagged) of the VLAN tag and forwarded as tagged. 40 CHAPTER 4: CONFIGURING THE SWITCH The Switch will only forward a frame to ports that the ports on the default VLAN1 and the ports on VLAN2 cannot communicate with each Switch is set to Tagged, and that are connected to the Switch, the following : 1 Create a new VLAN...

User Guide
Page 59
... the Recovery button on page 59 for instructions. After resetting the Switch, log on to Appendix A. admin ■ Password - blank (no password) 5 TROUBLESHOOTING This chapter lists some issues that is not listed here and you cannot solve it, check the 3Com Knowledgebase at http://knowledgebase.3com.com before contacting your local technical support representative. CAUTION: Resetting the Switch to factory defaults erases all your Switch, refer to the Web interface using Discovery, and then pressing the RESET button...
... the Recovery button on page 59 for instructions. After resetting the Switch, log on to Appendix A. admin ■ Password - blank (no password) 5 TROUBLESHOOTING This chapter lists some issues that is not listed here and you cannot solve it, check the 3Com Knowledgebase at http://knowledgebase.3com.com before contacting your local technical support representative. CAUTION: Resetting the Switch to factory defaults erases all your Switch, refer to the Web interface using Discovery, and then pressing the RESET button...

User Guide
Page 60
... Switch and you need to access the Web interface, use the Discovery application to automatically detect the IP address and connect to the interface. There is off . 60 CHAPTER 5: TROUBLESHOOTING Forgotten Static IP Address If you forget the static IP address that will configure the link as full-duplex, the Switch will reduce network performance when data is being used for 1000BASE-T operation. A fiber cable is connected, but the Module Active LED is a problem with this connection...
... Switch and you need to access the Web interface, use the Discovery application to automatically detect the IP address and connect to the interface. There is off . 60 CHAPTER 5: TROUBLESHOOTING Forgotten Static IP Address If you forget the static IP address that will configure the link as full-duplex, the Switch will reduce network performance when data is being used for 1000BASE-T operation. A fiber cable is connected, but the Module Active LED is a problem with this connection...
User Guide
Page 64
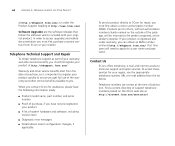
... for repair, you must first obtain a return authorization number (RMA). Telephone numbers are correct at http://www.3com.com/ Software Upgrades are the software releases that follow the software version included with your reseller. First time users will be returned to access upgrades and related documentation you must first purchase a service contract from the list below. Products sent to 3Com for a user name and password. Find a current directory of support telephone numbers...
... for repair, you must first obtain a return authorization number (RMA). Telephone numbers are correct at http://www.3com.com/ Software Upgrades are the software releases that follow the software version included with your reseller. First time users will be returned to access upgrades and related documentation you must first purchase a service contract from the list below. Products sent to 3Com for a user name and password. Find a current directory of support telephone numbers...
User Guide
Page 78
... SFP ports 8, 10 SFP transceivers 18 approved (supported) 18 inserting 18 removing 19 spot checks 19 subnet mask 74 switch defined 74 T TCP/IP 73 defined 74 traffic 75 monitoring 49 troubleshooting 59 forgotten IP address 59 forgotten password 59 LED-related issues 60 POST failed 17 trunking See link aggregation U user name default 32 V viewing status information 27 VLANs 35 creating 41 maximum supported 35 sample configurations 40 W Web interface accessing directly 26 accessing using Discovery 21 buttons 25 connecting 21 logging...
... SFP ports 8, 10 SFP transceivers 18 approved (supported) 18 inserting 18 removing 19 spot checks 19 subnet mask 74 switch defined 74 T TCP/IP 73 defined 74 traffic 75 monitoring 49 troubleshooting 59 forgotten IP address 59 forgotten password 59 LED-related issues 60 POST failed 17 trunking See link aggregation U user name default 32 V viewing status information 27 VLANs 35 creating 41 maximum supported 35 sample configurations 40 W Web interface accessing directly 26 accessing using Discovery 21 buttons 25 connecting 21 logging...

