Owner Guide 1st Printing
Page 4
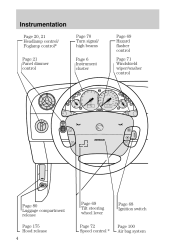
Instrumentation Page 20, 21 Headlamp control/ Foglamp control* Page 21 Panel dimmer control Page 70 Turn signal/ high beams Page 6 Instrument cluster Page 69 Hazard flasher control Page 71 Windshield wiper/washer control Page 80 Luggage compartment release Page 175 Hood release 4 Page 69 Tilt steering wheel lever Page 72 Speed control * Page 68 Ignition switch Page 100 Air bag system
Instrumentation Page 20, 21 Headlamp control/ Foglamp control* Page 21 Panel dimmer control Page 70 Turn signal/ high beams Page 6 Instrument cluster Page 69 Hazard flasher control Page 71 Windshield wiper/washer control Page 80 Luggage compartment release Page 175 Hood release 4 Page 69 Tilt steering wheel lever Page 72 Speed control * Page 68 Ignition switch Page 100 Air bag system
Owner Guide 1st Printing
Page 20
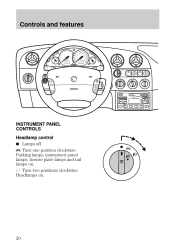
Controls and features INSTRUMENT PANEL CONTROLS Headlamp control Lamps off. Turn one position clockwise: Parking lamps, instrument panel lamps, license plate lamps and tail lamps on . 20 Turn two positions clockwise: Headlamps on .
Controls and features INSTRUMENT PANEL CONTROLS Headlamp control Lamps off. Turn one position clockwise: Parking lamps, instrument panel lamps, license plate lamps and tail lamps on . 20 Turn two positions clockwise: Headlamps on .
Owner Guide 1st Printing
Page 27
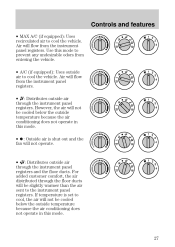
...): Uses recirculated air to prevent any undesirable odors from entering the vehicle. • A/C (if equipped): Uses outside air through the instrument panel registers and the floor ducts. For added customer comfort, the air distributed through the floor ducts will be cooled below the outside temperature because... shut out and the fan will not be slightly warmer than the air sent to the instrument panel registers. If temperature is set to cool the vehicle. Air will flow from the instrument panel registers. • : Distributes outside air to cool, the air will not operate. &#...
...): Uses recirculated air to prevent any undesirable odors from entering the vehicle. • A/C (if equipped): Uses outside air through the instrument panel registers and the floor ducts. For added customer comfort, the air distributed through the floor ducts will be cooled below the outside temperature because... shut out and the fan will not be slightly warmer than the air sent to the instrument panel registers. If temperature is set to cool the vehicle. Air will flow from the instrument panel registers. • : Distributes outside air to cool, the air will not operate. &#...
Owner Guide 1st Printing
Page 29
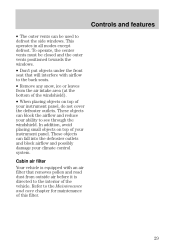
To operate, the center vents must be used to see through the windshield. In addition, avoid placing small objects on top of your instrument panel. These objects can fall into the defroster outlets and block airflow and possibly damage your ability to defrost the side windows. Cabin air ... removes pollen and road dust from the air intake area (at the bottom of the windshield). • When placing objects on top of your instrument panel, do not cover the defroster outlets. Refer to the interior of the vehicle. This operates in all modes except defrost. These objects can block ...
To operate, the center vents must be used to see through the windshield. In addition, avoid placing small objects on top of your instrument panel. These objects can fall into the defroster outlets and block airflow and possibly damage your ability to defrost the side windows. Cabin air ... removes pollen and road dust from the air intake area (at the bottom of the windshield). • When placing objects on top of your instrument panel, do not cover the defroster outlets. Refer to the interior of the vehicle. This operates in all modes except defrost. These objects can block ...
Owner Guide 1st Printing
Page 70
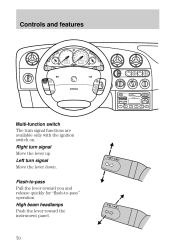
Flash-to Ćpass" operation. Controls and features Multi-function switch The turn signal Move the lever down. Left turn signal functions are available only with the ignition switch on. High beam headlamps Push the lever toward you and release quickly for flashĆto -pass Pull the lever toward the instrument panel. 70 Right turn signal Move the lever up.
Flash-to Ćpass" operation. Controls and features Multi-function switch The turn signal Move the lever down. Left turn signal functions are available only with the ignition switch on. High beam headlamps Push the lever toward you and release quickly for flashĆto -pass Pull the lever toward the instrument panel. 70 Right turn signal Move the lever up.
Owner Guide 1st Printing
Page 80
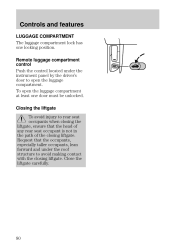
... head of any rear seat occupant is not in the path of the closing liftgate. Remote luggage compartment control Push the control located under the instrument panel by the driver's door to avoid making contact with the closing the liftgate, ensure that the occupants, especially taller occupants, lean forward and under the...
... head of any rear seat occupant is not in the path of the closing liftgate. Remote luggage compartment control Push the control located under the instrument panel by the driver's door to avoid making contact with the closing the liftgate, ensure that the occupants, especially taller occupants, lean forward and under the...
Owner Guide 1st Printing
Page 114
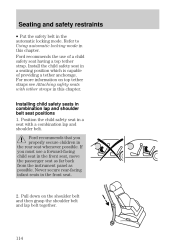
... in combination lap and shoulder belt seat positions 1. Installing child safety seats in the front seat, move the passenger seat as far back from the instrument panel as possible.
... in combination lap and shoulder belt seat positions 1. Installing child safety seats in the front seat, move the passenger seat as far back from the instrument panel as possible.
Owner Guide 1st Printing
Page 152
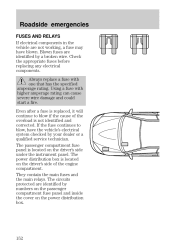
The power distribution box is located on the driver's side under the instrument panel. The passenger compartment fuse panel is located on the power distribution box. 152 They contain the main fuses and the main relays. Always replace a fuse with higher amperage rating can ... not working, a fuse may have the vehicle's electrical system checked by a broken wire. The circuits protected are identified by numbers on the passenger compartment fuse panel and inside the cover on the driver's side of the overload is not identified and corrected.
The power distribution box is located on the driver's side under the instrument panel. The passenger compartment fuse panel is located on the power distribution box. 152 They contain the main fuses and the main relays. Always replace a fuse with higher amperage rating can ... not working, a fuse may have the vehicle's electrical system checked by a broken wire. The circuits protected are identified by numbers on the passenger compartment fuse panel and inside the cover on the driver's side of the overload is not identified and corrected.
Owner Guide 1st Printing
Page 156
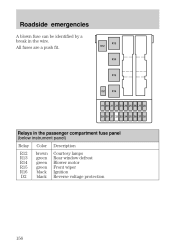
All fuses are a push fit. Relays in the wire. Roadside emergencies A blown fuse can be identified by a break in the passenger compartment fuse panel (below instrument panel) Relay R12 R13 R14 R15 R16 D2 Color brown green green green black black Description Courtesy lamps Rear window defrost Blower motor Front wiper Ignition Reverse voltage protection 156
All fuses are a push fit. Relays in the wire. Roadside emergencies A blown fuse can be identified by a break in the passenger compartment fuse panel (below instrument panel) Relay R12 R13 R14 R15 R16 D2 Color brown green green green black black Description Courtesy lamps Rear window defrost Blower motor Front wiper Ignition Reverse voltage protection 156
Owner Guide 1st Printing
Page 157
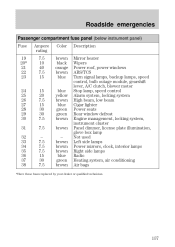
Roadside emergencies Passenger compartment fuse panel (below instrument panel) Fuse 19 20* 21 22 23 24 25 26 27 28 29 30 31 32 33 34 35 36 37 38 Ampere rating 7.5 10 40 7.5 ... motor Stop lamp, speed control Alarm system, locking system High beam, low beam Cigar lighter Power seats Rear window defrost Engine management, locking system, instrument cluster Panel dimmer, license plate illumination, glove box lamp Not used Left side lamps Power mirrors, clock, interior lamps Right side lamps Radio Heating system, air conditioning...
Roadside emergencies Passenger compartment fuse panel (below instrument panel) Fuse 19 20* 21 22 23 24 25 26 27 28 29 30 31 32 33 34 35 36 37 38 Ampere rating 7.5 10 40 7.5 ... motor Stop lamp, speed control Alarm system, locking system High beam, low beam Cigar lighter Power seats Rear window defrost Engine management, locking system, instrument cluster Panel dimmer, license plate illumination, glove box lamp Not used Left side lamps Power mirrors, clock, interior lamps Right side lamps Radio Heating system, air conditioning...
Owner Guide 1st Printing
Page 175
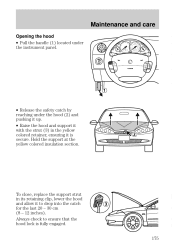
Always check to drop into the catch for the last 20 - 30 cm (8 - 12 inches). Hold the support at the yellow colored insulation section. Maintenance and care Opening the hood • Pull the handle (1) located under the instrument panel. • Release the safety catch by reaching under the hood (2) and pushing it up. • Raise the hood and support it with the strut (3) in its retaining clip, lower the hood and allow it is fully engaged. 175 To close, replace the support strut in the yellow colored retainer, ensuring it to ensure that the hood lock is secure.
Always check to drop into the catch for the last 20 - 30 cm (8 - 12 inches). Hold the support at the yellow colored insulation section. Maintenance and care Opening the hood • Pull the handle (1) located under the instrument panel. • Release the safety catch by reaching under the hood (2) and pushing it up. • Raise the hood and support it with the strut (3) in its retaining clip, lower the hood and allow it is fully engaged. 175 To close, replace the support strut in the yellow colored retainer, ensuring it to ensure that the hood lock is secure.
Owner Guide 1st Printing
Page 181
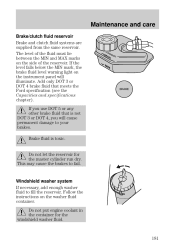
... clutch fluid systems are supplied from the same reservoir. If the level falls below the MIN mark, the brake fluid level warning light on the instrument panel will cause permanent damage to your brakes. Brake fluid is not DOT 3 or DOT 4, you use DOT 5 or any other brake fluid that meets the...
... clutch fluid systems are supplied from the same reservoir. If the level falls below the MIN mark, the brake fluid level warning light on the instrument panel will cause permanent damage to your brakes. Brake fluid is not DOT 3 or DOT 4, you use DOT 5 or any other brake fluid that meets the...
Owner Guide 1st Printing
Page 228
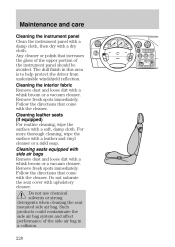
... be avoided. Follow the directions that come with a leather and vinyl cleaner or a mild soap. Maintenance and care Cleaning the instrument panel Clean the instrument panel with a damp cloth, then dry with the cleaner. Cleaning the interior fabric Remove dust and loose dirt with a whisk broom or a vacuum cleaner. Cleaning seats ...
... be avoided. Follow the directions that come with a leather and vinyl cleaner or a mild soap. Maintenance and care Cleaning the instrument panel Clean the instrument panel with a damp cloth, then dry with the cleaner. Cleaning the interior fabric Remove dust and loose dirt with a whisk broom or a vacuum cleaner. Cleaning seats ...

Owner Guide 1st Printing
Page 235
The VIN tag may be seen by looking through the windshield from the outside of the instrument panel. Capacities and specifications VEHICLE IDENTIFICATION NUMBER The vehicle identification number (VIN) is attached to a metal tag and is located on the front driver's side of the vehicle. 235
The VIN tag may be seen by looking through the windshield from the outside of the instrument panel. Capacities and specifications VEHICLE IDENTIFICATION NUMBER The vehicle identification number (VIN) is attached to a metal tag and is located on the front driver's side of the vehicle. 235
Owner Guide 1st Printing
Page 250
... tank ...231 Fuel, calculating fuel economy . 208 Fuel, choosing ...204 Fuel, octane recommendations 205 Fuel, safety information ...202 Fuse panels ...153, 155, 157 250 E Page Fuses and relays ...152 G Gross axle weight rating (GAWR) ...Gross combined weight (GCW... ...175 Horn ...69 I Icons ...2 Idle speed ...233 Idle, relearning ...192 Ignition positions ...68 Instrument cluster ...6 Instrument cluster gauges ...16 Instrument panel controls ...20 Instrumentation ...4 Interior lamps ...76 Interior lamps, replacing bulbs . 219 Introduction ...2 J Jack ...160 Jack positioning ...161 Jump...
... tank ...231 Fuel, calculating fuel economy . 208 Fuel, choosing ...204 Fuel, octane recommendations 205 Fuel, safety information ...202 Fuse panels ...153, 155, 157 250 E Page Fuses and relays ...152 G Gross axle weight rating (GAWR) ...Gross combined weight (GCW... ...175 Horn ...69 I Icons ...2 Idle speed ...233 Idle, relearning ...192 Ignition positions ...68 Instrument cluster ...6 Instrument cluster gauges ...16 Instrument panel controls ...20 Instrumentation ...4 Interior lamps ...76 Interior lamps, replacing bulbs . 219 Introduction ...2 J Jack ...160 Jack positioning ...161 Jump...
Owner Guide 1st Printing
Page 256
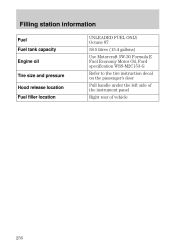
Filling station information Fuel Fuel tank capacity Engine oil Tire size and pressure Hood release location Fuel filler location UNLEADED FUEL ONLY Octane 87 58.5 litres (15.4 gallons) Use Motorcraft 5WĆ30 Formula E Fuel Economy Motor Oil, Ford specification WSSĆM2C153ĆG Refer to the tire instruction decal on the passenger's door Pull handle under the left side of the instrument panel Right rear of vehicle 256
Filling station information Fuel Fuel tank capacity Engine oil Tire size and pressure Hood release location Fuel filler location UNLEADED FUEL ONLY Octane 87 58.5 litres (15.4 gallons) Use Motorcraft 5WĆ30 Formula E Fuel Economy Motor Oil, Ford specification WSSĆM2C153ĆG Refer to the tire instruction decal on the passenger's door Pull handle under the left side of the instrument panel Right rear of vehicle 256


