Owner Guide 1st Printing
Page 16
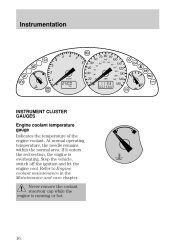
Refer to Engine coolant maintenance in the Maintenance and care chapter. Never remove the coolant reservoir cap while the engine is overheating. At normal operating temperature, the needle remains within the normal area. Stop the vehicle, switch off the ignition and let the engine cool. If it enters the red section, the engine is running or hot. 16 Instrumentation INSTRUMENT CLUSTER GAUGES Engine coolant temperature gauge Indicates the temperature of the engine coolant.
Refer to Engine coolant maintenance in the Maintenance and care chapter. Never remove the coolant reservoir cap while the engine is overheating. At normal operating temperature, the needle remains within the normal area. Stop the vehicle, switch off the ignition and let the engine cool. If it enters the red section, the engine is running or hot. 16 Instrumentation INSTRUMENT CLUSTER GAUGES Engine coolant temperature gauge Indicates the temperature of the engine coolant.
Owner Guide 1st Printing
Page 87
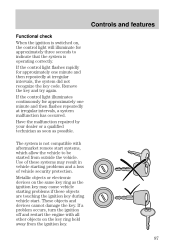
Remove the key and try again. Use of vehicle security protection. Have the malfunction repaired by your dealer or a qualified technician as soon as the ignition .... Metallic objects or electronic devices on the key ring held away from outside the vehicle. If a problem occurs, turn the ignition off and restart the engine with aftermarket remote start . If the control light flashes rapidly for approximately one minute and then flashes repeatedly at irregular intervals, the system did not...
Remove the key and try again. Use of vehicle security protection. Have the malfunction repaired by your dealer or a qualified technician as soon as the ignition .... Metallic objects or electronic devices on the key ring held away from outside the vehicle. If a problem occurs, turn the ignition off and restart the engine with aftermarket remote start . If the control light flashes rapidly for approximately one minute and then flashes repeatedly at irregular intervals, the system did not...
Owner Guide 1st Printing
Page 153
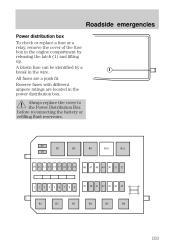
... 153 A blown fuse can be identified by releasing the latch (1) and lifting up. Roadside emergencies Power distribution box To check or replace a fuse or a relay, remove the cover of the fuse box in the engine compartment by a break in the power distribution box.
... 153 A blown fuse can be identified by releasing the latch (1) and lifting up. Roadside emergencies Power distribution box To check or replace a fuse or a relay, remove the cover of the fuse box in the engine compartment by a break in the power distribution box.

Owner Guide 1st Printing
Page 164
... vehicle, making sure the two vehicles do not touch. Ensure that vent caps are used to the hood of the engine cooling fan and other accessories off. Turn all battery terminals and remove any electrical surges. Turn the heater fan on both vehicles to the positive (+) terminal of the discharge battery. Connect...
... vehicle, making sure the two vehicles do not touch. Ensure that vent caps are used to the hood of the engine cooling fan and other accessories off. Turn all battery terminals and remove any electrical surges. Turn the heater fan on both vehicles to the positive (+) terminal of the discharge battery. Connect...

Owner Guide 1st Printing
Page 167
Be sure that they were connected. 1. Removing the jumper cables Remove the jumper cables in the reverse order that the cables are clear of fan blades, belts and other moving parts of both engines for a further three minutes before disconnecting the jumper cables. Start the engine of the disabled vehicle. 3. Remove the jumper cable from the ground" metal surface. 167 Start the engine of the booster vehicle and run both engines. Roadside emergencies 5. Jump starting 1. Once the disabled vehicle has been started, run the engine at a moderately increased speed. 2.
Be sure that they were connected. 1. Removing the jumper cables Remove the jumper cables in the reverse order that the cables are clear of fan blades, belts and other moving parts of both engines for a further three minutes before disconnecting the jumper cables. Start the engine of the disabled vehicle. 3. Remove the jumper cable from the ground" metal surface. 167 Start the engine of the booster vehicle and run both engines. Roadside emergencies 5. Jump starting 1. Once the disabled vehicle has been started, run the engine at a moderately increased speed. 2.
Owner Guide 1st Printing
Page 168
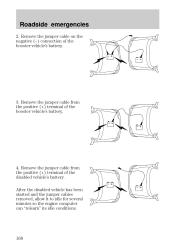
Remove the jumper cable on the negative (-) connection of the booster vehicle's battery. 4. Remove the jumper cable from the positive (+) terminal of the disabled vehicle's battery. Roadside emergencies 2. After the disabled vehicle has been started and the jumper cables removed, allow it to idle for several minutes so the engine computer can relearn" its idle conditions. 168 Remove the jumper cable from the positive (+) terminal of the booster vehicle's battery. 3.
Remove the jumper cable on the negative (-) connection of the booster vehicle's battery. 4. Remove the jumper cable from the positive (+) terminal of the disabled vehicle's battery. Roadside emergencies 2. After the disabled vehicle has been started and the jumper cables removed, allow it to idle for several minutes so the engine computer can relearn" its idle conditions. 168 Remove the jumper cable from the positive (+) terminal of the booster vehicle's battery. 3.
Owner Guide 1st Printing
Page 173
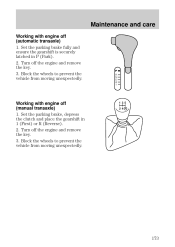
Turn off the engine and remove the key. 3. Turn off the engine and remove the key. 3. Block the wheels to prevent the vehicle from moving unexpectedly. Block the wheels to prevent the vehicle from moving unexpectedly. 173 Working with engine off (manual transaxle) 1. Set the parking brake fully and ensure the gearshift is securely latched in 1 (First) or R (Reverse). 2. Maintenance and care Working with engine off (automatic transaxle) 1. Set the parking brake, depress the clutch and place the gearshift in P (Park). 2.
Turn off the engine and remove the key. 3. Turn off the engine and remove the key. 3. Block the wheels to prevent the vehicle from moving unexpectedly. Block the wheels to prevent the vehicle from moving unexpectedly. 173 Working with engine off (manual transaxle) 1. Set the parking brake fully and ensure the gearshift is securely latched in 1 (First) or R (Reverse). 2. Maintenance and care Working with engine off (automatic transaxle) 1. Set the parking brake, depress the clutch and place the gearshift in P (Park). 2.
Owner Guide 1st Printing
Page 174
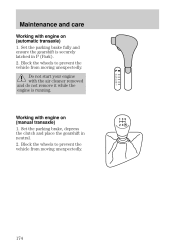
Do not start your engine with the air cleaner removed and do not remove it while the engine is securely latched in neutral. 2. Block the wheels to prevent the vehicle from moving unexpectedly. Working with engine on (automatic transaxle) 1. Maintenance and care Working with engine on (manual transaxle) 1. Set the parking brake fully and ensure the gearshift is running. Set the parking brake, depress the clutch and place the gearshift in P (Park). 2. Block the wheels to prevent the vehicle from moving unexpectedly. 174
Do not start your engine with the air cleaner removed and do not remove it while the engine is securely latched in neutral. 2. Block the wheels to prevent the vehicle from moving unexpectedly. Working with engine on (automatic transaxle) 1. Maintenance and care Working with engine on (manual transaxle) 1. Set the parking brake fully and ensure the gearshift is running. Set the parking brake, depress the clutch and place the gearshift in P (Park). 2. Block the wheels to prevent the vehicle from moving unexpectedly. 174
Owner Guide 1st Printing
Page 178
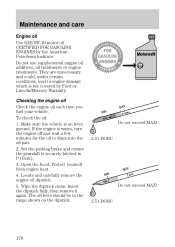
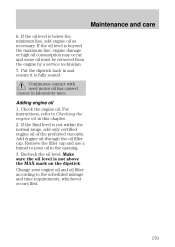
...Petroleum Institute. Checking the engine oil Check the engine oil each time you fuel your vehicle. Insert the dipstick fully, then remove it again. Make sure the vehicle is warm, turn the engine off and wait a few minutes for the oil to engine damage which is securely ...If the engine is on the dipstick. The oil level should be in P (Park). 3. Locate and carefully remove the engine oil dipstick. 5. Maintenance and care Engine oil Use SAE 5WĆ30 motor oil CERTIFIED FOR GASOLINE ENGINES by Ford or Lincoln/Mercury Warranty. Do not use supplemental engine oil additives...
...Petroleum Institute. Checking the engine oil Check the engine oil each time you fuel your vehicle. Insert the dipstick fully, then remove it again. Make sure the vehicle is warm, turn the engine off and wait a few minutes for the oil to engine damage which is securely ...If the engine is on the dipstick. The oil level should be in P (Park). 3. Locate and carefully remove the engine oil dipstick. 5. Maintenance and care Engine oil Use SAE 5WĆ30 motor oil CERTIFIED FOR GASOLINE ENGINES by Ford or Lincoln/Mercury Warranty. Do not use supplemental engine oil additives...
Owner Guide 1st Printing
Page 179
...not within the normal range, add only certified engine oil of the preferred viscosity. Adding engine oil 1. For instructions, refer to Checking the engine oil in the opening. 3. Change your engine oil and oil filter according to pour oil in this chapter. 2. Remove the filler cap and use a funnel to ...above the MAX mark on the dipstick. Make sure the oil level is beyond the maximum line, engine damage or high oil consumption may occur and some oil must be removed from the engine by a service technician. 7. Continuous contact with used motor oil has caused cancer in and ensure...
...not within the normal range, add only certified engine oil of the preferred viscosity. Adding engine oil 1. For instructions, refer to Checking the engine oil in the opening. 3. Change your engine oil and oil filter according to pour oil in this chapter. 2. Remove the filler cap and use a funnel to ...above the MAX mark on the dipstick. Make sure the oil level is beyond the maximum line, engine damage or high oil consumption may occur and some oil must be removed from the engine by a service technician. 7. Continuous contact with used motor oil has caused cancer in and ensure...
Owner Guide 1st Printing
Page 183
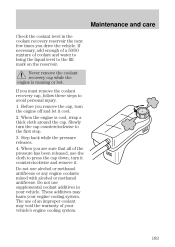
...warranty of coolant and water to bring the liquid level to the first stop. 3. When you remove the cap, turn the engine off and let it . Do not use alcohol or methanol antifreeze or any engine coolants mixed with alcohol or methanol antifreeze. Step back while the pressure releases. 4. If you...the pressure has been released, use of an improper coolant may harm your vehicle. Never remove the coolant recovery cap while the engine is cool, wrap a thick cloth around the cap. Slowly turn it counterclockwise and remove it cool. 2. The use the cloth to press the cap down, turn the ...
...warranty of coolant and water to bring the liquid level to the first stop. 3. When you remove the cap, turn the engine off and let it . Do not use alcohol or methanol antifreeze or any engine coolants mixed with alcohol or methanol antifreeze. Step back while the pressure releases. 4. If you...the pressure has been released, use of an improper coolant may harm your vehicle. Never remove the coolant recovery cap while the engine is cool, wrap a thick cloth around the cap. Slowly turn it counterclockwise and remove it cool. 2. The use the cloth to press the cap down, turn the ...

Owner Guide 1st Printing
Page 185
... concentration above 50%. Switch off the engine. Refer to the MAX mark. Maintenance and care Severe winter climate If you drive during the winter months. If the fluid level drops below the ... is such that the coolant will not freeze at normal operating temperature, the fluid level should come up to the Capacities and specifications chapter. 185 Remove the cap and fill to increase the coolant concentration above 60%. Leave a 50/50 mixture of...
... concentration above 50%. Switch off the engine. Refer to the MAX mark. Maintenance and care Severe winter climate If you drive during the winter months. If the fluid level drops below the ... is such that the coolant will not freeze at normal operating temperature, the fluid level should come up to the Capacities and specifications chapter. 185 Remove the cap and fill to increase the coolant concentration above 60%. Leave a 50/50 mixture of...
Owner Guide 1st Printing
Page 194
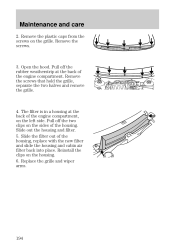
... that hold the grille, separate the two halves and remove the grille. 4. Remove the screws. 3. The filter is in a housing at the back of the engine compartment, on the housing. 6. Reinstall the clips on the left side. Open the hood. Slide the filter out of the housing. Slide out the...and filter. 5. Pull off the two clips on the grille. Pull off the rubber weatherstrip at the back of the engine compartment. Replace the grille and wiper arms. 194 Remove the plastic caps from the screws on the sides of the housing, replace with the new filter and slide the housing...
... that hold the grille, separate the two halves and remove the grille. 4. Remove the screws. 3. The filter is in a housing at the back of the engine compartment, on the housing. 6. Reinstall the clips on the left side. Open the hood. Slide the filter out of the housing. Slide out the...and filter. 5. Pull off the two clips on the grille. Pull off the rubber weatherstrip at the back of the engine compartment. Replace the grille and wiper arms. 194 Remove the plastic caps from the screws on the sides of the housing, replace with the new filter and slide the housing...

Owner Guide 1st Printing
Page 207
... it with the notches on when you must replace the fuel filler cap, replace it stops before completely removing the fuel filler cap. Turn off . 2. If you start the engine, the fuel filler cap may be properly installed. The fuel system may not be under pressure. Otherwise ...until it being careful to align the cap properly. Carefully turn the filler cap counterclockwise 1/8 of a turn until it stops. 3. Turn the engine off the engine, remove the fuel filler cap and reinstall it stops. To install the cap, align the tabs on the cap with an authorized Motorcraft part.
... it with the notches on when you must replace the fuel filler cap, replace it stops before completely removing the fuel filler cap. Turn off . 2. If you start the engine, the fuel filler cap may be properly installed. The fuel system may not be under pressure. Otherwise ...until it being careful to align the cap properly. Carefully turn the filler cap counterclockwise 1/8 of a turn until it stops. 3. Turn the engine off the engine, remove the fuel filler cap and reinstall it stops. To install the cap, align the tabs on the cap with an authorized Motorcraft part.
Owner Guide 1st Printing
Page 211
Maintenance and care Do not make any unauthorized changes to intentionally remove an emission control device or prevent it from working. Information about your Warranty Guide" for complete emission warranty information. 211 By law, vehicle owners and ...anyone who manufactures, repairs, services, sells, leases, trades vehicles, or supervises a fleet of vehicles are not permitted to your vehicle or engine. Please consult your vehicle's emission system is on the Vehicle Emission Control Information Decal located on or near the...
Maintenance and care Do not make any unauthorized changes to intentionally remove an emission control device or prevent it from working. Information about your Warranty Guide" for complete emission warranty information. 211 By law, vehicle owners and ...anyone who manufactures, repairs, services, sells, leases, trades vehicles, or supervises a fleet of vehicles are not permitted to your vehicle or engine. Please consult your vehicle's emission system is on the Vehicle Emission Control Information Decal located on or near the...
Owner Guide 1st Printing
Page 230
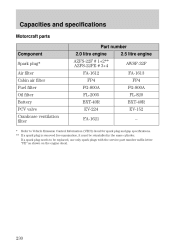
...) decal for spark plug and gap specifications. ** If a spark plug is removed for examination, it must be replaced, use only spark plugs with the service part number suffix letter FE" as shown on the engine decal. 230 Capacities and specifications Motorcraft parts Part number Component Spark plug* Air ...filter Cabin air filter Fuel filter Oil filter Battery PCV valve Crankcase ventilation filter 2.0 litre engine AZFSĆ22F # 1+2** AZFSĆ22FE # 3+4 FAĆ1612 FP4 FGĆ800A FLĆ2005 BXTĆ40R EVĆ224...
...) decal for spark plug and gap specifications. ** If a spark plug is removed for examination, it must be replaced, use only spark plugs with the service part number suffix letter FE" as shown on the engine decal. 230 Capacities and specifications Motorcraft parts Part number Component Spark plug* Air ...filter Cabin air filter Fuel filter Oil filter Battery PCV valve Crankcase ventilation filter 2.0 litre engine AZFSĆ22F # 1+2** AZFSĆ22FE # 3+4 FAĆ1612 FP4 FGĆ800A FLĆ2005 BXTĆ40R EVĆ224...
Owner Guide 1st Printing
Page 244
...name A wide selection of accessories is available through your local authorized Ford, LincolnĆMercury or Ford of Canada dealer. In addition, each accessory is greater. Ford accessories are...has many quality products available from high quality materials and meets or exceeds Ford's rigid engineering and safety specifications. For best results, use the following or products of equivalent quality... Protectant* Ford Deluxe Leather and Vinyl Cleaner Ford Extra Strength Tar and Road Oil Remover* Ford Extra Strength Upholstery Cleaner Ford Metal Surface Cleaner Ford MultiĆPurpose Cleaner*...
...name A wide selection of accessories is available through your local authorized Ford, LincolnĆMercury or Ford of Canada dealer. In addition, each accessory is greater. Ford accessories are...has many quality products available from high quality materials and meets or exceeds Ford's rigid engineering and safety specifications. For best results, use the following or products of equivalent quality... Protectant* Ford Deluxe Leather and Vinyl Cleaner Ford Extra Strength Tar and Road Oil Remover* Ford Extra Strength Upholstery Cleaner Ford Metal Surface Cleaner Ford MultiĆPurpose Cleaner*...
Owner Guide 1st Printing
Page 245
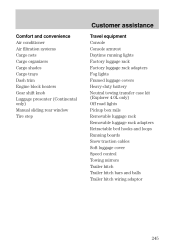
Customer assistance Comfort and convenience Air conditioner Air filtration systems Cargo nets Cargo organizers Cargo shades Cargo trays Dash trim Engine block heaters Gear shift knob Luggage presenter (Continental only) Manual sliding rear window Tire step Travel equipment Console Console... luggage covers HeavyĆduty battery Neutral towing transfer case kit (Explorer 4.0L only) Off road lights Pickup box rails Removable luggage rack Removable luggage rack adapters Retractable bed hooks and loops Running boards Snow traction cables Soft luggage cover Speed control Towing mirrors Trailer hitch...
Customer assistance Comfort and convenience Air conditioner Air filtration systems Cargo nets Cargo organizers Cargo shades Cargo trays Dash trim Engine block heaters Gear shift knob Luggage presenter (Continental only) Manual sliding rear window Tire step Travel equipment Console Console... luggage covers HeavyĆduty battery Neutral towing transfer case kit (Explorer 4.0L only) Off road lights Pickup box rails Removable luggage rack Removable luggage rack adapters Retractable bed hooks and loops Running boards Snow traction cables Soft luggage cover Speed control Towing mirrors Trailer hitch...


