Owner Guide 1st Printing
Page 4
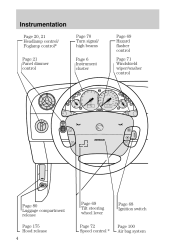
Instrumentation Page 20, 21 Headlamp control/ Foglamp control* Page 21 Panel dimmer control Page 70 Turn signal/ high beams Page 6 Instrument cluster Page 69 Hazard flasher control Page 71 Windshield wiper/washer control Page 80 Luggage compartment release Page 175 Hood release 4 Page 69 Tilt steering wheel lever Page 72 Speed control * Page 68 Ignition switch Page 100 Air bag system
Instrumentation Page 20, 21 Headlamp control/ Foglamp control* Page 21 Panel dimmer control Page 70 Turn signal/ high beams Page 6 Instrument cluster Page 69 Hazard flasher control Page 71 Windshield wiper/washer control Page 80 Luggage compartment release Page 175 Hood release 4 Page 69 Tilt steering wheel lever Page 72 Speed control * Page 68 Ignition switch Page 100 Air bag system
Owner Guide 1st Printing
Page 82
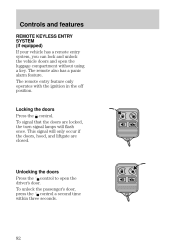
...'s door, press the control a second time within three seconds. 82 To signal that the doors are closed. This signal will only occur if the doors, hood, and liftgate are locked, the turn signal lamps will flash once. The remote entry feature only operates with the ignition in the off position. The...
...'s door, press the control a second time within three seconds. 82 To signal that the doors are closed. This signal will only occur if the doors, hood, and liftgate are locked, the turn signal lamps will flash once. The remote entry feature only operates with the ignition in the off position. The...
Owner Guide 1st Printing
Page 85
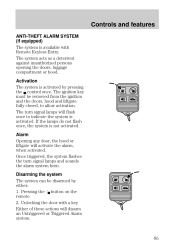
...key must be disarmed by pressing the control once. Disarming the system The system can be removed from the ignition and the doors, hood and liftgate fully closed, to indicate the system is activated. The turn signal lamps and sounds the alarm system horn. Once triggered...activate the alarm, when activated. The system acts as a deterrent against unauthorized persons opening the doors, luggage compartment or hood. Alarm Opening any door, the hood or liftgate will flash once to allow activation. Activation The system is not activated. Controls and features ANTI-THEFT ALARM ...
...key must be disarmed by pressing the control once. Disarming the system The system can be removed from the ignition and the doors, hood and liftgate fully closed, to indicate the system is activated. The turn signal lamps and sounds the alarm system horn. Once triggered...activate the alarm, when activated. The system acts as a deterrent against unauthorized persons opening the doors, luggage compartment or hood. Alarm Opening any door, the hood or liftgate will flash once to allow activation. Activation The system is not activated. Controls and features ANTI-THEFT ALARM ...

Owner Guide 1st Printing
Page 164
... brake on in both vehicles and stay clear of the engine cooling fan and other accessories off. Ensure that vent caps are used to the hood of the discharge battery. Connect the positive (+) booster cable to protect from any excessive corrosion before you attach the battery cables. Roadside emergencies 3. Turn all...
... brake on in both vehicles and stay clear of the engine cooling fan and other accessories off. Ensure that vent caps are used to the hood of the discharge battery. Connect the positive (+) booster cable to protect from any excessive corrosion before you attach the battery cables. Roadside emergencies 3. Turn all...
Owner Guide 1st Printing
Page 175
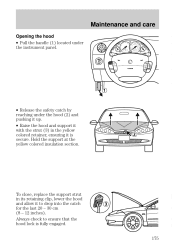
Maintenance and care Opening the hood • Pull the handle (1) located under the instrument panel. • Release the safety catch by reaching under the hood (2) and pushing it up. • Raise the hood and support it with the strut (3) in its retaining clip, lower the hood and allow it is fully engaged. 175 Hold the support at the yellow colored insulation section. Always check to drop into the catch for the last 20 - 30 cm (8 - 12 inches). To close, replace the support strut in the yellow colored retainer, ensuring it to ensure that the hood lock is secure.
Maintenance and care Opening the hood • Pull the handle (1) located under the instrument panel. • Release the safety catch by reaching under the hood (2) and pushing it up. • Raise the hood and support it with the strut (3) in its retaining clip, lower the hood and allow it is fully engaged. 175 Hold the support at the yellow colored insulation section. Always check to drop into the catch for the last 20 - 30 cm (8 - 12 inches). To close, replace the support strut in the yellow colored retainer, ensuring it to ensure that the hood lock is secure.
Owner Guide 1st Printing
Page 178
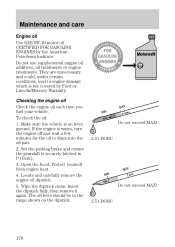
..., turn the engine off and wait a few minutes for the oil to engine damage which is not covered by the American Petroleum Institute. Open the hood. Wipe the dipstick clean. The oil level should be in P (Park). 3. Insert the dipstick fully, then remove it again. Make sure the vehicle is securely... time you fuel your vehicle. Maintenance and care Engine oil Use SAE 5WĆ30 motor oil CERTIFIED FOR GASOLINE ENGINES by Ford or Lincoln/Mercury Warranty. Do not use supplemental engine oil additives, oil treatments or engine treatments.
..., turn the engine off and wait a few minutes for the oil to engine damage which is not covered by the American Petroleum Institute. Open the hood. Wipe the dipstick clean. The oil level should be in P (Park). 3. Insert the dipstick fully, then remove it again. Make sure the vehicle is securely... time you fuel your vehicle. Maintenance and care Engine oil Use SAE 5WĆ30 motor oil CERTIFIED FOR GASOLINE ENGINES by Ford or Lincoln/Mercury Warranty. Do not use supplemental engine oil additives, oil treatments or engine treatments.
Owner Guide 1st Printing
Page 194
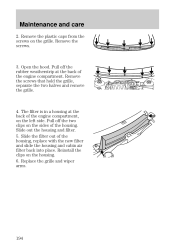
... the sides of the engine compartment. The filter is in a housing at the back of the housing. Maintenance and care 2. Remove the screws. 3. Open the hood. Pull off the rubber weatherstrip at the back of the housing, replace with the new filter and slide the housing and cabin air filter back...
... the sides of the engine compartment. The filter is in a housing at the back of the housing. Maintenance and care 2. Remove the screws. 3. Open the hood. Pull off the rubber weatherstrip at the back of the housing, replace with the new filter and slide the housing and cabin air filter back...
Owner Guide 1st Printing
Page 213
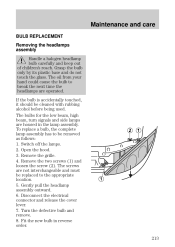
.... If the bulb is accidentally touched, it should be removed as follows: 1. Remove the grille. 4. Fit the new bulb in the lamp assembly. Open the hood. 3. Switch off the lamps. 2. Grasp the bulb only by its plastic base and do not touch the glass. The screws are operated.
.... If the bulb is accidentally touched, it should be removed as follows: 1. Remove the grille. 4. Fit the new bulb in the lamp assembly. Open the hood. 3. Switch off the lamps. 2. Grasp the bulb only by its plastic base and do not touch the glass. The screws are operated.
Owner Guide 1st Printing
Page 223
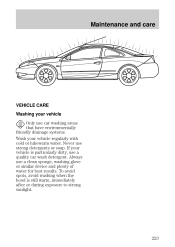
To avoid spots, avoid washing when the hood is particularly dirty, use a quality car wash detergent. Maintenance and care VEHICLE CARE Washing your vehicle Only use car washing areas that have environmentally friendly drainage systems. Wash your vehicle is still warm, immediately after or during exposure to strong sunlight. 223 If your vehicle regularly with cold or lukewarm water. Always use strong detergents or soap. Never use a clean sponge, washing glove or similar device and plenty of water for best results.
To avoid spots, avoid washing when the hood is particularly dirty, use a quality car wash detergent. Maintenance and care VEHICLE CARE Washing your vehicle Only use car washing areas that have environmentally friendly drainage systems. Wash your vehicle is still warm, immediately after or during exposure to strong sunlight. 223 If your vehicle regularly with cold or lukewarm water. Always use strong detergents or soap. Never use a clean sponge, washing glove or similar device and plenty of water for best results.
Owner Guide 1st Printing
Page 246
... Bed mats Bedliners Car/truck covers Cargo liners, interior Carpet floor mats Cleaners, waxes and polishes Flat splash guards Frond end covers (full and mini) Hood deflectors Locking gas cap Lubricants and oils Molded splash guards Molded vinyl floor mats Rallye bars Rear air deflectors Rear decklid spoilers Side window air...
... Bed mats Bedliners Car/truck covers Cargo liners, interior Carpet floor mats Cleaners, waxes and polishes Flat splash guards Frond end covers (full and mini) Hood deflectors Locking gas cap Lubricants and oils Molded splash guards Molded vinyl floor mats Rallye bars Rear air deflectors Rear decklid spoilers Side window air...
Owner Guide 1st Printing
Page 250
... Headlamp control ...20 Headlamps on warning chime ...15 Headlamps, aiming ...215, 220 Headlamps, replacing bulbs ...213 High beams ...10, 70 High mounted brake lamp ...218 Hood, opening ...175 Horn ...69 I Icons ...2 Idle speed ...233 Idle, relearning ...192 Ignition positions ...68 Instrument cluster ...6 Instrument cluster gauges ...16 Instrument panel controls ...20 Instrumentation...
... Headlamp control ...20 Headlamps on warning chime ...15 Headlamps, aiming ...215, 220 Headlamps, replacing bulbs ...213 High beams ...10, 70 High mounted brake lamp ...218 Hood, opening ...175 Horn ...69 I Icons ...2 Idle speed ...233 Idle, relearning ...192 Ignition positions ...68 Instrument cluster ...6 Instrument cluster gauges ...16 Instrument panel controls ...20 Instrumentation...
Owner Guide 1st Printing
Page 256
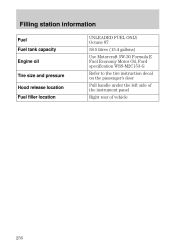
Filling station information Fuel Fuel tank capacity Engine oil Tire size and pressure Hood release location Fuel filler location UNLEADED FUEL ONLY Octane 87 58.5 litres (15.4 gallons) Use Motorcraft 5WĆ30 Formula E Fuel Economy Motor Oil, Ford specification WSSĆM2C153ĆG Refer to the tire instruction decal on the passenger's door Pull handle under the left side of the instrument panel Right rear of vehicle 256
Filling station information Fuel Fuel tank capacity Engine oil Tire size and pressure Hood release location Fuel filler location UNLEADED FUEL ONLY Octane 87 58.5 litres (15.4 gallons) Use Motorcraft 5WĆ30 Formula E Fuel Economy Motor Oil, Ford specification WSSĆM2C153ĆG Refer to the tire instruction decal on the passenger's door Pull handle under the left side of the instrument panel Right rear of vehicle 256


