
Owner's Manual
Page 9
If someone tampers with it, it , refer to the left front door lock facing or the door latch post pillar. Federal Highway Administration Regulation Regulations such as those issued by the National Highway Traffic Safety Administration and is attached to the Index. Your Ford dealer has information about the Safety Compliance Certification Label and...
If someone tampers with it, it , refer to the left front door lock facing or the door latch post pillar. Federal Highway Administration Regulation Regulations such as those issued by the National Highway Traffic Safety Administration and is attached to the Index. Your Ford dealer has information about the Safety Compliance Certification Label and...

Owner's Manual
Page 14
Failure to follow these precautions could increase the risk and/or severity of the door coming open in a collision, children should always ride with a twisted or jammed safety belt. Never swing it around the neck over the inside shoulder. RWARNING ... risk of serious injury in a collision. 12 If you cannot untwist or unjam the safety belt, see the nearest qualified technician immediately. RWARNING Lock the doors of one buckle and one seating position. RWARNING Never wear the shoulder belt under the arm. The passenger cannot protect the child from injury in...
Failure to follow these precautions could increase the risk and/or severity of the door coming open in a collision, children should always ride with a twisted or jammed safety belt. Never swing it around the neck over the inside shoulder. RWARNING ... risk of serious injury in a collision. 12 If you cannot untwist or unjam the safety belt, see the nearest qualified technician immediately. RWARNING Lock the doors of one buckle and one seating position. RWARNING Never wear the shoulder belt under the arm. The passenger cannot protect the child from injury in...
Owner's Manual
Page 15
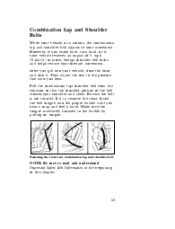
..., turn hard, or if your vehicle receives an impact of 5 mph (8 km/h) or more, thelap/shoulder belt locks and helps reduce your vehicle, close the door and lock it. Pull the combination lap/shoulder belt from the retractor so that suits you hear a snap and feel it is securely fastened to...
..., turn hard, or if your vehicle receives an impact of 5 mph (8 km/h) or more, thelap/shoulder belt locks and helps reduce your vehicle, close the door and lock it. Pull the combination lap/shoulder belt from the retractor so that suits you hear a snap and feel it is securely fastened to...
Owner's Manual
Page 18
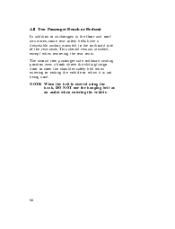
This should remain attached, except when removing the rear seats. The second row passenger side outboard seating position uses a hook above the sliding/cargo door to the outboard side of the rear seats. NOTE: When the belt is not being used. All Two Passenger Bench or Bedseat In addition to anchorages in the floor and roof structures, some rear safety belts have a detachable anchor mounted to stow the shoulder safety belt when entering or exiting the vehicle or when it is stowed using the hook, DO NOT use the hanging belt as an assist when entering the vehicle. 16
This should remain attached, except when removing the rear seats. The second row passenger side outboard seating position uses a hook above the sliding/cargo door to the outboard side of the rear seats. NOTE: When the belt is not being used. All Two Passenger Bench or Bedseat In addition to anchorages in the floor and roof structures, some rear safety belts have a detachable anchor mounted to stow the shoulder safety belt when entering or exiting the vehicle or when it is stowed using the hook, DO NOT use the hanging belt as an assist when entering the vehicle. 16
Owner's Manual
Page 64
... and make sure the gearshift is in the ignition. Ignition Key Buzzer or Chime The buzzer or chime will sound if you open the driver's door while the key is securely latched in a closed vehicle could accidentally injure themselves or others through inadvertent operation of the vehicle. RWARNING Do not leave...
... and make sure the gearshift is in the ignition. Ignition Key Buzzer or Chime The buzzer or chime will sound if you open the driver's door while the key is securely latched in a closed vehicle could accidentally injure themselves or others through inadvertent operation of the vehicle. RWARNING Do not leave...
Owner's Manual
Page 72
RWARNING Do not start your vehicle immediately. Take precautions to avoid its dangerous effects. If your vehicle has rear windows and doors that were installed as part of time with the engine running . Exhaust fumes are toxic. RWARNING If you smell exhaust fumes. Never sit in a stopped ...
RWARNING Do not start your vehicle immediately. Take precautions to avoid its dangerous effects. If your vehicle has rear windows and doors that were installed as part of time with the engine running . Exhaust fumes are toxic. RWARNING If you smell exhaust fumes. Never sit in a stopped ...

Owner's Manual
Page 78
Safety Belt Warning Light and Chime This warning light and chime remind you turn off. Door ajar light 77 on along with an audible chime if one of the following will come on for 1 to ...2 minutes and the chime sounds for 4 to the ON position, the light comes on . Safety belt warning light symbol Door Ajar Light and Chime This light turns on and the chime is turned to 8 seconds. u If the safety belt is buckled while...sounding, both the light and chime turn the ignition to fasten your safety belt. One of the doors is not completely shut when you to the ON position.
Safety Belt Warning Light and Chime This warning light and chime remind you turn off. Door ajar light 77 on along with an audible chime if one of the following will come on for 1 to ...2 minutes and the chime sounds for 4 to the ON position, the light comes on . Safety belt warning light symbol Door Ajar Light and Chime This light turns on and the chime is turned to 8 seconds. u If the safety belt is buckled while...sounding, both the light and chime turn the ignition to fasten your safety belt. One of the doors is not completely shut when you to the ON position.
Owner's Manual
Page 85
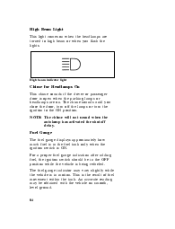
The fuel gauge indicator may be in the OFF position while the vehicle is being refueled. The chime sounds until you close the door, turn off the lamps or turn the ignition to high beam or when you flash the lights. An accurate reading may vary slightly while the ... lamps or headlamps are turned to the ON position. High beam indicator light Chime for Headlamps On This chime sounds if the driver or passenger door is in the fuel tank only when the ignition switch is the result of fuel movement within the tank. Fuel Gauge The fuel gauge displays...
The fuel gauge indicator may be in the OFF position while the vehicle is being refueled. The chime sounds until you close the door, turn off the lamps or turn the ignition to high beam or when you flash the lights. An accurate reading may vary slightly while the ... lamps or headlamps are turned to the ON position. High beam indicator light Chime for Headlamps On This chime sounds if the driver or passenger door is in the fuel tank only when the ignition switch is the result of fuel movement within the tank. Fuel Gauge The fuel gauge displays...

Owner's Manual
Page 102
Features Your vehicle has a variety of features designed for your comfort, convenience and safety. Read this chapter to find out about standard and optional features. Doors Door Handles and Locks Inside handles 121
Features Your vehicle has a variety of features designed for your comfort, convenience and safety. Read this chapter to find out about standard and optional features. Doors Door Handles and Locks Inside handles 121
Owner's Manual
Page 103
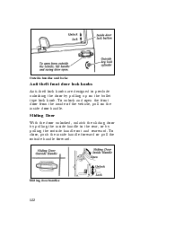
To close, push the inside handle forward or pull the outside handle out and rearward. Sliding Door With the door unlocked, unlatch the sliding door by pulling the inside door handle. Sliding door handles 122 To unlock and open the front door from the inside of the vehicle, pull on the inside handle to preclude unlocking the door by pulling the outside handle forward. Outside handles and locks Anti-theft front door lock knobs Anti-theft lock knobs are designed to the rear, or by pulling up on the bullet type lock knob.
To close, push the inside handle forward or pull the outside handle out and rearward. Sliding Door With the door unlocked, unlatch the sliding door by pulling the inside door handle. Sliding door handles 122 To unlock and open the front door from the inside of the vehicle, pull on the inside handle to preclude unlocking the door by pulling the outside handle forward. Outside handles and locks Anti-theft front door lock knobs Anti-theft lock knobs are designed to the rear, or by pulling up on the bullet type lock knob.
Owner's Manual
Page 104
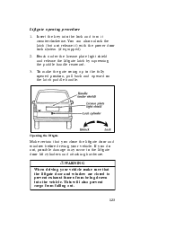
... procedure 1. You can also unlock the latch (but not release it counterclockwise. If you close the liftgate door and window before driving your vehicle make the gate swing up to the liftgate door lift cylinders and attaching hardware. To make sure that you do not, possible damage may occur to the.... Insert the key into the vehicle. This will also prevent cargo from being drawn into the lock and turn it ) with the power door lock system (if equipped). Opening the liftgate Make certain that the liftgate door and window are closed to prevent exhaust fumes from falling out. 123
... procedure 1. You can also unlock the latch (but not release it counterclockwise. If you close the liftgate door and window before driving your vehicle make the gate swing up to the liftgate door lift cylinders and attaching hardware. To make sure that you do not, possible damage may occur to the.... Insert the key into the vehicle. This will also prevent cargo from being drawn into the lock and turn it ) with the power door lock system (if equipped). Opening the liftgate Make certain that the liftgate door and window are closed to prevent exhaust fumes from falling out. 123
Owner's Manual
Page 105
... of vehicles with this point, the latch is only intended for cargo, not passengers. You can also lock the liftgate latch by inserting your vehicle's door key and turning it clockwise after you have pulled down the liftgate enough so that you pull down and close the liftgate. You can reach... from inside the cargo area. 124 Liftgate closing procedure 1. The liftgate area is not locked. You can lock the liftgate latch by using the power door locks (if equipped). 2. 3.
... of vehicles with this point, the latch is only intended for cargo, not passengers. You can also lock the liftgate latch by inserting your vehicle's door key and turning it clockwise after you have pulled down the liftgate enough so that you pull down and close the liftgate. You can reach... from inside the cargo area. 124 Liftgate closing procedure 1. The liftgate area is not locked. You can lock the liftgate latch by using the power door locks (if equipped). 2. 3.
Owner's Manual
Page 106
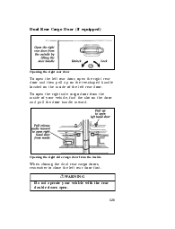
To open the right side cargo door from the inside When closing the dual rear cargo doors, remember to close the left rear door first. Opening the right side cargo door from the inside of the left rear door. RWARNING Do not operate your vehicle, find the slot on the inside of your vehicle with the rear double doors open. 125 Dual Rear Cargo Door (If equipped) Opening the right rear door To open the left rear door, open the right rear door and then pull up on the tee-shaped handle located on the door and pull the door handle inward.
To open the right side cargo door from the inside When closing the dual rear cargo doors, remember to close the left rear door first. Opening the right side cargo door from the inside of the left rear door. RWARNING Do not operate your vehicle, find the slot on the inside of your vehicle with the rear double doors open. 125 Dual Rear Cargo Door (If equipped) Opening the right rear door To open the left rear door, open the right rear door and then pull up on the tee-shaped handle located on the door and pull the door handle inward.

Owner's Manual
Page 107
To lock all doors push the switch marked UNLOCK. Memory lock (sliding door) Your vehicle has a sliding door memory lock feature that does not require the sliding door to be closed . Power door lock controls 126 The manual door locks will activate after the door is closed before using the power locks. To unlock all doors push the switch marked LOCK. The locking function will override the power door lock controls. Power Door Locks (If equipped) The power door lock switches are located in the front doors.
To lock all doors push the switch marked UNLOCK. Memory lock (sliding door) Your vehicle has a sliding door memory lock feature that does not require the sliding door to be closed . Power door lock controls 126 The manual door locks will activate after the door is closed before using the power locks. To unlock all doors push the switch marked LOCK. The locking function will override the power door lock controls. Power Door Locks (If equipped) The power door lock switches are located in the front doors.
Owner's Manual
Page 108
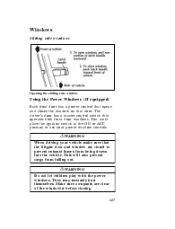
... Do not let children play with the power windows. Make sure occupants are closed to use your vehicle make sure that the liftgate door and window are clear of the window(s) before closing. 127 Windows Sliding side windows Opening the sliding side window Using the Power Windows... (If equipped) Each front door has a power control that opens and closes the window on that operates both front door windows. They may seriously hurt themselves. The driver's door has a master control switch that...
... Do not let children play with the power windows. Make sure occupants are closed to use your vehicle make sure that the liftgate door and window are clear of the window(s) before closing. 127 Windows Sliding side windows Opening the sliding side window Using the Power Windows... (If equipped) Each front door has a power control that opens and closes the window on that operates both front door windows. They may seriously hurt themselves. The driver's door has a master control switch that...
Owner's Manual
Page 125
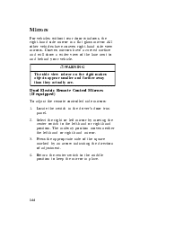
... by an arrow indicating the direction of adjustment. The midway position moves neither the left -hand or right-hand position. Mirrors For vehicles without rear door windows, the right-hand side mirror is a flat glass mirror. All other vehicles have a curved surface and will show a wider view of the square ... next to the left -hand or right-hand mirror. Return the center switch to the middle position to keep the mirror in the driver's door trim panel. Locate the switch in place. 3. 4. 144 Dual Electric Remote Control Mirrors (If equipped) To adjust the remote controlled side mirrors...
... by an arrow indicating the direction of adjustment. The midway position moves neither the left -hand or right-hand position. Mirrors For vehicles without rear door windows, the right-hand side mirror is a flat glass mirror. All other vehicles have a curved surface and will show a wider view of the square ... next to the left -hand or right-hand mirror. Return the center switch to the middle position to keep the mirror in the driver's door trim panel. Locate the switch in place. 3. 4. 144 Dual Electric Remote Control Mirrors (If equipped) To adjust the remote controlled side mirrors...

Owner's Manual
Page 127
In its stored position, the transmitter can be activated by moving hand towards front of vehicle while maintaining pressure on the compartment door. Garage Door Opener Storage At the center of the console, a compartment is provided for storage of your transmitter. 146 Open door by pressing on latch (Figure 1). 3. Remove the backing from the self-adhesive side of the VelcroTM (supplied with the console) and apply it to the back of a garage door opener transmitter. To install the transmitter: 1. 2. Push down on latch.
In its stored position, the transmitter can be activated by moving hand towards front of vehicle while maintaining pressure on the compartment door. Garage Door Opener Storage At the center of the console, a compartment is provided for storage of your transmitter. 146 Open door by pressing on latch (Figure 1). 3. Remove the backing from the self-adhesive side of the VelcroTM (supplied with the console) and apply it to the back of a garage door opener transmitter. To install the transmitter: 1. 2. Push down on latch.

Owner's Manual
Page 128
4. This can be adjusted for proper function. Add one of your transmitter is in line with your transmitter button may need to be done using the button height adjustment pegs (located on the door in line with one peg at a time until pressing the door actuates the transmitter button (Figure 3). 147 Install your transmitter into the compartment, making sure the actuator button of the pegs on the door when the door is installed, the actuation peg on the compartment door). Once the transmitter is closed (Figure 2). 5.
4. This can be adjusted for proper function. Add one of your transmitter is in line with your transmitter button may need to be done using the button height adjustment pegs (located on the door in line with one peg at a time until pressing the door actuates the transmitter button (Figure 3). 147 Install your transmitter into the compartment, making sure the actuator button of the pegs on the door when the door is installed, the actuation peg on the compartment door). Once the transmitter is closed (Figure 2). 5.

Owner's Manual
Page 129
By properly adjusting the actuation peg height, you will be able to actuate your garage door by pressing the door as shown (Figure 4). 148 6.
By properly adjusting the actuation peg height, you will be able to actuate your garage door by pressing the door as shown (Figure 4). 148 6.

Owner's Manual
Page 158
... tape can change frequencies quickly, press and hold down , listenable stations can be loaded with the open edge to the right) firmly into the tape door opening, making sure the cassette is on each listenable station for approximately a five-second sampling. u Using the "SCAN" function (Stereo Cassette Radio) Press the "SCAN...
... tape can change frequencies quickly, press and hold down , listenable stations can be loaded with the open edge to the right) firmly into the tape door opening, making sure the cassette is on each listenable station for approximately a five-second sampling. u Using the "SCAN" function (Stereo Cassette Radio) Press the "SCAN...


