
Owner's Manual
Page 10
... an adjustment or break-in period during the first 1,000 miles (1,600 km) that you should take these steps: The break-in period for new brake linings lasts for 100 miles (160 km) of city driving or 1,000 miles (1,600 km) of highway driving. has new... brake linings, you drive it. Because your vehicle - Watch traffic carefully so that Ford 7 recommends. u Use only the type of new vehicle operation. u Avoid sudden stops. Do not use special "break-in this...
... an adjustment or break-in period during the first 1,000 miles (1,600 km) that you should take these steps: The break-in period for new brake linings lasts for 100 miles (160 km) of city driving or 1,000 miles (1,600 km) of highway driving. has new... brake linings, you drive it. Because your vehicle - Watch traffic carefully so that Ford 7 recommends. u Use only the type of new vehicle operation. u Avoid sudden stops. Do not use special "break-in this...
Owner's Manual
Page 15
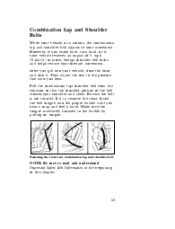
... the tongue is not twisted. Pull the combination lap/shoulder belt from the retractor so that suits you get into the proper buckle until you brake hard, turn hard, or if your vehicle receives an impact of this chapter. 13 Fastening the front seat combination lap and shoulder belt NOTE: Be...
... the tongue is not twisted. Pull the combination lap/shoulder belt from the retractor so that suits you get into the proper buckle until you brake hard, turn hard, or if your vehicle receives an impact of this chapter. 13 Fastening the front seat combination lap and shoulder belt NOTE: Be...
Owner's Manual
Page 16
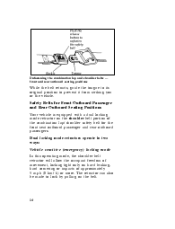
... the belt. 14 Safety Belts for Front Outboard Passenger and Rear Outboard Seating Positions Your vehicle is equipped with a dual locking mode retractor on hard braking, hard cornering or impacts of the combination lap/shoulder safety belt for the front seat outboard passenger and rear outboard passengers.
... the belt. 14 Safety Belts for Front Outboard Passenger and Rear Outboard Seating Positions Your vehicle is equipped with a dual locking mode retractor on hard braking, hard cornering or impacts of the combination lap/shoulder safety belt for the front seat outboard passenger and rear outboard passengers.
Owner's Manual
Page 63
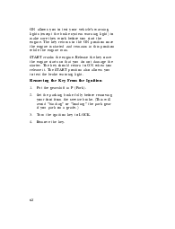
The key should return to ON when you to test the brake warning light. Set the parking brake fully before removing your vehicle's warning lights (except the brake system warning light) to make sure they work before you start the engine. Removing the Key From the Ignition 1. 2. ON allows you to ...test your foot from the service brake. (This will avoid "binding" or "loading" the park gear if you park on a grade.) Turn the ignition key to LOCK. Put the gearshift ...
The key should return to ON when you to test the brake warning light. Set the parking brake fully before removing your vehicle's warning lights (except the brake system warning light) to make sure they work before you start the engine. Removing the Key From the Ignition 1. 2. ON allows you to ...test your foot from the service brake. (This will avoid "binding" or "loading" the park gear if you park on a grade.) Turn the ignition key to LOCK. Put the gearshift ...
Owner's Manual
Page 64
... vehicle unattended with the key in the ignition. Only use the accelerator while you have problems getting your vehicle. 63 RWARNING Always set the parking brake fully and make sure the gearshift is in the ignition. Further, on hot, sunny days, temperatures in this chapter for details about when to use...
... vehicle unattended with the key in the ignition. Only use the accelerator while you have problems getting your vehicle. 63 RWARNING Always set the parking brake fully and make sure the gearshift is in the ignition. Further, on hot, sunny days, temperatures in this chapter for details about when to use...
Owner's Manual
Page 65
... start your vehicle, you should test the warning lights on the instrument panel to make sure that the gearshift is in P (Park) and the parking brake is parked. 64 Starting Your Vehicle Preparing to Start Your Vehicle RWARNING Do not start your vehicle in a closed garage or other accessories are toxic.
... start your vehicle, you should test the warning lights on the instrument panel to make sure that the gearshift is in P (Park) and the parking brake is parked. 64 Starting Your Vehicle Preparing to Start Your Vehicle RWARNING Do not start your vehicle in a closed garage or other accessories are toxic.
Owner's Manual
Page 66
..., turn the key to the OFF position. Whenever you do not flood the engine, then try again. Release the parking brake. engine does not start within five (5) seconds on the brake pedal and put the gearshift lever in the normal manner. 65 Keep your vehicle, release the key as soon as the..., then try , turn the key to OFF, wait approximately ten (10) seconds so you start the engine let it may be binding. 4. Slowly release the brake pedal and drive away in gear. Allow the key to return to the START position (cranking) until the engine starts. Excessive cranking could damage the...
..., turn the key to the OFF position. Whenever you do not flood the engine, then try again. Release the parking brake. engine does not start within five (5) seconds on the brake pedal and put the gearshift lever in the normal manner. 65 Keep your vehicle, release the key as soon as the..., then try , turn the key to OFF, wait approximately ten (10) seconds so you start the engine let it may be binding. 4. Slowly release the brake pedal and drive away in gear. Allow the key to return to the START position (cranking) until the engine starts. Excessive cranking could damage the...
Owner's Manual
Page 67
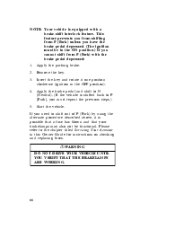
...], you cannot shift from P (Park) unless you have the brake pedal depressed. (The ignition must repeat the previous steps.) Start the vehicle. 5. Apply the brake pedal and shift to the chapter titled Servicing Your Aerostar in the ON position.) If you must be functional. This feature... prevents you from shifting from P (Park) with a brake-shift interlock feature. Please refer to N (Neutral). (...
...], you cannot shift from P (Park) unless you have the brake pedal depressed. (The ignition must repeat the previous steps.) Start the vehicle. 5. Apply the brake pedal and shift to the chapter titled Servicing Your Aerostar in the ON position.) If you must be functional. This feature... prevents you from shifting from P (Park) with a brake-shift interlock feature. Please refer to N (Neutral). (...
Owner's Manual
Page 76
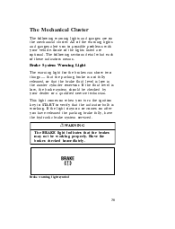
The following warning lights and gauges are optional. This light comes on after you to verify that the brakes may not be checked by your vehicle. Brake warning light symbol 75 Some of the lights listed are on the mechanical cluster. If the light stays on or comes on...that the indicator bulb is working properly. Brake System Warning Light The warning light for the brakes can show two things - that the parking brake is not fully released, or that the brake fluid level is low, the brake system should be working . Have the brakes checked immediately. All of the warning ...
The following warning lights and gauges are optional. This light comes on after you to verify that the brakes may not be checked by your vehicle. Brake warning light symbol 75 Some of the lights listed are on the mechanical cluster. If the light stays on or comes on...that the indicator bulb is working properly. Brake System Warning Light The warning light for the brakes can show two things - that the parking brake is not fully released, or that the brake fluid level is low, the brake system should be working . Have the brakes checked immediately. All of the warning ...
Owner's Manual
Page 77
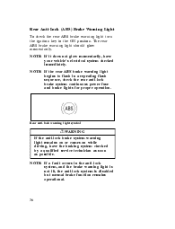
...operational. 76 Rear anti-lock warning light symbol RWARNING If the anti-lock brake system warning light remains on or comes on while driving, have your vehicle's electrical system checked immediately. The rear ABS brake warning light should glow momentarily. NOTE: If a fault occurs in a... flash sequence, check the rear anti-lock brake system continuous power fuse and brake lights for proper operation. NOTE: If the rear ABS brake warning light begins to the ON position. NOTE: If it does not glow momentarily, have the braking system checked by a qualified service technician as...
...operational. 76 Rear anti-lock warning light symbol RWARNING If the anti-lock brake system warning light remains on or comes on while driving, have your vehicle's electrical system checked immediately. The rear ABS brake warning light should glow momentarily. NOTE: If a fault occurs in a... flash sequence, check the rear anti-lock brake system continuous power fuse and brake lights for proper operation. NOTE: If the rear ABS brake warning light begins to the ON position. NOTE: If it does not glow momentarily, have the braking system checked by a qualified service technician as...
Owner's Manual
Page 88
... tells you how many miles (kilometers) per hour your vehicle is changed. Your vehicle contains a speedometer which receives its input from the Anti-Lock brake sensor. Your Ford dealership service personnel can only be changed will also ensure that is contained within the Powertrain Control Module (PCM). Changing the conversion constant to...
... tells you how many miles (kilometers) per hour your vehicle is changed. Your vehicle contains a speedometer which receives its input from the Anti-Lock brake sensor. Your Ford dealership service personnel can only be changed will also ensure that is contained within the Powertrain Control Module (PCM). Changing the conversion constant to...

Owner's Manual
Page 94
... flashers will continue to flash. it will pop out and the lamps will be drained. NOTE: The flasher button will begin to flash with the brake pedal depressed. Hazard flasher 113 If the flashers run for up slightly higher when on than two hours or if the battery is not fully...
... flashers will continue to flash. it will pop out and the lamps will be drained. NOTE: The flasher button will begin to flash with the brake pedal depressed. Hazard flasher 113 If the flashers run for up slightly higher when on than two hours or if the battery is not fully...
Owner's Manual
Page 167
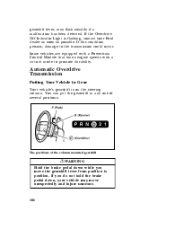
... you move unexpectedly and injure someone. 186 Automatic Overdrive Transmission Putting Your Vehicle in any one of the column-mounted gearshift RWARNING Hold the brake pedal down , your Ford dealer as soon as possible. If this condition persists, damage to promote durability. Some vehicles are equipped with a Powertrain Control Module that limits...
... you move unexpectedly and injure someone. 186 Automatic Overdrive Transmission Putting Your Vehicle in any one of the column-mounted gearshift RWARNING Hold the brake pedal down , your Ford dealer as soon as possible. If this condition persists, damage to promote durability. Some vehicles are equipped with a Powertrain Control Module that limits...
Owner's Manual
Page 168
... UNTIL YOU VERIFY THAT THE BRAKELAMPS ARE WORKING. 187 Remove the key. Please refer to N (Neutral). (If the vehicle is equipped with the brake pedal depressed: 1. 2. 3. 4. Insert the key and rotate it is possible that a fuse has blown and that your brakelamps may also not..., it one position clockwise (ignition in this Owner Guide for instructions on checking and replacing fuses. Apply the brake pedal and shift to the chapter titled Servicing Your Aerostar in the OFF position). This feature prevents you place the gearshift securely into position, gradually release the...
... UNTIL YOU VERIFY THAT THE BRAKELAMPS ARE WORKING. 187 Remove the key. Please refer to N (Neutral). (If the vehicle is equipped with the brake pedal depressed: 1. 2. 3. 4. Insert the key and rotate it is possible that a fuse has blown and that your brakelamps may also not..., it one position clockwise (ignition in this Owner Guide for instructions on checking and replacing fuses. Apply the brake pedal and shift to the chapter titled Servicing Your Aerostar in the OFF position). This feature prevents you place the gearshift securely into position, gradually release the...
Owner's Manual
Page 169
R (Reverse) With the gearshift in the R (Reverse) position, the vehicle will operate in hilly terrain, or if additional engine braking is achieved, for the accelerator pedal position you will shift into or out of the vehicle are on the end of the gearshift lever.... cancelled and the word OFF illuminated, the transmission will move backward. Your vehicle will roll freely, even on the slightest incline, unless the parking brake or brakes are not locked. As the vehicle picks up speed, automatic upshifts to use Drive You will occur when j Overdrive is not a drive position ...
R (Reverse) With the gearshift in the R (Reverse) position, the vehicle will operate in hilly terrain, or if additional engine braking is achieved, for the accelerator pedal position you will shift into or out of the vehicle are on the end of the gearshift lever.... cancelled and the word OFF illuminated, the transmission will move backward. Your vehicle will roll freely, even on the slightest incline, unless the parking brake or brakes are not locked. As the vehicle picks up speed, automatic upshifts to use Drive You will occur when j Overdrive is not a drive position ...
Owner's Manual
Page 170
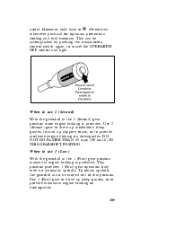
...FASTER THAN 55 mph (88 km/h) IN THIS GEARSHIFT POSITION. Use 1 (First) gear to drive up slippery roads, or to provide maximum engine braking on downgrades. This position provides 1 (First) gear operation only with no automatic upshifts. useful. Use 2 (Second) gear to drive up moderately steep ... to use 1 (Low) With the gearshift in the 2 (Second) gear position more engine braking is provided. When to use 2 (Second) With the gearshift in the 1 (First) gear position maximum engine braking is provided. This can be moved out of this position. However, shift back to cancel the...
...FASTER THAN 55 mph (88 km/h) IN THIS GEARSHIFT POSITION. Use 1 (First) gear to drive up slippery roads, or to provide maximum engine braking on downgrades. This position provides 1 (First) gear operation only with no automatic upshifts. useful. Use 2 (Second) gear to drive up moderately steep ... to use 1 (Low) With the gearshift in the 2 (Second) gear position more engine braking is provided. When to use 2 (Second) With the gearshift in the 1 (First) gear position maximum engine braking is provided. This can be moved out of this position. However, shift back to cancel the...
Owner's Manual
Page 171
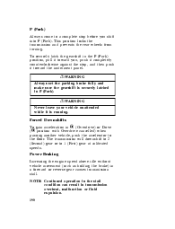
... the P (Park) position, pull it toward the instrument panel. RWARNING Always set the parking brake fully and make sure the gearshift is running. Power Braking Increasing the engine speed above idle without vehicle movement (such as holding the brake) in a forward or reverse gear causes transmission stall. P (Park) Always come to a complete stop...
... the P (Park) position, pull it toward the instrument panel. RWARNING Always set the parking brake fully and make sure the gearshift is running. Power Braking Increasing the engine speed above idle without vehicle movement (such as holding the brake) in a forward or reverse gear causes transmission stall. P (Park) Always come to a complete stop...
Owner's Manual
Page 173
... with more power to be safe: u Avoid unnecessary turns or other maneuvers that could cause loss of power.) NOTE: The microprocessor is disabled when the brakes are applied or when the transmission selector is unique, follow these steps to the axle with your vehicle and inflate the tires to the rear...
... with more power to be safe: u Avoid unnecessary turns or other maneuvers that could cause loss of power.) NOTE: The microprocessor is disabled when the brakes are applied or when the transmission selector is unique, follow these steps to the axle with your vehicle and inflate the tires to the rear...
Owner's Manual
Page 174
... The added traction performance does not improve the braking ability of E-4WD Aerostars. RWARNING On-vehicle wheel balancing will cause damage to believe that you can stop any off-road use ; Brakes Front Disc Brakes The front disc brakes are self-adjusting. They do not require service ...any quicker than a conventional two-wheel drive vehicle. Rear Drum Brakes The rear drum brakes are self-adjusting. RWARNING Your E-4WD Aerostar is "Low" in this chapter. 193 Allow the same amount of distance when braking as with a two-wheel drive vehicle. Automatic adjustment occurs ...
... The added traction performance does not improve the braking ability of E-4WD Aerostars. RWARNING On-vehicle wheel balancing will cause damage to believe that you can stop any off-road use ; Brakes Front Disc Brakes The front disc brakes are self-adjusting. They do not require service ...any quicker than a conventional two-wheel drive vehicle. Rear Drum Brakes The rear drum brakes are self-adjusting. RWARNING Your E-4WD Aerostar is "Low" in this chapter. 193 Allow the same amount of distance when braking as with a two-wheel drive vehicle. Automatic adjustment occurs ...

Owner's Manual
Page 175
... you should be careful when braking. Front brake lock up on any surface, even on roads with the Anti-lock Brake System, you to the rear drum brakes. RWARNING An increase in pedal travel will light for example. Hydraulic Power Brakes The hydraulic brake system is equipped with a ...fluid level sensor. The brake system should be checked immediately. These two ...
... you should be careful when braking. Front brake lock up on any surface, even on roads with the Anti-lock Brake System, you to the rear drum brakes. RWARNING An increase in pedal travel will light for example. Hydraulic Power Brakes The hydraulic brake system is equipped with a ...fluid level sensor. The brake system should be checked immediately. These two ...


