
Owner's Manual
Page 21
Whenever a rear seat has been removed, the tongue end of the detachable anchor must be correctly stowed. See the following illustration. Rear seat shoulder safety belt - stowage (with seat removed) 19
Whenever a rear seat has been removed, the tongue end of the detachable anchor must be correctly stowed. See the following illustration. Rear seat shoulder safety belt - stowage (with seat removed) 19
Owner's Manual
Page 23
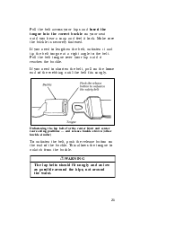
... seat until it reaches the buckle. Unfastening the lap belts for the center front and center rear seating positions - end release buckle shown (other buckle similar) To unfasten the belt, push the release button on the loose end of the buckle. If you need to lengthen the belt, unfasten it lock. If you... need to shorten the belt, pull on the end of the webbing until the belt fits snugly. This allows the tongue to the...
... seat until it reaches the buckle. Unfastening the lap belts for the center front and center rear seating positions - end release buckle shown (other buckle similar) To unfasten the belt, push the release button on the loose end of the buckle. If you need to lengthen the belt, unfasten it lock. If you... need to shorten the belt, pull on the end of the webbing until the belt fits snugly. This allows the tongue to the...
Owner's Manual
Page 26
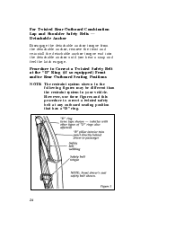
... position that has a "D" ring. 24 Procedure to correct a twisted safety belt at the "D" Ring (if so equipped) Front and/or Rear Outboard Seating Positions NOTE: The restraint system shown in the following figures may be different than the restraint system in your vehicle. For Twisted... Rear Outboard Combination Lap and Shoulder Safety Belts - Detachable Anchor Disengage the detachable anchor tongue from the detachable anchor, remove the twist and...
... position that has a "D" ring. 24 Procedure to correct a twisted safety belt at the "D" Ring (if so equipped) Front and/or Rear Outboard Seating Positions NOTE: The restraint system shown in the following figures may be different than the restraint system in your vehicle. For Twisted... Rear Outboard Combination Lap and Shoulder Safety Belts - Detachable Anchor Disengage the detachable anchor tongue from the detachable anchor, remove the twist and...

Owner's Manual
Page 47
... child seat in forward directions to ensure that its bottom is securely fastened to the buckle by pulling on the loose end of webbing. Installing Child Safety Seats at the Rear Center Seating Position with a lap/shoulder belt, or a lap belt and top tether strap. 1. Forward-facing seats must be installed with.... If the child seat moves excessively, repeat steps 5 through the child seat according to the direction of webbing while sliding the tongue toward the loose end of the lap belt webbing to tighten the belt.
... child seat in forward directions to ensure that its bottom is securely fastened to the buckle by pulling on the loose end of webbing. Installing Child Safety Seats at the Rear Center Seating Position with a lap/shoulder belt, or a lap belt and top tether strap. 1. Forward-facing seats must be installed with.... If the child seat moves excessively, repeat steps 5 through the child seat according to the direction of webbing while sliding the tongue toward the loose end of the lap belt webbing to tighten the belt.
Owner's Manual
Page 112
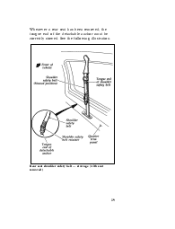
... Release Rear Captain Chairs To remove: 1. For left hand seats, lift and rotate the seat latch handle (located under the seat) rearward, causing the J hook to disengage from the front floor well retainer. Disengage the lap/shoulder safety belt from the vehicle. 131 Stow the tongue end of the... detachable anchor as shown. 2. For right hand seats, lift and rotate the seat latch handle (located under the seat) rearward, causing the J hook to disengage from the front floor well retainer. Push the seat assembly rearward to disengage the front and rear floor hooks...
... Release Rear Captain Chairs To remove: 1. For left hand seats, lift and rotate the seat latch handle (located under the seat) rearward, causing the J hook to disengage from the front floor well retainer. Disengage the lap/shoulder safety belt from the vehicle. 131 Stow the tongue end of the... detachable anchor as shown. 2. For right hand seats, lift and rotate the seat latch handle (located under the seat) rearward, causing the J hook to disengage from the front floor well retainer. Push the seat assembly rearward to disengage the front and rear floor hooks...

Owner's Manual
Page 113
... until you engage the safety belt, be sure it comes to see that would prevent proper seat engagement. Remove any twist, then insert the tongue end of the tube. Rotate the seat latch handle forward, causing the J hook to a full stop on the top of the detachable anchor into the floor... objects that the seat is in position. Before you hear a "snap" and feel the latch engage. Never attempt to slide forward, engaging the front and rear floor hooks with the floor well retainers. This will cause the seat assembly to adjust the seat latch while the vehicle is latched securely in...
... until you engage the safety belt, be sure it comes to see that would prevent proper seat engagement. Remove any twist, then insert the tongue end of the tube. Rotate the seat latch handle forward, causing the J hook to a full stop on the top of the detachable anchor into the floor... objects that the seat is in position. Before you hear a "snap" and feel the latch engage. Never attempt to slide forward, engaging the front and rear floor hooks with the floor well retainers. This will cause the seat assembly to adjust the seat latch while the vehicle is latched securely in...
Owner's Manual
Page 120
...to work improperly. The two passenger bench or bed seat must be sure it is not twisted. Remove any twist, then insert the tongue end of the detachable anchor into the detachable anchor until the latch re-engages. (A slight downward pressure on the bench seat seatback will re-engage...a "snap" and feel the latch engage. A twisted safety belt may cause the retractor to the previous illustration. To fold down the rear seatback: To lower the rear seatback down . To raise the seatback, release the seatback latch and rotate the seatback upwards until you engage the safety belt, be installed...
...to work improperly. The two passenger bench or bed seat must be sure it is not twisted. Remove any twist, then insert the tongue end of the detachable anchor into the detachable anchor until the latch re-engages. (A slight downward pressure on the bench seat seatback will re-engage...a "snap" and feel the latch engage. A twisted safety belt may cause the retractor to the previous illustration. To fold down the rear seatback: To lower the rear seatback down . To raise the seatback, release the seatback latch and rotate the seatback upwards until you engage the safety belt, be installed...
Owner's Manual
Page 194
... given as the vehicle owner/operator compensates. This can be accomplished, if necessary, by carrying fewer passengers, less cargo or positioning cargo more toward the rear, which has the effect of all seating positions, and add evenly distributed cargo in Pounds (kgs): If this value is given as 83 pounds (38... accessories to adding 112 pounds (51 kgs) of accessory weight that sometimes cause confusion. Not exactly. It is that you are limited to the front end capacity?
... given as the vehicle owner/operator compensates. This can be accomplished, if necessary, by carrying fewer passengers, less cargo or positioning cargo more toward the rear, which has the effect of all seating positions, and add evenly distributed cargo in Pounds (kgs): If this value is given as 83 pounds (38... accessories to adding 112 pounds (51 kgs) of accessory weight that sometimes cause confusion. Not exactly. It is that you are limited to the front end capacity?

Owner's Manual
Page 217
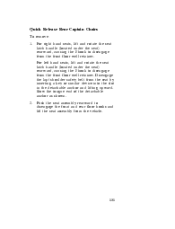
... from moving or slipping off the jack, you or someone else could be sure the parking brake is diagonally opposite (other than the front or rear jacking points, be sure to the tire being changed. To prevent the vehicle from moving when you are stowed and secured in P (Park). Make sure... that is set, then block the wheel (both directions) that your vehicle by other side and end of the back wheels is off the ground, the transmission alone will not move or roll. When one of the vehicle) to use only hoist...
... from moving or slipping off the jack, you or someone else could be sure the parking brake is diagonally opposite (other than the front or rear jacking points, be sure to the tire being changed. To prevent the vehicle from moving when you are stowed and secured in P (Park). Make sure... that is set, then block the wheel (both directions) that your vehicle by other side and end of the back wheels is off the ground, the transmission alone will not move or roll. When one of the vehicle) to use only hoist...

Owner's Manual
Page 303
... both sides of the socket. With the flat side of the bulb's plastic base facing upward, insert the glass end of the bulb into the socket until the plastic base contacts the rear of the bulb and connect the electrical connector. Turn the headlamps on the vehicle and install the four attaching...
... both sides of the socket. With the flat side of the bulb's plastic base facing upward, insert the glass end of the bulb into the socket until the plastic base contacts the rear of the bulb and connect the electrical connector. Turn the headlamps on the vehicle and install the four attaching...


