
Owner's Manual
Page 3
Table of Contents Introductory Information ...1 Safety Restraints ...11 Starting Your Aerostar ...61 Warning Lights and Gauges ...73 Instrument Panel Controls ...89 Steering Column Controls ...109 Features ...121 Electronic Sound Systems ...149 Driving Your Aerostar ...185 Roadside Emergencies ...225 Customer Assistance ...245 Reporting Safety Defects ...252 Accessories ...257 Servicing Your Aerostar ...265 Quick Index ...351 Index ...359 Service Station Information ...380
Table of Contents Introductory Information ...1 Safety Restraints ...11 Starting Your Aerostar ...61 Warning Lights and Gauges ...73 Instrument Panel Controls ...89 Steering Column Controls ...109 Features ...121 Electronic Sound Systems ...149 Driving Your Aerostar ...185 Roadside Emergencies ...225 Customer Assistance ...245 Reporting Safety Defects ...252 Accessories ...257 Servicing Your Aerostar ...265 Quick Index ...351 Index ...359 Service Station Information ...380
Owner's Manual
Page 4
Our u Continuous improvement is the continuous commitment to achieve the best result possible. Introductory Information Ford's Commitment to You At Ford Motor Company, excellence is essential to our success. For your satisfaction, the quality of everything we do : in our products - in their safety and value - ...
Our u Continuous improvement is the continuous commitment to achieve the best result possible. Introductory Information Ford's Commitment to You At Ford Motor Company, excellence is essential to our success. For your satisfaction, the quality of everything we do : in our products - in their safety and value - ...
Owner's Manual
Page 5
... on the purchase of your passengers or other people. You may discontinue models or change specifications or design without any notice and without incurring obligation. Ford may not have bought all WARNINGS carefully. u Integrity is socially responsible and commands respect for its integrity and for its positive contributions to society. WARNINGS...
... on the purchase of your passengers or other people. You may discontinue models or change specifications or design without any notice and without incurring obligation. Ford may not have bought all WARNINGS carefully. u Integrity is socially responsible and commands respect for its integrity and for its positive contributions to society. WARNINGS...
Owner's Manual
Page 6
... Record booklet lists the services that are most important for the word that you can find specific information quickly, you chose is also provided to Ford Motor Company of Contents, or the Index. A record log is not listed, think of the book and search in good condition. Canadian Owners - French Version...
... Record booklet lists the services that are most important for the word that you can find specific information quickly, you chose is also provided to Ford Motor Company of Contents, or the Index. A record log is not listed, think of the book and search in good condition. Canadian Owners - French Version...
Owner's Manual
Page 7
...Service Plan runs out after 18 months or 18,000 miles. See your option to find out about the Ford Extended Service Plan. Contact any Ford or Lincoln-Mercury dealer, or refer to buy a Ford Extended Service Plan for the details. 4 However, your dealer for a longer period of time than the ...Booklet, you can buy this owner guide. You do not have to the addresses and phone numbers on certain parts, and Emissions Warranties. Buying a Ford Extended Service Plan If you bought your dealer for your vehicle. If you purchased a Canadian vehicle and did not take advantage of the...
...Service Plan runs out after 18 months or 18,000 miles. See your option to find out about the Ford Extended Service Plan. Contact any Ford or Lincoln-Mercury dealer, or refer to buy a Ford Extended Service Plan for the details. 4 However, your dealer for a longer period of time than the ...Booklet, you can buy this owner guide. You do not have to the addresses and phone numbers on certain parts, and Emissions Warranties. Buying a Ford Extended Service Plan If you bought your dealer for your vehicle. If you purchased a Canadian vehicle and did not take advantage of the...
Owner's Manual
Page 8
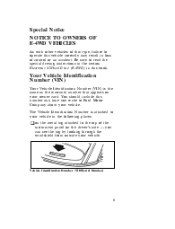
... windshield from outside your vehicle. The Vehicle Identification Number is the same as the warranty number that appears on the driver's side - you write to Ford Motor Company about your vehicle. Special Notice NOTICE TO OWNERS OF E-4WD VEHICLES As with other vehicles of this type, failure to operate this vehicle...
... windshield from outside your vehicle. The Vehicle Identification Number is the same as the warranty number that appears on the driver's side - you write to Ford Motor Company about your vehicle. Special Notice NOTICE TO OWNERS OF E-4WD VEHICLES As with other vehicles of this type, failure to operate this vehicle...
Owner's Manual
Page 9
... Gross Vehicle Weight Rating and Gross Axle Weight Ratings, wheel and tire data and information codes for the vehicle, and to use the vehicle. Your Ford dealer has information about the Safety Compliance Certification Label and the information contained on the Safety Compliance Certification Label - this label is the responsibility of...
... Gross Vehicle Weight Rating and Gross Axle Weight Ratings, wheel and tire data and information codes for the vehicle, and to use the vehicle. Your Ford dealer has information about the Safety Compliance Certification Label and the information contained on the Safety Compliance Certification Label - this label is the responsibility of...
Owner's Manual
Page 10
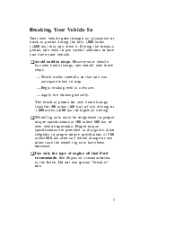
... provided in period for new brake linings lasts for 100 miles (160 km) of city driving or 1,000 miles (1,600 km) of engine oil that Ford 7 recommends. Because your vehicle. See Engine oil recommendations in advance. - Apply the brakes gradually. Breaking Your Vehicle In Your new vehicle goes through an adjustment...
... provided in period for new brake linings lasts for 100 miles (160 km) of city driving or 1,000 miles (1,600 km) of engine oil that Ford 7 recommends. Because your vehicle. See Engine oil recommendations in advance. - Apply the brakes gradually. Breaking Your Vehicle In Your new vehicle goes through an adjustment...
Owner's Manual
Page 11
Paint damage resulting from fallout is not related to bring their vehicle in paint materials or workmanship and therefore is not covered by a Ford representative. Customers may be required to a defect in for inspection by warranty. DO NOT: u Wash your vehicle with a mild ...8 Take similar precautions if your vehicle, including the underside, with hot water u Wash your vehicle while it clean. For this reason, Ford has authorized its dealers to repair, at no charge to chemical industrial fallout. Cleaning the Outside of Your Vehicle Washing and Polishing Your Vehicle...
Paint damage resulting from fallout is not related to bring their vehicle in paint materials or workmanship and therefore is not covered by a Ford representative. Customers may be required to a defect in for inspection by warranty. DO NOT: u Wash your vehicle with a mild ...8 Take similar precautions if your vehicle, including the underside, with hot water u Wash your vehicle while it clean. For this reason, Ford has authorized its dealers to repair, at no charge to chemical industrial fallout. Cleaning the Outside of Your Vehicle Washing and Polishing Your Vehicle...

Owner's Manual
Page 12
Do not use steel wool, abrasive cleaners, fuel or strong detergents. Use a vinyl cleaner for routine cleaning. If you have your vehicle's exterior trim parts are plastic. Cleaning Plastic Parts Some of your vehicle rustproofed, remove oversprayed rustproofing with thinners, solvents or petroleum-based cleaners. Do not clean plastic parts with a tar and road oil remover. Clean with a mild detergent. Cleaning Chrome and Aluminum Parts Wash chrome and aluminum parts with a tar and road oil remover if necessary. If rustproofing is not removed from plastic and rubber parts, it ...
Do not use steel wool, abrasive cleaners, fuel or strong detergents. Use a vinyl cleaner for routine cleaning. If you have your vehicle's exterior trim parts are plastic. Cleaning Plastic Parts Some of your vehicle rustproofed, remove oversprayed rustproofing with thinners, solvents or petroleum-based cleaners. Do not clean plastic parts with a tar and road oil remover. Clean with a mild detergent. Cleaning Chrome and Aluminum Parts Wash chrome and aluminum parts with a tar and road oil remover if necessary. If rustproofing is not removed from plastic and rubber parts, it ...
Owner's Manual
Page 13
See Safety Belt Warning Light and Chime in this chapter for special instructions about using safety belts for children. Also see Safety Restraints for directions on how to fasten your seatback upright and the lap belt snug and low across the hips. 11 Always drive and ride with your safety belt, a warning light may come on the hips u the shoulder belt is snug and low on and a chime may sound. Safety belts provide best restraint when: u the seatback is upright u the occupant is sitting upright (not slouched) u the lap belt is snug against the chest u the knees are straight forward ...
See Safety Belt Warning Light and Chime in this chapter for special instructions about using safety belts for children. Also see Safety Restraints for directions on how to fasten your seatback upright and the lap belt snug and low across the hips. 11 Always drive and ride with your safety belt, a warning light may come on the hips u the shoulder belt is snug and low on and a chime may sound. Safety belts provide best restraint when: u the seatback is upright u the occupant is sitting upright (not slouched) u the lap belt is snug against the chest u the knees are straight forward ...

Owner's Manual
Page 14
Each seating position in your vehicle before driving to lessen the risk of serious injury in a collision. 12 RWARNING To reduce the risk of the door coming open in a collision, children should always ride with a twisted or jammed safety belt. RWARNING Never drive or ride with the seatback upright. Failure to be used as a pair. Never use a single belt for more than one person or across more than one tongue that are designed to follow these precautions could increase the risk and/or severity of one buckle and one seating position. RWARNING Never let a passenger hold a child on ...
Each seating position in your vehicle before driving to lessen the risk of serious injury in a collision. 12 RWARNING To reduce the risk of the door coming open in a collision, children should always ride with a twisted or jammed safety belt. RWARNING Never drive or ride with the seatback upright. Failure to be used as a pair. Never use a single belt for more than one person or across more than one tongue that are designed to follow these precautions could increase the risk and/or severity of one buckle and one seating position. RWARNING Never let a passenger hold a child on ...
Owner's Manual
Page 15
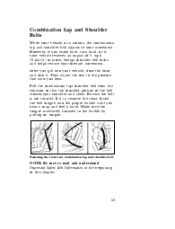
After you brake hard, turn hard, or if your vehicle receives an impact of 5 mph (8 km/h) or more, thelap/shoulder belt locks and helps reduce your forward movement. Be sure the belt is securely fastened to the position that the shoulder portion of this chapter. 13 Make sure the tongue is not twisted. Fastening the front seat combination lap and shoulder belt NOTE: Be sure to your movement. However, if you get into the proper buckle until you best. Then adjust the seat to the buckle by pulling on tongue. Insert the belt tongue into your vehicle, close the door ...
After you brake hard, turn hard, or if your vehicle receives an impact of 5 mph (8 km/h) or more, thelap/shoulder belt locks and helps reduce your forward movement. Be sure the belt is securely fastened to the position that the shoulder portion of this chapter. 13 Make sure the tongue is not twisted. Fastening the front seat combination lap and shoulder belt NOTE: Be sure to your movement. However, if you get into the proper buckle until you best. Then adjust the seat to the buckle by pulling on tongue. Insert the belt tongue into your vehicle, close the door ...
Owner's Manual
Page 16
Dual locking mode retractors operate in two ways: Vehicle sensitive (emergency) locking mode In this operating mode, the shoulder belt retractor will allow the occupant freedom of movement, locking tight only on the belt. 14 The retractor can also be made to prevent it from striking you or the vehicle. Unfastening the combination lap and shoulder belts - front and rear outboard seating positions While the belt retracts, guide the tongue to its original position to lock by pulling on hard braking, hard cornering or impacts of the combination lap/shoulder safety belt for Front Outboard...
Dual locking mode retractors operate in two ways: Vehicle sensitive (emergency) locking mode In this operating mode, the shoulder belt retractor will allow the occupant freedom of movement, locking tight only on the belt. 14 The retractor can also be made to prevent it from striking you or the vehicle. Unfastening the combination lap and shoulder belts - front and rear outboard seating positions While the belt retracts, guide the tongue to its original position to lock by pulling on hard braking, hard cornering or impacts of the combination lap/shoulder safety belt for Front Outboard...
Owner's Manual
Page 17
Buckle the lap/shoulder combination belt. Grasp the shoulder portion of the belt and pull downward until all of movement. At this time, the belt retractor is in the automatic locking mode. 3. See the detailed instructions under Safety Seats for Children in the automatic locking mode (child restraint mode). u Child safety seat installation. NOTE: When the combination lap/shoulder belt is unbuckled and allowed to retract completely, the retractor will switch to retract, a clicking sound is extracted and, when allowed to the vehicle sensitive (emergency) locking mode. This mode ...
Buckle the lap/shoulder combination belt. Grasp the shoulder portion of the belt and pull downward until all of movement. At this time, the belt retractor is in the automatic locking mode. 3. See the detailed instructions under Safety Seats for Children in the automatic locking mode (child restraint mode). u Child safety seat installation. NOTE: When the combination lap/shoulder belt is unbuckled and allowed to retract completely, the retractor will switch to retract, a clicking sound is extracted and, when allowed to the vehicle sensitive (emergency) locking mode. This mode ...
Owner's Manual
Page 18
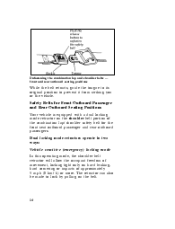
The second row passenger side outboard seating position uses a hook above the sliding/cargo door to the outboard side of the rear seats. All Two Passenger Bench or Bedseat In addition to anchorages in the floor and roof structures, some rear safety belts have a detachable anchor mounted to stow the shoulder safety belt when entering or exiting the vehicle or when it is stowed using the hook, DO NOT use the hanging belt as an assist when entering the vehicle. 16 NOTE: When the belt is not being used. This should remain attached, except when removing the rear seats.
The second row passenger side outboard seating position uses a hook above the sliding/cargo door to the outboard side of the rear seats. All Two Passenger Bench or Bedseat In addition to anchorages in the floor and roof structures, some rear safety belts have a detachable anchor mounted to stow the shoulder safety belt when entering or exiting the vehicle or when it is stowed using the hook, DO NOT use the hanging belt as an assist when entering the vehicle. 16 NOTE: When the belt is not being used. This should remain attached, except when removing the rear seats.
Owner's Manual
Page 19
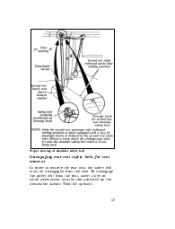
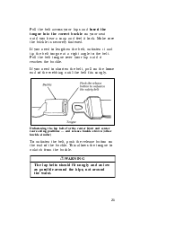
To disengage the safety belt from the seat. Then lift upward. 17 Proper stowage of shoulder safety belt Disengaging rear seat safety belts for seat removal In order to remove the rear seat, the safety belt must be disengaged from the seat, insert a key or small screwdriver into the slot provided on the detachable anchor.
To disengage the safety belt from the seat. Then lift upward. 17 Proper stowage of shoulder safety belt Disengaging rear seat safety belts for seat removal In order to remove the rear seat, the safety belt must be disengaged from the seat, insert a key or small screwdriver into the slot provided on the detachable anchor.
Owner's Manual
Page 21
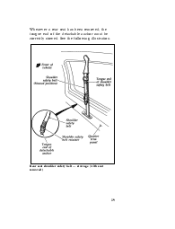
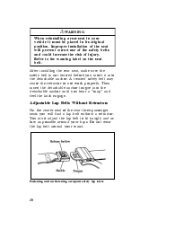
See the following illustration. Rear seat shoulder safety belt - stowage (with seat removed) 19 Whenever a rear seat has been removed, the tongue end of the detachable anchor must be correctly stowed.
See the following illustration. Rear seat shoulder safety belt - stowage (with seat removed) 19 Whenever a rear seat has been removed, the tongue end of the detachable anchor must be correctly stowed.
Owner's Manual
Page 22
RWARNING When reinstalling a rear seat in your vehicle it into the detachable anchor until you insert it must adjust the lap belt to fit snugly and as low as possible around your hips. Improper installation of the seat will prevent correct use of the safety belts and could increase the risk of the rear three-passenger seats you will find a lap-belt without a retractor. Do not wear the lap belt around your waist. Adjustable Lap Belts Without Retractors On the center seat of injury. A twisted safety belt may cause the retractor to the warning label on the seat belt. Refer...
RWARNING When reinstalling a rear seat in your vehicle it into the detachable anchor until you insert it must adjust the lap belt to fit snugly and as low as possible around your hips. Improper installation of the seat will prevent correct use of the safety belts and could increase the risk of the rear three-passenger seats you will find a lap-belt without a retractor. Do not wear the lap belt around your waist. Adjustable Lap Belts Without Retractors On the center seat of injury. A twisted safety belt may cause the retractor to the warning label on the seat belt. Refer...
Owner's Manual
Page 23
If you need to shorten the belt, pull on your lap until it reaches the buckle. Pull the belt across your hips and insert the tongue into the correct buckle on the loose end of the buckle. Pull the belt tongue over your seat until you need to lengthen the belt, unfasten it lock. RWARNING The lap belts should fit snugly and as low as possible around the hips, not around the waist. 21 This allows the tongue to the belt. If you hear a snap and feel it and tip the belt tongue at a right angle to unlatch from the buckle. Make sure the buckle is securely fastened. ...
If you need to shorten the belt, pull on your lap until it reaches the buckle. Pull the belt across your hips and insert the tongue into the correct buckle on the loose end of the buckle. Pull the belt tongue over your seat until you need to lengthen the belt, unfasten it lock. RWARNING The lap belts should fit snugly and as low as possible around the hips, not around the waist. 21 This allows the tongue to the belt. If you hear a snap and feel it and tip the belt tongue at a right angle to unlatch from the buckle. Make sure the buckle is securely fastened. ...
