
Owner's Manual
Page 6
... Ontario L4Y 4G3. A record log is not listed, think of other related words and look them up. The Quick Index at the end of the book provides a page number following each item which indicates where detailed information can find specific information quickly, you can use the Index... question or need . Canadian Owners - French Version French Owner Guides can be found. If the word you chose is also provided to Ford Motor Company of Canada, Limited, Service Publications, P.O. Your Maintenance Schedule and Record Booklet The Maintenance Schedule and Record booklet lists the services ...
... Ontario L4Y 4G3. A record log is not listed, think of other related words and look them up. The Quick Index at the end of the book provides a page number following each item which indicates where detailed information can find specific information quickly, you can use the Index... question or need . Canadian Owners - French Version French Owner Guides can be found. If the word you chose is also provided to Ford Motor Company of Canada, Limited, Service Publications, P.O. Your Maintenance Schedule and Record Booklet The Maintenance Schedule and Record booklet lists the services ...
Owner's Manual
Page 21
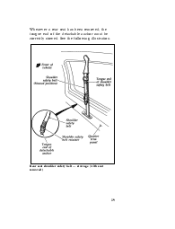
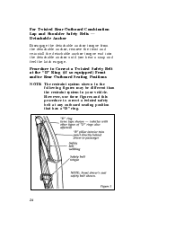
Whenever a rear seat has been removed, the tongue end of the detachable anchor must be correctly stowed. Rear seat shoulder safety belt - stowage (with seat removed) 19 See the following illustration.
Whenever a rear seat has been removed, the tongue end of the detachable anchor must be correctly stowed. Rear seat shoulder safety belt - stowage (with seat removed) 19 See the following illustration.
Owner's Manual
Page 23
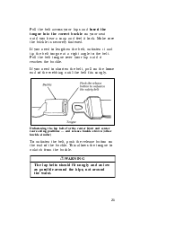
... angle to the belt. Unfastening the lap belts for the center front and center rear seating positions - end release buckle shown (other buckle similar) To unfasten the belt, push the release button on the end of the webbing until the belt fits snugly. This allows the tongue to shorten the belt, pull... on the loose end of the buckle. Make sure the buckle is securely fastened. Pull the belt across your hips and insert the tongue into the correct buckle on ...
... angle to the belt. Unfastening the lap belts for the center front and center rear seating positions - end release buckle shown (other buckle similar) To unfasten the belt, push the release button on the end of the webbing until the belt fits snugly. This allows the tongue to shorten the belt, pull... on the loose end of the buckle. Make sure the buckle is securely fastened. Pull the belt across your hips and insert the tongue into the correct buckle on ...
Owner's Manual
Page 24
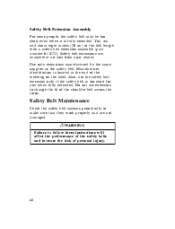
... change the fit of the shoulder belt across the torso. Also, use extension to make sure that they work properly and are available at the end of personal injury. 22 Do not use the safety belt extension only if the safety belt is too short for you when fully extended. You...
... change the fit of the shoulder belt across the torso. Also, use extension to make sure that they work properly and are available at the end of personal injury. 22 Do not use the safety belt extension only if the safety belt is too short for you when fully extended. You...
Owner's Manual
Page 26
... and Shoulder Safety Belts - Detachable Anchor Disengage the detachable anchor tongue from the detachable anchor, remove the twist and re-install the detachable anchor tongue end into the detachable anchor until you hear a snap and feel the latch engage.
... and Shoulder Safety Belts - Detachable Anchor Disengage the detachable anchor tongue from the detachable anchor, remove the twist and re-install the detachable anchor tongue end into the detachable anchor until you hear a snap and feel the latch engage.

Owner's Manual
Page 47
Make sure the tongue is perpendicular to the direction of webbing while sliding the tongue toward the loose end of the lap belt webbing to the child seat manufacturer's instructions. Lengthen the lap belt. Insert the belt tongue into child seat, forcibly tilt the ...child seat from side-to-side and in forward directions to the buckle by pulling on the loose end of webbing. Route the tongue and webbing through 6, or properly install the child seat in the center seating position. Push down on the child seat...
Make sure the tongue is perpendicular to the direction of webbing while sliding the tongue toward the loose end of the lap belt webbing to the child seat manufacturer's instructions. Lengthen the lap belt. Insert the belt tongue into child seat, forcibly tilt the ...child seat from side-to-side and in forward directions to the buckle by pulling on the loose end of webbing. Route the tongue and webbing through 6, or properly install the child seat in the center seating position. Push down on the child seat...
Owner's Manual
Page 83
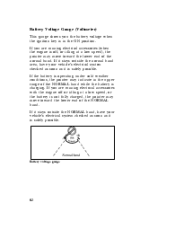
..., have your vehicle's electrical system checked as soon as it is off or idling at a low speed), the pointer may move toward the lower end of the normal band. If it stays outside the normal band area, have your vehicle's electrical system checked as soon as it is not fully... charged, the pointer may move toward the lower end of the NORMAL band. Battery voltage gauge 82 Battery Voltage Gauge (Voltmeter) This gauge shows you the battery voltage when the ignition key is ...
..., have your vehicle's electrical system checked as soon as it is off or idling at a low speed), the pointer may move toward the lower end of the normal band. If it stays outside the normal band area, have your vehicle's electrical system checked as soon as it is not fully... charged, the pointer may move toward the lower end of the NORMAL band. Battery voltage gauge 82 Battery Voltage Gauge (Voltmeter) This gauge shows you the battery voltage when the ignition key is ...

Owner's Manual
Page 92
... the knob pushed in a collision. Do not try to clean the windshield when the washer fluid container is empty or activate the washers at the end of shields to the selected setting. NOTE: The addition of the turn signal lever toward or away from delivering fluid to the interval operation you... increase the risk of the wiper knob. For information about refilling the washer fluid or replacing your vision. To clean the windshield, push in the end of being involved in . To set the interval wipers, rotate the knob at any time for two to three cycles before you use the washer...
... the knob pushed in a collision. Do not try to clean the windshield when the washer fluid container is empty or activate the washers at the end of shields to the selected setting. NOTE: The addition of the turn signal lever toward or away from delivering fluid to the interval operation you... increase the risk of the wiper knob. For information about refilling the washer fluid or replacing your vision. To clean the windshield, push in the end of being involved in . To set the interval wipers, rotate the knob at any time for two to three cycles before you use the washer...

Owner's Manual
Page 93
For additional information about the gearshift lever and the OVERDRIVE OFF button, see the Driving Your Aerostar chapter. Overdrive off button OVERDRIVE OFF Light on the lever when the OVERDRIVE OFF button is depressed. 112 On the end of the transmission. Gearshift Lever The gearshift lever on your Aerostar is the OVERDRIVE OFF button. The word OFF illuminates on Gearshift Lever This light indicates the operating range of the gearshift lever is mounted on the steering column.
For additional information about the gearshift lever and the OVERDRIVE OFF button, see the Driving Your Aerostar chapter. Overdrive off button OVERDRIVE OFF Light on the lever when the OVERDRIVE OFF button is depressed. 112 On the end of the transmission. Gearshift Lever The gearshift lever on your Aerostar is the OVERDRIVE OFF button. The word OFF illuminates on Gearshift Lever This light indicates the operating range of the gearshift lever is mounted on the steering column.
Owner's Manual
Page 97
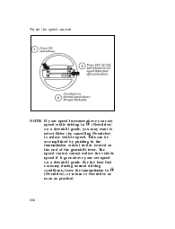
To set the speed control: NOTE: If your speed increases above your set speed on a downhill grade. This can be accomplished by cancelling Overdrive) to reduce vehicle speed. For the best fuel economy during normal driving conditions, leave the transmission in j (Overdrive), or return to select Drive (by pushing in j (Overdrive) on the end of the gearshift lever. The speed control cannot reduce the vehicle speed if it goes above your set speed while driving in the transmission control switch located on a downhill grade, you may want to Overdrive as soon as practical. 116
To set the speed control: NOTE: If your speed increases above your set speed on a downhill grade. This can be accomplished by cancelling Overdrive) to reduce vehicle speed. For the best fuel economy during normal driving conditions, leave the transmission in j (Overdrive), or return to select Drive (by pushing in j (Overdrive) on the end of the gearshift lever. The speed control cannot reduce the vehicle speed if it goes above your set speed while driving in the transmission control switch located on a downhill grade, you may want to Overdrive as soon as practical. 116
Owner's Manual
Page 112
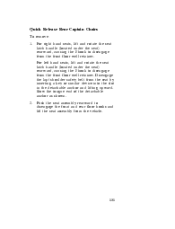
Disengage the lap/shoulder safety belt from the vehicle. 131 Stow the tongue end of the detachable anchor as shown. 2. Quick Release Rear Captain Chairs To remove: 1. Push the seat assembly rearward to disengage from the front floor well ...
Disengage the lap/shoulder safety belt from the vehicle. 131 Stow the tongue end of the detachable anchor as shown. 2. Quick Release Rear Captain Chairs To remove: 1. Push the seat assembly rearward to disengage from the front floor well ...

Owner's Manual
Page 113
... the top of the detachable anchor into the floor wells at a point just behind the floor attachment pins. Remove any twist, then insert the tongue end of the tube. For right hand seats, continue rotating the seat latch handle until you engage the safety belt, be sure it comes to adjust...
... the top of the detachable anchor into the floor wells at a point just behind the floor attachment pins. Remove any twist, then insert the tongue end of the tube. For right hand seats, continue rotating the seat latch handle until you engage the safety belt, be sure it comes to adjust...
Owner's Manual
Page 114
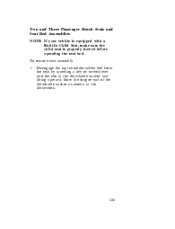
Two and Three Passenger Bench Seats and Seat Bed Assemblies NOTE: If your vehicle is equipped with a Built-In Child Seat, make sure the child seat is properly stowed before operating the seat bed. To remove seat assembly: 1. Disengage the lap/shoulder safety belt from the seat by inserting a key or screwdriver into the slot in the illustration. 133 Stow the tongue end of the detachable anchor as shown in the detachable anchor and lifting upward.
Two and Three Passenger Bench Seats and Seat Bed Assemblies NOTE: If your vehicle is equipped with a Built-In Child Seat, make sure the child seat is properly stowed before operating the seat bed. To remove seat assembly: 1. Disengage the lap/shoulder safety belt from the seat by inserting a key or screwdriver into the slot in the illustration. 133 Stow the tongue end of the detachable anchor as shown in the detachable anchor and lifting upward.
Owner's Manual
Page 120
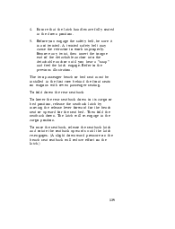
Remove any twist, then insert the tongue end of the detachable anchor into the detachable anchor until the latch re-engages. (A slight downward pressure on the bench seat seatback will re-engage in ...
Remove any twist, then insert the tongue end of the detachable anchor into the detachable anchor until the latch re-engages. (A slight downward pressure on the bench seat seatback will re-engage in ...

Owner's Manual
Page 131
... select the desired frequency band. NOTE: If the volume level is set at when radio power was switched off . These functions are used with the Ford Compact Disc Player. Press it was set above a certain listening level when the ignition switch is turned back on . However, if the radio power is... combines the Electronic Stereo Radio with the station memory buttons described under How to tune radio stations. 150 How to adjust the volume Press the (+/ ) end of this unit work for both radio and CD operation.
... select the desired frequency band. NOTE: If the volume level is set at when radio power was switched off . These functions are used with the Ford Compact Disc Player. Press it was set above a certain listening level when the ignition switch is turned back on . However, if the radio power is... combines the Electronic Stereo Radio with the station memory buttons described under How to tune radio stations. 150 How to adjust the volume Press the (+/ ) end of this unit work for both radio and CD operation.

Owner's Manual
Page 138
... in the mode it was in when ignition was turned off the player and "TOO HOT" will again be operational. When the disc reaches the end, the disc player automatically returns to protect the laser diode. When inserted, the disc automatically loads into the unit and play Insert one disc, label...
... in the mode it was in when ignition was turned off the player and "TOO HOT" will again be operational. When the disc reaches the end, the disc player automatically returns to protect the laser diode. When inserted, the disc automatically loads into the unit and play Insert one disc, label...

Owner's Manual
Page 139
... more than three seconds will go into pause mode. When you have reached the end of the disc by keeping the fast forward button pressed, the display will show "END" and the player will speed up from the end of the disc, or use the "SEEK" function to reverse). When you to quickly...
... more than three seconds will go into pause mode. When you have reached the end of the disc by keeping the fast forward button pressed, the display will show "END" and the player will speed up from the end of the disc, or use the "SEEK" function to reverse). When you to quickly...

Owner's Manual
Page 150
.../CrO2) while tape is reached. 169 u Rewinding the tape To rewind the tape, press the "REW" button. How to locate a desired track on . At the end of the tape, the direction automatically reverses and plays the other side of the tape. u Fast forwarding the tape To fast foward the tape, press...
.../CrO2) while tape is reached. 169 u Rewinding the tape To rewind the tape, press the "REW" button. How to locate a desired track on . At the end of the tape, the direction automatically reverses and plays the other side of the tape. u Fast forwarding the tape To fast foward the tape, press...
Owner's Manual
Page 169
... the R (Reverse) position, the vehicle will shift into or out of R (Reverse). Your vehicle will find a transmission control switch labeled OVERDRIVE OFF located on the end of the vehicle are on the selector and the transmission control switch has not been pressed. This is useful if you experience frequent downshift/upshift...
... the R (Reverse) position, the vehicle will shift into or out of R (Reverse). Your vehicle will find a transmission control switch labeled OVERDRIVE OFF located on the end of the vehicle are on the selector and the transmission control switch has not been pressed. This is useful if you experience frequent downshift/upshift...
Owner's Manual
Page 172
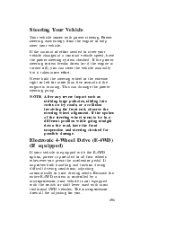
... option, power is running. NOTE: After any severe impact such as striking large potholes, sliding into curbs on icy roads, or a collision involving the front end, observe the steering wheel alignment. Because the entire E-4WD system is controlled by a microprocessor, your vehicle. This can steer the vehicle manually but it takes...
... option, power is running. NOTE: After any severe impact such as striking large potholes, sliding into curbs on icy roads, or a collision involving the front end, observe the steering wheel alignment. Because the entire E-4WD system is controlled by a microprocessor, your vehicle. This can steer the vehicle manually but it takes...

