Owner's Manual
Page 1
2004 Chevrolet Blazer Owner Manual Seats and Restraint Systems ...1-1 Front Seats ...1-2 Rear Seats ...1-6 Safety Belts ...1-8 Child Restraints ...1-31 Air Bag System ...1-52 Restraint System Check ...1-58 Features...(s) ...3-37 M Driving Your Vehicle ...4-1 Your Driving, the Road, and Your Vehicle ...4-2 Towing ...4-46 Service and Appearance Care ...5-1 Service ...5-3 Fuel ...5-4 Checking Things Under the Hood ...5-10 Rear Axle ...5-48 Four-Wheel Drive ...5-49 Front Axle ...5-50 Bulb Replacement ...5-51 Windshield Wiper Blade Replacement ...5-56 Tires ...5-59 Appearance Care ...5-93 Vehicle...
2004 Chevrolet Blazer Owner Manual Seats and Restraint Systems ...1-1 Front Seats ...1-2 Rear Seats ...1-6 Safety Belts ...1-8 Child Restraints ...1-31 Air Bag System ...1-52 Restraint System Check ...1-58 Features...(s) ...3-37 M Driving Your Vehicle ...4-1 Your Driving, the Road, and Your Vehicle ...4-2 Towing ...4-46 Service and Appearance Care ...5-1 Service ...5-3 Fuel ...5-4 Checking Things Under the Hood ...5-10 Rear Axle ...5-48 Four-Wheel Drive ...5-49 Front Axle ...5-50 Bulb Replacement ...5-51 Windshield Wiper Blade Replacement ...5-56 Tires ...5-59 Appearance Care ...5-93 Vehicle...
Owner's Manual
Page 88
... pushing your foot off the accelerator pedal, turn the ignition key to starting your vehicle. Turn off if the engine reaches 5,600 rpm. Open the hood and unwrap the electrical cord. Notice: Your engine is not required. Engine Speed Control Your vehicle has an engine overspeed control that shuts the fuel...
... pushing your foot off the accelerator pedal, turn the ignition key to starting your vehicle. Turn off if the engine reaches 5,600 rpm. Open the hood and unwrap the electrical cord. Notice: Your engine is not required. Engine Speed Control Your vehicle has an engine overspeed control that shuts the fuel...

Owner's Manual
Page 151
... air inlets at the base of the windshield that may block the flow of air into your vehicle. • Use of non-GM approved hood deflectors may be or is a problem with this section, you locate them. Operation Tips • Clear away any ice, snow or leaves from...
... air inlets at the base of the windshield that may block the flow of air into your vehicle. • Use of non-GM approved hood deflectors may be or is a problem with this section, you locate them. Operation Tips • Clear away any ice, snow or leaves from...

Owner's Manual
Page 233
... traction and roll the vehicle over. Remove any leakage. If it is only shallow water, it can still wash away the ground from under the hood. These accumulations can cause glazing and uneven braking. Also, check the fuel lines and cooling system for damage. See Driving in mud or sand, have...
... traction and roll the vehicle over. Remove any leakage. If it is only shallow water, it can still wash away the ground from under the hood. These accumulations can cause glazing and uneven braking. Also, check the fuel lines and cooling system for damage. See Driving in mud or sand, have...

Owner's Manual
Page 277
... Octane ...5-4 Gasoline Specifications ...5-5 California Fuel ...5-5 Additives ...5-6 Fuels in Foreign Countries ...5-6 Filling Your Tank ...5-7 Filling a Portable Fuel Container ...5-10 Checking Things Under the Hood ...5-10 Hood Release ...5-11 Engine Compartment Overview ...5-12 Engine Oil ...5-13 Engine Air Cleaner/Filter ...5-18 Automatic Transmission Fluid ...5-19 Manual Transmission Fluid ...5-22 Hydraulic Clutch ...5-23...
... Octane ...5-4 Gasoline Specifications ...5-5 California Fuel ...5-5 Additives ...5-6 Fuels in Foreign Countries ...5-6 Filling Your Tank ...5-7 Filling a Portable Fuel Container ...5-10 Checking Things Under the Hood ...5-10 Hood Release ...5-11 Engine Compartment Overview ...5-12 Engine Oil ...5-13 Engine Air Cleaner/Filter ...5-18 Automatic Transmission Fluid ...5-19 Manual Transmission Fluid ...5-22 Hydraulic Clutch ...5-23...
Owner's Manual
Page 286
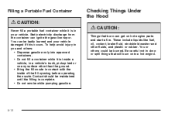
... while it is in a vehicle's trunk, pickup bed or on hot engine parts and start a fire. Filling a Portable Fuel Container Checking Things Under the Hood {CAUTION: Never fill a portable fuel container while it is inside of the fill opening before operating the nozzle. Static electricity discharge from the...
... while it is in a vehicle's trunk, pickup bed or on hot engine parts and start a fire. Filling a Portable Fuel Container Checking Things Under the Hood {CAUTION: Never fill a portable fuel container while it is inside of the fill opening before operating the nozzle. Static electricity discharge from the...
Owner's Manual
Page 287
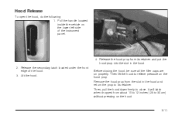
.... 4. Remove the hood prop from its retainer. Then lift the hood to its retainer and put the hood prop into the slot in the hood and return the prop to relieve pressure on the hood. 5-11 Release the hood prop from the slot in the hood. 2. Hood Release To open the hood, do the following:... 1. Pull the handle located inside the vehicle on properly. Before closing the hood, be sure all the filler caps are on...
.... 4. Remove the hood prop from its retainer. Then lift the hood to its retainer and put the hood prop into the slot in the hood and return the prop to relieve pressure on the hood. 5-11 Release the hood prop from the slot in the hood. 2. Hood Release To open the hood, do the following:... 1. Pull the handle located inside the vehicle on properly. Before closing the hood, be sure all the filler caps are on...
Owner's Manual
Page 288
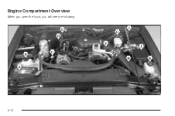
Engine Compartment Overview When you open the hood, you will see the following: 5-12
Engine Compartment Overview When you open the hood, you will see the following: 5-12

Owner's Manual
Page 304
... turn it off and get everyone away from the vehicle until it overheats, and get out of steam or coolant before you just open the hood. You or others could be covered by your engine if it cools down. Stop your warranty. 5-28 The costly repairs would not be badly burned... be badly damaged. If Steam Is Coming From Your Engine {CAUTION: Steam from an overheated engine can burn you badly, even if you open the hood.
... turn it off and get everyone away from the vehicle until it overheats, and get out of steam or coolant before you just open the hood. You or others could be covered by your engine if it cools down. Stop your warranty. 5-28 The costly repairs would not be badly burned... be badly damaged. If Steam Is Coming From Your Engine {CAUTION: Steam from an overheated engine can burn you badly, even if you open the hood.
Owner's Manual
Page 305
... driving. If No Steam Is Coming From Your Engine If you 're parked. Turn on , you : 2. Push down . You may decide not to lift the hood but see or hear no sign of steam, idle the engine for three minutes while you get the overheat warning with no steam, the problem...
... driving. If No Steam Is Coming From Your Engine If you 're parked. Turn on , you : 2. Push down . You may decide not to lift the hood but see or hear no sign of steam, idle the engine for three minutes while you get the overheat warning with no steam, the problem...
Owner's Manual
Page 306
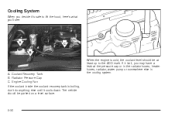
When the engine is boiling, don't do anything else until it isn't, you may have a leak at least up to lift the hood, here's what you decide it's safe to the ADD mark. The vehicle should be parked on a level surface. Radiator Pressure Cap C. Coolant Recovery Tank B. Engine Cooling Fan If the coolant inside the coolant recovery tank is cold, the coolant level should be at the pressure cap or in the radiator hoses, heater hoses, radiator, water pump or somewhere else in the cooling system. 5-30 If it cools down. Cooling System When you 'll see: A.
When the engine is boiling, don't do anything else until it isn't, you may have a leak at least up to lift the hood, here's what you decide it's safe to the ADD mark. The vehicle should be parked on a level surface. Radiator Pressure Cap C. Coolant Recovery Tank B. Engine Cooling Fan If the coolant inside the coolant recovery tank is cold, the coolant level should be at the pressure cap or in the radiator hoses, heater hoses, radiator, water pump or somewhere else in the cooling system. 5-30 If it cools down. Cooling System When you 'll see: A.
Owner's Manual
Page 321
... and get it on the dead battery because this , and some basic things you . Do not get medical help immediately. 5-45 If you . Open the hoods and locate the batteries. Find the positive (+) and negative (-) terminal locations on your new vehicle. The vehicles could be sure the right amount of the...
... and get it on the dead battery because this , and some basic things you . Do not get medical help immediately. 5-45 If you . Open the hoods and locate the batteries. Find the positive (+) and negative (-) terminal locations on your new vehicle. The vehicles could be sure the right amount of the...
Owner's Manual
Page 327
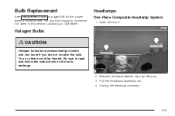
For any bulb changing procedure not listed in this section, contact your GM dealer. Halogen Bulbs {CAUTION: Halogen bulbs have pressurized gas inside and can burst if you drop or scratch the bulb. Be sure to use. Headlamps One-Piece Composite Headlamp System 1. Pull the headlamp assembly out. 4. You or others could be injured. Unplug the electrical connector. 5-51 Open the hood. Remove the black retainer clips by lifting up. 3. Bulb Replacement See Replacement Bulbs on page 5-56 for the proper types of bulbs to read and follow the instructions on the bulb package. 2.
For any bulb changing procedure not listed in this section, contact your GM dealer. Halogen Bulbs {CAUTION: Halogen bulbs have pressurized gas inside and can burst if you drop or scratch the bulb. Be sure to use. Headlamps One-Piece Composite Headlamp System 1. Pull the headlamp assembly out. 4. You or others could be injured. Unplug the electrical connector. 5-51 Open the hood. Remove the black retainer clips by lifting up. 3. Bulb Replacement See Replacement Bulbs on page 5-56 for the proper types of bulbs to read and follow the instructions on the bulb package. 2.
Owner's Manual
Page 328
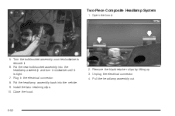
Close the hood. 2. Pull the headlamp assembly out. 5-52 Put the new bulb/socket assembly into the vehicle. 9. Put the headlamp assembly back into the headlamp assembly and turn it clockwise until it . 6. Unplug the electrical connector. 4. Plug in the electrical connector. 8. Open the hood. 5. Remove the black retainer clips by lifting up. 3. Turn the bulb/socket assembly counterclockwise to remove it is tight. 7. Install the two retaining clips. 10. Two-Piece Composite Headlamp System 1.
Close the hood. 2. Pull the headlamp assembly out. 5-52 Put the new bulb/socket assembly into the vehicle. 9. Put the headlamp assembly back into the headlamp assembly and turn it clockwise until it . 6. Unplug the electrical connector. 4. Plug in the electrical connector. 8. Open the hood. 5. Remove the black retainer clips by lifting up. 3. Turn the bulb/socket assembly counterclockwise to remove it is tight. 7. Install the two retaining clips. 10. Two-Piece Composite Headlamp System 1.
Owner's Manual
Page 329
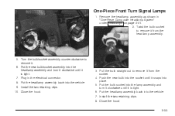
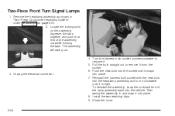
...-Piece Front Turn Signal Lamps 1. Put the headlamp assembly back into the vehicle. 7. Pull the bulb straight out to remove it is tight. 7. Close the hood. 3. Put the headlamp assembly back into the vehicle. 9. Put the new bulb/socket assembly into place. 5. Push the new bulb into the socket until it... bulb socket to remove it . 6. Plug in "One-Piece Composite Headlamp System" under Headlamps on page 5-51. 2. Install the two retaining clips. 10. Close the hood. 5-53
...-Piece Front Turn Signal Lamps 1. Put the headlamp assembly back into the vehicle. 7. Pull the bulb straight out to remove it is tight. 7. Close the hood. 3. Put the headlamp assembly back into the vehicle. 9. Put the new bulb/socket assembly into place. 5. Push the new bulb into the socket until it... bulb socket to remove it . 6. Plug in "One-Piece Composite Headlamp System" under Headlamps on page 5-51. 2. Install the two retaining clips. 10. Close the hood. 5-53
Owner's Manual
Page 330
... into place. 8. To reinstall the assembly, snap the outboard end of the assembly out while holding the tabs. Unplug the electrical connector. 5-54 Close the hood. 3. Install the two retaining clips. 9. The assembly will swing out. 4. Pull the bulb straight out to remove it into place. 7. Two-Piece Front Turn Signal...
... into place. 8. To reinstall the assembly, snap the outboard end of the assembly out while holding the tabs. Unplug the electrical connector. 5-54 Close the hood. 3. Install the two retaining clips. 9. The assembly will swing out. 4. Pull the bulb straight out to remove it into place. 7. Two-Piece Front Turn Signal...

Owner's Manual
Page 381
..., Ventilation, Air Cooling Sensors (Automatic) Anti-Lock Brakes Rear Wiper Radio, Ignition Engine Compartment Fuse Block The engine compartment fuse block is located under the hood on location. To reinstall the fuse panel cover, push in and turn the fastener clockwise. 5-105 Remove the cover by turning the fastener counterclockwise.
..., Ventilation, Air Cooling Sensors (Automatic) Anti-Lock Brakes Rear Wiper Radio, Ignition Engine Compartment Fuse Block The engine compartment fuse block is located under the hood on location. To reinstall the fuse panel cover, push in and turn the fastener clockwise. 5-105 Remove the cover by turning the fastener counterclockwise.

Owner's Manual
Page 412
... to turn off the engine immediately if it starts. 3. The starter should work only when the clutch is not pushed all the way down all hood hinges, hood latch assembly, secondary latch, pivots, spring anchor, release pawl, door hinges, fuel door hinge, endgate hinges, outer tailgate handle pivot points, tailgate hinges, tailgate...
... to turn off the engine immediately if it starts. 3. The starter should work only when the clutch is not pushed all the way down all hood hinges, hood latch assembly, secondary latch, pivots, spring anchor, release pawl, door hinges, fuel door hinge, endgate hinges, outer tailgate handle pivot points, tailgate hinges, tailgate...
Owner's Manual
Page 418
... meeting requirements of NLGI #2, Category LB or GC-LB. Synthetic Grease with Teflon, Superlube (GM Part No. Usage Hood Latch Assembly, Secondary Latch, Pivots, Spring Anchor and Release Pawl Hood and Door Hinges Fluid/Lubricant Lubriplate Lubricant Aerosol (GM Part No. U.S. 12346241, in Canada 10950849. Chassis Lubricant Clutch Pushrod (GM...
... meeting requirements of NLGI #2, Category LB or GC-LB. Synthetic Grease with Teflon, Superlube (GM Part No. Usage Hood Latch Assembly, Secondary Latch, Pivots, Spring Anchor and Release Pawl Hood and Door Hinges Fluid/Lubricant Lubriplate Lubricant Aerosol (GM Part No. U.S. 12346241, in Canada 10950849. Chassis Lubricant Clutch Pushrod (GM...

Owner's Manual
Page 439
.../Tire Label ...Chains, Tires ...Charging System Light ...Check Engine Light ...Gages Warning Light ...Checking Brake Fluid ...Checking Coolant ...Checking Engine Oil ...Checking Things Under the Hood ...Checking Your Restraint Systems ...Chemical Paint Spotting ...Child Restraints Center Seat Positions ...Child Restraint Systems ...Infants and Young Children ...Lower Anchorages and Top Tethers for...
.../Tire Label ...Chains, Tires ...Charging System Light ...Check Engine Light ...Gages Warning Light ...Checking Brake Fluid ...Checking Coolant ...Checking Engine Oil ...Checking Things Under the Hood ...Checking Your Restraint Systems ...Chemical Paint Spotting ...Child Restraints Center Seat Positions ...Child Restraint Systems ...Infants and Young Children ...Lower Anchorages and Top Tethers for...


