
Owner's Manual
Page 68
Section 2 Features and Controls Storage Areas ...2-49 Glove Box ...2-49 Overhead Console ...2-49 Front Storage Area ...2-56 Assist Handles ...2-57 Garment Hooks ...2-57 Luggage Carrier ...2-57 Rear Storage Area ...2-59 Convenience Net ...2-59 Rear Convenience System ...2-60 ...
Section 2 Features and Controls Storage Areas ...2-49 Glove Box ...2-49 Overhead Console ...2-49 Front Storage Area ...2-56 Assist Handles ...2-57 Garment Hooks ...2-57 Luggage Carrier ...2-57 Rear Storage Area ...2-59 Convenience Net ...2-59 Rear Convenience System ...2-60 ...

Owner's Manual
Page 87
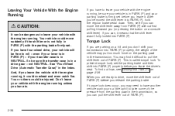
... continue to the floor, while you hold the ignition key in any other position - that 's a safety feature. Your radio, power windows, sunroof and overhead console will go of the key and let up to PARK (P) or NEUTRAL (N).
... continue to the floor, while you hold the ignition key in any other position - that 's a safety feature. Your radio, power windows, sunroof and overhead console will go of the key and let up to PARK (P) or NEUTRAL (N).
Owner's Manual
Page 89
... best advice for your battery which could be powered anytime the shift lever is in the area where you have a shift lever located on the console between the seats or on your shift lever. Also, the wrong kind of oil you 'll be sure to unplug and store the cord as...
... best advice for your battery which could be powered anytime the shift lever is in the area where you have a shift lever located on the console between the seats or on your shift lever. Also, the wrong kind of oil you 'll be sure to unplug and store the cord as...

Owner's Manual
Page 90
... have to fully apply your vehicle if the shift lever is not fully in PARK (P) as you wish. See Shifting Out of Park (P) on the console shift lever, push the shift lever all the way in PARK (P) with the parking brake firmly set your rear wheels. To be free to...
... have to fully apply your vehicle if the shift lever is not fully in PARK (P) as you wish. See Shifting Out of Park (P) on the console shift lever, push the shift lever all the way in PARK (P) with the parking brake firmly set your rear wheels. To be free to...
Owner's Manual
Page 92
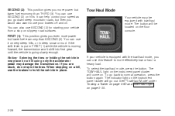
... Mode" under Towing a Trailer on page 4-60 and Tow/Haul Light on a hill using only the accelerator pedal may be located on the floor console. It can help control your speed as you go down steep mountain roads, but then you would also want to use this feature to more...
... Mode" under Towing a Trailer on page 4-60 and Tow/Haul Light on a hill using only the accelerator pedal may be located on the floor console. It can help control your speed as you go down steep mountain roads, but then you would also want to use this feature to more...
Owner's Manual
Page 103
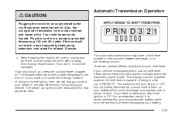
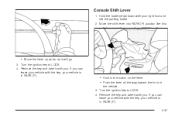
... If you . Remove the key and take it with the key, your right foot and set the parking brake. 2. Turn the ignition key to LOCK. 4. Console Shift Lever 1.
... If you . Remove the key and take it with the key, your right foot and set the parking brake. 2. Turn the ignition key to LOCK. 4. Console Shift Lever 1.
Owner's Manual
Page 104
... (or pressing the button on the parking pawl in PARK (P) and your transfer case is called torque lock. You may put too much force on a console shift lever). If torque lock does occur, you may need to have to leave your vehicle with the engine running . Torque Lock If you are...
... (or pressing the button on the parking pawl in PARK (P) and your transfer case is called torque lock. You may put too much force on a console shift lever). If torque lock does occur, you may need to have to leave your vehicle with the engine running . Torque Lock If you are...

Owner's Manual
Page 110
... changing lanes. See "Rear Window Defogger" under Climate Control System on your right. HomeLink® Transmitter {CAUTION: A convex mirror can see more information. Mini Overhead Console 2-44 If you cut too sharply into the right lane, you operate the rear window defogger, a defogger also warms the heated outside heated mirrors. Outside...
... changing lanes. See "Rear Window Defogger" under Climate Control System on your right. HomeLink® Transmitter {CAUTION: A convex mirror can see more information. Mini Overhead Console 2-44 If you cut too sharply into the right lane, you operate the rear window defogger, a defogger also warms the heated outside heated mirrors. Outside...

Owner's Manual
Page 111
Operation is subject to the following two conditions: (1) this device may not cause harmful interference, and (2) this equipment. Full-Size Overhead Console HomeLink , a combined universal transmitter and receiver, provides a way to replace up to three hand−held transmitters used to the following two conditions: (1) this device ...
Operation is subject to the following two conditions: (1) this device may not cause harmful interference, and (2) this equipment. Full-Size Overhead Console HomeLink , a combined universal transmitter and receiver, provides a way to replace up to three hand−held transmitters used to the following two conditions: (1) this device ...
Owner's Manual
Page 115
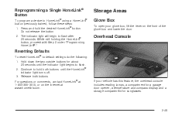
...light begins to HomeLink® using a HomeLink® button previously trained, follow these steps: 1. Press and hold both buttons. Overhead Console Resetting Defaults To reset HomeLink® to flash after 20 seconds. Continue to hold the desired HomeLink® button. Hold ...174; button, proceed with Step 2 under "Programming HomeLink®." Storage Areas Glove Box To open your vehicle has this feature, the overhead console includes reading lamps, a compartment for a garage door opener, a temperature and compass display and a storage compartment for about 20 seconds until...
...light begins to HomeLink® using a HomeLink® button previously trained, follow these steps: 1. Press and hold both buttons. Overhead Console Resetting Defaults To reset HomeLink® to flash after 20 seconds. Continue to hold the desired HomeLink® button. Hold ...174; button, proceed with Step 2 under "Programming HomeLink®." Storage Areas Glove Box To open your vehicle has this feature, the overhead console includes reading lamps, a compartment for a garage door opener, a temperature and compass display and a storage compartment for about 20 seconds until...
Owner's Manual
Page 116
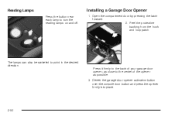
Peel the protective backing from the hook and loop patch. Center the garage door opener activation button over the console door button and press the opener firmly into place. 2-50 Installing a Garage Door Opener 1. The lamps can also be swiveled to the center of the opener as possible. 3. Press it firmly to the back of your garage door opener, as close to point in the desired direction. Open the compartment door by pressing the latch forward. 2. Reading Lamps Press the button near each lamp to turn the reading lamps on and off.
Peel the protective backing from the hook and loop patch. Center the garage door opener activation button over the console door button and press the opener firmly into place. 2-50 Installing a Garage Door Opener 1. The lamps can also be swiveled to the center of the opener as possible. 3. Press it firmly to the back of your garage door opener, as close to point in the desired direction. Open the compartment door by pressing the latch forward. 2. Reading Lamps Press the button near each lamp to turn the reading lamps on and off.
Owner's Manual
Page 118
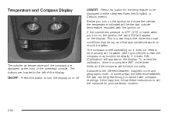
... appear on or off. 2-52 However, when your particular location: The outside air temperature and the compass are located to the left of the overhead console. To correct the calibration, drive in either degrees Farenheit (English) or Celsius (metric). The compass is a warning to be great enough to cause false compass...
... appear on or off. 2-52 However, when your particular location: The outside air temperature and the compass are located to the left of the overhead console. To correct the calibration, drive in either degrees Farenheit (English) or Celsius (metric). The compass is a warning to be great enough to cause false compass...

Owner's Manual
Page 119
4. Press ON/OFF to enter your zone number. 2. Find your zone number appears on the display. 5. The overhead console has a sunglasses storage compartment. 2-53 After five seconds, VAR CAL (Variance Calibration) will go off. 3. Your variance is now set. Sunglasses Storage Compartment 1. The display will appear on the zone map. When it does, release both the ON/OFF and the US/MET buttons. Record your zone number. Press US/MET until your location on the display. Press and hold both buttons.
4. Press ON/OFF to enter your zone number. 2. Find your zone number appears on the display. 5. The overhead console has a sunglasses storage compartment. 2-53 After five seconds, VAR CAL (Variance Calibration) will go off. 3. Your variance is now set. Sunglasses Storage Compartment 1. The display will appear on the zone map. When it does, release both the ON/OFF and the US/MET buttons. Record your zone number. Press US/MET until your location on the display. Press and hold both buttons.

Owner's Manual
Page 120
... vehicle, the temperature indicated will function normally. Drive the vehicle in a complete 360° circle three times at the same time while in the overhead console. If this system displays the outside temperature recorded with a Driver Information Center (DIC), this happens, follow these instructions to the drive that road conditions may...
... vehicle, the temperature indicated will function normally. Drive the vehicle in a complete 360° circle three times at the same time while in the overhead console. If this system displays the outside temperature recorded with a Driver Information Center (DIC), this happens, follow these instructions to the drive that road conditions may...
Owner's Manual
Page 122
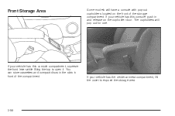
If your vehicle has this console compartment, squeeze the front lever while lifting the top to expose the storage area. 2-56 Front Storage Area Some models will pop out for use. You can store cassettes and compact discs in the slots in and release on the front of the compartment. If your vehicle has the center armrest compartment, lift the cover to open it. The cupholders will have a console with pop-out cupholders located on the cupholder door. If your vehicle has this console push in front of the storage compartment.
If your vehicle has this console compartment, squeeze the front lever while lifting the top to expose the storage area. 2-56 Front Storage Area Some models will pop out for use. You can store cassettes and compact discs in the slots in and release on the front of the compartment. If your vehicle has the center armrest compartment, lift the cover to open it. The cupholders will have a console with pop-out cupholders located on the cupholder door. If your vehicle has this console push in front of the storage compartment.

Owner's Manual
Page 146
... position, the dome lamps will remain on until the ignition key is in the desired direction. If you have the mini console, press the lens on each lamp on the overhead console to turn it may be swiveled to RUN. 3-16 The lamps can press the DOME OVERRIDE button, located below the...
... position, the dome lamps will remain on until the ignition key is in the desired direction. If you have the mini console, press the lens on each lamp on the overhead console to turn it may be swiveled to RUN. 3-16 The lamps can press the DOME OVERRIDE button, located below the...

Owner's Manual
Page 412
..., release pawl, door hinges, fuel door hinge, endgate hinges, outer tailgate handle pivot points, tailgate hinges, tailgate mounted spare tire (if equipped), glove box and console doors, moving seat hardware and folding seat hardware. The starter should work only in NEUTRAL (N), push the clutch down , your vehicle needs service. Body Lubrication...
..., release pawl, door hinges, fuel door hinge, endgate hinges, outer tailgate handle pivot points, tailgate hinges, tailgate mounted spare tire (if equipped), glove box and console doors, moving seat hardware and folding seat hardware. The starter should work only in NEUTRAL (N), push the clutch down , your vehicle needs service. Body Lubrication...
Owner's Manual
Page 440
Climate Control System ...3-17 Outlet Adjustment ...3-20 Clutch, Hydraulic ...5-23 Column Shift Lever ...2-36 Compact Spare Tire ...5-92 Console Shift Lever ...2-37 Content Theft-Deferrent ...2-16 Control of a Vehicle ...4-6 Convenience Net ...2-59 Convenience System, Rear ...2-60 Coolant Engine Temperature Gage ...3-29 Heater, Engine ...2-22 ...
Climate Control System ...3-17 Outlet Adjustment ...3-20 Clutch, Hydraulic ...5-23 Column Shift Lever ...2-36 Compact Spare Tire ...5-92 Console Shift Lever ...2-37 Content Theft-Deferrent ...2-16 Control of a Vehicle ...4-6 Convenience Net ...2-59 Convenience System, Rear ...2-60 Coolant Engine Temperature Gage ...3-29 Heater, Engine ...2-22 ...
Owner's Manual
Page 447
... ...4-15 Other Warning Devices ...3-4 Outlet Adjustment ...3-20 Outside Automatic Dimming Mirror ...2-44 Convex Mirror ...2-44 Heated Mirrors ...2-44 Manual Mirror ...2-43 Power Mirrors ...2-43 Overhead Console ...2-49 Overseas - Customer Assistance ...7-5 Owners, Canadian ...ii Owner's Information ...7-12 11 N New Vehicle Break-In ...2-18 Normal Maintenance Replacement Parts ...6-35 P Park (P) Shifting Into ...2-36...
... ...4-15 Other Warning Devices ...3-4 Outlet Adjustment ...3-20 Outside Automatic Dimming Mirror ...2-44 Convex Mirror ...2-44 Heated Mirrors ...2-44 Manual Mirror ...2-43 Power Mirrors ...2-43 Overhead Console ...2-49 Overseas - Customer Assistance ...7-5 Owners, Canadian ...ii Owner's Information ...7-12 11 N New Vehicle Break-In ...2-18 Normal Maintenance Replacement Parts ...6-35 P Park (P) Shifting Into ...2-36...
Owner's Manual
Page 451
Steering Tips ...Storage Garment Hooks ...Storage Areas Convenience Net ...Front Storage Area ...Glove Box ...Luggage Carrier ...Overhead Console ...Rear Convenience System ...Rear Storage Area ...Storing a Flat or Spare Tire and Tools ...Stuck in Sand, Mud, Ice or Snow ...Sun Visors ...Sunglasses Storage Compartment ......
Steering Tips ...Storage Garment Hooks ...Storage Areas Convenience Net ...Front Storage Area ...Glove Box ...Luggage Carrier ...Overhead Console ...Rear Convenience System ...Rear Storage Area ...Storing a Flat or Spare Tire and Tools ...Stuck in Sand, Mud, Ice or Snow ...Sun Visors ...Sunglasses Storage Compartment ......


