Owner's Manual
Page 1
2004 Chevrolet Blazer Owner Manual Seats and Restraint Systems ...1-1 Front Seats ...1-2 Rear Seats ...1-6 Safety Belts ...1-8 Child Restraints ...1-31 Air Bag System ...1-52 Restraint System Check ...1-58 Features and Controls ...2-1 Keys ...2-3 Doors and Locks ...2-7 Windows ...2-11 Theft-Deterrent Systems ...2-16 Starting and Operating Your Vehicle ...2-18 Mirrors ...2-42 HomeLink® Transmitter ...2-44 Storage Areas ...2-49 Sunroof...
2004 Chevrolet Blazer Owner Manual Seats and Restraint Systems ...1-1 Front Seats ...1-2 Rear Seats ...1-6 Safety Belts ...1-8 Child Restraints ...1-31 Air Bag System ...1-52 Restraint System Check ...1-58 Features and Controls ...2-1 Keys ...2-3 Doors and Locks ...2-7 Windows ...2-11 Theft-Deterrent Systems ...2-16 Starting and Operating Your Vehicle ...2-18 Mirrors ...2-42 HomeLink® Transmitter ...2-44 Storage Areas ...2-49 Sunroof...
Owner's Manual
Page 19
And there are for smaller children and babies. We'll start with the driver position. Safety belts are different rules for everyone 's protection. How to know about safety belts and children. If a child will be riding ...
And there are for smaller children and babies. We'll start with the driver position. Safety belts are different rules for everyone 's protection. How to know about safety belts and children. If a child will be riding ...
Owner's Manual
Page 27
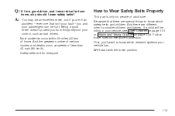
If you ever pull the shoulder portion of the belt out all the way and start again. For pregnant women, as the driver's safety belt - except for anyone, the key to wear the right front passenger's safety belt properly, see Driver ...
If you ever pull the shoulder portion of the belt out all the way and start again. For pregnant women, as the driver's safety belt - except for anyone, the key to wear the right front passenger's safety belt properly, see Driver ...
Owner's Manual
Page 30
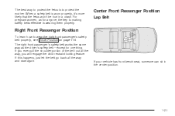
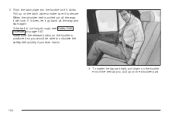
Make sure the release button on the buckle is not long enough, see Safety Belt Extender on page 1-30. To make the lap part tight, pull down on the buckle end of the belt as you ever had to. 3. Pull up on the latch plate to unbuckle the safety belt quickly if you pull up on the shoulder part. 1-24 If it does, let it go back all the way, it will lock. Push the latch plate into the buckle until it is pulled out all the way and start again. If the belt is positioned so you would be able to make sure it clicks. 2. When the shoulder belt is secure.
Make sure the release button on the buckle is not long enough, see Safety Belt Extender on page 1-30. To make the lap part tight, pull down on the buckle end of the belt as you ever had to. 3. Pull up on the latch plate to unbuckle the safety belt quickly if you pull up on the shoulder part. 1-24 If it does, let it go back all the way, it will lock. Push the latch plate into the buckle until it is pulled out all the way and start again. If the belt is positioned so you would be able to make sure it clicks. 2. When the shoulder belt is secure.
Owner's Manual
Page 67
... Operating Your Vehicle ...2-18 New Vehicle Break-In ...2-18 Ignition Positions ...2-19 Starting Your Engine ...2-21 Engine Coolant Heater ...2-22 Automatic Transmission Operation ...2-23 Manual Transmission Operation ...2-27 Four-Wheel Drive ...2-29 Parking Brake ...2-35 Shifting Into Park (P) ...2-...
... Operating Your Vehicle ...2-18 New Vehicle Break-In ...2-18 Ignition Positions ...2-19 Starting Your Engine ...2-21 Engine Coolant Heater ...2-22 Automatic Transmission Operation ...2-23 Manual Transmission Operation ...2-27 Four-Wheel Drive ...2-29 Parking Brake ...2-35 Shifting Into Park (P) ...2-...
Owner's Manual
Page 71
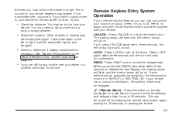
... remote alarm button again, waiting for any remote keyless entry system. Take a few steps to determine if battery replacement is normal for 30 seconds, or starting the vehicle. 2-5 LOCK: Press LOCK to unlock the driver's door. L (Remote Alarm): Press this feature, you can be in range. The parking lamps will fl...
... remote alarm button again, waiting for any remote keyless entry system. Take a few steps to determine if battery replacement is normal for 30 seconds, or starting the vehicle. 2-5 LOCK: Press LOCK to unlock the driver's door. L (Remote Alarm): Press this feature, you can be in range. The parking lamps will fl...
Owner's Manual
Page 83
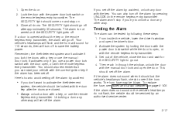
... will sound for the SECURITY light to save the battery power. You can also turn off to go out. 4. Testing the Alarm The alarm can start your vehicle with the remote keyless entry transmitter. 3. Then reach in through the window, unlock the door with the power door lock switch or the...
... will sound for the SECURITY light to save the battery power. You can also turn off to go out. 4. Testing the Alarm The alarm can start your vehicle with the remote keyless entry transmitter. 3. Then reach in through the window, unlock the door with the power door lock switch or the...

Owner's Manual
Page 84
...is tampered with a valid key. Your vehicle is disabled. Passlock® Your vehicle is a passive theft-deterrent system. If the engine does not start after the key is running and the SECURITY message comes on page 5-103. See Fuses and Circuit Breakers on , you will be serviced by ...Passlock® at any one speed - fast or slow - for service. See Towing a Trailer on page 7-6. 2-18 Starting and Operating Your Vehicle New Vehicle Break-In Notice: Your vehicle does not need an elaborate "break-in." But it will go off approximately fi...
...is tampered with a valid key. Your vehicle is disabled. Passlock® Your vehicle is a passive theft-deterrent system. If the engine does not start after the key is running and the SECURITY message comes on page 5-103. See Fuses and Circuit Breakers on , you will be serviced by ...Passlock® at any one speed - fast or slow - for service. See Towing a Trailer on page 7-6. 2-18 Starting and Operating Your Vehicle New Vehicle Break-In Notice: Your vehicle does not need an elaborate "break-in." But it will go off approximately fi...

Owner's Manual
Page 85
... turn it was before you use things like the radio and the windshield wipers when the engine is off. Do not operate your vehicle from starting. A (ACCESSORY): This position lets you inserted the key. 2-19 Push in the accessory ignition position for a long period of features such as it to fi...
... turn it was before you use things like the radio and the windshield wipers when the engine is off. Do not operate your vehicle from starting. A (ACCESSORY): This position lets you inserted the key. 2-19 Push in the accessory ignition position for a long period of features such as it to fi...

Owner's Manual
Page 86
... ignition switch to steer the vehicle. Pull the key straight out. 2-20 Do not press the key release button while the vehicle is pressed. E (START): This position starts your hand. It's a theft-deterrent feature. B (LOCK): This position locks your vehicle is all the way in motion while the engine is removed. Use...
... ignition switch to steer the vehicle. Pull the key straight out. 2-20 Do not press the key release button while the vehicle is pressed. E (START): This position starts your hand. It's a theft-deterrent feature. B (LOCK): This position locks your vehicle is all the way in motion while the engine is removed. Use...

Owner's Manual
Page 87
...help avoid draining your battery or damaging your starter. 2. Manual Transmission The gear selector should be drained much sooner. Notice: Holding your key in START for up to 20 minutes or until a door is opened. And the excessive heat can damage your shift lever to PARK (P) or NEUTRAL ...turned from RUN to OFF, these features will continue to work for longer than 15 seconds at a time will cause your battery to be in START. To restart when you could damage the transmission. Retained Accessory Power (RAP) Your vehicle is equipped with a Retained Accessory Power (RAP) feature...
...help avoid draining your battery or damaging your starter. 2. Manual Transmission The gear selector should be drained much sooner. Notice: Holding your key in START for up to 20 minutes or until a door is opened. And the excessive heat can damage your shift lever to PARK (P) or NEUTRAL ...turned from RUN to OFF, these features will continue to work for longer than 15 seconds at a time will cause your battery to be in START. To restart when you could damage the transmission. Retained Accessory Power (RAP) Your vehicle is equipped with a Retained Accessory Power (RAP) feature...
Owner's Manual
Page 88
...;oor and holding it could change the way the engine operates. If you add electrical parts or accessories, you do not, your engine still won't start (or starts but then stops), it there as you hold it into a normal, grounded 110-volt AC outlet. 2-22 In very cold weather, 0°F (-...engine coolant heater can help. Open the hood and unwrap the electrical cord. This clears the extra gasoline from the engine. You'll get easier starting your dealer. Turn off if the engine reaches 5,600 rpm. Plug it there up . If your engine might not perform properly. Engine Coolant ...
...;oor and holding it could change the way the engine operates. If you add electrical parts or accessories, you do not, your engine still won't start (or starts but then stops), it there as you hold it into a normal, grounded 110-volt AC outlet. 2-22 In very cold weather, 0°F (-...engine coolant heater can help. Open the hood and unwrap the electrical cord. This clears the extra gasoline from the engine. You'll get easier starting your dealer. Turn off if the engine reaches 5,600 rpm. Plug it there up . If your engine might not perform properly. Engine Coolant ...
Owner's Manual
Page 89
... at least 15 amps. 4. If you don't, it away from the battery to list everything here, we ask that you 'll be seriously injured. Before starting the engine, be a small current drain on your battery which could be parking your dealer in OFF, but not locked, there will not reach, use...
... at least 15 amps. 4. If you don't, it away from the battery to list everything here, we ask that you 'll be seriously injured. Before starting the engine, be a small current drain on your battery which could be parking your dealer in OFF, but not locked, there will not reach, use...

Owner's Manual
Page 90
... the engine running unless you can 't move suddenly. Then move the shift lever into the gear you have to use when you start your engine because your regular brakes before starting the engine. So, be sure the transfer case is fully in PARK (P) with the parking brake firmly set your vehicle...
... the engine running unless you can 't move suddenly. Then move the shift lever into the gear you have to use when you start your engine because your regular brakes before starting the engine. So, be sure the transfer case is fully in PARK (P) with the parking brake firmly set your vehicle...
Owner's Manual
Page 92
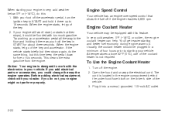
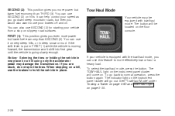
... in place. When stopping on a hill, use the brakes to use your vehicle from a stop on . The indicator light on . It can use SECOND (2) for starting your brakes off and on the instrument panel cluster will go back to more power but lower fuel economy than SECOND (2). Tow/Haul Mode Your...
... in place. When stopping on a hill, use the brakes to use your vehicle from a stop on . The indicator light on . It can use SECOND (2) for starting your brakes off and on the instrument panel cluster will go back to more power but lower fuel economy than SECOND (2). Tow/Haul Mode Your...

Owner's Manual
Page 93
... (4) and FIFTH (5) the same way you press the accelerator pedal. Shift to REVERSE (R) while your warranty. Slowly let up on the clutch pedal as you start or idle your shift pattern. Notice: Shifting to REVERSE (R) only after your vehicle is your engine. Here's how to shift into FIRST (1). If you let...
... (4) and FIFTH (5) the same way you press the accelerator pedal. Shift to REVERSE (R) while your warranty. Slowly let up on the clutch pedal as you start or idle your shift pattern. Notice: Shifting to REVERSE (R) only after your vehicle is your engine. Here's how to shift into FIRST (1). If you let...

Owner's Manual
Page 100
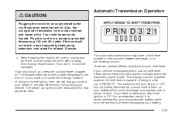
...to 2HI. 6. A re-engagement sound is normal when shifting out of NEUTRAL: 1. Shifting out of NEUTRAL To shift out of NEUTRAL 2-34 Start the vehicle with the transmission in PARK (P) or FIRST (1) for vehicles with manual transmission. 10. After the transfer case has shifted out of NEUTRAL... so that it will go out. Shift the transmission lever to DRIVE (D) for one second or FIRST (1) for vehicles with manual transmission. 8. Start the vehicle. 3. Set the parking brake and apply the regular brake pedal. 2. Place the transmission shift lever in PARK (P) or FIRST (1) ...
...to 2HI. 6. A re-engagement sound is normal when shifting out of NEUTRAL: 1. Shifting out of NEUTRAL To shift out of NEUTRAL 2-34 Start the vehicle with the transmission in PARK (P) or FIRST (1) for vehicles with manual transmission. 10. After the transfer case has shifted out of NEUTRAL... so that it will go out. Shift the transmission lever to DRIVE (D) for one second or FIRST (1) for vehicles with manual transmission. 8. Start the vehicle. 3. Set the parking brake and apply the regular brake pedal. 2. Place the transmission shift lever in PARK (P) or FIRST (1) ...
Owner's Manual
Page 105
... to OFF, remove the key and release the clutch. You must press the shift lever button on page 4-60. 2-39 Turn the key to NEUTRAL (N). 4. Start the vehicle and then shift to fully apply the regular brakes before you are parking on a hill, or if your vehicle, move the shift lever...
... to OFF, remove the key and release the clutch. You must press the shift lever button on page 4-60. 2-39 Turn the key to NEUTRAL (N). 4. Start the vehicle and then shift to fully apply the regular brakes before you are parking on a hill, or if your vehicle, move the shift lever...

Owner's Manual
Page 113
... 2 under "Programming HomeLink®." Do not repeat Step 1 as this sequence a third time to complete the programming. Locate the "Learn" or "Smart" button. 5. Return to start Step 8. 8. Press and hold the programmed HomeLink® button for two seconds and then turns to a constant light, continue with Steps 6 through 8 following to the...
... 2 under "Programming HomeLink®." Do not repeat Step 1 as this sequence a third time to complete the programming. Locate the "Learn" or "Smart" button. 5. Return to start Step 8. 8. Press and hold the programmed HomeLink® button for two seconds and then turns to a constant light, continue with Steps 6 through 8 following to the...
Owner's Manual
Page 125
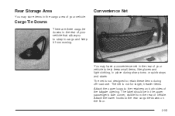
The net is not designed to retain these items during sharp turns or quick stops and starts. You may store items in the cargo area of your vehicle to the retainers on the floor. 2-59 Attach the lower hooks to strap ...
The net is not designed to retain these items during sharp turns or quick stops and starts. You may store items in the cargo area of your vehicle to the retainers on the floor. 2-59 Attach the lower hooks to strap ...


