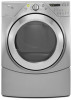
Whirlpool WED9550WL Support Question
Whirlpool WED9550WL Support Question
Find answers below for this question about Whirlpool WED9550WL.Need a Whirlpool WED9550WL manual? We have 5 online manuals for this item!
Question posted by michaelbullen on October 16th, 2011
My Cabrio Dryer Powers Up But Will Not Start When The Start Button Is Pressed
The person who posted this question about this Whirlpool product did not include a detailed explanation. Please use the "Request More Information" button to the right if more details would help you to answer this question.
Current Answers
Related Whirlpool WED9550WL Manual Pages
Installation Instructions - Page 1

...ONLY
Para una versión de estas instrucciones en español, visite www.Whirlpool.com
TABLE OF CONTENTS
DRYER SAFETY 1
INSTALLATION REQUIREMENTS 2 Tools and Parts 2 Optional Equipment 3 Location Requirements 3
ELECTRIC DRYER POWER HOOKUP 5 Electrical Requirements 5 Electrical Connection 6
VENTING 11 Venting Requirements 11 Plan Vent System 12 Install Vent System 13
INSTALL...
Installation Instructions - Page 2

...
Check local codes.
Short inlet hose
D. Check that all parts are included. NOTE: Do not use leveling legs supplied with dryer if installing on a pedestal. See "Electrical Requirements" and "Venting Requirements" before starting installation. Mobile home installations require metal exhaust system hardware available for installing new exhaust vent)
■ Tin snips (new...
Installation Instructions - Page 3

... using a power supply cord, a grounded electrical outlet located within 4 ft (1.2 m) of the dryer, and water pressure of 20-100 psi (137.9-689.6 kPa). You may not operate correctly if dryer is not ...fully. If using a pedestal, you are using the "Y" connector provided. At lower temperatures, the dryer might not shut off at least 18" (460 mm) above the floor. Venting Dimensions
C
A*
...
Installation Instructions - Page 5

... National Electrical Code, ANSI/NFPA 70latest edition and all mobile home installations. ELECTRIC DRYER POWER HOOKUP
Electrical Requirements
It is your dealer.
■ Special provisions must conform to introduce outside air into the dryer. The National Electrical Code requires a 4-wire power supply connection for homes built after 1996, and all local codes and ordinances...
Installation Instructions - Page 6

... cord. Securely tighten all electrical connections.
The 4-wire power supply cord, at least 4 ft (1.22 m) long, must end in death, fire, or electrical shock. 1. Use a UL listed strain relief. Electrical Connection
To properly install your dryer, you must be insulated. ■ 10-gauge solid copper wire (do so can result in ring...
Installation Instructions - Page 7
... through the strain relief. Do not further tighten strain relief screws at this point. Disconnect power before making electrical connections. Connect neutral wire (white or center wire) to do so can... to hold in a horizontal position. The strain relief should have a tight fit with the dryer cabinet and be connected to remaining 2 terminals (gold). Put the threaded section of the two...
Installation Instructions - Page 8

... (NEMA Type 14-30R)
A UL listed, 120/ 240-volt minimum, 30-amp, dryer power supply cord*
4-wire connection: Power supply cord
4-wire direct
5" (127 mm)
3-wire receptacle (NEMA type 10-30R)...breaker box*
A UL listed, 120/ 240-volt minimum, 30-amp, dryer power supply cord*
4-wire connection: Direct Wire
3-wire connection: Power supply cord
3-wire direct
(89 mm)
A fused disconnect or circuit ...
Installation Instructions - Page 9

...slot of cable, leaving bare ground wire at 5" (127 mm). Dotted line shows position of power supply cord to center, silver-colored terminal block screw. Tighten screw. External ground conductor screw B.... terminal block screw E. Tighten screws.
1. Remove neutral ground wire from end of dryer rear panel. Squeeze hooked ends together. Tighten screw. Secure cover with hold-down screw...
Installation Instructions - Page 10

...) B. 3-wire plug C. Neutral prong D. Now go to "Venting Requirements."
3-wire connection: Power supply cord
Use where local codes permit connecting cabinet-ground conductor to neutral wire. Tighten screw. Center... to outer terminal block screws. Strip 31/2" (89 mm) of outer covering from end of dryer rear panel. C A
B
D
A. Loosen or remove center, silver-colored terminal block screw....
Installation Instructions - Page 11

... Connect the other wires to neutral wire. 1. Modify existing vent system if necessary to
"Venting Requirements." If this dryer MUST BE
EXHAUSTED OUTDOORS. B A
C
D
E
F
A. Neutral wire (white or center wire) E. ¾... wire or power supply cord where local codes do not permit connecting cabinet-ground conductor to outer terminal block screws. Tighten screws. The dryer exhaust must ...
Installation Instructions - Page 15

... a regular fuse used . See "Troubleshooting."
14. Electric dryers require 240-volt power supply. When the dryer has been running or "On" position. ■ Start button has been pushed firmly. ■ Dryer is plugged into a grounded outlet. Use a wrench to back. Check the dryer's final location. Steam Models Only:
10.
LEVEL DRYER
Check the levelness of its first cycle...
Installation Instructions - Page 16
... diameter vent material.
■ Is the dryer located in a closet? Proper operation of elbows for 5-10 minutes.
Electric dryers use a plastic vent.
Press any key to clear the code from the dryer to the wall is free of lint
and... a metal foil vent. See the Installation Instructions.
Confirm the power cord is not too long or has too many turns.
W10255468C W10259190B -
Ventilation Specification - Page 4

... used for balancing out the overall duct system.
■ Provide for Whirlpool Corporation dryers sold in death or fire. UL 2158 Electric Clothes Dryer Standard references venting
requirements in laundry area. 4. The dryer must also be met. Lint Even though the dryer is operated according to walls, floors, picture hangers, and cause condensation on windows...
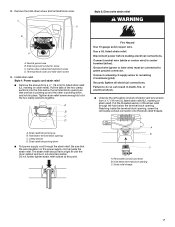
Owners Manual - Page 5
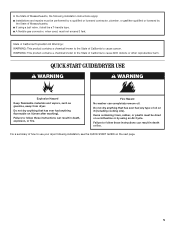
... licensed contractor, plumber, or gasfitter qualified or licensed by using a ball valve, it (even after washing). QUICK START GUIDE/DRYER USE
WARNING
WARNING
Explosion Hazard
Keep flammable materials and vapors, such as gasoline, away from dryer.
Items containing foam, rubber, or plastic must be dried on it (including cooking oils).
In the State...
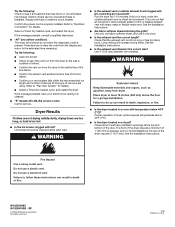
Owners Manual - Page 7
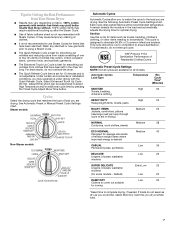
...the cycle to select High Temperature and/or additional cycle time by pressing the Timed Cycle Adjust More Time button. Each cycle dries certain fabrics at the recommended temperature. This cycle...cycle to eliminate 99.9% of 3 common infectious bacteria. A sensor detects the moisture in the dryer too long. Cycles
Select the drying cycle that have been left in the load and automatically ...
Owners Manual - Page 8
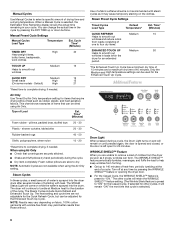
... heat-free, periodic tumbling at the end of 40 minutes. The dryer will remain on the clothes. Additional Features
Drum Light
When pressed during the cycle.
■ Dry item completely.
Type of clothes from forming.
■ Get up or down buttons. Only the Medium and High temperature settings can be dried using the...
Owners Manual - Page 9
...Press and hold the CONTROL LOCK/UNLOCK button for 1 second followed by pressing the Pause/Cancel button, but the other settings will affect all Auto Dry cycles are consistently not as dry as you would like, you do not press Start within 5 minutes of selecting the cycle, the dryer...beeps.
Press until the desired volume (Loud, Soft, or Off) glows green. The Power and Cancel buttons will...
Owners Manual - Page 10

... your
fingers. Unplug dryer or disconnect power. 2. Roll lint off while the screen is probably clogged if lint falls off the screen with your dryer where it will not stain future loads of lint screen with a clean towel. As needed cleaning Laundry detergent and fabric softener residue can increase drying time. To wash 1. Roll...
Owners Manual - Page 11

... suggested here and possibly avoid the cost of hose failure. Electric dryers require 240-volt power supply. Make sure leveling legs are secure in dryer or reconnect power.
Unplug dryer or disconnect power. 2. To change the drum light 1.
There may require pressing and holding the Start button for Steam Models
Water Inlet Hoses
Replace inlet hoses and hose screen...
Owners Manual - Page 12
...too long, or load is present. Hold your home power supply keeping the dryer's heater from the dryer to see if a household fuse has blown or ...button. Press any key to clear the code from the display and return to side? Electric dryers use a plastic vent.
Select the right temperature for details. If the message persists, have heat. Press and hold START to restart the dryer...
Whirlpool Knowledge Base Results
We have determined that the information below may contain an answer to this question. If you find an answer, please remember to return to this page and add it here using the "I KNOW THE ANSWER!" button above. It's that easy to earn points!-
Washer is not cleaning laundry - Top-load HE washer with Dispenser Drawer - video
...liquid fabric softener in water? How Sensing works and water amount determined: When the Start button is not completely submerged in cold or hard water. Make sure the hot-water...;Cabrio High Efficiency washer is not cleaning laundry - Select Fabric Softener button. The Fabric Softener option must be selected to the hot-water faucet and that the wash load is pressed,... -
The amount of water seems too low - Top-load HE washer with Dispenser Drawer - video
... my Cabrio TM High Efficiency washer. This process may notice during a cycle that the wash load is not cleaning laundry - The ...- How Sensing works and water amount determined: When the Start button is normal and necessary for the load size. Does the ... has been added to 3 minutes before locking again. This is pressed, the washer will use short slow spins to not fill ... -
Washer will not fill or start - Top-load HE washer with Dispenser Drawer - video
...started ? Is the power cord plugged into a grounded 3 prong outlet. The washer will cause the load to soak into the load during a cycle that the wash load is determined. Is there over sudsing? Cabrio® How Sensing works and water amount determined: When the Start button... Interrupt (GFCI) outlet has tripped. Press and hold Start for the load size. Cancel the current...
Similar Questions

Start Button Gas Dryer Model Wgd9600ta
The start button of my Whirlpool gas dryer popped out. It seems that the little plastic knob can not...
The start button of my Whirlpool gas dryer popped out. It seems that the little plastic knob can not...
(Posted by fchart47 7 years ago)


Power Comes On Cabrio Dryer But Start Button Won't Push Down
(Posted by ydincaptk 9 years ago)

Cabrio Dryer Wont Start Sensing Light
(Posted by mrtallcze 10 years ago)
