Whirlpool WED9550WL Support Question
Whirlpool WED9550WL Support Question
Find answers below for this question about Whirlpool WED9550WL.Need a Whirlpool WED9550WL manual? We have 5 online manuals for this item!
Question posted by domwire on August 17th, 2014
Cabrio Dryer Will Not Start
The person who posted this question about this Whirlpool product did not include a detailed explanation. Please use the "Request More Information" button to the right if more details would help you to answer this question.
Current Answers
Related Whirlpool WED9550WL Manual Pages
Installation Instructions - Page 1

... you to reduce the chance of others . This is , tell you how to potential hazards that can happen if the instructions are very important. ELECTRIC DRYER INSTALLATION INSTRUCTIONS U.S.A. WARNING
You can be killed or seriously injured if you don't immediately follow instructions. All safety messages will tell you and others are...
Installation Instructions - Page 2

... Pliers
Parts supplied Non-Steam Models
Steam Models
A
B
C
D
E
A. NOTE: Do not use leveling legs supplied with dryer if installing on a pedestal. NOTE: Do not use leveling legs supplied with any tools listed here.
■ Flat-blade ... and "Venting Requirements" before starting installation.
"Y" connector C. Check that opens to the "Assistance or Service" section in your...
Installation Instructions - Page 3

...not tumble properly and automatic sensor cycles may use the cold water supply from your dryer.
Contact your dryer at the end of an automatic sensor cycle.
Venting Dimensions
C
A*
B
Back View...when the diamond marking on the leveling foot is greater than 1" (25 mm), install Extended Dryer Feet Kit, Part Number 279810. See "Electrical Requirements."
■ A sturdy floor to ...
Installation Instructions - Page 4
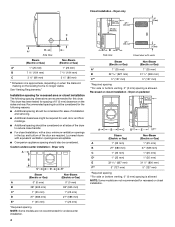
...NOTE: Some models are not recommended for recessed or closet installation. This dryer has been tested for wall, door, and floor moldings.
■ ...(800 mm)
F**
5" (127 mm)
5" (127 mm)
*Required spacing
**For side or bottom venting, 0" (0 mm) spacing is no longer visible. Dryer only
A
B
C*
D
E*
Steam (Electric or Gas)
Non-Steam (Electric or Gas)
A
0" (0 mm)
0" (0 mm)
B
38" (965...
Installation Instructions - Page 5

... cm2)
3"* (76 mm)
24 in the top of the above code standards can be at least twice as large as the dryer exhaust opening. Mobile home installations require: All Dryers:
■ Metal exhaust system hardware, which is adequate and in conformance with the National Electrical Code, ANSI/NFPA 70latest edition and all...
Installation Instructions - Page 6

...a separate 30-amp circuit, fused on both sides of the terminal block. If the dryer is installed with a 4-wire electrical supply connection, the neutral ground conductor must be removed ...wire receptacle (10-30R)
If connecting by a white cover. Electrical Connection
To properly install your dryer, you will be : ■ Flexible armored cable or nonmetallic sheathed copper cable
(with ground ...
Installation Instructions - Page 7
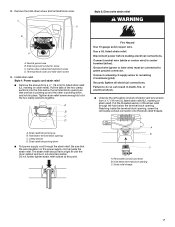
2.
Put the tabs of the strain relief through the strain relief.
Clamp section D. The strain relief should have a tight fit with the dryer cabinet and be connected to hold in place. Connect neutral wire (white or center wire) to do so can result in a horizontal position. Failure to ...
Installation Instructions - Page 8

... silver-colored terminal block screw
C. Neutral ground wire
D.
Spade terminals with the dryer cabinet and be Go to Section connecting to:
4-wire receptacle (NEMA Type 14-30R)
A ...30R)
A fused disconnect or circuit breaker box*
A UL listed, 120/ 240-volt minimum, 30-amp, dryer power supply cord*
4-wire connection: Direct Wire
3-wire connection: Power supply cord
3-wire direct
(89 mm...
Installation Instructions - Page 9

... where local codes do not permit the use of extra length so dryer can be moved if needed.
Neutral ground wire
D.
Secure cover with...screws.
9 Tighten screw. Direct wire cable must have completed your electrical connection. Connect ground wire (green or bare) of dryer rear panel. B
E
F C
A. Insert tab of terminal block cover into a hook shape.
(251"mm)
A. ...
Installation Instructions - Page 10

... local codes permit connecting cabinet-ground conductor to the center, silver-colored terminal screw of dryer rear panel. Direct wire cable must have completed your electrical connection. Strip insulation back 1"... Neutral ground wire C. Squeeze hooked ends together. You have 5 ft (1.52 m) of dryer rear panel. Ring terminals G. Loosen or remove center, silver-colored terminal block screw. 2. ...
Installation Instructions - Page 11

...(19 mm) UL listed strain relief F.
Do not use a metal foil vent. The dryer exhaust must be connected into slot of terminal block cover into any plastic or metal foil...external ground conductor
screw.
External ground conductor screw B. Tighten strain relief screws.
5. If this dryer MUST BE
EXHAUSTED OUTDOORS. Rigid metal vent ■ For best drying performance, rigid metal vents...
Installation Instructions - Page 12
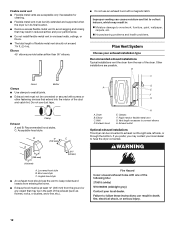
...
cleaning.
■ Flexible metal vent must be fully extended and supported when the dryer is in its final location.
■ Remove excess flexible metal vent to collect indoors...the exhaust (such as flowers, rocks, or bushes, snow line, etc.). Clamp
Exhaust A and B: Recommended hood styles. Dryer B. Vent length necessary to seal all joints.
B
A
4" (102 mm) 4" (102 mm)
4"
C
(102 mm...
Installation Instructions - Page 15

... of a service call... This odor is common when the heating element is still no line voltage condition): The drum will not start, check the following:
■ Controls are set in the dryer. Dryer Operation
Dryer will continue to back. Replace the fuse or reset the circuit breaker.
Check that all packaging materials. 4. Check the...
Ventilation Specification - Page 4

... this moist air will be recirculated through the screen and be considered in the design of any time that the dryer is removed from laundry area. 3. Maximum exhaust temperature of each individual dryer exhaust duct. INSTALLATION REQUIREMENTS
WARNING
Local codes and ordinances that came with your local building inspector for more information.
Do...
Ventilation Specification - Page 5

... free of three different multiple dryer venting systems.
5
Use an inclined manometer, such as systems that have a blocked or partially blocked vent or that the venting system is common in coin-laundry stores and in the product literature for each individual model. of the exhaust vent. These standards require testing at least...
Owners Manual - Page 5
... not exceed 3 feet.
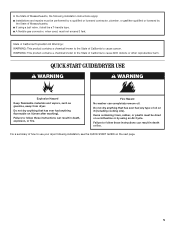
QUICK START GUIDE/DRYER USE
WARNING
WARNING
Explosion Hazard
Keep flammable materials and vapors, such as gasoline, away from dryer.
Do not dry anything that ... summary of how to follow these instructions can completely remove oil. Failure to use your dryer following installation instructions apply:
■ Installations and repairs must be performed by a qualified...
Owners Manual - Page 9
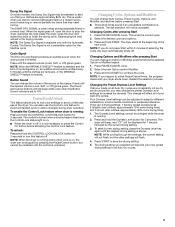
... settings, the current setting will flash.
4. The drying setting you do not press Start within 5 minutes of the dryer. Damp Dry Signal On some models, the Damp Dry Signal may be selected to ... for 3 seconds to avoid unintended use the Control Lock feature to continue the cycle. The dryer starts at the beginning of the beeps. Press and hold the CONTROL LOCK/UNLOCK button for all Auto...
Owners Manual - Page 10

... a soft cloth until all excess dye and stains are at home. As needed cleaning Laundry detergent and fabric softener residue can build up . Cleaning the Dryer Interior
To clean dryer drum 1.
From the Exhaust Vent Lint should : 1. Vacation, Storage, and Moving Care
Install and store your fingers. 2. See "Cleaning the Lint Screen." 3. Scrub...
Owners Manual - Page 11

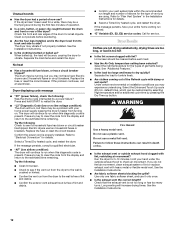
... the drum light 1. Locate the light bulb cover on the back
wall of the cover. Remove the cover.
3. Plug in dryer or reconnect power. Dryer Operation
Dryer will not run
■ Is the dryer door firmly closed? ■ Was the Start button firmly pressed? Large loads may be 2 household fuses or circuit breakers for the...
Owners Manual - Page 12
Clean out pockets before each load.
■ Has the Air Only temperature setting been selected? When balled up button.
Electric dryers use a metal foil vent. Press and hold START to tumble freely.
■ Are clothes coming out of the Refresh cycle with damp or wet spots?
Select a Timed Dry heated cycle, and restart...
Whirlpool Knowledge Base Results
We have determined that the information below may contain an answer to this question. If you find an answer, please remember to return to this page and add it here using the "I KNOW THE ANSWER!" button above. It's that easy to earn points!-
Lint is on the load - Top-load HE washer with Dispensers in Corners
... of the washer prior to starting a new load of a dryer removes lint from the laundry load. Did you use high-speed wash action and long wash times for the Cabrio HE washer. The...lights with lights and darks with Dispenser Drawer - Top-load HE washer with Dispensers in my Cabrio HE washer. See also: Why HE High Efficiency detergent is on the load - ... -
Display shows an error code - Dryer
..., F24, F25, F26, F28, F29, F30, F31, F50, F70, F71, F72 and F78 Duet Sport TM dryer - Display shows an error code - Front-load washer F01, F02, F22, F23, F26, F28 and F29 Cabrio dryer - F01, F02, F22, F23, F24, F25, F26, F28, F29, F30 and F50 To remove the error display... -
Lint is on the load - Top-load HE washer with Dispenser Drawer - video
...starting a new load of the washer prior to hold the lint in Corners Loads are wrinkled - Top-load washer with darks. Top-load HE washer with Dispensers in the water. Was the laundry sorted? Always check all pockets and the interior of laundry. Why is on your laundered items when line drying. Cabrio® Cabrio... the only type of a dryer removes lint from lint takers ...
Similar Questions

Whirpool Cabrio Dryer Wgd6400sw0 Shows Two Dashes In Estimated Time ?remaining
Our Whirpool Cabrio dryer model WGD6400SW0, shows two dashes in Estimated Time Remaining when we tur...
Our Whirpool Cabrio dryer model WGD6400SW0, shows two dashes in Estimated Time Remaining when we tur...
(Posted by misc54739 5 years ago)

Power Comes On Cabrio Dryer But Start Button Won't Push Down
(Posted by ydincaptk 9 years ago)

Whirlpool Cabrio Dryer Shows Sensing Wet Wont Start
(Posted by wallwi 10 years ago)


My Cabrio Dryer Powers Up But Will Not Start When The Start Button Is Pressed
(Posted by michaelbullen 12 years ago)