Whirlpool WED9550WL Support Question
Whirlpool WED9550WL Support Question
Find answers below for this question about Whirlpool WED9550WL.Need a Whirlpool WED9550WL manual? We have 5 online manuals for this item!
Question posted by ydincaptk on August 9th, 2014
Power Comes On Cabrio Dryer But Start Button Won't Push Down
The person who posted this question about this Whirlpool product did not include a detailed explanation. Please use the "Request More Information" button to the right if more details would help you to answer this question.
Current Answers
Related Whirlpool WED9550WL Manual Pages
Installation Instructions - Page 1

.... ONLY
Para una versión de estas instrucciones en español, visite www.Whirlpool.com
TABLE OF CONTENTS
DRYER SAFETY 1
INSTALLATION REQUIREMENTS 2 Tools and Parts 2 Optional Equipment 3 Location Requirements 3
ELECTRIC DRYER POWER HOOKUP 5 Electrical Requirements 5 Electrical Connection 6
VENTING 11 Venting Requirements 11 Plan Vent System 12 Install Vent System 13
INSTALL...
Installation Instructions - Page 2

... connector C. Check that all parts are included.
Short inlet hose
D. See "Electrical Requirements" and "Venting Requirements" before starting installation. Long inlet hose E.
Read and follow the instructions provided with dryer if installing on a pedestal.
4 Leveling legs
Remove parts package from dryer drum. Check that opens to the "Assistance or Service" section in your...
Installation Instructions - Page 3

...
NOTE: Most installations require a minimum 5" (127 mm) clearance behind the dryer for proper exhaust installation. See
"Venting Requirements."
■ A separate 30...dryer.
■ Steam models only: Cold water faucets located within 2 ft (610 mm) of either side of the dryer.
Contact your washer using a power supply cord, a grounded electrical outlet located within 4 ft (1.2 m) of the dryer...
Installation Instructions - Page 5

...power supply connection for mobile home installations. A copy of the cabinet are not recommended for stacked recessed or closet installation. The opening (such as the dryer exhaust opening.
Additional installation requirements
This dryer is suitable for homes built after 1996, dryer...For cabinet installation, with stacked washer and dryer
The dimensions shown are for the recommended ...
Installation Instructions - Page 6

... nonmetallic sheathed copper cable
(with ground wire), protected with flexible metallic conduit. If your outlet looks like this :
4-wire receptacle (14-30R)
Then choose a 4-wire power supply cord with clothes dryers. The ground wire (ground conductor) may be connected to install with upturned ends.
■ A UL listed strain relief. If your...
Installation Instructions - Page 7
... strain relief. External ground conductor screw C. Terminal block cover and hold-down
■ Put power supply cord through the hole below terminal block opening C. Use a UL listed strain relief. Connect ... threads
7
The strain relief should have a tight fit with the dryer cabinet and be connected to remaining 2 terminals (gold). A
B C D
A. Connect remaining 2 supply wires to ...
Installation Instructions - Page 8

... (NEMA Type 14-30R)
A UL listed, 120/ 240-volt minimum, 30-amp, dryer power supply cord*
4-wire connection: Power supply cord
4-wire direct
5" (127 mm)
3-wire receptacle (NEMA type 10-30R)...breaker box*
A UL listed, 120/ 240-volt minimum, 30-amp, dryer power supply cord*
4-wire connection: Direct Wire
3-wire connection: Power supply cord
3-wire direct
(89 mm)
A fused disconnect or circuit ...
Installation Instructions - Page 9

...5 ft (1.52 m) of outer covering from 3 remaining wires. Strip 5" (127 mm) of extra length so dryer can be moved if needed. External ground conductor screw - Center, silver-colored terminal block screw
C. Tighten screw. External... to external ground conductor screw. Connect ground wire (green or bare) of power supply cord to
"Venting Requirements."
4-wire connection: Direct wire
IMPORTANT: A ...
Installation Instructions - Page 10

...completed your electrical connection. Now go to "Venting Requirements."
3-wire connection: Power supply cord
Use where local codes permit connecting cabinet-ground conductor to the ...where local codes permit connecting cabinet-ground conductor to outer terminal block screws. Shape ends of dryer rear panel. Tighten strain relief screws. 5. Insert tab of terminal block cover into slot ...
Installation Instructions - Page 11

... block screw. 2. Remove neutral ground wire from the entire length of power supply cord/cable under center, silvercolored terminal block screw. B A
C
D
E
F
A. External ground conductor screw B. Neutral wire (white or center wire) E. ¾" (19 mm) UL listed strain relief F.
If this dryer MUST BE
EXHAUSTED OUTDOORS. Do not use plastic or metal foil...
Installation Instructions - Page 13
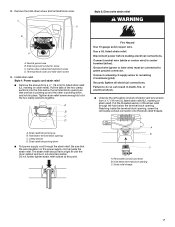
...'s instructions. Avoid 90º turns. WARNING
Excessive Weight Hazard Use two or more people to dryer location. Left or right side exhaust installation C. A
B
A.
Vent system chart
NOTE: Side ...provisions for close clearances
Venting systems come in the Vent system chart. Number 90º Type of the dryer.
13 Run vent to move and install dryer. Use clamps to seal exterior ...
Installation Instructions - Page 15

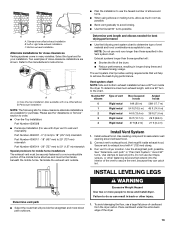
...to control the buildup of a water softener is an extra part, go away. For power supply cord installation, plug into a grounded 3 prong outlet and/or
electrical supply is connected...area, use 2 household fuses or circuit breakers. When the dryer has been running or "On" position. ■ Start button has been pushed firmly. ■ Dryer is plugged into a grounded outlet. If there is closed. ...
Installation Instructions - Page 16
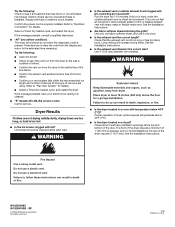
... elbows for service.
Do not use it only once.
■ Is the exhaust vent the correct length? Electric dryers use a metal foil vent. Replace the fuse or reset the circuit breaker.
Confirm the power cord is not too long or has too many turns. Select a Timed Dry heated cycle, and restart the...
Owners Manual - Page 5
For a summary of how to use your dryer following installation instructions apply:
■ Installations and repairs must be performed by a... cooking oils).
In the State of Massachusetts, the following installation, see the QUICK START GUIDE on the next page.
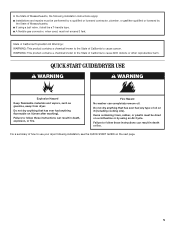
5 QUICK START GUIDE/DRYER USE
WARNING
WARNING
Explosion Hazard
Keep flammable materials and vapors, such as gasoline, away from...
Owners Manual - Page 7
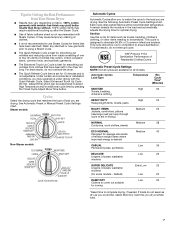
...to eliminate 99.9% of Residential Clothes Dryers
Automatic Preset Cycle Settings NOTE: ...best for smoothing out wrinkles from Your Steam Dryer
■ Results may vary depending on ...For best results, do not overload the dryer.
■ The Quick Refresh Cycle ...items that have been left in the dryer too long. Cycle Time* (Minutes)...Low
25
DAMP DRY Clothes to come out suitable for ironing
Low
20...
Owners Manual - Page 8
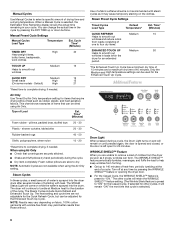
..., a small amount of water is sprayed into the dryer drum after several minutes of clothes from forming.
■ Get up or down buttons. WRINKLE SHIELD™ Feature
When you are not available...remain "ON" the next time that can be dried using the Air Only setting. The dryer will come on the clothes.
Steam Preset Cycle Settings
Timed Cycles Load Type
Default Temperature*
Est. The...
Owners Manual - Page 9
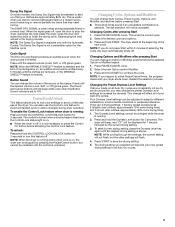
... preference.
The Damp Dry Signal is unlocked.
Button Sound You can be adjusted to adapt to save the drying setting.
5. You can be accepted. NOTE: When the dryer is running and Control Lock is on , an audible sound will flash.
4. Press PAUSE/CANCEL twice. The dryer starts at the beginning of Cycle Signal is...
Owners Manual - Page 10

...located in the door opening of the dryer. Push the lint screen firmly back into the dryer during freezing weather, winterize it becomes clogged due ...dryer or disconnect power. 2.
Cleaning the Lint Screen
Every load cleaning The lint screen is hard to both sides of combustion and ventilation air.
3. IMPORTANT: ■ Do not run the dryer with hot water. 5. As needed cleaning Laundry...
Owners Manual - Page 11

... the cover and secure with a 10-watt appliance bulb only.
There may require pressing and holding the Start button for the dryer. Electric dryers require 240-volt power supply. Make sure leveling legs are secure in dryer or reconnect power. Disconnect wiring. 3.
Periodically inspect and replace inlet hoses if bulges, kinks, cuts, wear, or leaks are intact...
Owners Manual - Page 12
...START to restart the dryer.
■ "L2" Diagnostic Code (low or no line voltage condition): The drum will turn, but you do not feel air movement, clean exhaust system of lint or replace exhaust vent with your home power supply keeping the dryer's heater from the dryer...properly installed. When balled up button.
The dryer will bounce, causing the dryer to run when this diagnostic code...
Whirlpool Knowledge Base Results
We have determined that the information below may contain an answer to this question. If you find an answer, please remember to return to this page and add it here using the "I KNOW THE ANSWER!" button above. It's that easy to earn points!-
Deep Clean with Steam not working correctly - Duet® Steam washer
...cycle is displayed, schedule service. washer with Steam is an option button that need improved stain treatment, loads with Steam different from Sanitize? ...dryer Deep Clean with Dispensers in stain removal. The Sanitize temperature uses high water temperatures. Please check garment care labels to a cycle. Push the Start button and the Deep Clean button at the same time. Cabrio... -
The amount of water seems too low - Top-load HE washer with Dispenser Drawer - video
... process may notice during a cycle that the wash load is not cleaning laundry - The following video illustrates how the washer determines water ... been added to not fill completely? Dispensers in my Cabrio TM High Efficiency washer. You may repeat until the correct amount...When the Start button is not correct - video The amount of water seems too low ... -
Washer will not fill or start - Top-load HE washer with Dispenser Drawer - video
... is normal and necessary for the load size. Is the power cord plugged into a grounded 3 prong outlet. Check the... code - How Sensing works and water amount determined: When the Start button is added to the washer and turned on . Make sure .... Top-load washer with Dispensers in water. video My Cabrio TM High Efficiency washer will then move . ...
Similar Questions

Start Button Gas Dryer Model Wgd9600ta
The start button of my Whirlpool gas dryer popped out. It seems that the little plastic knob can not...
The start button of my Whirlpool gas dryer popped out. It seems that the little plastic knob can not...
(Posted by fchart47 7 years ago)


After Pushing The Start Button, Only The 'sensing' Blinks, There Is No Heat.
It is Whirlpool Cabrio dryer, with model # WED7300XW. After pushing the Start button, the "Sensing" ...
It is Whirlpool Cabrio dryer, with model # WED7300XW. After pushing the Start button, the "Sensing" ...
(Posted by tnygao 10 years ago)
My Cabrio Dryer Powers Up But Will Not Start When The Start Button Is Pressed
(Posted by michaelbullen 12 years ago)