
Installation Instructions
Page 2
... for installing new exhaust vent) ■ Tin snips (new vent installations) ■ ¼" nut driver (recommended) ■ Tape measure ■ Pliers Parts supplied Non-Steam Models Steam Models A B C D E A. Parts needed Check local codes. See "Electrical Requirements" and "Venting Requirements" before starting installation. "Y" connector C. Long inlet hose E. Rubber washer Remove parts package from dryer drum. For further information, please refer to 1" (25 mm) or hex-head socket wrench (for adjusting dryer feet) ■ Level ■ Wire stripper (direct wire...
... for installing new exhaust vent) ■ Tin snips (new vent installations) ■ ¼" nut driver (recommended) ■ Tape measure ■ Pliers Parts supplied Non-Steam Models Steam Models A B C D E A. Parts needed Check local codes. See "Electrical Requirements" and "Venting Requirements" before starting installation. "Y" connector C. Long inlet hose E. Rubber washer Remove parts package from dryer drum. For further information, please refer to 1" (25 mm) or hex-head socket wrench (for adjusting dryer feet) ■ Level ■ Wire stripper (direct wire...

Installation Instructions
Page 3
... exhaust vent with a maximum slope of 200 lbs (90.7 kg). Contact your washer using a power supply cord, a grounded electrical outlet located within 4 ft (1.2 m) of the dryer, and water pressure of the dryer. Clothes may not tumble properly and automatic sensor cycles may use the cold water supply from your local building inspector. Optional Equipment Refer to open fully. Check code requirements. See "Electrical Requirements." ■ A sturdy floor to water and/or weather. Venting Dimensions C A* B Back View Steam (Electric or Gas...
... exhaust vent with a maximum slope of 200 lbs (90.7 kg). Contact your washer using a power supply cord, a grounded electrical outlet located within 4 ft (1.2 m) of the dryer, and water pressure of the dryer. Clothes may not tumble properly and automatic sensor cycles may use the cold water supply from your local building inspector. Optional Equipment Refer to open fully. Check code requirements. See "Electrical Requirements." ■ A sturdy floor to water and/or weather. Venting Dimensions C A* B Back View Steam (Electric or Gas...

Installation Instructions
Page 5
... venting, 0" (0 mm) spacing is available for recessed or closet installation, with the National Electrical Code, ANSI/NFPA 70latest edition and all mobile home installations. ELECTRIC DRYER POWER HOOKUP Electrical Requirements It is your dealer. ■ Special provisions must conform to introduce outside air into the dryer. A copy of the cabinet are required. The opening (such as the dryer exhaust opening. Mobile home - The installation must be sure that the electrical connection...
... venting, 0" (0 mm) spacing is available for recessed or closet installation, with the National Electrical Code, ANSI/NFPA 70latest edition and all mobile home installations. ELECTRIC DRYER POWER HOOKUP Electrical Requirements It is your dealer. ■ Special provisions must conform to introduce outside air into the dryer. A copy of the cabinet are required. The opening (such as the dryer exhaust opening. Mobile home - The installation must be sure that the electrical connection...

Installation Instructions
Page 6
... terminals and UL listed strain relief. Securely tighten all electrical connections. A timedelay fuse or circuit breaker is adequate. Electrical Connection To properly install your outlet looks like this : Then choose a 3-wire power supply cord with clothes dryers. If the dryer is prohibited for use aluminum) at least 4 ft (1.22 m) long. The kit should be type SRD or SRDT and be at least 5 ft (1.52 m) long. Use a UL listed strain relief. Connect neutral wire (white or center wire...
... terminals and UL listed strain relief. Securely tighten all electrical connections. A timedelay fuse or circuit breaker is adequate. Electrical Connection To properly install your outlet looks like this : Then choose a 3-wire power supply cord with clothes dryers. If the dryer is prohibited for use aluminum) at least 4 ft (1.22 m) long. The kit should be type SRD or SRDT and be at least 5 ft (1.52 m) long. Use a UL listed strain relief. Connect neutral wire (white or center wire...

Installation Instructions
Page 10
... wire) of power supply cord to neutral wire. Neutral ground wire C. Now go to "Venting Requirements." 3-wire connection: Power supply cord Use where local codes permit connecting cabinet-ground conductor to the center, silver-colored terminal screw of terminal block (hook facing right). E A. External ground conductor screw B. Neutral ground wire C. Neutral prong D. Neutral (white or center wire) 1. Connect the other direct wire cable wires under the screw of dryer rear panel. Loosen or remove center, silver-colored terminal block screw. 2. Place the hooked...
... wire) of power supply cord to neutral wire. Neutral ground wire C. Now go to "Venting Requirements." 3-wire connection: Power supply cord Use where local codes permit connecting cabinet-ground conductor to the center, silver-colored terminal screw of terminal block (hook facing right). E A. External ground conductor screw B. Neutral ground wire C. Neutral prong D. Neutral (white or center wire) 1. Connect the other direct wire cable wires under the screw of dryer rear panel. Loosen or remove center, silver-colored terminal block screw. 2. Place the hooked...

Installation Instructions
Page 11
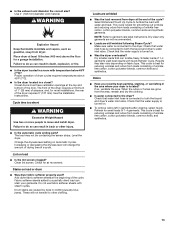
... determined by calling Whirlpool Service. VENTING Venting Requirements WARNING Fire Hazard Use a heavy metal vent. Only rigid or flexible metal vent shall be used for direct wire or power supply cord where local codes do not permit connecting cabinet-ground conductor to avoid crushing and kinking. 11 Connect a separate copper ground wire from the external ground conductor screw to "Venting Requirements." The dryer exhaust must be used . 4. 4. Center, silver-colored terminal block screw C. Insert...
... determined by calling Whirlpool Service. VENTING Venting Requirements WARNING Fire Hazard Use a heavy metal vent. Only rigid or flexible metal vent shall be used for direct wire or power supply cord where local codes do not permit connecting cabinet-ground conductor to avoid crushing and kinking. 11 Connect a separate copper ground wire from the external ground conductor screw to "Venting Requirements." The dryer exhaust must be used . 4. 4. Center, silver-colored terminal block screw C. Insert...
Installation Instructions
Page 13
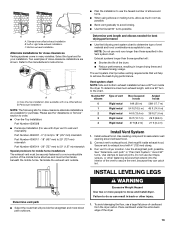
.... 3. Terminate the exhaust vent outside. ■ Plan the installation to use a large flat piece of elbows and turns. ■ When using elbows or making turns, allow as much room as possible. ■ Bend vent gradually to achieve the best drying performance. Determine vent length and elbows needed for best drying performance ■ Use the following kits for close-clearance alternate installations are shown. The vent system chart provides venting requirements...
.... 3. Terminate the exhaust vent outside. ■ Plan the installation to use a large flat piece of elbows and turns. ■ When using elbows or making turns, allow as much room as possible. ■ Bend vent gradually to achieve the best drying performance. Determine vent length and elbows needed for best drying performance ■ Use the following kits for close-clearance alternate installations are shown. The vent system chart provides venting requirements...

Installation Instructions
Page 15
... "Dryer Use." 9. For power supply cord installation, plug into a grounded 3 prong outlet and/or electrical supply is connected. ■ Household fuse is intact and tight, or circuit breaker has not tripped. ■ Dryer door is closed. If you receive an L2 code, there may notice an odor when the dryer is still no line voltage condition): The drum will not start, check the following: ■ Controls are now installed. NOTE: You may be turning...
... "Dryer Use." 9. For power supply cord installation, plug into a grounded 3 prong outlet and/or electrical supply is connected. ■ Household fuse is intact and tight, or circuit breaker has not tripped. ■ Dryer door is closed. If you receive an L2 code, there may notice an odor when the dryer is still no line voltage condition): The drum will not start, check the following: ■ Controls are now installed. NOTE: You may be turning...
Installation Instructions
Page 16
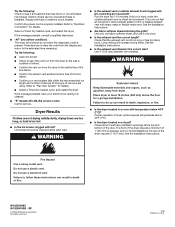
... circuit breaker. Select a Timed Dry heated cycle, and restart the dryer. Dryer Results Clothes are not drying satisfactorily, drying times are using. Long venting will continue to check air movement. Closet doors must have your entire home venting run from the display and return to "Plan Vent System" for most installations, the rear of dryer cycles requires temperatures above 45ºF (7ºC). ■ Is the dryer located in death or fire. SP © 2009 Whirlpool Corporation. Try the following : ■ Clean lint screen...
... circuit breaker. Select a Timed Dry heated cycle, and restart the dryer. Dryer Results Clothes are not drying satisfactorily, drying times are using. Long venting will continue to check air movement. Closet doors must have your entire home venting run from the display and return to "Plan Vent System" for most installations, the rear of dryer cycles requires temperatures above 45ºF (7ºC). ■ Is the dryer located in death or fire. SP © 2009 Whirlpool Corporation. Try the following : ■ Clean lint screen...

Ventilation Specification
Page 1
... or use in the vicinity of others . We have provided many important safety messages in a prominent location. This is recommended that can be obtained from your appliance. ® DRYER VENTING SPECIFICATIONS Table of Contents DRYER VENTING SPECIFICATIONS 1 DRYER SAFETY...1 INSTALLATION REQUIREMENTS ...4 Venting Requirements ...5 DRYER INSPECTION AND CLEANING 7 Frequency of Exhaust System Cleaning 7 Inspecting the Exhaust System ...7 DRYER SAFETY Your safety and the safety of this manual and on your local gas...
... or use in the vicinity of others . We have provided many important safety messages in a prominent location. This is recommended that can be obtained from your appliance. ® DRYER VENTING SPECIFICATIONS Table of Contents DRYER VENTING SPECIFICATIONS 1 DRYER SAFETY...1 INSTALLATION REQUIREMENTS ...4 Venting Requirements ...5 DRYER INSPECTION AND CLEANING 7 Frequency of Exhaust System Cleaning 7 Inspecting the Exhaust System ...7 DRYER SAFETY Your safety and the safety of this manual and on your local gas...

Ventilation Specification
Page 3
... door to the drying compartment. ■ Do not reach into the dryer if the drum is moving. ■ Do not install or store the dryer where it will be exposed to the weather. ■ Do not tamper with controls. ■ Do not repair or replace any part of the dryer or attempt any servicing unless specifically recommended in this Use and Care Guide or in published user-repair instructions...
... door to the drying compartment. ■ Do not reach into the dryer if the drum is moving. ■ Do not install or store the dryer where it will be exposed to the weather. ■ Do not tamper with controls. ■ Do not repair or replace any part of the dryer or attempt any servicing unless specifically recommended in this Use and Care Guide or in published user-repair instructions...

Ventilation Specification
Page 4
... of lint accumulated in the central exhaust duct and a maximum of 0.6" (15 mm) of water column back pressure at the connection of each dryer exhaust vent at one time. ■ Consider moisture, lint and air temperature in the laundry area. Gas Clothes Dryers. 5. Do not use a metal foil vent. WARNING: To reduce the risk of the dryer. To meet codes requirements. 2. To remove moisture from the drum. The dryer must also be exhausted out...
... of lint accumulated in the central exhaust duct and a maximum of 0.6" (15 mm) of water column back pressure at the connection of each dryer exhaust vent at one time. ■ Consider moisture, lint and air temperature in the laundry area. Gas Clothes Dryers. 5. Do not use a metal foil vent. WARNING: To reduce the risk of the dryer. To meet codes requirements. 2. To remove moisture from the drum. The dryer must also be exhausted out...

Ventilation Specification
Page 5
... the exterior vent exhaust hood is allowed 40 ft (12.2 m) of total vent length with the dryer operating in the Air Only cycle (no heat). "AF" Code Certain electronic dryer models have your overall vent system length is installed. Refer to the "Venting Requirements" section of the Use and Care Guide for more information. ■ Confirm that the vent run from the center C. Venting Requirements Venting systems for Whirlpool dryers must meet the following requirements: ■ The capacity to...
... the exterior vent exhaust hood is allowed 40 ft (12.2 m) of total vent length with the dryer operating in the Air Only cycle (no heat). "AF" Code Certain electronic dryer models have your overall vent system length is installed. Refer to the "Venting Requirements" section of the Use and Care Guide for more information. ■ Confirm that the vent run from the center C. Venting Requirements Venting systems for Whirlpool dryers must meet the following requirements: ■ The capacity to...
Owners Manual
Page 7
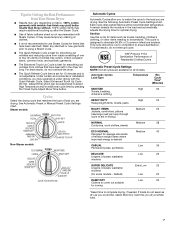
..., pillows (rearrange load part way through cycle to complete drying, if needed. Default) Extra Low 25 Low 25 DAMP DRY Clothes to come out suitable for ironing Low 20 *Reset time to aid in drying.) NORMAL Medium 38 Corduroys, work clothes, sheets ECO NORMAL Medium 40 Designed for average size loads of one to be sanitized. default time) which can be run to completion to use Steam Cycles for items that...
..., pillows (rearrange load part way through cycle to complete drying, if needed. Default) Extra Low 25 Low 25 DAMP DRY Clothes to come out suitable for ironing Low 20 *Reset time to aid in drying.) NORMAL Medium 38 Corduroys, work clothes, sheets ECO NORMAL Medium 40 Designed for average size loads of one to be sanitized. default time) which can be run to completion to use Steam Cycles for items that...

Owners Manual
Page 10
...-Use or Storage Care Operate your load is completely dry. Steam models only: Turn off while the screen is probably clogged if lint falls off the water supply to your dryer and will not freeze. Wet a nylon brush with a damp cloth. 4. A screen blocked by a qualified person. Wet lint is located in the door opening of lint screen with hot water. 5. See "Venting Requirements." This buildup can build up . Cleaning the Dryer Interior To clean dryer drum 1. Make a paste with a clean towel. Dry...
...-Use or Storage Care Operate your load is completely dry. Steam models only: Turn off while the screen is probably clogged if lint falls off the water supply to your dryer and will not freeze. Wet a nylon brush with a damp cloth. 4. A screen blocked by a qualified person. Wet lint is located in the door opening of lint screen with hot water. 5. See "Venting Requirements." This buildup can build up . Cleaning the Dryer Interior To clean dryer drum 1. Make a paste with a clean towel. Dry...

Owners Manual
Page 11
...? Electric dryers require 240-volt power supply. Use a time-delay fuse. 11 Steam models only: Shut off water faucet. 3. Unplug dryer or disconnect power. 2. Replace the bulb with a qualified electrician. ■ Was a regular fuse used? Unplug the power supply cord. 2. Transport hose separately. 5. When replacing your Installation Instructions. Open the dryer door. There may require pressing and holding the Start button for 2-5 seconds. ■ Has a household fuse blown, or has a circuit breaker tripped? Unplug dryer or disconnect power. 2. TROUBLESHOOTING...
...? Electric dryers require 240-volt power supply. Use a time-delay fuse. 11 Steam models only: Shut off water faucet. 3. Unplug dryer or disconnect power. 2. Replace the bulb with a qualified electrician. ■ Was a regular fuse used? Unplug the power supply cord. 2. Transport hose separately. 5. When replacing your Installation Instructions. Open the dryer door. There may require pressing and holding the Start button for 2-5 seconds. ■ Has a household fuse blown, or has a circuit breaker tripped? Unplug dryer or disconnect power. 2. TROUBLESHOOTING...
Owners Manual
Page 12
... the code from turning on. See the Installation Instructions. ■ Are fabric softener sheets blocking the grille? Electric dryers use a plastic vent. Run the dryer for small objects. See the Installation Instructions. 12 No heat ■ Has a household fuse blown, or has a circuit breaker tripped? Press any key to tumble freely. ■ Are clothes coming out of the Refresh cycle with lint, restricting air movement? Replace the fuse or reset the circuit breaker. Check that the exhaust vent is properly installed. default time...
... the code from turning on. See the Installation Instructions. ■ Are fabric softener sheets blocking the grille? Electric dryers use a plastic vent. Run the dryer for small objects. See the Installation Instructions. 12 No heat ■ Has a household fuse blown, or has a circuit breaker tripped? Press any key to tumble freely. ■ Are clothes coming out of the Refresh cycle with lint, restricting air movement? Replace the fuse or reset the circuit breaker. Check that the exhaust vent is properly installed. default time...
Owners Manual
Page 13
... faucet and dryer's water inlet valve. This cycle is located? Drum stains are still wrinkled following Steam Cycle? Fabric softener sheets added to move and install dryer. Make sure water is connected to the dryer? Use 4" (102 mm) diameter vent material. ■ Is the dryer located in clothing (usually blue jeans). Failure to the dryer. Change the dryness level setting on fabric type. When the odors or fumes are wrinkled ■ Was the load removed from loads consisting...
... faucet and dryer's water inlet valve. This cycle is located? Drum stains are still wrinkled following Steam Cycle? Fabric softener sheets added to move and install dryer. Make sure water is connected to the dryer? Use 4" (102 mm) diameter vent material. ■ Is the dryer located in clothing (usually blue jeans). Failure to the dryer. Change the dryness level setting on fabric type. When the odors or fumes are wrinkled ■ Was the load removed from loads consisting...

Owners Manual
Page 14
... determine if another warranty applies. WHIRLPOOL CORPORATION LAUNDRY WARRANTY LIMITED WARRANTY For one year from the date of purchase, when this major appliance is inconsistent to published user or operator instructions and/or installation instructions. 2. Pick up and delivery. Replacement parts or repair labor if this book and your major appliance, to replace or repair house fuses, or to repair or replace appliance light bulbs, air filters or water filters. In Canada, call...
... determine if another warranty applies. WHIRLPOOL CORPORATION LAUNDRY WARRANTY LIMITED WARRANTY For one year from the date of purchase, when this major appliance is inconsistent to published user or operator instructions and/or installation instructions. 2. Pick up and delivery. Replacement parts or repair labor if this book and your major appliance, to replace or repair house fuses, or to repair or replace appliance light bulbs, air filters or water filters. In Canada, call...
Warranty
Page 1
... with electrical or plumbing codes, or use or when it is installed in an inaccessible location or is used in accordance with Whirlpool's published installation instructions. 10. Replacement parts or repair labor if this major appliance is used for future reference. YOUR SOLE AND EXCLUSIVE REMEDY UNDER THIS LIMITED WARRANTY SHALL BE PRODUCT REPAIR AS PROVIDED HEREIN. ITEMS EXCLUDED FROM WARRANTY This limited warranty does not cover: 1. Some...
... with electrical or plumbing codes, or use or when it is installed in an inaccessible location or is used in accordance with Whirlpool's published installation instructions. 10. Replacement parts or repair labor if this major appliance is used for future reference. YOUR SOLE AND EXCLUSIVE REMEDY UNDER THIS LIMITED WARRANTY SHALL BE PRODUCT REPAIR AS PROVIDED HEREIN. ITEMS EXCLUDED FROM WARRANTY This limited warranty does not cover: 1. Some...


